jmgtechnology.com.au/product_info.php?products_id=1748
Source:
thinkbroadband.com/hardware/reviews/73-fritzbox-7390
AVM’s unconventional product design is continued, with the 7390 more
resembling a futuristic hovercraft or a classic 1950’s American muscle car with
its fins. The fins do serve a purpose, as they help to keep an air gap clear
above the router.
The list of contents is as follows:
- Router (dimensions: 21cm x 15.5cm x 2.5cm)
- Power supply (230V input, 12V 2A output)
- Yellow Cat 5e Ethernet cable
- 3m long RJ11 modem and telephone Y cable (twisted pair)
- 2 x RJ11 plug to UK phone socket adapters
- Installation Guide
There are no micro filters included which is a little unusual, but by now we
suspect many UK homes already have a couple of these.
Connectivity options
The 7390 is capable of broadband across a choice of technologies
including:
- ADSL
- ADSL2/2+
- ISDN telephony
- VDSL2 (FTTC)
- WLAN at up to 300 Mbps(2.4GHz and 5GHz)
- 3G USB modem for backup
- LAN port reconfigurable as an eWAN port for use with cable and fibre
services
The 7390’s ability to handle a range of broadband technologies might be an
advantage for those wishing to future-proof their equipment, rather than
changing equipment as those technologies become available.
The wide range of connectivity may seem confusing, but the routers web
interface does a good job of guiding users through the range of options, and
the 7390 is aimed at the enthusiast or business user who has already got
experience in setting up routers.
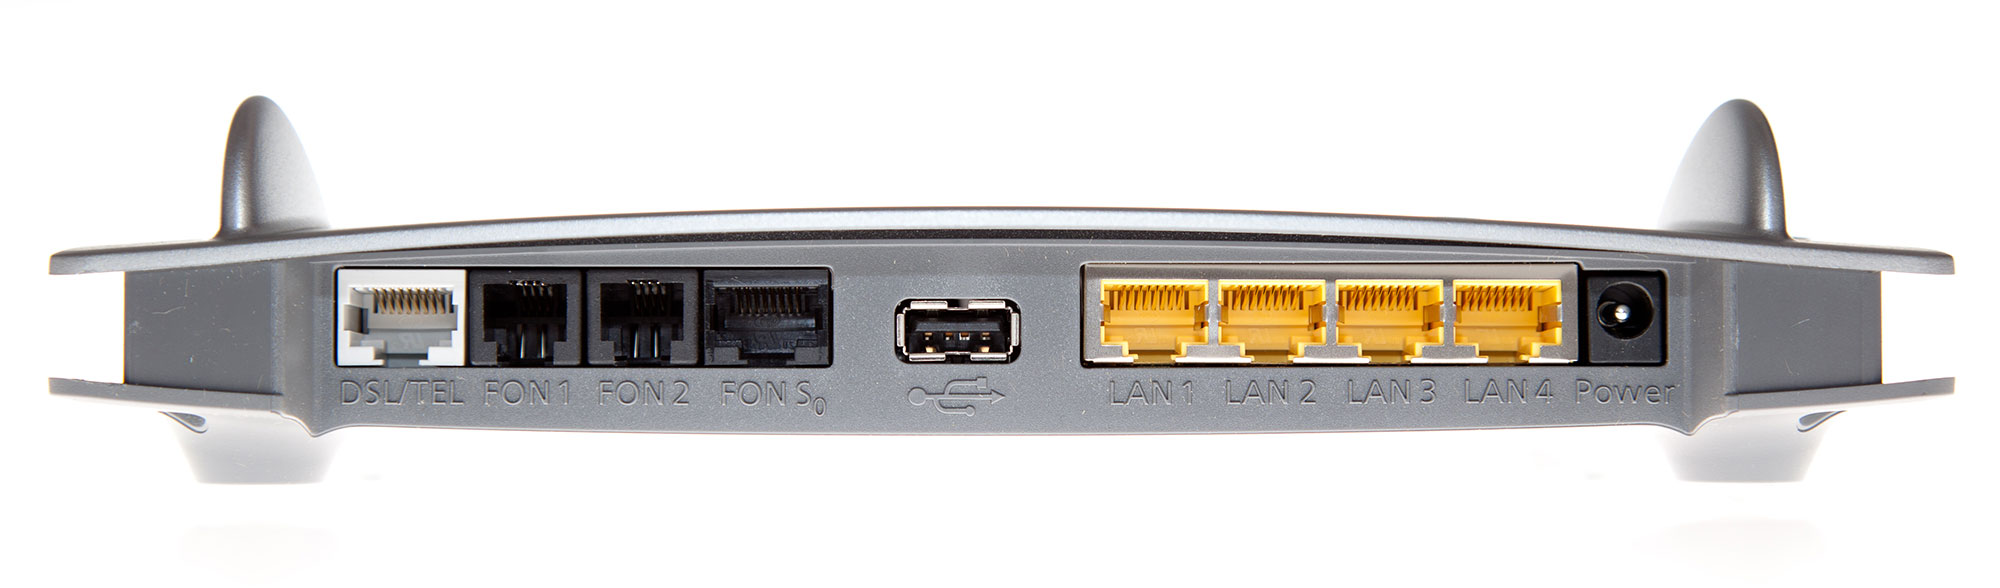
The Hardware

Click image for larger version
From left to right:
- ADSL/ADSL2+/VDSL2 Connection;
- FON ports 1 & 2 for analogue telephone or fax;
- FON S0 port for ISDN telephony or ISDN PBX usage;
- USB 2.0 for connecting printer, USB storage devices or USB 3G modem;
- Gigabit LAN ports 1-4
- Power Supply
A second USB port is located on the side of the 7390. The top of the router
also features a button to switch the DECT base station in the router into
association mode, and a handy button to turn off/on the wireless network.

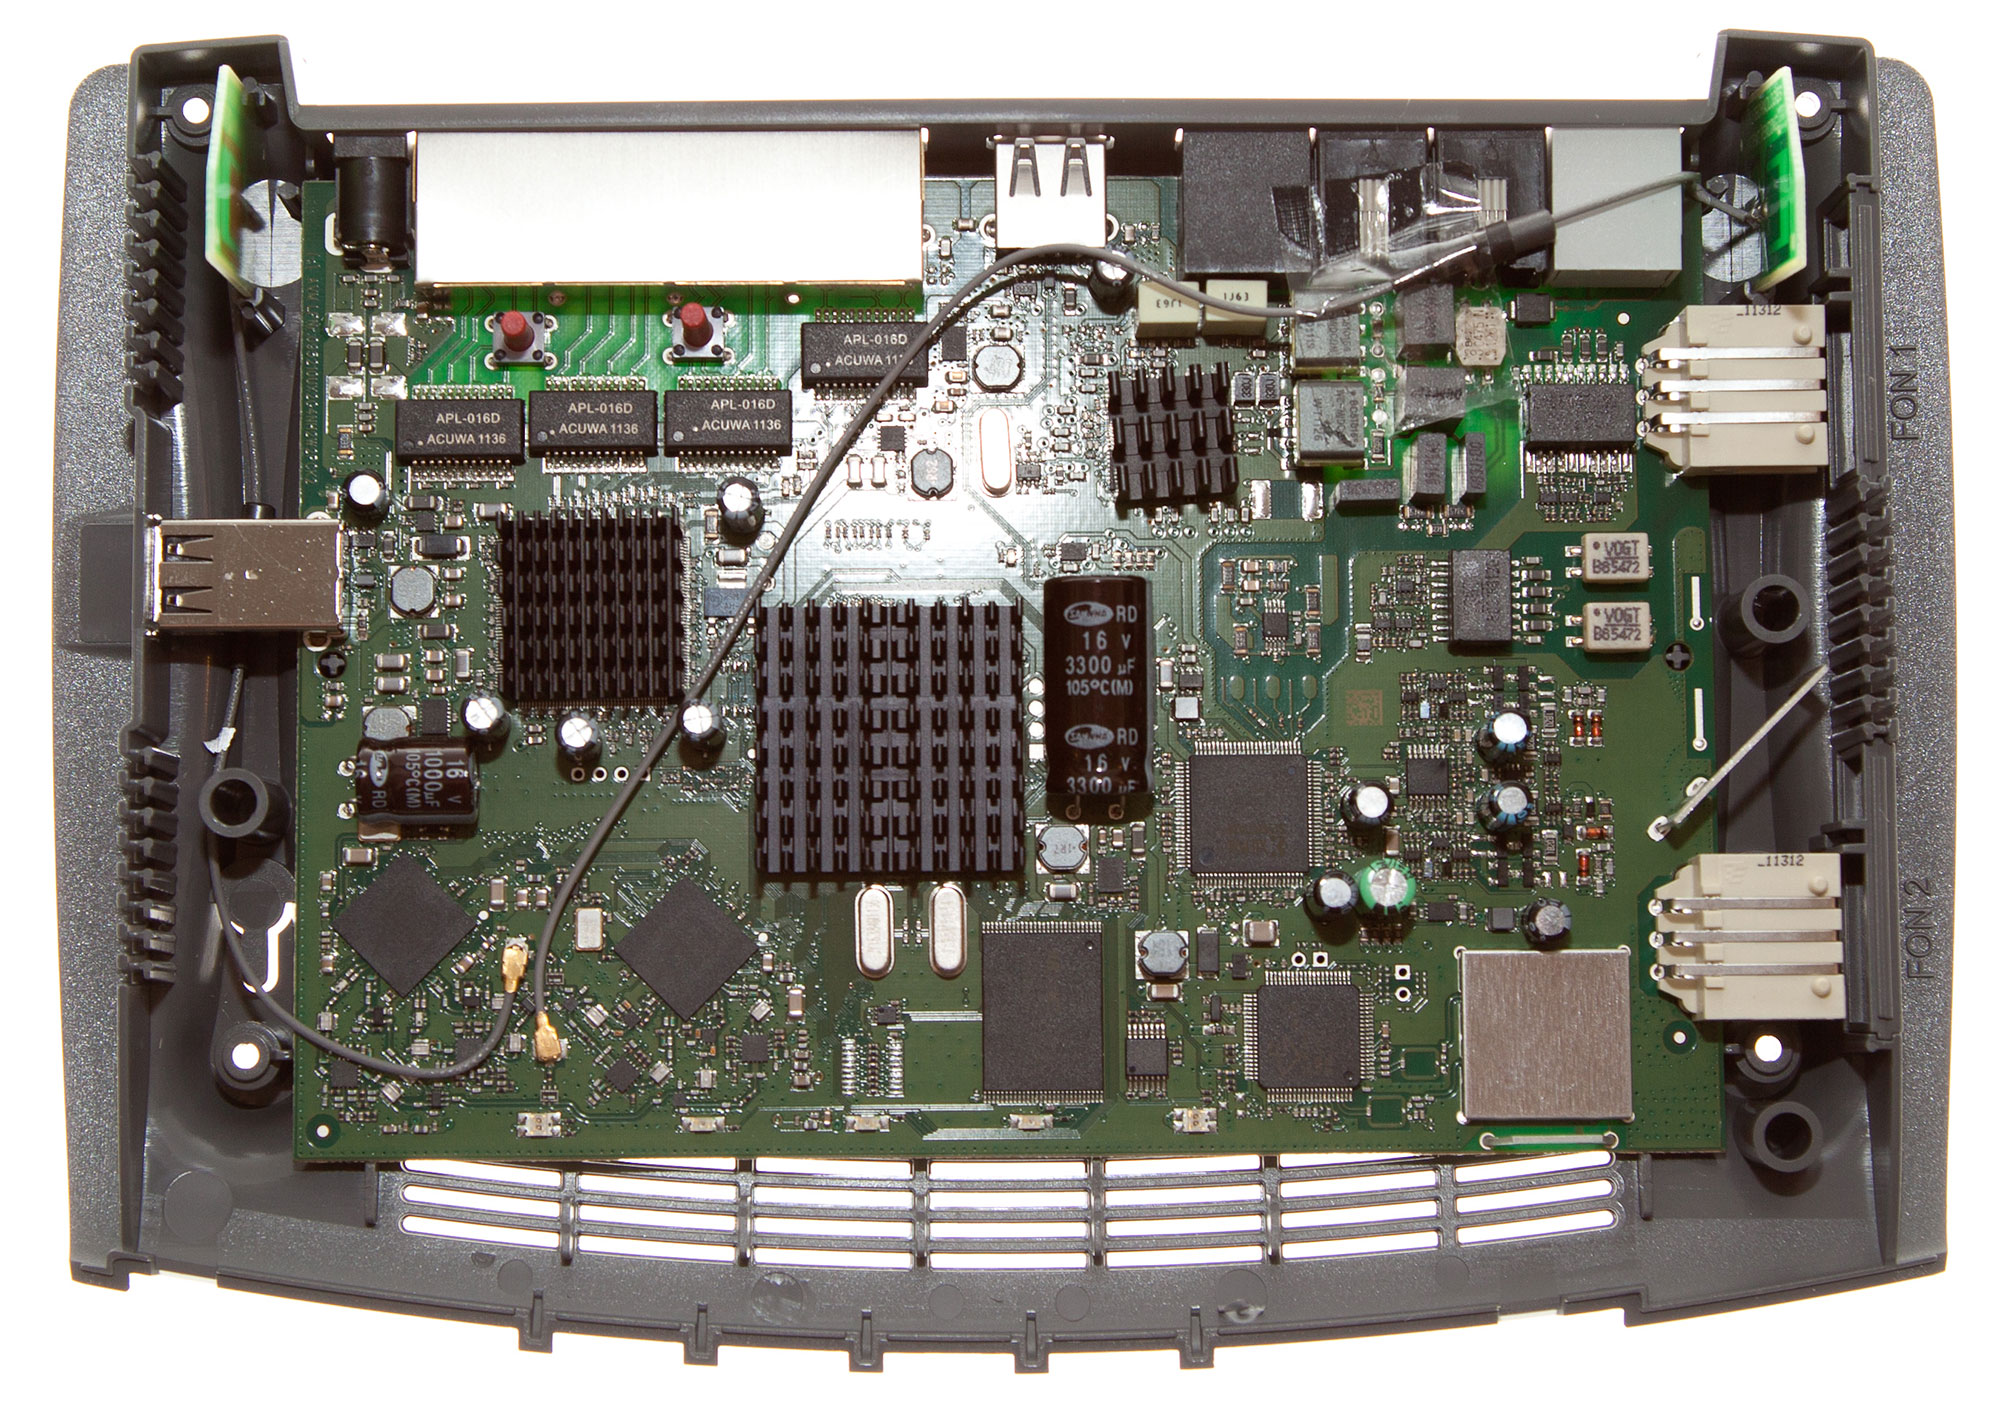
Click image for larger version
Dismantling the 7390 reveals that the two fins house the Wi-Fi antenna .

Click image for larger version
Configuring the
router
The unusual combined telephone and RJ11 ADSL lead may confuse some, but it
is pretty simple. The RJ11 connector goes to the ADSL side of the micro filter
and you can, if you want to use the Fritzbox as a DECT base station, connect
the telephone connector to the telephone socket on the microfilter.
As is common with pretty much all ADSL/ADSL2+/VDSL modem router units, once
the ADSL is connected the device will automatically synchronise with the
hardware in the telephone exchange or street cabinet. The configuration of the
router is really to enter any authentication details your broadband provider
supplied, or adjust the myriad of other options in the 7390.
WARNING: The 7390 behaved oddly on an old BT Wholesale 20CN (ADSL
only) service appearing to lock the DSLAM port into a state that required a
remote reset, but on a 21CN (ADSL2+) service there was no problems at all. AVM
had tested the 7390 at the BT test labs, and it worked in all the combinations
thrown at it. The 20CN service is decreasing its footprint, with less than 20%
of the UK reliant on it for connectivity now.
HINT: LAN ports 2,3 and 4 are configured to use 100 Mbps by default,
so if your computers Ethernet port has 1000 Mbps (1 Gbps) forced as its only
connection speed you will see no link light.
Once the router has booted up and you are connected, preferably via Ethernet
initially, connection is achieved by typing ‘fritz.box’ in a browser or typing
192.168.178.1 (routers default IP address). If your computer cannot get an IP
address, check that you do not have an IP address set up manually, or if DHCP
fails to work, manually setting an IP address in the range 192.168.178.2 to
192.168.178.254, with a subnet mask of 255.255.255.0 and a gateway of
192.168.7.1 should get you connected.
There is no default administrator password set, but before you can proceed
with the configuration process you are forced to enter a new administrator
password.
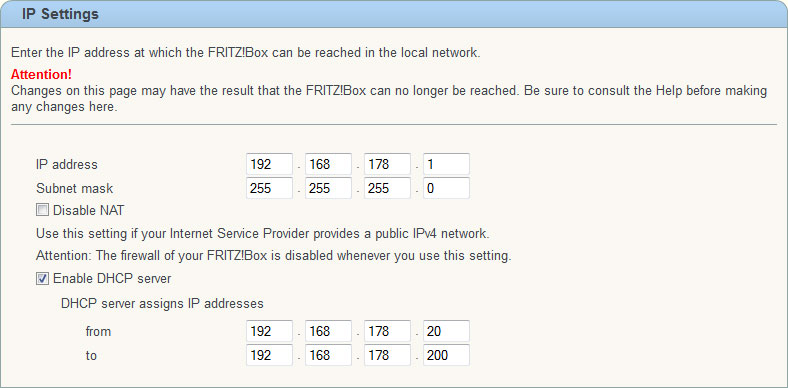
The feature rich device can be a little difficult to navigate if used to
simpler routers, but the groupings are logical, so for example if you want to
change the IP range used by the router for DHCP on the LAN side, you click the
Home Network menu, then Network, then the Network settings tab, followed by IP
Addresses button to reach the following screen.

Click image for larger version
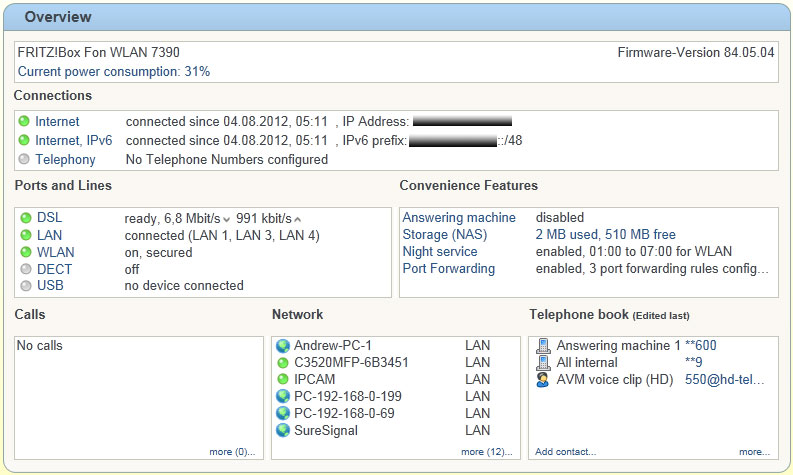
Once access to the 7390 is achieved, the user is presented with a system
overview. This gives a general run-down on connected devices and services, and
their status.

Click image for larger version
As you can see the IPv6 connectivity really does work, and the page layout
gives you an overview of almost every feature on the router. Each section is
clickable taking you to that specific area.
One unique feature is the night service, which allows you to power down the
wireless network (saving a little power) and for those who like a quiet nights
sleep, you can disable all the telephones that operate via the device.
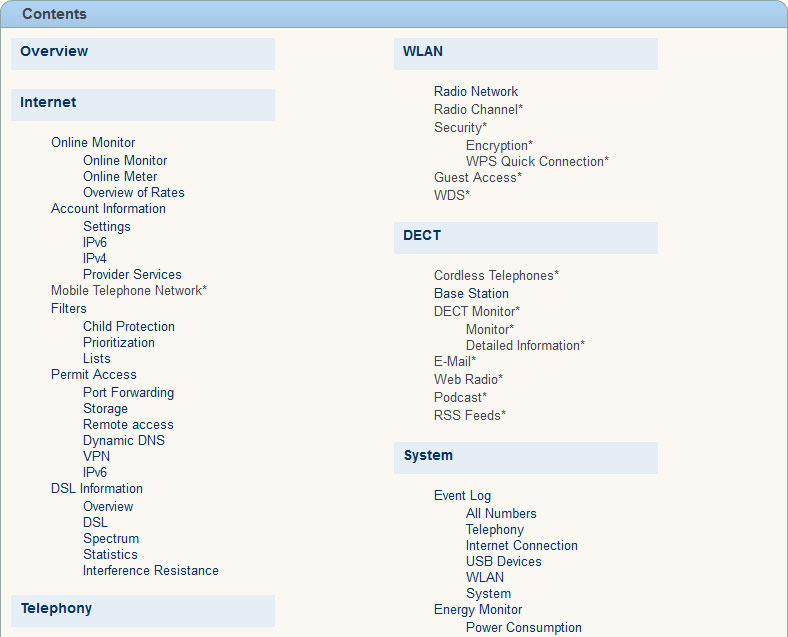
Interface
The 7390’s interface is fairly intuitive. If you get lost, the Contents page
is available at the top of the each screen.

Click image for larger version
In addition, a range of wizards to assist the user is available.

Click image for larger version
There is an Expert mode, which if this is your first fully featured router
you may find switching down to standard mode may help to reduce the confusion
that can arise from so many options.
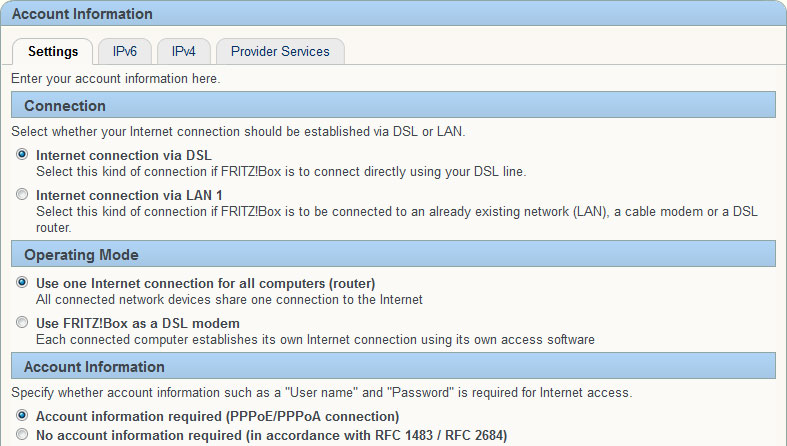
Getting Online
Once you can see any routers web interface, the first thing you will want to
do is configure the internet connection.

Click image for larger version
Select the methods of connection, check any specific settings, enter
username and password if applicable, and the 7390 will attempt to connect
online.
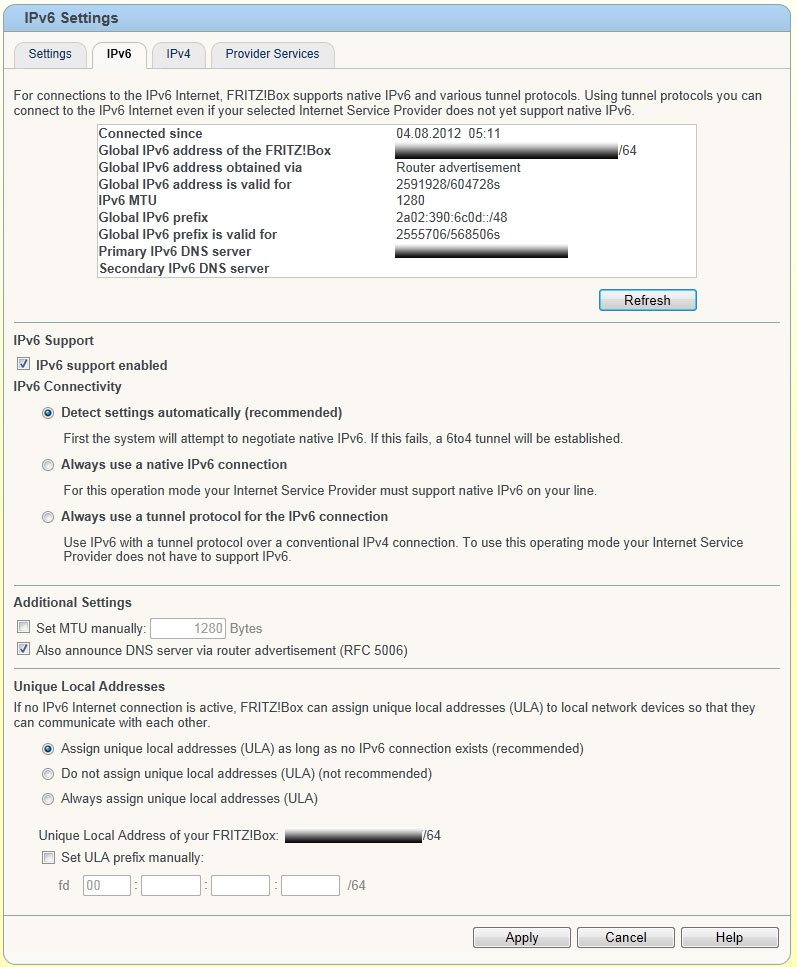
While IPv6 support from broadband providers is still limited, where it is
available the 7390 supports it, and seems to work pretty well with IPv6 and
IPv4 enabled at the same time.

Click image for larger version
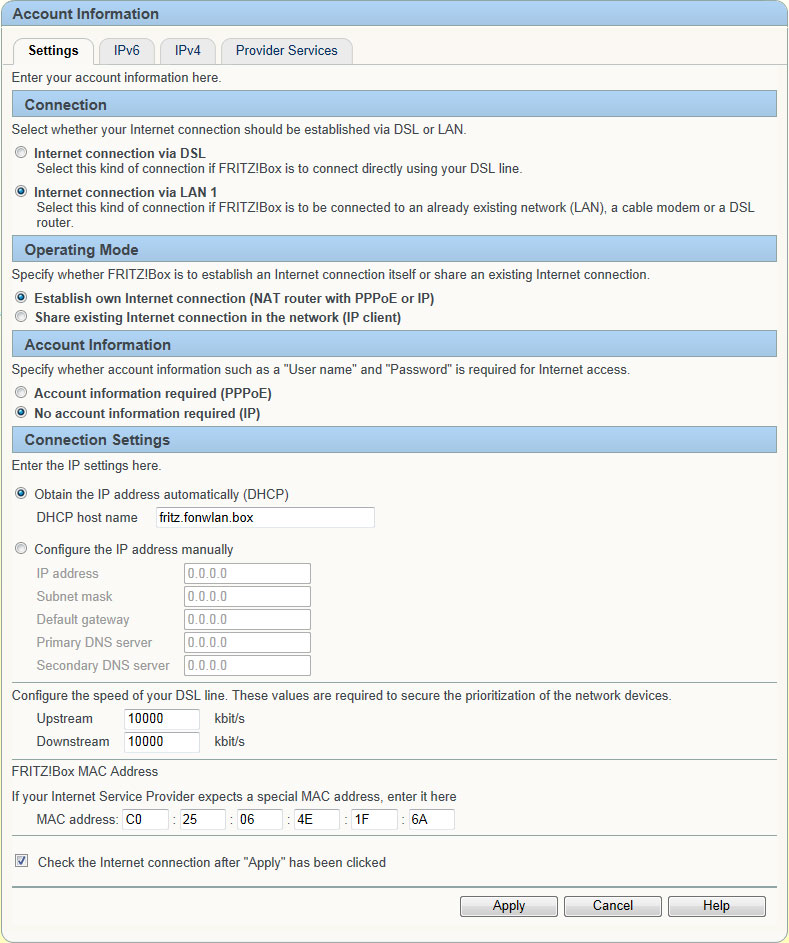
Configuring router for
Ethernet WAN
One of key advantages with the 7390 is that it supports Ethernet WAN
connections, making it suitable for use with cable and FTTC/P services.
The simplest method is what you would use to connect to a Virgin Media cable
service, e.g. where you have switched their superhub into modem mode. Select
Internet Connection via LAN 1 and
No account information
required. In this mode the router will request an IP address from the modem
it is connected to via Ethernet on LAN1.
While writing the review we found that configuring the router to use the
eWAN port worked best after a reset to factory defaults. The upstream and
downstream speeds only need to be worried about if you make use of the Quality
of Service options.

Click image for larger version
For the growing number of people with FTTC and FTTP connections, the account
information option PPPoE should be selected, and the username and password
supplied by your provider will need to be entered. For BT Infinity users the
username is usually something like Bxxxxxx@hgxx.btclick.com.
We should add a few words about the second Operating Mode,
Share Existing
Internet Connection in the network, this mode essentially disables the NAT
and firewall of the 7390, and the router effectively becomes a simple wireless
access point.
Connection
Tweaking and DSL feedback
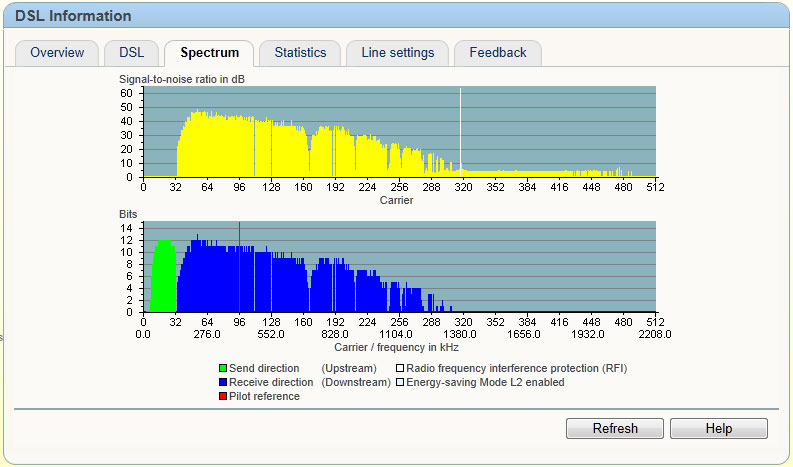
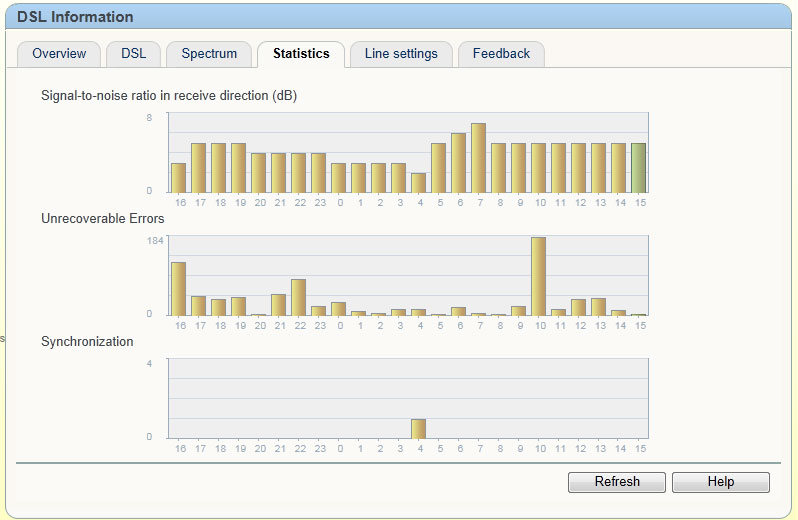
The level of information in the 7390 is unprecedented, and surpasses what
most broadband support staff can see about your service. There is a DSL
information page giving the standard sync speeds, attenuation and signal to
noise ratio, but there are additional spectrum plots and graphs of the SNR over
time.

Click image for larger version
The signal-to-noise ratio plot shows the classic SNR dip that can occur once
the sun sets, and in combination with the DSL spectrum can be useful in
identifying why your connection is not stable.

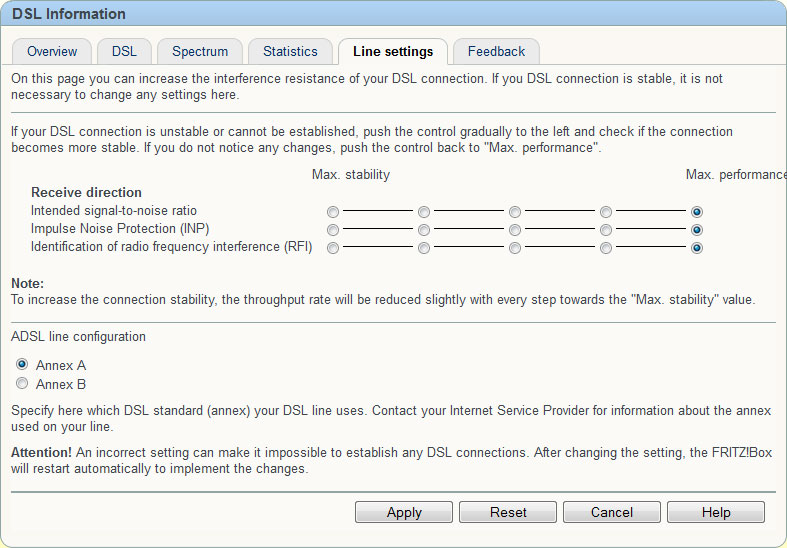
Click image for larger version
The 7390 connection settings can be fine-tuned to suit stability or quality,
or a balance of the two. This allows you to experiment with your connection,
without having to telephone your broadband provider and waste 30 minutes on the
telephone.

Click image for larger version
In actual use we found the 7390 even with its settings at the default
Maximum Performance to be a stable router, coping with fluctuations in noise
margin, without undue stress.
Wireless
Configuration
The router supports b, g and n wireless networks, offering dual band
connectivity at 2.4GHz and 5GHz. The router out of the box has a 16 digit
WPA/WPA2 security key set.
The simpler option of WPS push button connectivity is supported, and you can
define an additional PIN so that the WPS system cannot be abused by guests. A
welcome addition is the support of a Guest channel, which has its own set of
security settings.
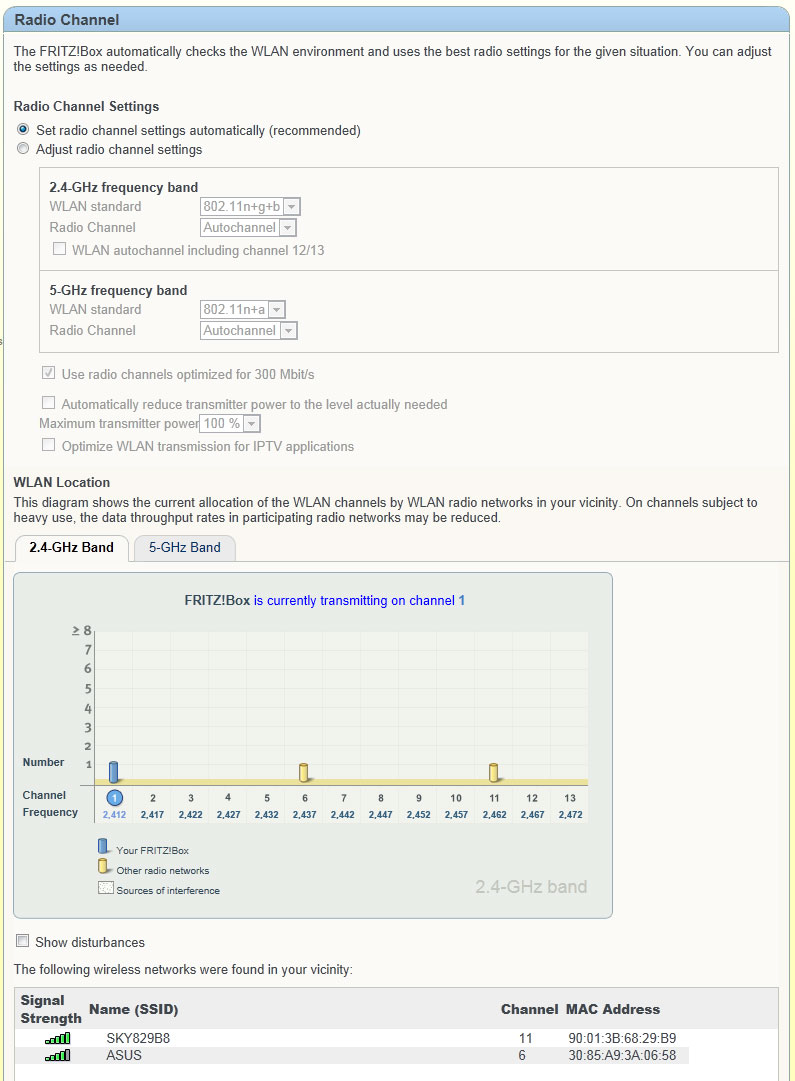
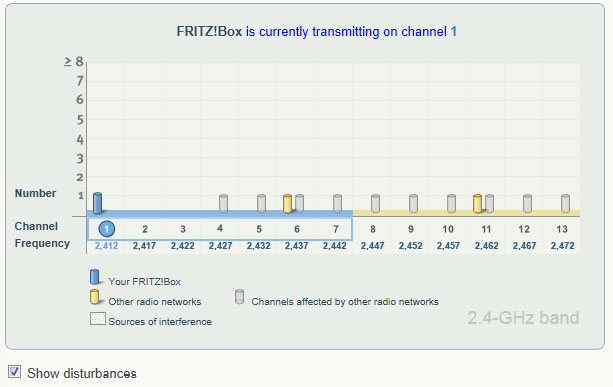
As with the DSL connectivity, WiFi is highly configurable, and the presence
of a spectrum plot for both wireless bands will help you choose which radio
channels to use, or allow the 7390 to continue with its sensible default
settings.

Click image for larger version
The 7390 has 40MHz wide channels enabled, which are needed to get the
fastest speeds out of WiFi, and the ‘Show disturbances’ option clearly shows
the potential for interference in the 2.4GHz spectrum, hence why having
dual-band devices is so important for good wireless connectivity.

Click image for larger version
Parental Controls
and Filters
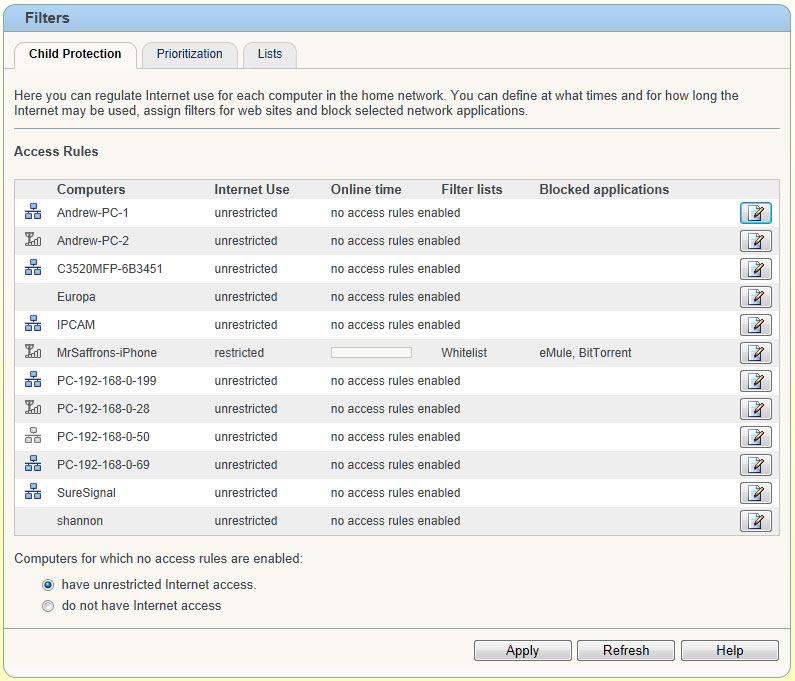
The 7390 provides network filtering, with parental control, application
filtering, and application prioritisation.
The summary page lists all the devices that have been seen by your network,
and allows you to control access.

Click image for larger version
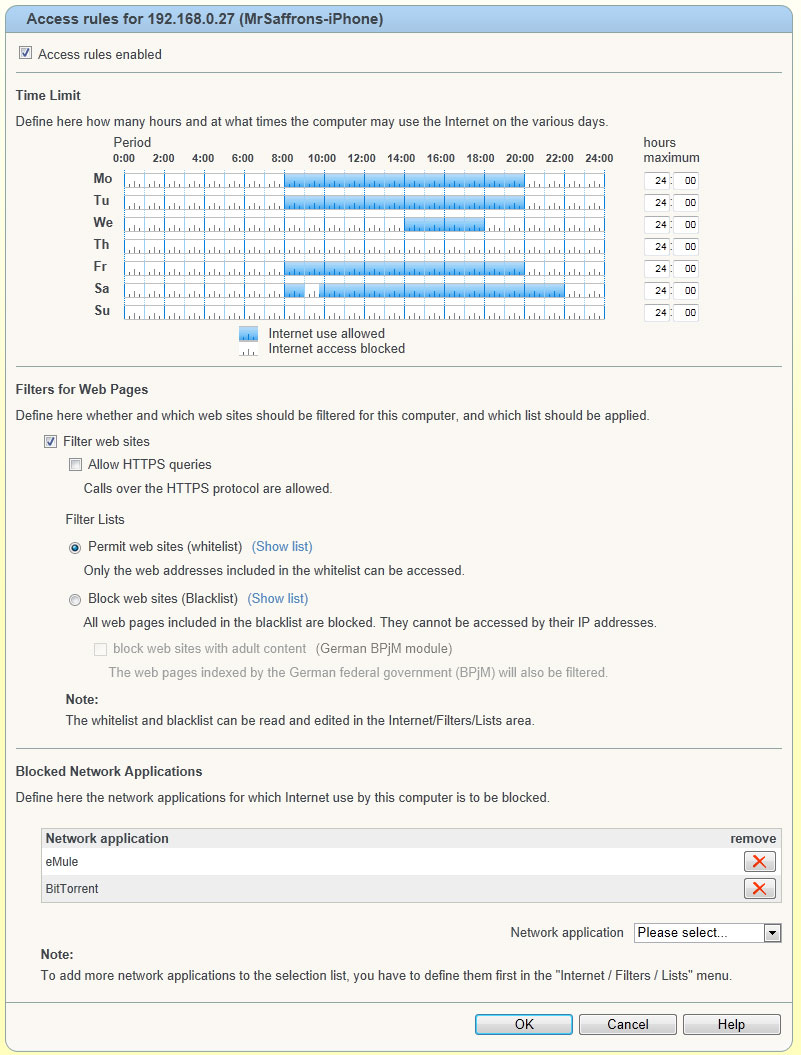
Editing the options for each device could take some time, but if you have
children in the home, then the simple ability to restrict access times can be
important. The blacklist system claims to support the German BPjM module, but
this still allows a wide range of adult content, so parents with younger
children would be advised to use the whitelist system to control a list of
sites you are happy for your child to have unrestricted access to.

Click image for larger version
The white list editing is very simple, and you can enter partial site names
e.g. bbc.co.uk which would allow access to all content hosted on bbc.co.uk. The
black list option would take forever to keep up to date, so is of less use in
the UK. The ability to block applications may prove useful, and if on a below
average speed broadband connection, application blocking can be a good way to
ensure one member of a household does not hog the connection.
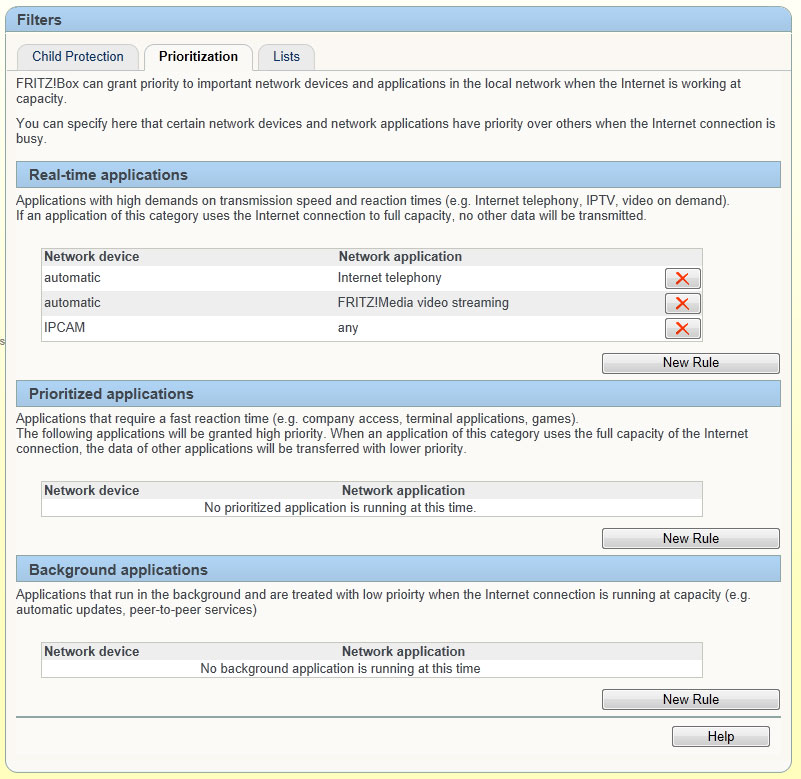
The Prioritisation tab is where people in households with lots of devices
may spend a lot of time. By default prioritisation is enabled for VoIP and any
streaming done via the Fritz!Media system.

Click image for larger version
Adding a new application to the three categories is very easy, real-time
applications will always run, and if anyone of them utilises 100% of your
connection the router will lock out any other activity. Prioritised
applications are more forgiving, and will allow some other traffic through.
Background applications allows you to define what applications you do not mind
being slow if the connection is busy, prime candidates here would be
bittorrent.
You can assign a complete device to any one of the priority levels, thus a
household with a keen gamer, may want their Xbox 360 in the real-time category,
and a home based mail server could happily run as a background application.
Port Forwarding and
Remote Access
The Permit Access menu (under Internet) controls a wide range of things,
including port forwarding, NAS, remote access via HTTPS to the 7390, DynDNS,
VPN server and a section to control which IPv6 devices are visible from the
Internet.

Click image for larger version
By default the ability for UPnP to punch holes in the NAT to allow devices
that require ports open is disabled. In terms of security this is preferable as
it avoids devices opening up the network without warning. The main Port
Forwarding is very straightforward to use simply click the New Port Forwarding
button to take you to the screen.

Click image for larger version
The default list of servers available is, FTP Server, HTTP Server, eMule
TCP, eMule UDP and MS Remote Desktop. To create a new rule for an application
that does not exist, select Other Applications and extra fields for protocol,
from and to port will appear.
The Exposed Host option, allows you to define a single device as the DMZ
host, in other words this machine becomes totally exposed to the Internet.
The Remote Access tab allows you to make the Fritz!Box web interface
available from the Internet, and unusually it uses HTTPS, with the option to
switch from the default TCP port of 443. There is no default username and
password, which is a welcome change from manufacturers who use easy to guess
default authentication settings.
Dynamic DNS built into the router is a rare but welcome sight. We have seen
other routers offer this, but often only supporting dyndns.org, the 7390
supports 11 different providers, and in theory many more, all you need is the
update URL for the router to communicate with.

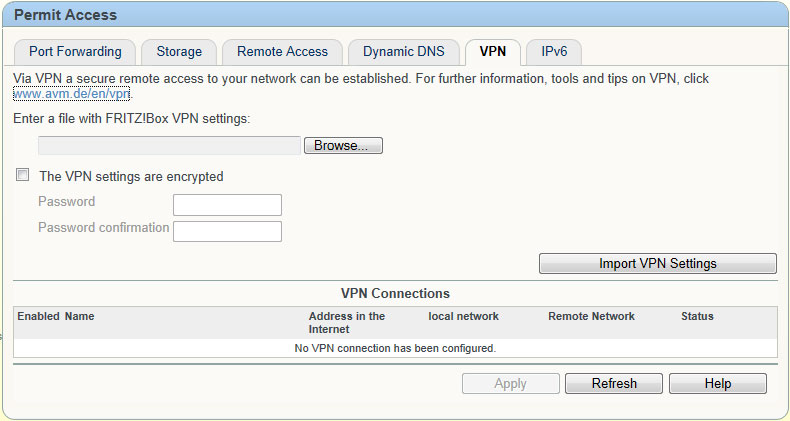
Click image for larger version
The VPN tab looks very sparse, this is because it relies on an external
software package available at
http://www.avm.de/en/vpn.
Unfortunately only MS Windows software is available, but the software is only
used to create the VPN settings file. The reason we suspect they have gone for
this file based approach, is that it is easier to transfer the settings between
computers and avoid the problems of not getting the settings correct when
linking to 7390 units via the internet.
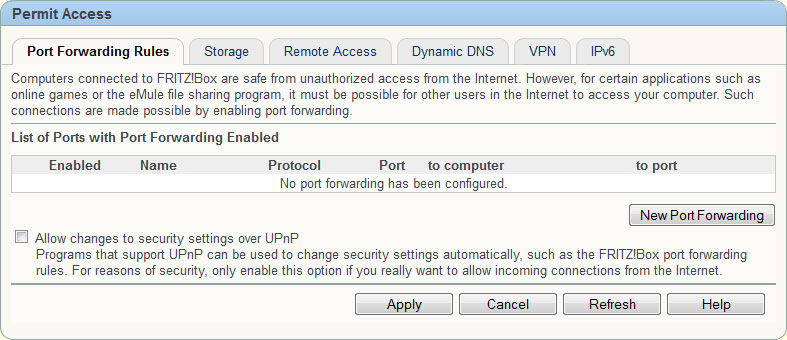
IPv6 Port
Forwarding
One of the reasons why many consumers are wary of IPv6 is that there is a
perception that when using IPv6 all the computers on your local LAN will be
visible to the Internet. The IPv6 port forwarding section on the 7390, offers a
very reassuring explanation:
"Computers connected to FRITZ!Box are safe from unauthorized access from
the Internet. However, for certain applications such as online games or the
eMule file sharing program, it must be possible for other users in the Internet
to access your computer. Such connections are made possible by enabling port
forwarding."
The 7390 while providing full IPv6 addresses to computers connected to it,
runs a firewall that in its default state blocks incoming access – just like
NAT does for IPv4. Configuring a port forward rule is very simple, and as port
ranges are supported, if you want to make a device very visible it should easy
to achieve.
Telephony, PSTN, VoIP and ISDN
The 7390 has the potential to act as a true service hub, by allowing you to
route both old fashioned PSTN services via the device, as well as handle VoIP
and ISDN telephone lines. You can also use the 7390 to receive faxes for those
very rare occasions when you need it.

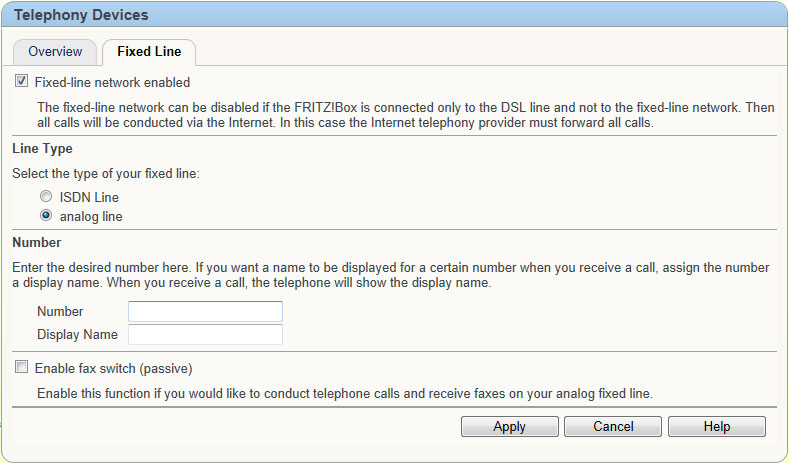
Click image for larger version
The first step to get the 7390 to handle calls is to configure your fixed
(PSTN) line if you have this connected to the router. Assigning a name to the
number is useful, as you can configure handsets to receive calls from multiple
lines (e.g. VoIP). Usefully once you configure the fixed line, the router will
attempt to make the telephone ring, so you can check you have the physical
connections correct.
The 7390 allows you to dispense with your existing DECT base station if you
want, using the stands to just charge the telephone. The DECT configuration is
in its own menu on the router, allowing you to control parameters such as the
handset registration PIN.

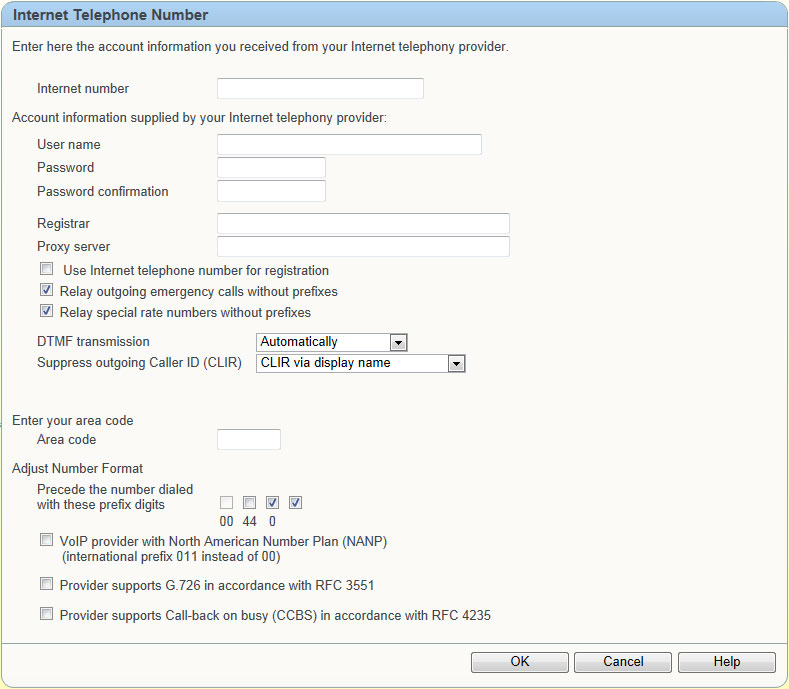
Click image for larger version
The VoIP configuration is relatively straightforward; the fun really starts
once you have both VoIP and a fixed line configured. Since under the Dialling
Rules you can control which telephone service a specific dialled number will
actually use, by default emergency calls such as 999 and 112 are configured to
use a fixed line if one is attached.
Once you have your cordless handsets connected, you do have the option to
control each DECT handset individually, so you can restrict individual phones
to only ring for certain incoming calls.
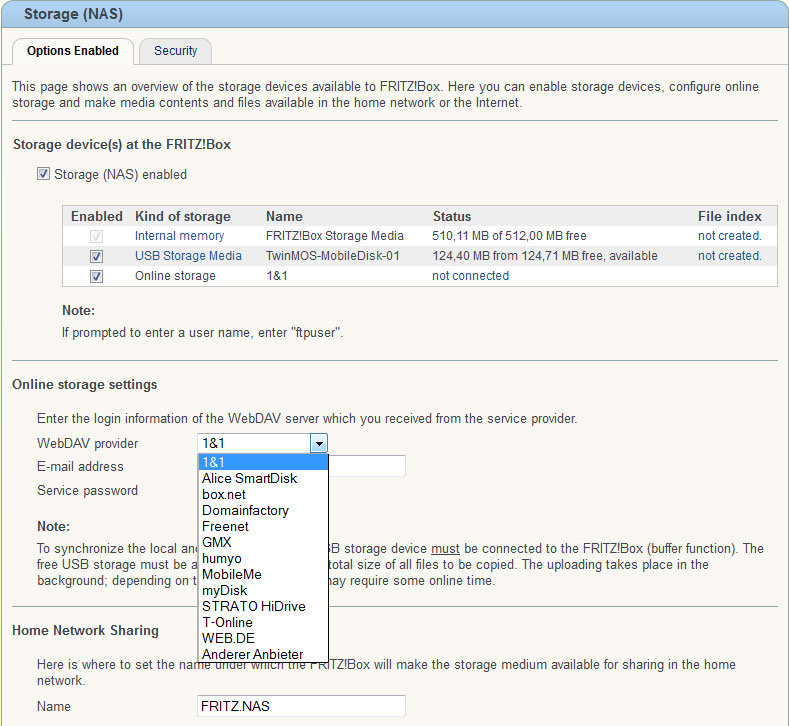
Integrated
Storage
AVM have included 512MB of integrated storage memory, for use with its NAS
and media server functions. For example, it could be used to continue uploading
to an external network while the PC is switched off. If 512MB is not enough,
there are two USB ports for additional storage or the ports can be used for
other USB devices, such as a printer.

Click image for larger version
The ability to link online cloud storage to USB devices connected to the
7390 is an interesting one, and assuming you believe your WebDAV provider is
secure enough this method can offer a good way to back up personal data. The
increasing size and reducing cost of USB memory also means adding 32GB or more
of storage capacity for storing documents on your LAN rather than any one
device is appealing.
The NAS is available via either a file share, or by a DNLA media server.
Accessing the media server was easy and worked well with the various devices we
tried.
USB Devices
The USB devices window seems to offer very few options. For those wanting to
use the 7390 as a media server, the option to enable energy-saving mode (to
spin down hard drives) for attached devices will be welcome, , reducing power
consumption and background noise.

Click image for larger version
The USB Remote Connection is an interesting aspect, allowing you to have
devices connected to the 7390, but accessible as if they were connected direct
to the PC. This relies on the installation of a software driver, again this is
restricted to Windows 7, Vista and XP. With the media service options using
this to access a storage device makes little sense, it makes more sense for
connecting a USB printer and a guide to doing this is on the
AVM
website.
Miscellaneous
Router Options
The surprises in the routers interface continue, with the system section
offering twelve more sub windows of options.
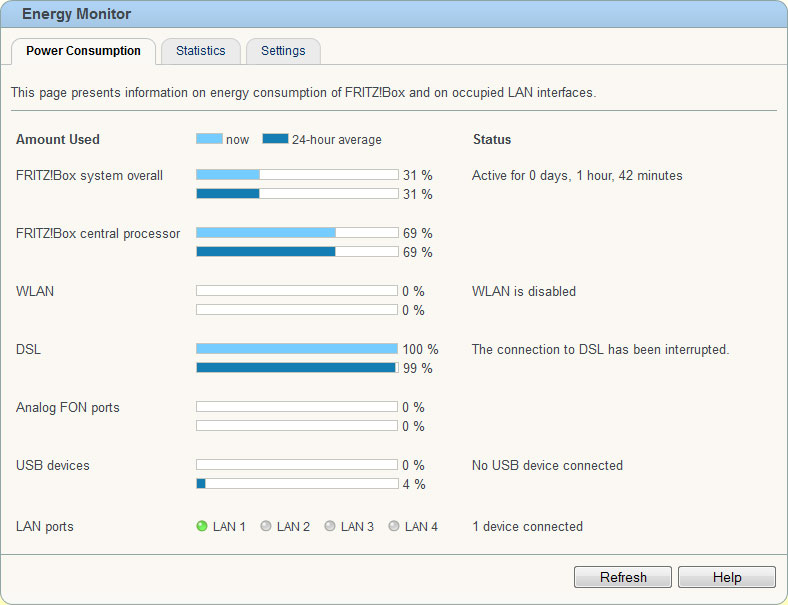
Energy Monitor
The 7390 runs fairly cool, even when using it with both 2.4GHZ and 5GHz
wireless networks enabled. Testing suggests the unit is consuming around 5W if
the wireless networks are turned off, and up to 11W with them enabled.
Obviously power consumption will vary according to what you can connect to the
router, hence the presence of a power consumption monitor to let you track
which parts of the router are using all the power.

Click image for larger version
Here we can see how connected devices and available services have consumed
resources. The screenshot above shows the unit when its DSL line was
disconnected and wireless turned off. Interestingly even with wireless turned
on and DSL connected, the overall system power only rose to 41%.
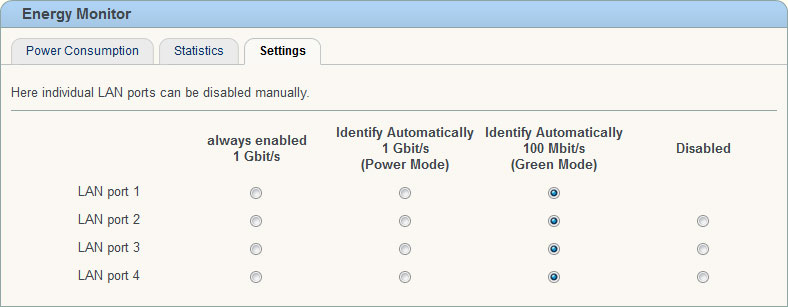
A very useful security option hidden away in the Energy Monitor Settings
tabs is the ability to control the speed of the four LAN Ethernet ports, or
even totally disable them. Running the ports at a slower speed can also help
reduce power consumption.

Click image for larger version

Click image for larger version
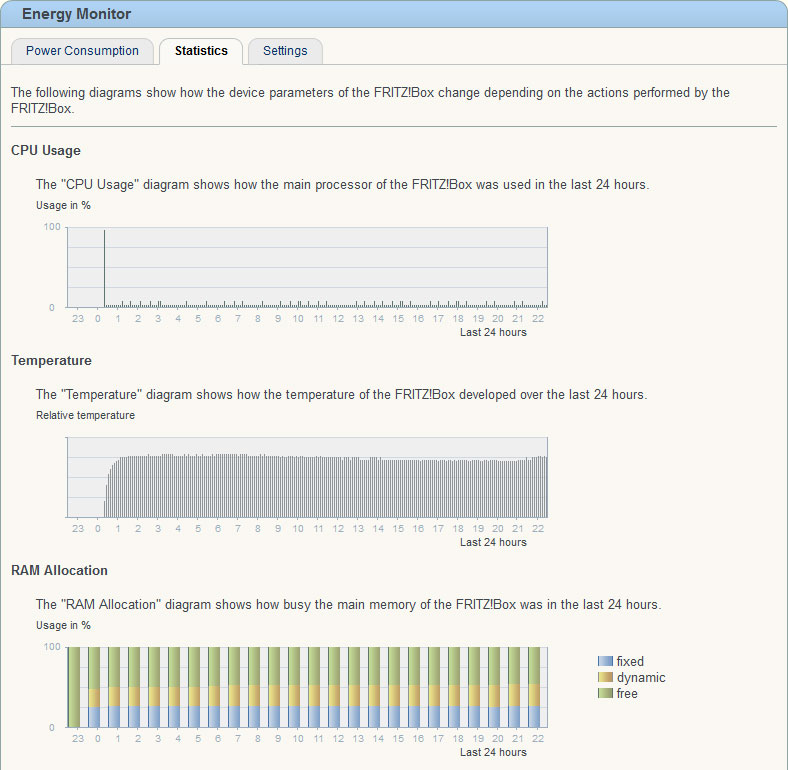
The statistics page is interesting, but with no scale for the temperature it
is not terribly useful. The CPU Usage and RAM allocation are more useful,
particularly for those who are really pushing the capabilities of the 7390.
With a movie streaming over the internet, and a HD video streaming off a USB
stick on the 7390, the CPU usage only rose to around 5%.
Night Service
Being able to turn off the wireless network is one of the ‘green’ aspects of
the router, but it can also be used to help avoid teenagers staying up all
night chatting away online. A simple off every day between two times is
configurable, or for the real control freaks you can configure a lot more
complex set of on/off points. One nice option is that you can elect to stop the
wireless network from switching off if a device is actively using it.
The Do Not Disturb option allows you to turn off all the telephones
connected to the 7390, hence avoiding those annoying wrong number calls that
happen at 3 in the morning. More complicated rules for when different
telephones will ring can be configured in the Telephony section.
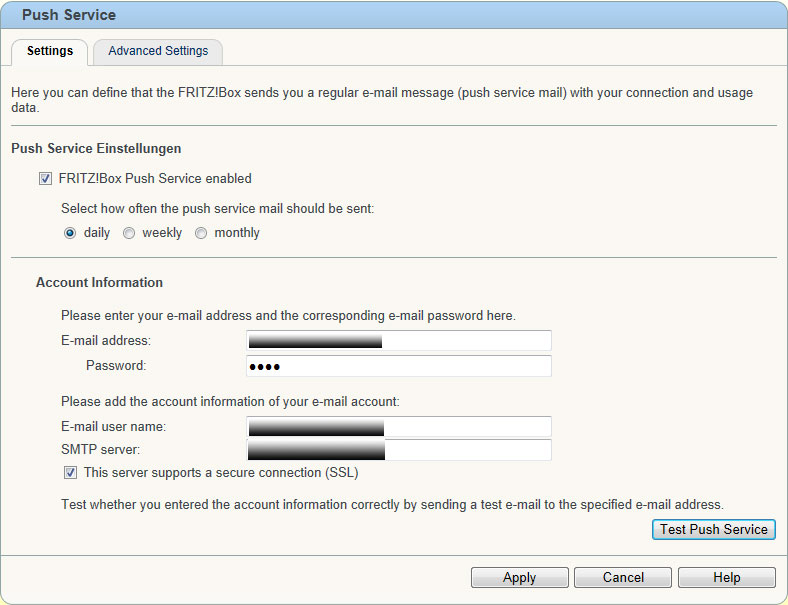
Push Service
The Push Service can be configured to send a daily/weekly or monthly email
that summarises the various operations of the 7390. This includes telephone
call logs, usage records for the broadband connection, event logs and the DSL
attenuation and noise margins when the email was sent.

Click image for larger version
For those who help to administer a broadband connection for someone else, or
a small business wanting to track call logs (which are also attached as a CSV
file) this feature could prove very useful.
Event Log
Most routers offer some form of logging service, but all too often these are
minimal. With the extra CPU and memory the 7390 offers, these logs can actually
be useful. Six different logs are available:
- All Numbers - Nothing to do with telephony, but just an overview of what
has been happening to the system, e.g. when Internet access was lost and
connected again.
- Telephony - Logs on what the telephone functions of the 7390 have been
seeing.
- Internet Connection – Information on parameters such as what IPv6 and IPv4
addresses have been assigned to the WAN side of the router.
- USB Devices – Information about the identity of USB devices connected to
the router.
- WLAN – logs of when a device has connected, with its MAC address, or device
name and the devices connection speed. Interestingly it even logs when a
microwave was detected, and thus 300 Mbps speeds temporarily turned off.
- System – Logins to the routers own user interface.
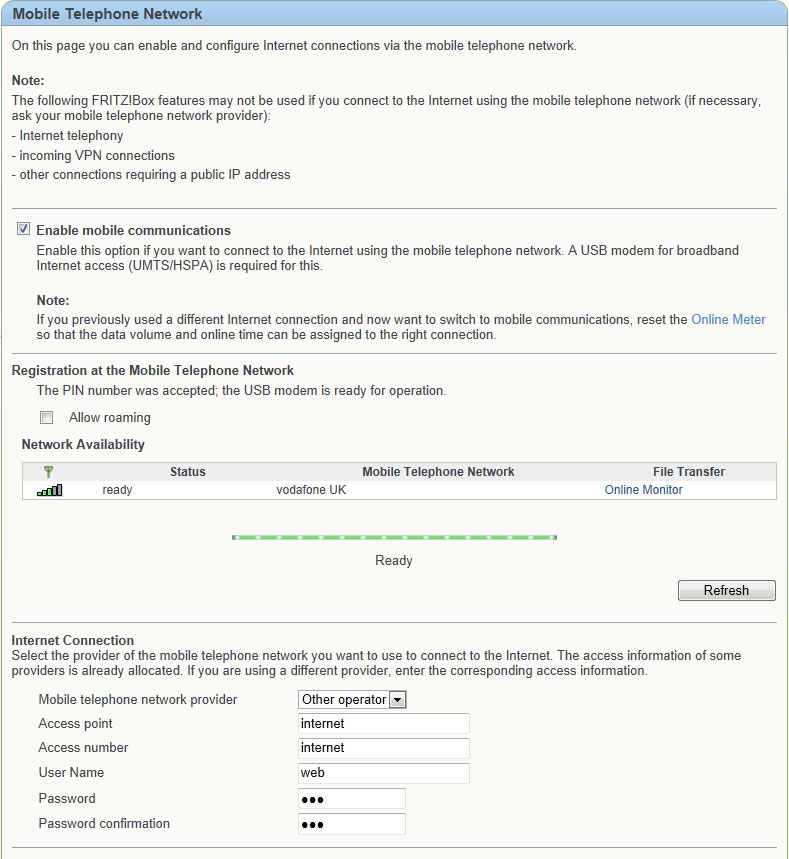
Mobile/3G Broadband
Connection
Given the price of the 7390 it is unlikely you will buy it to primarily use
it as a mobile broadband router, but having this built into a router can be
useful as a backup connectivity option.

Click image for larger version
We plugged a Vodafone USB dongle into the router, which the router happily
saw, but we were unable to get any connectivity, but given the rural location
this is not actually unusual. Further testing at a location with actual 3G
service, rather than GPRS at best will be needed.
We did notice that plugging in the 3G dongle was the only thing that slowed
the routers web interface down, and rather than being very snappy, it slowed
down to a page displaying after a few seconds wait. The routers logs show the
router being stuck in a 10 second cycle, with the dongle throwing errors.
Strangely the router continued to perform slowly even after the dongle was
removed and switched off/on, suggesting that perhaps the 3G connectivity may
need some extra work in the firmware.
Performance
One thing we did notice when doing testing is that the bottom of the case
under the main processor does get pretty warm. This seems to be a localised hot
spot on the case, as the remainder of the device remains reasonably cool.
Testing this router is interesting, as there are so are many permutations
possible. In terms of throughput we have followed our usual pattern of testing
transfer speeds between two computers on the LAN side, and as this router
supports Ethernet WAN (for FTTC/P services) we have also tested that.
All wireless testing was done with WPA/WPA2 encryption enabled, this can
affect throughput, but running a wireless network without encryption is not
recommended. The nominal speeds reflect the connection speed reported by the
laptops wireless network card.
| Test Location/Type |
Measured Speed |
| Gigabit LAN between two PC’s |
600 Mbps |
| 2.4GHz Wireless (<2m 2nd="2nd" floor="floor" td="td">
| 70 Mbps (nominally 130 Mbps) |
| 5GHz Wireless (<2m 2nd="2nd" floor="floor" td="td">
| 90 Mbps (nominally 240 Mbps) |
| 2.4GHz Wireless (5m – 1st floor) |
65 Mbps |
| 5GHz Wireless (5m – 1st floor) |
105 Mbps |
| 2.4GHz Wireless (10m ground floor) |
12 Mbps |
| 5GHz Wireless (10m ground floor) |
55 Mbps |
| File copy from USB stick direct to PC |
125 Mbps |
| File copy from USB stick via NAS to PC |
25 Mbps |
| File copy to USB stick on PC |
33 Mbps |
| File copy to USB stick on NAS |
4 Mbps |
| Download throughput Ethernet WAN port |
200 Mbps |
| Upload throughput Ethernet WAN port |
300 Mbps |
We usually test at two further locations, a conservatory, which for the 7390
gave no signal from both wireless frequencies and the same further down the
garden. Other devices have reached those locations, so it seems while very good
speeds are possible, the range is a little limited.
The throughput figures for the Ethernet WAN port are impressive and show the
router should be able to cope with any FTTC service (even once vectoring is
deployed), but may struggle if you subscribe to a service that connects at over
200 Mbps.
For those worrying about how the router performs on ADSL2+ and the noise
margin drop once the sun sets, the line used for testing suffers from variable
amounts of noise, but the 7390 would hold onto the line for a week or more,
when other routers would drop it once or twice a night.
Conclusion
Never in the course of the years we have reviewed broadband hardware have we
come across a device with so many connectivity options. While this can seem
overwhelming, and occasionally we did lose our way in the web interface, the
web interface is generally very easy to use, and most important is always
responsive.
The routers price at around £200 is not cheap, but then you do get a router
that will work on almost any UK broadband connection, including use as a 3G
router. For a business that has a number of home workers, the inclusion of
VoIP, VPN and flexibility on the Internet side along with good logging and
remote access should appeal.
The only disappointing aspect with the router was to do with the telephony
side, both DECT and corded telephones gained a fair bit of white noise on the
line, not enough to interfere with a call, but when used to crystal clear DECT
systems, it is a surprise.
For the home user, if you have a tablet and smartphone with limited storage
space, then a NAS for storing all your music, video and pictures will be high
on your shopping list, and the 7390 fulfils this roll nicely. In fact if you
add up the cost of all the separate boxes to do what this router achieves, it
could be considered a bargain, and you only need one power supply, rather than
a block of four or five.
We would not recommend the 7390 to someone as their first router, but if you
have setup your own broadband router before it should prove easy to use. For
those people used to routers that are slow when using their web interface, the
7390 is a breath of fresh air with a very responsive interface (apart from when
a 3G dongle in poor reception area is connected).
The niggle with the old ADSL only service, is a worry and may have actually
been something specific to that exchange, alas the ADSL2+ service has replaced
the ADSL service in that area so we cannot investigate further.
In the three months we ran the 7390 on an ADSL2+ line it was rock solid. It
is a sign of how reliable a router is when you forget you actually have one
under test.


")


 LibreOffice
 Firefox
 OpenSUSE


