Bienvenido! - Willkommen! - Welcome!

Bitácora Técnica de Tux&Cía., Santa Cruz de la Sierra, BO
Bitácora Central: Tux&Cía.
Bitácora de Información Avanzada: Tux&Cía.-Información
May the source be with you!
Showing posts with label NTFS. Show all posts

Friday, June 17, 2011

$MFTMirr does not match $MFT (record 0)

Source
 BY 

Sometimes, when you are executing a file transfer between your computer hard drive and an external drive and your computer shutdown for some reason (in my case, no battery/ac power) it’s pretty common to get some errors on external drives that uses NTFS as they file system.

The most common message is:

Error mounting: mount exited with exit code 13: $MFTMirr does not match $MFT (record 0).

Failed to mount ‘/dev/sdb3′: Input/output error
NTFS is either inconsistent, or there is a hardware fault, or it’s a
SoftRAID/FakeRAID hardware. In the first case run chkdsk /f on Windows
then reboot into Windows twice. The usage of the /f parameter is very
important! If the device is a SoftRAID/FakeRAID then first activate
it and mount a different device under the /dev/mapper/ directory, (e.g.
/dev/mapper/nvidia_eahaabcc1). Please see the ‘dmraid’ documentation
for more details.
One workaround for this issue is to do as the message says, boot on Windows and try to use the 
awesome
 NTFS tool that Windows offer. But a perfect solution for a Linux users is to use the ntfsprogs utility.
ntfsprogs is a suite of NTFS utilities based around a shared library. The tools are available for free and come with full source code.
  • mkntfs: Create an NTFS volume on a partition
  • ntfscat: Print a file on the standard output
  • ntfsclone: Efficiently backup/restore a volume at the sector level
  • ntfscluster: Given a cluster, or sector, find the file
  • ntfsfix: Forces Windows to check NTFS at boot time
  • ntfsinfo: Dump a file’s attributes, completely
  • ntfslabel: Display or set a volume’s label
  • ntfslib: Move all the common code into a shared library
  • ntfsls: List directory contents
  • ntfsresize: Resize an NTFS volume
  • ntfsundelete: Find files that have been deleted and recover them
  • ntfswipe: Write zeros over the unused parts of the disk
  • ntfsdefrag: Defragment files, directories and the MFT
  • ntfsck: Perform consistancy checks on a volume
  • nttools: Command-line tools to view/change an offline NTFS volume, e.g. ntfscp, ntfsgrep, ntfstouch, ntfsrm, ntfsrmdir, ntfsmkdir
  • ntfsdiskedit: Walk the tree of NTFS ondisk structures (and alter them)
Be careful with these utilities, they might damage the filesystem, or your hard disk !
With ntfsprogs installed (sudo apt-get install ntfsprogs) you should execute the following commands in a terminal:
sudo ntfsfix /dev/partitionName
After this command you should expect the following output:
~$ sudo ntfsfix /dev/sdb3
Mounting volume... FAILEDAttempting to correct errors...Processing $MFT and $MFTMirr...Reading $MFT... OKReading $MFTMirr... OKComparing $MFTMirr to $MFT... FAILEDCorrecting differences in $MFTMirr record 0...OKProcessing of $MFT and $MFTMirr completed successfully.Setting required flags on partition... OKGoing to empty the journal ($LogFile)... OKNTFS volume version is 3.1.NTFS partition /dev/sdb3 was processed successfully.
After this step you should be able to access your external drive partition as usual, mount or use nautilus to access your files.
Source:  http://gnuwin32.sourceforge.net/packages/ntfsprogs.htm


How to recover files off a crashed hard drive


One universal true about computers is this: the hard drive will fail. It is not a matter of if, but a matter of when. In an ideal world, every computer user would make regular, full backups of their system. Unfortunately, that isn’t the case, and far too often computer users find themselves with a crashed hard drive.
If your hard drive has crashed and you’re unable to boot into the system to retrieve your files, you’ll have to take a different, more involved approach. This tutorial will show you how to recover files off of a crashed hard drive.
These instructions assume that the hard drive is crashed but not physically damaged. You can use these instruction with both Mac OS X and Windows. You will need a second computer with Internet access and a DVD burner, a blank CD, and the crashed system should have an optical drive.
Step 1
Download a Linux distro that offers a LiveCD, or that can be run from a CD or pen drive. Small-file size options are Puppy Linux and Damn Small Linux. However, I recommend downloading Ubuntu, simply because mounting a drive is effortless with it and does not require the Terminal.
Step 2
Burn the downloaded ISO file to a blank CD using Nero or any other burning software.
Step 3
Insert the CD into your crashed system and restart the computer. At BIOS, enter setup by pressing the designated key for your system – for most computers, it’s F12 or ESC.
Once in BIOS, select Boot Sequence and highlight CD/DVD Drive. Press the ‘U’ button to move the option above the internal hard drive, then save and exit BIOS.
The computer will restart and the Ubuntu logo will be displayed along with a menu of options. Choose ‘Try Ubuntu….’ This will start Ubuntu, running it from your CD drive. Don’t worry, it won’t affect your hard drive in any way.
Step 4
After Ubuntu has loaded, look in the upper left corner. Choose Places. Towards the bottom of the menu, you will see a picture of a hard drive – it will say something like ’0.0GB Drive’, displaying the capacity of your internal hard drive. Click to mount.
Step 5
Plug in your external hard drive or flash drive. Navigate to Places and choose the new drive you just plugged in to mount it.
Step 6
The internal hard drive and external media are now mounted. Look on the desktop for the hard drives. Click them to open.
In the windows that appear, you can choose Documents and Settings and copy the data files to your external drive, or you can simply copy the entire internal drive to the external drive and sort it out later.
Step 7
Once finished, shut the machine down and remove the CD when instructed.
You can now reload your system as normal.
http://www.ubuntu-es.org/?q=node/124721

Tuesday, August 24, 2010

Using NTFS for USB flash memory drives

Source
USB Flash memory drives (also known as pen drives or memory sticks) are normally formatted using the FAT or FAT32 file systems, as are most removable drives. NTFS is generally considered to be a better file system if you use Microsoft Windows, so wouldn't it be better to reformat your flash drives so they use NTFS as well?
Write caching
It's perfectly possible to format USB Flash drives and memory cards using NTFS, but in Windows XP and Vista you must first enable write caching. This is disabled by default, with good reason. Caching means that data due to be written to the drive is held in memory, sometimes for a long time after the write took place. Many removable drives and memory cards were corrupted under older versions of Windows because people removed them without using the "Safely Remove Hardware" icon on the task bar, which forces any cached data to be written to the drive. So you should only enable write caching for removable drives if you're sure that you will remember to use the safe removal process.
How to enable write caching for removable drives
  • Open My Computer
  • Right-click the drive and click Properties
  • On the Properties dialog select Hardware
  • Select the physical drive (all drives will be listed) and click Properties
  • Select Policies and click Optimize for Performance
  • Click OK to close the property dialogs.
Disadvantages of NTFS for Flash drives
Once you have enabled write caching for your flash drive, you can go ahead and format it as NTFS. However, we consider NTFS to be the wrong choice for Flash memory drives drives for several reasons:
  • Portability: the drive will be unreadable by computers running Windows 95, 98 or Me, Linux, or any other non-Windows device.
  • Longevity: NTFS will shorten the life of the drive. It is a journalling file system, which means that it logs changes, not just the end result, causing more writes to the drive. It also logs last access times for files, so even a read causes a write access. Flash memory has a lifespan of only about 100,000 writes.
  • Ease of access: NTFS records the owner of a file, so you are likely to see “Access denied” messages if you try to access the file on another computer. This could be regarded as a benefit, but it's actually just an inconvenience, as the data is not encrypted. If you want to secure the data on your USB memory sticks from prying eyes you should use encryption.

Saturday, June 20, 2009

NewSID

Source
Von Mark Russinovich und Bryce Cogswell
NewSID herunterladen (68 KB)

NTFS-3g error: Hal.Storage.mount-fixed

org.freedesktop.Hal.Device.PermissionDeniedByPolicy:
org.freedesktop.Hal.Storage.mount-fixed
auth_admin_keep_always <-- (action, result).
Source
Hal is the hardware abstraction layer, which to my knowledge knows no policy by itself. That is usually the domain of "udev". Have a look at
http://www.reactivated.net/writing_udev_rules.html
http://gentoo-wiki.com/HOWTO_Customizing_UDEV
http://linuxcommand.org/man_pages/udev8.html
http://ftp.kernel.org/pub/linux/util...tplug/udev-FAQ
http://www.linuxfromscratch.org/lfs/...er07/udev.html
But maybe, just maybe, it is faster to have a look at your file ".hal-mtab-lock". What does it contain? "cat /etc/mtab" lists the mounted devices as you probably know. Why not renaming that ".hal-mtab-lock" for a test and try to access your DVD-drive...
-------------------------------
Windows-Partitionen einbinden
Bugs in Hal?
mein Fall:/dev/disk/by-id/ata-ST3250310AS_6RYFZQM8-part2 / ext3 acl,user_xattr 1 1
/dev/disk/by-id/ata-ST3250310AS_6RYFZQM8-part8 /DATEN ntfs-3g users,gid=users,fmask=133,dmask=022,locale=de_DE.UTF-8 0 0
/dev/disk/by-id/ata-ST3250310AS_6RYFZQM8-part11 /IMAGES ntfs-3g users,gid=users,fmask=133,dmask=022,locale=de_DE.UTF-8 0 0
/dev/disk/by-id/ata-ST3250310AS_6RYFZQM8-part9 /MMEDIA ntfs-3g users,gid=users,fmask=133,dmask=022,locale=de_DE.UTF-8 0 0
/dev/disk/by-id/ata-ST3250310AS_6RYFZQM8-part10 /VMs ntfs-3g users,gid=users,fmask=133,dmask=022,locale=de_DE.UTF-8 0 0
/dev/disk/by-id/ata-ST3250310AS_6RYFZQM8-part1 /Win2k3 ntfs-3g defaults,users,locale=POSIX 0 0
/dev/disk/by-id/ata-ST3250310AS_6RYFZQM8-part3 /WinXP ntfs-3g defaults,locale=POSIX 0 0
/dev/disk/by-id/ata-ST3250310AS_6RYFZQM8-part7 /home ext3 acl,user_xattr 1 2
/dev/sdb9 /media/data1 ntfs-3g defaults,locale=POSIX 0 0
/dev/disk/by-id/ata-ST3250310AS_6RYFZQM8-part6 swap swap defaults 0 0

/dev/sdb9 wird gemounted ohne Probleme!

Wednesday, June 17, 2009

NTFS access in Linux

Use ntfs-config to allow full access to the NTFS partitions
If errors:
$LogFile indicates unclean shutdown (0, 0)
Failed to mount '/dev/sdb5': Operation not supported
Mount is denied because NTFS is marked to be in use. Choose one action:
Choice 1: If you have Windows then disconnect the external devices by
clicking on the 'Safely Remove Hardware' icon in the Windows
taskbar then shutdown Windows cleanly.

Choice 2: If you don't have Windows then you can use the 'force' option for
your own responsibility. For example type on the command line:

mount -t ntfs-3g /dev/sdb5 /media/PAGEFILE_ -o force

Or add the option to the relevant row in the /etc/fstab file:

/dev/sdb5 /media/PAGEFILE_ ntfs-3g force 0 0

Monday, May 18, 2009

Recovery of a lost and damaged NTFS

Source
Analyse Disk 81 - CHS 2434 255 63 - 19092 MB (Enh BIOS mode)
No partition is bootable

No partition is available.

Analyse Disk 81 - CHS 2434 255 63 - 19092 MB (Enh BIOS mode)
L FAT32 1275 1 1 2433 254 63 18619272 [NO NAME]

Only the second NTFS partition is found during Quick Search. Select Deeper Search to try to find more partitions.

Analyse Disk 81 - CHS 2434 255 63 - 19092 MB (Enh BIOS mode)
* HPFS - NTFS 0 1 1 1274 254 63 20482812
L FAT32 1275 1 1 2433 254 63 18619272 [NO NAME]

Both partitions have been found, but the first NTFS has been found using backup boot sector, we need to restore the boot sector. Choose Write and next choose Backup BS to copy backup boot sector over boot sector.

More:

NTFS Partition Recovery

... with Free Partition Recovery

All things must start somewhere, when it comes to operating systems’; the partition sector is the single most important component in the boot sequence. When the partition sector is missing, corrupt, or set up improperly it can wreak havoc with the booting of your operating system. The partition sector is vulnerable to virus attacks, operating system anomalies, bad sector reads, and an ever increasing set of tools, fdisk included, that when used incorrectly can and will totally destroy an operating systems boot sequence.

In order to more clearly understand how the partition sector fits into the boot sequence, the following is a standard garden variety boot up.

When you turn on your computer several things happen. The first of which is the BIOS (Basic Input Output System) is executed by the CPU (Central Processing Unit). The CPU knows to load the BIOS on power up as there is a flag set at power on. The BIOS then jumps to a set of routines that will execute the POST (Power On Self Test). The POST will look at memory, some peripheral devices, and do some other house keeping procedures. The most important of these is determining the boot device. The boot device is stored in non-volatile read/write memory. If the boot device is set to a hard drive, then an industry standard interrupt 0×19 is called. This routine loads the first 512 bytes of the boot device, which in this case the hard drive, into memory location 0×7C00. The 512 bytes is a standard sector size. It then jumps to that address (0×7C00) and executes whatever it finds there.

If all goes well, the set of instructions executed will look at the partition entry data. The partition entry data is used to determine which partition is the boot partition. If it finds a boot partition in the partition entry list the instructions will then load a secondary set of instructions which the partition entry has pointed to. In the case of Windows the OS (Operating System) pre loader is now loading itself into memory. This type of OS loader is called a two phase loader and is very common. Take a look at the table below to help better understand the role of the partition sector entry data.

The format of a partition sector entry is as follows:
1.) Byte 1 Boot Partition Indicator (0×80 is bootable, 0×00 is not)

2.) Byte 2 Starting Head of the partition (255 or less)

3.) Byte 3-4 Starting Sector and Cylinder of the partition
This is set up as 10 bits for the Cylinder and
6 bits for the Sector (Sector Max 63, Cylinders Max 1024)

4.) Byte 5 File System Type (NTFS, FAT32 etc)

5.) Byte 6 Ending Head of the partition (255 or less)

6.) Byte 7-8 Ending Sector and Cylinder of the partition
This is set up as 10 bits for the Cylinder and
6 bits for the Sector (Sector Max 63, Cylinders Max 1024)

7.) Bytes 9 -12 Relative Sector to the partition sector. In other
words, where the actual partition starts.

8.) Bytes 13-16 Total sectors for this partition.

If any of this data is outside the stated parameters the partition will fail and consequently the boot sequence will stop. In order to clearly understand what happens when the partition sector is corrupt or damaged, the following is a list of scenarios.1. Boot Failure: System Halted
An error message that comes from the BIOS. Certain BIOS versions, especially the most recent revisions, take a look at the partition sector. The BIOS will perform some preliminary tests and one of the tests is the Partition Identifier. At the end of every partition sector is the value 0xAA55. If this indicator is missing then the BIOS assumes that this is not a partition sector and the aforementioned error message will be issued.

2. System reboots over and over
Although this is not an error message, it can happen if the relative sectors point to an invalid OS pre loader. A trap is set and if the data that is loaded is not executable machine most BIOS’s will reboot.

3. Invalid Partition Table
This error message comes from the partition boot code. If there are no boot devices then the boot code will enter an infinite loop after this message is displayed.

4. Error Loading Operating System
After a valid partition is found the LBA sector pointed to by the partition entry table will be loaded using INT 13. This is the operating system loader. If the code cannot be loaded into memory then the above message is normally displayed.

5. Missing Operating System
Once the operating system boot code is loaded it is checked for the 0xAA55 identifier in the same manner that the partition sector is tested. If this test fails, then the above message will be displayed.

Over the years the BIOS writers have gotten smarter, personal computer as well as operating system standards have been set and are normally followed. So many of the messages, as well as error checking is now handled by the BIOS. The messages I have mentioned are just a few, but, are very common; however, from BIOS to BIOS the messages as well as the error handling can differ greatly.

As you can clearly see the partition sector is of primary importance in the boot sequence. Without it nothing happens. In the future there may be ways to overcome the use of a partition sector, one would be to store the partition entry data in the BIOS, this would eliminate boot sector viruses as well as the possibility that the boot sector goes bad and becomes unreadable. However for now, we will work with what we have. The next segment will discuss how to do partition recovery using a simple piece of software.

How To Use The Software

Free Partition Recovery is an extremely powerful tool for anyone to use but this statement must be caveated with the fact that with power comes a degree of responsibility. In other words, use this tool with extreme caution as it can destroy your file system to the point of massive and possibly permanent data loss. That being said lets take a look at how we can put this tool to good use.

First, the software should be run from a master drive. There should be two drives in the system, your boot drive from where the software is executed, and the damaged drive. The damaged drive being the one with the corrupt or missing partition. Free Partition Recovery is designed to work on Windows XP type operating systems, so make sure that you have unzipped the file onto that type of operating system.

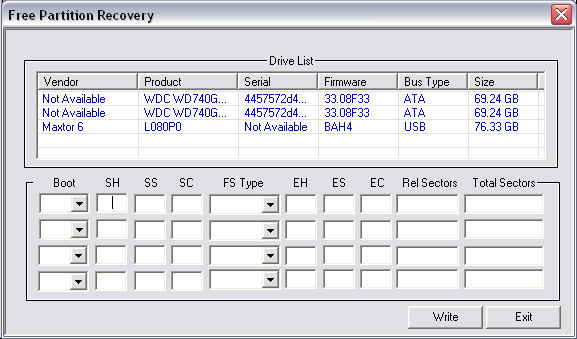
Once the Free Partition Recovery has been executed you will see in Figure 1.

Figure 1

The top row displays all the physical drives currently active in your system. This will also include any external devices that can be mounted as a physical block device. An example of this would be the 80 GB Maxtor USB device. Once you choose a physical drive all partition entry data will be displayed as in Figure 2.

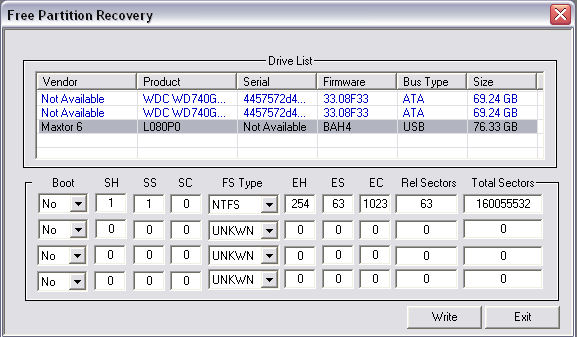
Figure 2

The partition entry data for this particular drive gives us a clear example of a drive that has been configured with one NTFS logical drive with the standard offset of 63 sectors, start head and sector of 1 and ending cylinder of 1023. These are classic values for a normal single logical drive setup.
The other three entries are clear and not in use. These entries will be ignored by the OS loader. There is one other important item in this configuration. On the far left of Figure 2 of the first partition entry is the boot flag “No”. This indicates that this partition is ‘Not Bootable’. You can change that value buy using the drop down list (Figure 3)

Figure 3

Once you have configured all of the partition entries to reflect the correct values all you need do is press the “Write” button. You will be presented with the following message box in Figure 4. A word of caution, once you write the data down to the partition sector, you must live with it. Please exhibit extreme caution.

Figure 4

You can download the free NTFS partition repair software here. For more info about freeware data recovery visit our free data recovery software page.

Tuesday, November 4, 2008

Linux ntfsfix on Vista

Source
I wanted to test ntfsfix /dev/sda1 to see what would happen. This was a very bad idea. Windows vista refuses to boot since then. It goes up to the first windows splash screen with the moving horizontal pattern, and nothing more.
What can I do to correct this miserable action?
linux version is kubuntu, kernel 2.6.22-14 and linux-ntfs is 1.13.1-6
Thanks in advance

linux-ntfs 1.13.1 is not compatible with Vista
as you found out... You need at least linux-ntfs 2.0.0 for Vista support.
The easiest way to fix your volume is to allowing windows 2000 or XP to mount it. That will reset the correct flags and Vista will be able to mount it.
Alternatively you need to write a tool (or modify ntfsfix.c) to clear
the VOLUME_MOUNTED_ON_NT4 bit in the volume flags - where we set the VOLUME_IS_DIRTY flag would be the place to edit ntfsfix.c just add something like thus:
flags &= ~ VOLUME_MOUNTED_ON_NT4;
after the line:
flags = vol->flags | VOLUME_IS_DIRTY;
Compile and run and with some luck it should fix your volume.

#ntfsfix isw

Source by arunl (corrected!)
I had the same problem. Machine would not boot because \WINDOWS\SYSTEM32\CONFIG\SYSTEM was missing.
Windows
XP Restore did not help. On booting with the XP disk, it would not give
a list of OS to choose
. Instead it gave a Windows prompt.
The drive C: was shown as empty. Though I had a RAID-1 disk.
Chkdsk could not help because the disk was not recognized (or something to the effect).
Some
people have suggested that under this situation you have to essentially
reformat dis and reinstall the OS (thus losing all the data).
After some experimentation I found an alternative to chkdsk which was a big help. Here is a summary.
My machine had three problems:
1. My C drive was configured as an NTFS filesytem. This filesystem was corrupted. (See below how I found this out).
2. The five registry files mentioned in the following Microsoft article were corrupted.
http://support.microsoft.com/kb/307545
3. My machine was infected.
I
will describe my solution for #1 and #2 because that is relevant for
this thread. But to complete the recovery one has to clean the machine
too.

* Restoring NTFS filesystem
Normally chkdsk does
this. But as discussed above, chkdsk was not helpful in my case.
I
restored the NTFS filesystem using ntfsfix available with Knoppix (and
may be other Linux based recovery CDs).
- Download and burn a Knoppix CD (on another machine)
- Boot using Knoppix CD
- The desktop will have icons showing the disks recognized by Knoppic.
Since I had RAID drives using ISW format, I had four icons on my desktop named "isw..."
- Double click on the drive icons. The drive will be mounted in READONLY mode (if our drive can be mounted then its good news)
The icon will now be replaced by another icon showing the mounted drive.
- Browse through the filesystem of each drive, and find the one containing your WINDOW directory.
- Rightclick on the icon for the mounted drive. Convert it to 'READ-WRITE' (from READONLY).
At
this stage, Knoppix is likely to give an error that it cannot change
the drive to RW mode because the NTFS filesystem is corrupted.

The
message also says that you need to use chkdsk (on Windows) or else
use ntfsfix. This is how I learned that the NTFS filesystem was
corrupted.

- Now rightclick on the drive and unmount it.
- Open a terminal window (with the shell promt)
-
Use the command "ntfsfix". Use the command "man ntfsfix" to learn how
to use ntfsfix. In my case I had type the following command.
# ntfsfix isw

Notice the "isw" when I was discussing the desktop icons. The name of
the icon should give you some hint on the right parameter for you.
Don't
forget to read the disclaimer given by ntfsfix. Before you go further,
think whether you need to save any data from your disk.
If your disk is
mounted correctly by Knoppix, its your chance to backup data you need.
If ntfsfix goofs up, you'd lose this opportunity.

* Restoring Registry Files
I tried rebooting after doing ntfsfix, but still received the same error message about the SYSTEM32/... file not found.
At this point I could have tried using Windows XP Recovery and followed the steps in this MS article http://support.microsoft.com/kb/307545.
I
didn't attempt it. Once my boot failed, I went back to Knoppix and did
what is recommended in the MS article, but using Knoppix
. Of course, to
make changes to the filesystem, it should be mounted in RW mode
(following the steps listed before).
I used another external drive to make backup of the registry files.
After restoring the four registry files, I was able to reboot.

* Caution when you reboot, if your machine is infected
-
Make sure you reboot in safe mode. If the infection was the cause of
your problem, it is likely to get repeated. Who knows what else would
happen this time.
- Use "hijackthis" to find problematic configuration entries, and clean up.
- Look up other articles that can help further.

Problems repartitioning NTFS partition

CEB
After trying to repartition the C: drive (NTFS formatted with 40 GB)
After running n-times (in CMD line modus) the infamous command
C:\chkdsk /r               (/r not /f)
and waiting long time to repair errors and twice restarts...
It could not be able with Linux OS (Knoppix 5.1 and openSuSE 10.3 and Parted Magic 2.1) to repartitioning this (little) bad M$ file system.
The disk surface is in order (it has no bad clusters), confirmed after inspection (SMART utility)
The error output from Linux (gparted & visualparted) was:

#....error 2 while executing fsck.ntfs-3G


(When some blocks of the partition(s) could be damaged, I suggest to run "fdisk -l" to be 100% sure about sda* and then run "fsck" to
check these partitions)
#fdisk -l

I don' like to use the last instance linux command to clear certain journaling structures of ntfs and something in the FMT.
#ntfsfix /dev/sda1
but I didn't have another better choice... et voilá!
It was then possible to resize (partition of 20 GB)

Another case

Another sugestion
If you are using TestDisk 6.8 or later, in the
Advanced menu, select the NTFS partition, choose Boot and List.
Sometimes it can access files even if the filesystem is a "little"
damaged. RepairMFT can repair the MFT using the MFT mirror, it will ask
you confirmation before changing anything. If you have done a backup
with dd or GNU ddrescue, it's even better.
Another suggestion
If the recovery console can't see the drive, it can't repair, in this kind of situation, I would try using a bootcd like from www.ubcd4win.com
and use those utilities to do data recovery, after important data
recovered, delete the raid volumes, check the drives one by one if
having problem or not, if healthy, rebuilt the raid, this kind of hard
drive crash maybe caused by overheated drives. Be sure your hard drives are well ventilated.

NTFS repair possibilities

dslreports.com/forum/...
There is a thing called Windows MXPE that is a bootable version of
Windows XP. It has some problems, first of all it's illegal and second
it's damn hard to find a copy. I do have a copy and it is as much a
life saver in fixing Windows problems of this nature as a Linux live CD
is for fixing Linux problems. It's too damn bad that Microsoft doesn't
offer it so one can legally purchase it.
---------------------------------
I think BartPE is also okay for that purpose. But it is a chicken-or-egg problem.
MS's recovery toolset is a bit limited in my opinion, too. From a sysadmin's standpoint, Microsoft has a superb set of tools for every administration task except recovery. It's a shame.
---------------------------------
One day, there will be an fsck.ntfs.
NTFS development is very much alive but proceeding very, very slowly,
due to lack of manpower (1 person does this, part-time) and extreme
caution be the author (the last version of Linux NTFS ate filesystems).
---------------------------------
There's also:
www.nu2.nu/pebuilder/
pcworld.about.com/magazine/2111p···2479.htm