Bienvenido! - Willkommen! - Welcome!

Bitácora Técnica de Tux&Cía., Santa Cruz de la Sierra, BO
Bitácora Central: Tux&Cía.
Bitácora de Información Avanzada: Tux&Cía.-Información
May the source be with you!
Showing posts with label RAIDXpert. Show all posts

Wednesday, July 10, 2013

RAIDXpert timeout errors

tiempo de espera 40 de la tarea en disco
Task 40 timeout on disk (Port Number _2_,Target ID _1_) at LBA ...
Issues with AMD system
What is AMD's RAIDXpert?
RAIDXpert User Interface - AMD (pdf)
=============
Look for Warnings in the log that show disk timeouts. You should notice a pattern if you use your desktop with the RAIDXpert panel open. It will freeze around the time of the disk timeouts. This is most likely due to the deep recovery cycle process present in the disk firmware on blue and green drives. -- What this means is if it was a Raid or NAS label drive it would have failed sooner. Time is on your side in this case and you have more time to get a replacement drive at the cost of having to check the logs by hand.
www3.hp.com/t5/Desktop-Hardware/AMD-RAIDXpert-Warning-Errors
I encountered AMD RAIDXpert error messages after performing a factory restore on a client's non-bootable Pavilion a6750f running Vista Home Premium 64.  This PC had a single hard drive.
I was able to stop the error by disabling the AMD RAIDXpert service.  Type Services in the "Start Search" box.  Right click on Services and select "Run as administrator."  Right-click on the "AMD RAIDXpert Service" and change the Startup type to "Disabled."  Problem solved.
Seems strange that RAID was enabled right out of the box.
http://www.tomshardware.com/forum/282935-32-raid-time-critical-notice-help
There was some FUD around using WD drive in raid arrays. Google 'time limited error recovery' Not sure if this was real, or just a trick to get people to buy the very nice, fast and expensive 'raid edition' RE drives from WD. I have a WD black in raid 0 with a seagate drive, no problems for about a year now.
I bought 2 WD green 1TB drives for some crazy reason 2 years ago. They are both dead now. The Black drives I bought were only a little more expensive, performed way better and are still alive. Your experience with green WD 1TB drives mirrors mine. They may have had a bad batch/design.
re "Task 30 timeout" sounds like the drive was not responsive for longer than the controller would tolerate, but that retrying worked. There used to be a bunch of errors that cause the drive logic to reset that could be long running (issue IO, lose response, wait to timeout, issue reset, wait for reset to complete, re-issue IO) plus there used to be thermal recalibrates where after the drive heated up teh head wouldn't go tot he right spot, etc. Not sure modern drive has these problems.
-----------
Western Digital HDs: Use black labelled RE x (RAID Edition)
=======================
http://www.tomshardware.com/forum/299238-32-howto-raid-raidxpert-diagnostics-performance
Look for Warnings in the log that show disk timeouts. You should notice a pattern if you use your desktop with the RAIDXpert panel open. It will freeze around the time of the disk timeouts. This is most likely due to the deep recovery cycle process present in the disk firmware on blue and green drives. -- What this means is if it was a Raid or NAS label drive it would have failed sooner. Time is on your side in this case and you have more time to get a replacement drive at the cost of having to check the logs by hand.
=======================
http://www.techpowerup.com/forums/showthread.php?t=140536
(RAID 0)
you need to disconnect the drive from the Raid array to check its SMART data, if you have another onboard Sata Controller, like from JMicron, connect the drive upto that and boot to windows, then download a SMART utility such as
http://www.hdtune.com/files/hdtunepro_460_trial.exe
once complete disconnect the drive from the JMicron controller and put it back into the SB 850, it should then reconnect to the raid array.
NOTE* works fine on intels ICH10R chipset, i have not tested it using AMDs. 
---
you cannot scan SMART data from drives in a raid array, that is why you must disconnect a drive and either use another PC to test it or another onboard controller that is not the AMD one.
-------------
Leave the raid array as it is. what you need to do is remove one of the disks from the array, just pull the disk out and connect it to either another controller on your motherboard or a different PC.
Scan the disk and if it checks out, plug it back into the AMD Raid controller and it will add it automaticaly back to the raid array.
NOTE: if windows is installed onto that raid array with the disk your going to check then it wont work on the same PC, as it cannot boot that array due to the disk missing.
-------------
with that many BSL logs i would definetly be A doing a smart scan, and B possibly even replacing that disk.
=======================  
HP Proliant Microserver | AMD RAIDXpert RAID Rebuild

I recently developed a few faults with Windows Server 2008 R2 install running on my HP Proliant Microserver.

A number of posts and articles suggested the fault maybe the result of a faulty HDD therefore I ran a series of disk checks and applications to verify. Unable to locate any faults I opted to remove both 2TB HDDs (configured in RAID1) in order that I could dock them in another workstation and run thought some more thougher checks.
strangely as a result of removing the HDDs the Windows “BSOD” and crashing did stop, however I was still unable to locate any errors on the HDDs.
Rather than installing both HDDs back in the system, I thought it best to only reinstall one HDD in order to fault find, therefore breaking the RAID. Once happy that the fault was correct (Never found out the issue) I started RAID1 rebuild process using the following steps.
Continue reading →
=======================
HP Proliant Microserver | AMD RAIDXpert Software Download Link
4 Replies


Microserver_AMD_RaidXpert I was having trouble finding the AMD RAIDXpert manager for the Microserver, since the AMD link I was using now prompts for a password and username…
Here is the latest direct AMD RAIDXpert Utility Link:
http://support.amd.com/us/gpudownload/windows/Pages/raid_windows.aspx
From the HP Microserver driver page (http://goo.gl/utZgj) for Windows Server 2008 R2, the AMD RAIDXpert Utility  isn’t listed, but the HP version can be found here (http://goo.gl/DlFxI) Although this software link says it only supports, XP & Vista (x86/x64) OS, I’ve installed and tested with Windows Server 2008 R2 and all seems to work fine. There were reports on this HP forum (http://goo.gl/scIeP) that the drivers show errors in the eventvwr, however I didn’t see any listed.
When I called HP to confirm (April 2012) (40min of the phone), they were unable to find the product from my serial number and their records show the server was purchased in 1974… 1974 I ask you? Where did this year come from I ask? Surely logic would tell you this is incorrect? This was the year for “Pocket Calculators” to appear in shops, the start of “barcodes” being used and the first “primitive word processors” in offices!
I was then told that the software was not supported and that I would need to contact the software vendor (presumable AMD??) to get hold of the download. I’ve been given some dodgy advise from HP before so rang back a 2nd time to confirm… again being told that the AMD RAIDXpert utility was not supported on the Microserver or any HP 100 series and that no downloads were available or listed on the HP website. The software link above for the “AMD RAIDXpert utility” hosted on the HP site (although not specifically for the Microserver) would contradict this information, but the icing on the cake is the following article HP:
HP ProLiant Microserver – How to Configure AMD RAIDXpert for E-mail Notifications: http://goo.gl/gjQKr (artical ID: c03143514)
Finally goo-gling around I got hold of the new link (listed above) no thanks to HP for their information.
AMD RAIDXpert Utility Info:
  • URL: http://localhost:25902/amd/screen.jsp
  • Default Username: admin
  • Default Password: admin
To find your HP Microserver Serial Number in the OS:
  1. HP Serial number finder
  2. From command line run:
    wmic bios get serialnumber 
=====================
http://h18000.www1.hp.com/products/quickspecs/13716_div/1371...

Saturday, January 26, 2013

AMD RAID Setup

http://www.compucon.co.nz/component/option,com_registration/task,register

Introduction:
  AMD host RAID technology is capable of RAID levels 0, 1, 5, 10 and JBOD; host RAID is also known as 'BIOS-aware software RAID', when there is RAID capability/logic integrated into the motherboard that use the systems memory and processing power as apposed to a dedicated RAID controller card that has its own processing chip, memory and firmware logic.
Setup:
  This guide goes through the process of creating and managing RAID volumes using both the AMD RAID Utility which is accessed on computer start up and using the RAIDXpert application from within the operating system. For RAID email notification setup please see this knowledgebase article.
AMD RAID Utility:
  The RAID utility is fairly straight forward as creating a Logical Disk is a linear procedure.
1) Press CTRL+F when prompted on startup to enter the utility
2) Navigate the main menu using the numbers for each section; 1 will bring you to the Drive details page. Here you can see which RAID volume/Logical Disk a drive is assigned to as well as other specific drive details. You are also able to erase a selected drive by entering CTRL+H and specifying the number of passes to make on the drive. Press escape to return to the main menu.
3) Menu 2 is where you create RAID volumes; it makes you enter the details in order so it should be fairly simple. Use up/down to change between the different settings and space bar to change the value of the selected setting. Select the RAID type you want; leave Fast Init on if you do not want to wait a long time for it to fully initialize; Gigabyte Boundary rounds the volume down to the nearest Gigabyte so it’s up to you whether you want to enable it or not; Cache Mode is Write-Thru by default and in most cases you will not be able to change it. Change the N to a Y next to the drives you want to use for this volume then press CTRL+Y to save the volume. There will then be a few prompts you have to go through: first it will ask you to press CTRL+Y to set a custom name; it might ask you to press CRTL+Y to confirm the deletion of the MBR, this would be a good idea if you are creating a new volume; it will also ask you to press CTRL+Y to change the volume size, by default it is the maximum available space.
  You are also able to press CTRL+V in this menu to see a list of drives that aren’t assigned to a RAID volume and press enter on a volume to see more details about it
4) Menu 3 is where you delete Logical Disks, not too much to add here as it is rather basic: press delete when selecting the drive you want to delete then confirm deletion.
5) Menu 4 shows you details about the RAID device itself, things like the IRQ number. This page isn’t normally that important.
AMD RAIDXpert:
  For specific information on settings and procedures go to the Help page at the top right of the RAIDXpert interface as it is concise and contains information on every part of the application.
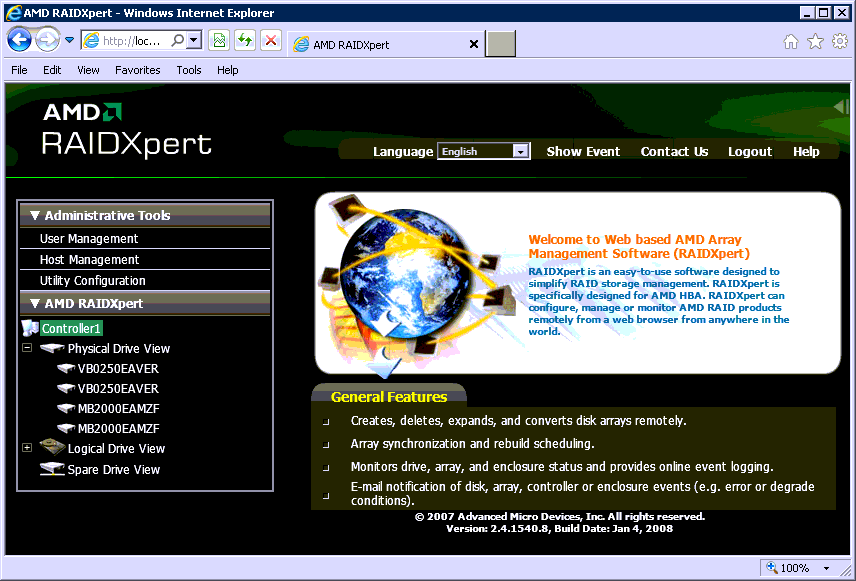
1) RAIDXpert uses a web GUI its layout is shown below:
Image
  The top menu contains options related to the user interface such as language, contact information, logout, help and show/hide event. Choosing to show event will split the Main Page into two sections with the bottom half showing the event log and the top half showing whatever configuration page you are currently on.
2) The Administrative Tools are for configuration of the RAIDXpert application. Inside User Management you can create, edit and delete users; it is mandatory for each user to have a login ID and password, optionally they can also have a display name and an email address used for notifications. Each user has their permissions set here, the permissions include: Creation Rights, Deletion Rights, Maintenance Rights and Notification Rights which apply to the various tasks you can perform inside RAIDXpert.
Image
3) Host Management shows the host machine, click it’s name to bring up it’s details which include IP Address and hostname, the current version of RAIDXpert and the current version of Java Virtual Machine that was installed with RAIDXpert.
4) Utility Management is where you mail server details for notification setup. Try and use a valid email address as the sender to prevent potential issues with the mail server. Enabling the Simplified Backup checkbox will cause it to offer to backup Raid Ready logical devices from time to time, these are just plain single disk volumes with no redundancy. Enabling the System Event Notification will produce notification messages on the host PC’s desktop.
Image
5) The Tree View on the side menu is where you can see information about and configure the controller and the physical/logical disks on your system. In the Controller page you can see the controller’s name, driver version, number of ports it has and the maximum number of physical/ logical drives it can support. In the controller settings tab you can allocate system resource usage for background tasks RAIDXpert performs such as Rebuild, Media Patrol, Synchronisation and so on. There are also some other basic controller settings that you can choose to enable. The Schedule tab of the controller page has a list of all currently scheduled tasks and from here you are able to delete any you no longer wish to run.
6) Under the Physical Drive page you can see important drive information such as what logical volume the disk is assigned to and its status; there are also the Merge and Media Patrol tabs. When a single physical drive’s capacity is used in multiple logical volumes it becomes logically split; when the logical volumes are deleted this split still remains so from the Merge tab you are able to reunite the portions back into a single drive.
  Media Patrol is a process that checks the physical media of the drives sector by sector and attempts to fix any bad sectors. Media Patrol checks all drives apart from new unassigned drives and those assigned as JBOD. It can be performed on a single drive or all physical drives and it can be performed on demand or on a schedule.
Image
7) Other Drive View shows information on things such as DVD Drives
8) Logical Drive View, much the same as Physical Drive View, is where you can view information about Logical Drives and perform or schedule various tasks. Here you can create, delete, rename, initialize new volumes, migrate, rebuild and perform maintenance tasks on the logical drives.
Image
  Migration is where you either change the RAID level or add more capacity to a logical volume; this can be done manually or set to be done on a schedule, at night for example, so as to not effect file access speeds during work hours. RAIDXpert will show you which RAID levels you are able to change a selected logical volume to depending on what spare drives are present, for example to change a RAID 0 volume on 3 drives to a RAID 1 volume you would need 3 spare drives of the same size match the current logical volume's capacity
  Rebuilding occurs when a volume has become degraded due to a failed harddrive or something similar, you can choose to rebuild the volume using another functional drive. You can set RAIDXpert to rebuild a volume automatically upon  RAID degradation as long as there are available hot-swap drives. Important maintenance tasks include Synchronisation and Redundancy Checking. Synchronisation is the process of checking and correcting both data and parity on a logical volume, Redundancy Checking just checks the data and parity and reports any inconsistencies instead of fixing them. Both can be set on a schedule as a routine maintenance task.
9) Spare drive view shows physical drives that have not been assigned to anything yet. Here you can assign them as Hot-Swap drives which means they can be used to rebuild degraded volumes. Also you can choose to make they drive available to any logical volume that needs it or dedicate it to one specific volume.
Special Notes:
- A newly added physical drive needs to be turned into a hot-spare drive before it can be used to rebuild a degraded volume. For example say a 2 disk RAID 1 volume becomes degraded and you remove the failed drive but upon testing it it seems fine. When you reinsert it it will show up as another drive and logical volume so to make the original RAID volume rebuild you need to wipe the reinserted drive and turn it into a hot-spare.

- Using the automated and scheduled features of RAIDXpert you could produce a fairly robust data protection plan as far as host RAID setups go.