Bienvenido! - Willkommen! - Welcome!

Bitácora Técnica de Tux&Cía., Santa Cruz de la Sierra, BO
Bitácora Central: Tux&Cía.
Bitácora de Información Avanzada: Tux&Cía.-Información
May the source be with you!
Showing posts with label NAS. Show all posts

Wednesday, January 16, 2013

RAID - NAS and QNap

2006 QNap launched Turbo NAS TS-101, which is the first NAS with SATA interface in the world, and exclusively provides.
Q-RAID1 configuration for single drive model for data protection.
QNAP Systems, Inc., as its brand promise "Quality Network Appliance Provider", aims to deliver comprehensive offerings of cutting edge network attached storage (NAS) and network video recorder (NVR) solutions featured with ease-of-use, robust operation, large storage capacity, and trustworthy reliability. QNAP integrates technologies and designs to bring forth quality products that effectively improve business efficiency on file sharing, virtualization applications, storage management and surveillance in the business environments, as well as enrich entertainment life for home users with the offering of a fun multimedia center experience. Headquartered in Taipei
How to recover NTFS data from HDD after insertin into NAS?
HDD Spin Down (HDD Standby)
WD Desktop drives (Green/Blue/Black) are not recommended
The WD Desktop drives (Green/Blue/Black) are not recommended for RAID volume usage, as the following issues has been realized.
1. Slow performance
2. Disk drop out from RAID easily
3. Read/write error on file system 
According to the reply from WD manufacturer. 
Q:Are WD Desktop drives (Green/Blue/Black) good for RAID systems?

A:You may need to know if the NAS controller works with drive that have the TLER disabled, or the TLER needs to be enabled on the drive. However, we do support these drive on computers only, but not on RAID environment, please see the RAID enabled drives in the link below: (Enterprise Drive) http://www.wdc.com/en/products/index.asp?cat=2
We have add the WD Desktop drives as the not suggested HDD on HDD compatibility List 
Note8
The HDDs have passed QNAP lab's initial verification of compatibility. However, because the HDD manufacturer has suggested not to use the desktop HDDs in RAID subsystems and some users have reported unstable experience with these HDDs, we do not recommend using these HDDs with QNAP products."
====================
compucon.co.nz/content/blogcategory/0/37/9/693/
The best hard drives for Intel's PCH RAID

WD RE(RAID edition) disks definitely have TLER.
http://www.tomshardware.com/review [...] 689-7.html
Even some desktop edition WD disks used to be "TLER available" via the TLER utility, and that is before WD decided to widen the gap between Desktop disks and Server RAID ones in the beginning of this year.
I'm looking for a more reliable RAID solution, but of course faster is always better. For example, maybe I should just pick a RAID card which is marked CCTL compliant and then pair it with CCTL ready drives to achieve the RAID stability. Any suggestion on which to choose from, CCTL, TLER or ERC? or SAS maybe?
users assembled a RAID using WD's Caviar Black series, which do not support time-limited error recovery ("TLER" ).
Yes, they will drop out of the RAID array after they start to fill up, because the firmware's error recovery logic may take too long,
and Intel's I/O controller hub will conclude that one or more HDDs are not responding.
BEST WAY is to stay with WD's RE (RAID Edition) HDDs, which are designed with TLER --time-limited error recovery.
The specs for each WD HDD will state if TLER is supported by any given HDD.
----------------------------
Yes, with WD RE hard drives and Intel I/O controller hubs' reputation and prevalence, I shouldn't worry too much about their incompatibility.
Just like you thought, TLER will most likely help lessen the chance for hard drives to be dropped from a RAID array. This has also been mentioned by an Intel engineer.
http://communities.intel.com/message/12098#12098
However, by looking at these reported problems:
"Random drive fails with new Matrix Storage Manager 8.9"
http://communities.intel.com/message/51299#51299
"Random drive fails with new Rapid Storage Technology 9.5 ?"
http://communities.intel.com/threa [...] 0&tstart=0
I am afraid WD RE TLER enabled disks will only alleviate the drop-out sympton somehow instead of providing a rock solid array, because even though they will be more responsive to ICHxR/PCH but may still not be a perfect match? The Intel support engineer told me that ICHxR/PCH does not truely support TLER/ERC/CCTL. He can't provide me a list of compatible hard drives for ICHxR/PCH.
-----------------------
I searched through Intel site for tested and supported parts for the PCH motherboards but failed to find info regarding compatible/tested hard drives. Tested memory is listed nonetheless.
http://www.intel.com/support/mothe [...] 029945.htm
I think two things can help assure the stability of matching ICHxR/PCH with TLER/ERC/CCTL drives:
1. Even though Intel's integrated RAID solution may not claim to be the perfect match for any specific vendor's(or vendor group's) standard but it should still claim categorically compatible to the extent that ICHxR/PCH is guaranteed not causing drop-out problem due to the prolonged disk's error recovery process(e.g., 5~10 seconds) as long as these disks have implemented TLER/ERC/CCTL.
2. Some compatibility list of hard drives for the ICHxR/PCH boards
-------------------------------
I read the threads and it appears that version 9.6 fixes the issues reported with 8.9 and 9.5. It also looks like using RE drives wasn't as bad as using Caviar Black drives. What will you do? Buy a RAID controller, use version 9.6 or no RAID at all? Edit: SAS drives are not more reliable that SATA drives, but they are faster. When connected to a good RAID controller with a BBU, writing is very fast. Just add more drives to improve performance.
----------------------------------
From a scientific point of view, controlled tests need to compare all permutations involving all IDE, AHCI and RAID modes with and without TLER (or similar) support in the HDDs attached.
And, with or without Intel's ICHxR chipsets, there is also the option to create "software RAID" arrays with Windows XP e.g. starting with dynamic disks.
Thus, IDE and AHCI can still be configured in such a software RAID.
We have 2 x 6G WD HDDs configured as a software RAID 0 (for speed); each is 1TB for a total of 2TB; and, this RAID 0 array is far from being full :)
Here's that 6G HDD:
http://www.newegg.com/Product/Prod [...] 6822136533
So far, so good; and, it's pretty fast too!
The following test was done with a 96MB file,
to force the test to read from the 2 HDD caches only,
in order to get a feel for the 6G difference (if any):
http://www.supremelaw.org/systems/io.tests/ASUS.PCIE.GEN2.SATA6G.96MB.read.2xHDD6G.XP.RAID0.bmp
 
[Read more at link!]
http://www.wdc.com/en/products/pro [...] anguage=en
p.s. WD has sold so many millions of HDDs in recent years, and Intel's I/O controller hubs are also so ubiquitous, it's extremely unlikely that WD's RAID Edition HDDs are incompatible with any recent ICHx.
TLER/ERC/CCTL capable drives needed for PCH RAID
http://communities.intel.com/message/11995#11995
====================
The drives are clearly targeting different market segments, the RE drives are for servers with heavier load and they also come with five rather than three years warranty.
I guess it comes down to what you're using your NAS for and how much the extra warranty period is worth to you.

The fact that we test drives doesn't mean that you won't run into problems, they are after all mechanical devices that are spinning disks are silly high speeds, so things can go wrong.

The main differences in specifications are: 
  • Spin speed - WD RE [RAID Edition]spin at 7200 rpm and WD Red use an unknown variable spin speed with the marketing name IntelliPower (probably somewhere closer to 5400 rpm).
  • MTBF - WD RE are specified at 1.2 million hours and WD Red are specified at 1 million hours.
  • Error rate (non-recoverable bits read) - WD RE are specified at 1 in 10^15 and WD Red are specified at 1 in 10^14.
  • Warranty - Real enterprise disk have a 5 year warranty. WD Red have 3 years.
...and if the red drives are better than desktop drives or those dredded green drives, how much so?
Again, I'd say that it is almost impossible for any human to quanitify that but I'll have a shot at it and say they are 27096.4 % better. Considering that WD Green have given a huge majority of NAS/RAID users nothing but problems and WD Red so far have an excellent reputation, the difference must at least be gigantic.

What we do know is that WD Green have a crippled firmware, intended to make them unsuitable for NAS/RAID applications, while WD Red have a firmware intended for that specific use. That is a very, very important factor! According to marketing, WD Red also have a balance/vibration control (3D Active Balance Plus) that the average desktop disk may not have. But I'm no disk expert and don't know enough to make any definite claims about.

I do know that WD Red are extremely quiet compared to moste other desktop disks.
i plan to back up the nas periodically...
Yes, all important data needs to be backed up on separate systems regardless of the reliability, quality and price of the main storage (that includes also all enterprise products WAY above the market segments Qnap are covering).
...but even so i dont want to run into [problems a year down the track like i have with the seagate 5900 drives that were meant to also be on the supported list.
Yes unfortunately it took a while for the compatibility problems to show. :cry:

WD Red have only been available for 5-6 months for mere mortals but I believe the problems showed much, much earlier that that with both WD Green and ST2000DL003.
also are these red drives similar to the green ones? in that they run at a slower speed etc.
Yes.
...i think that was a major problem in the nas fo the green drives.
I absolutely don't think the spinning speed was ever the issue with any Green disk, it is other things that cause the problems. Do remember that the problems have mainly been with "Green" disks from WD and Seagate. There are examples of slower spinning disk models from both Samsung and Hitachi that have a very good reputation among Qnap users.
...so what has wd done with these reds to improve things and market them to be used in the nas?
Well for starters giving them a firmware specifically intended for NAS usage instead of being deliberately crippled...
Finally, i have read that having a mix of drives is better than all drives from the same model/batch.
Yes the theory is that in a RAID-volume you definately don't want disks failing extremely close to each other in time, as that may lead to more concurrent disk failures than the selected RAID-level can tolerate without data loss. Having all different disk models (or from different batches) and sourced from different suppliers would be the optimal configuration in that regard. How important that is, is however another matter.

Personally I think that the theory have some merits but it's importance shouldn't be overrated and personally I definately don't follow it religiously. There are also several other important factors in the equation. If you want to optimize in this regard, I believe that different suppliers (mostly to make sure the products have had a different handling in transportation), different batches and different disk models are important in that order.
i wonder what people think about mixing two wd re drives with two wd reds? is that going to be problematic?
It should be possible to mix any compatible disks listed on the Qnap disk compatibility list.

Image
"Bitmap" enables faster RAID rebuild time due to a drive crash or plugged out (recover from degrade mode to normal mode).
Bitmap only works in RAID 1, 5, 5+hotspare, and 6.

Thursday, October 25, 2012

Network Attached Storage -DIY

Fabrica tu NAS (Servidor de Archivos en Red) : Introducción
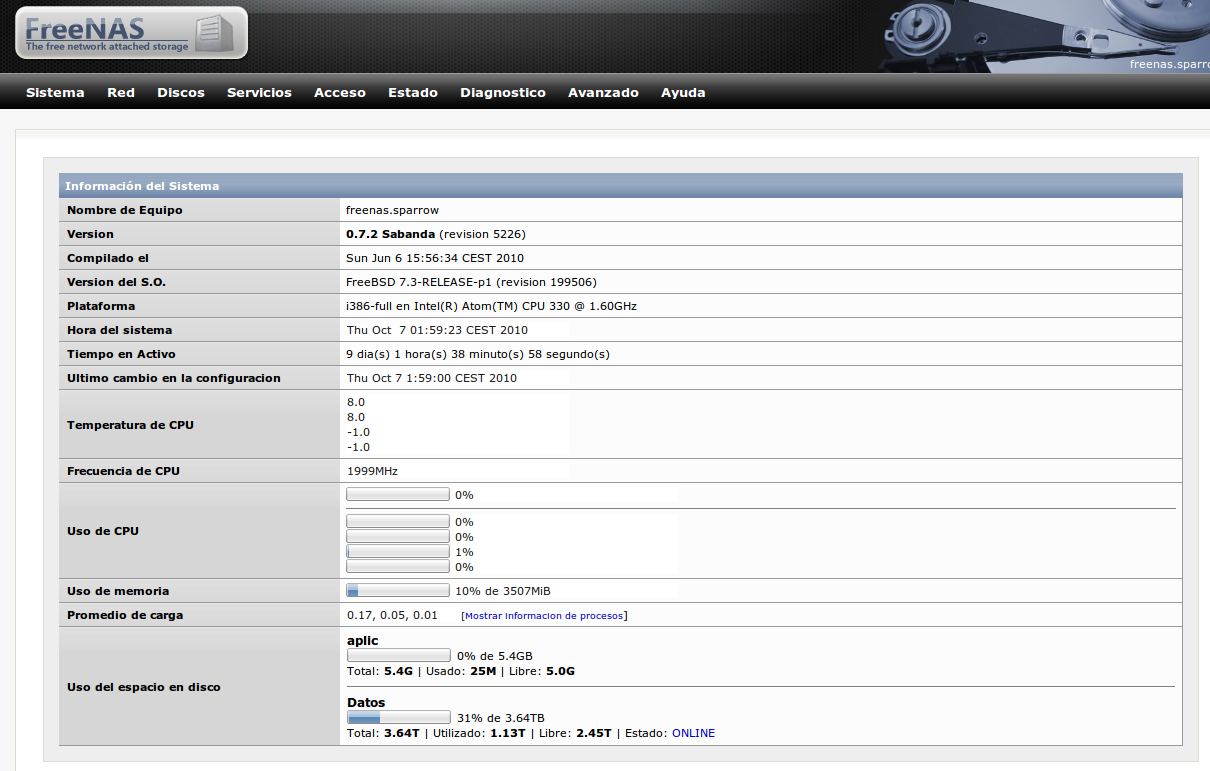
Unas capturas del equipo funcionando desde la última actualización, ya tiene 4Terabytes de capacidad.
Menú de estado del Servidor de Archivos en RedEl microprocesador de la máquina es Atom, mínimo consumo energético y mínima disipación de calor.
Fabrica tu NAS. Componentes. 1ª Parte
las normas a tener en cuenta serían:
CPU
Podemos utilizar cualquier CPU de 32 o 64 bits, de un núcleo o múltiples núcleos pero debemos reducir su consumo al mínimo: En los diferentes NAS montados se han usado; Atom 330, Celeron, Athlon XP, Pentium 2, Pentium 3, Pentium 4, AMD64 zócalo 939, Intel E8500, etc …  los resultados son muy iguales entre ellos (refiriéndose al rendimiento del sistema, no a las características del sistema). Las partes más sensibles que darán un rendimiento al sistema son el interface de red (tarjeta ethernet) y la compatibilidad del chipset de la placa base para controladora de los discos duros.
CONTROLADORAS
El software FreeNAS incluye drivers para los chipset más comunes y en ultimo caso siempre nos queda el recurso de comprar una tarjeta ethernet Gigabit (6-9€uros). Cuidado con el tipo de zócalo de la placa base al comprar la tarjeta de red (ISA, PCI..). Si tenemos problemas con las controladoras de disco duro de nuestra placa base, están dañadas o precisamos de más puertos para instalar discos duros adicionales podemos recurrir a una controladora externa en placa base, el modelo recomendado es la Promise SATA300 TX4 que dispone de 4 puertos SATA a 3GB de transferencia (unos 45€ en Ebay). Os recuerdo de nuevo que debéis aseguraros del zócalo interface de vuestra placa madre al adquirir estos componentes adicionales.
RAM
Sobre la memoria RAM recomendada por experiencia; 512MB es suficiente para FreeNAS versión 0.7.x , sin embargo para la nueva versión FreeNAS 8 que se encuentra en fase de pruebas (beta) se recomienda 1GB.
LISTA DE MATERIALES
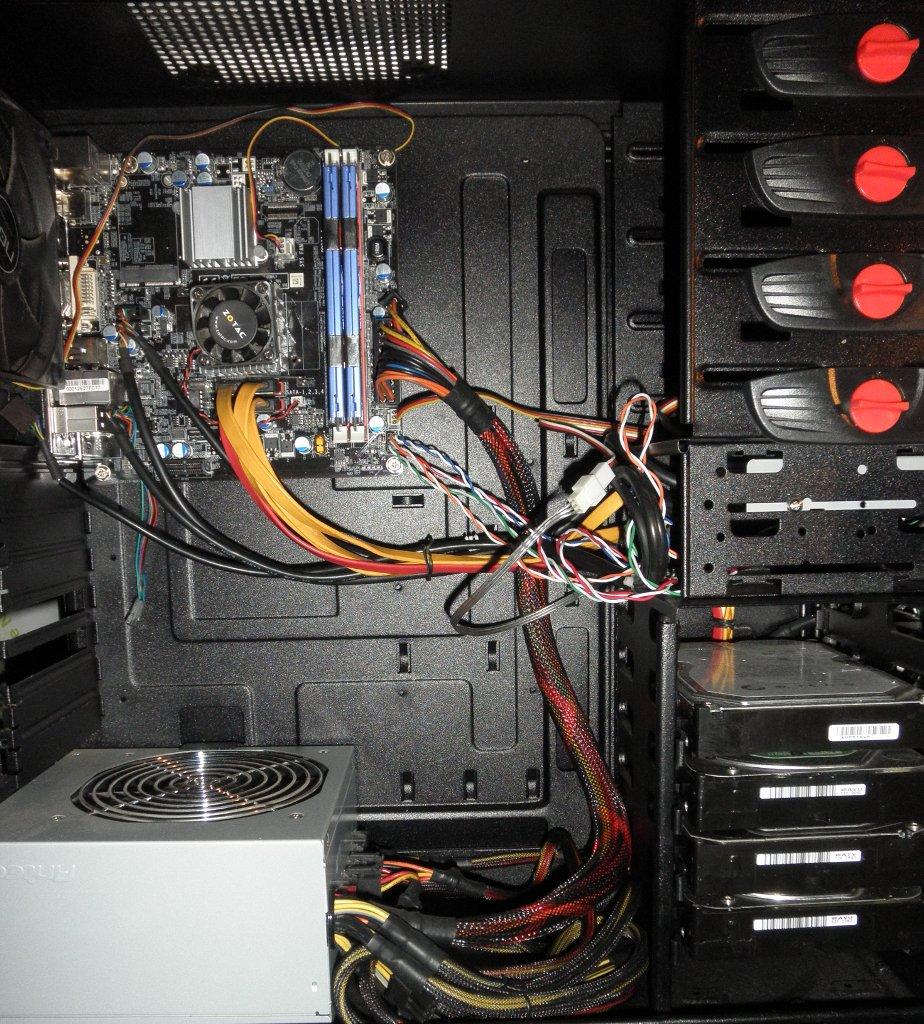
En esta foto podéis observar el NAS sencillo que hemos montado. La lista de materiales es:
*- Placa ATOM 330 con 4GB de RAM, tarjeta gráfica integrada, Ethernet Gigabit. Consumo = 18 Watios. Precio = 117€
*- Fuente de alimentación ANTEC 450W (gastar el dinero en una buena fuente, estará en marcha las 24 horas) = 67€
*- 4 Discos duros de 1TB (varias marcas…) o los discos duros que se hayan quedado pequeños… Precio medio = 70€ /unidad.
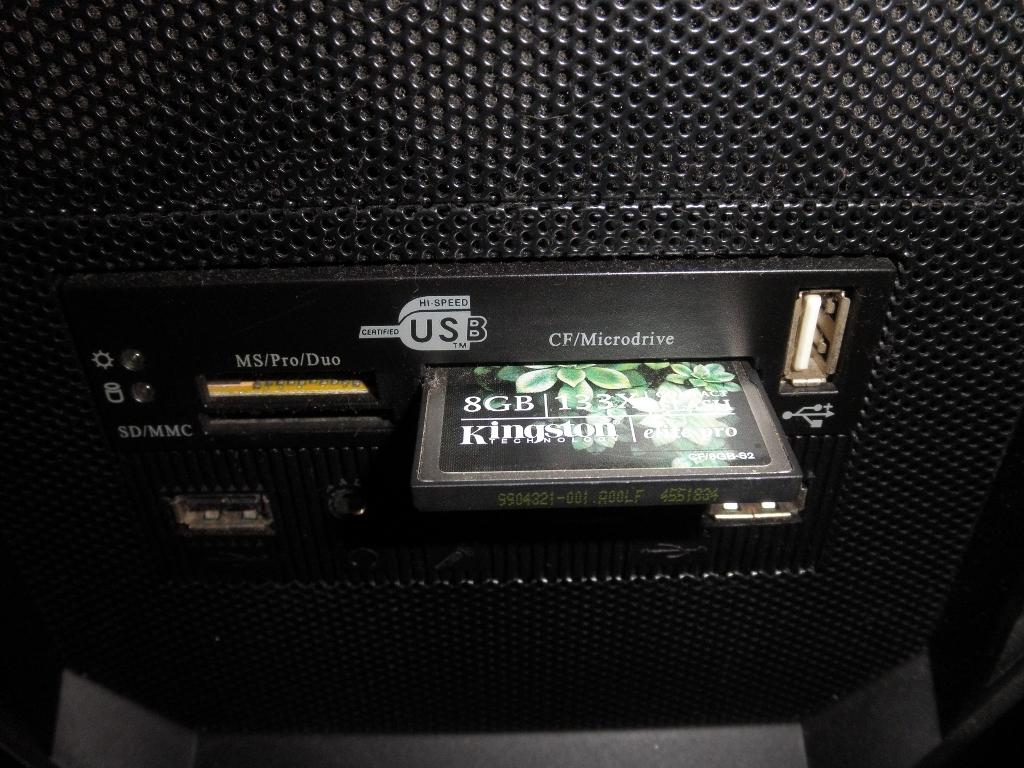
*- Memoria Compact Flash y lector de memorias multiples. = 20€
*- Caja. Precio = 27€
Consumo total del sistema funcionando (promedio) = 52 Watios.

La unidad lectora de tarjetas de memoria y la memoria compact flash dónde instalaremos el sistema operativo del NAS, así usaremos la capacidad total de los discos duros y podremos realizar un cambio de disco duro rápido en caso de problemas.

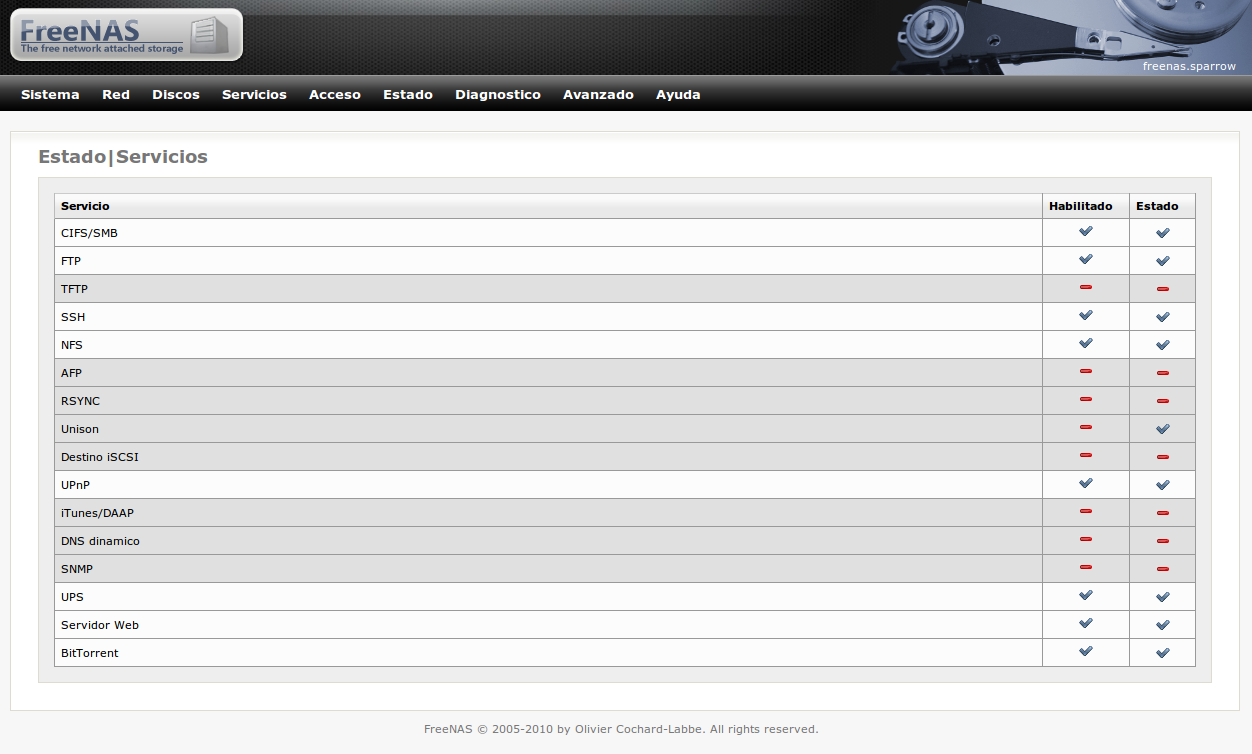
En esta otra captura podéis ver todos los servicios que están funcionando en el NAS, no figura en la lista el servidor de impresora y el servidor de archivos de música (Subsonic) que puedes usar para escuchar música cuando estés de viaje desde el navegador de Internet, ya explicaremos la configuración e integración de estos servicios adicionales.

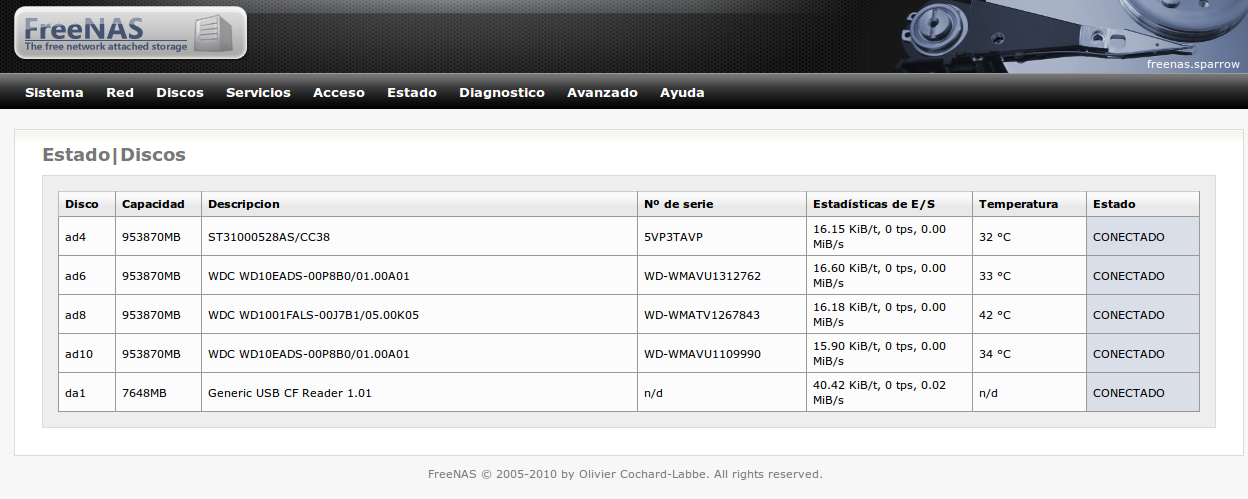
Y en esta otra captura el estado de los discos duros con información adicional sobre su temperatura de trabajo.

Seguiremos más a fondo en la siguiente entrega resolviendo las preguntas y dudas que os van surgiendo y comenzando la configuración del equipo con los componentes que he descrito en la lista de materiales. Ya falta poco para comenzar a disfrutar de tu servidor NAS sin gastarte dinero en sistemas operativos no dedicados y sin tener control sobre lo que haces, aquí te ayudamos a ser el director de tu proyecto!.

Fabrica tu NAS. Componentes. 2ª Parte
Existen dos versiones del sistema operativo FreeNAS que básicamente están diferenciadas por el tipo de CPU que use nuestro ordenador; Intel (i386)  o AMD (amd64).
Dentro de estas dos ramas tenemos dos versiones más, la imagen integrada (embedded) y la versión extendida (LiveCD). Las diferencias entre ambas versiones es que con la imagen integrada ocupa menos espacio en la memoria CF o USB de nuestro NAS pero no permite realizar cambios ni tampoco instalar programas adicionales. La imagen integrada es más rápida de arranque. Si no pensáis instalar funciones adicionales en el FreeNAS (servidor de impresión, servidor web de mp3 o video) es suficiente la imagen integrada.
Aconsejamos trabajar con la versión extendida correspondiente al modelo de CPU que use nuestra placa base, si nuestra CPU es de 32 bits instalaremos la versión Intel(i386), si nuestra CPU es de 64bits instalaremos la versión AMD (amd64).
Para instalar la imagen extendida debemos quemar la imagen (ISO) en un CD. Para instalarla lo mejor es usar un reproductor de CD/DVD con USB puesto que no necesitamos tener la grabadora instalada en el FreeNAS, es una tontería gastar el dinero y tener en el NAS un componente que solo es necesario cuando instalemos el sistema operativo.
La dirección url para descargar la versión de FreeNAS es; http://sourceforge.net/projects/freenas/files/

Wednesday, September 15, 2010

WD World Edition My Book as NAS


Source

The World Edition My Books function as Network-attached storage (NAS), by way of an Ethernet interface. They also feature an extra USB host port to allow an additional USB drive to be daisychained. Data on first generation (Blue Rings) My Book World is accessed as CIFS/SMB shared folders. The second generation (White Lights) expands the access choices to include NFS, FTP, an iTunes server, and a Twonky media server.
In addition, the World Edition uses WD Anywhere Access to gain remote access to the drive via the Internet.
It has the same basic case design as the Premium Edition drives, including the capacity gauge, except the color of the World Edition is white. It also has the same Morse codeventilation as the other editions.

[edit]
Network speed

Although MyBook Ethernet-capable disks come with a Gigabit Ethernet interface, the network speed is significantly slower. Especially for older "blue rings" models (200Mhz ARM CPU and 32 MByte RAM), where it varies between 3–6 MByte/s, with an average of 4.5 MByte/s.[5]. The newer "white lights" MyBook World Edition 1TB and 2TB models, WDH1NC and WDH2NC (oxnas810[6], 380 Mhz ARM CPU and 128 MByte RAM), compare to USB drive speed at about 10MB/s write and 25MB/s read.[7].
Using a performance-optimized copying software, such as FastCopy[8], enlarged TcpWindowSize on WindowsXP ("TCP tuning") and enlarged network MTU size ("Jumbo frame") enabled on both MyBook and Windows, a "white lights" WDH1NC achieves ~36 MByte/s reading and ~18 MByte/s writing speed for Samba/CIFS access over Gigabit Ethernet.

[edit]
Internals

Controller board for My Book World Edition
This drive runs BusyBox on Linux on an Oxford Semiconductor 0XE800 ARM chip which has the ARM926EJ-S core. In addition it uses aVIA Cicada Simpliphy vt6122 Gigabit Ethernet chipset, and a Hynix 32 Mbit DDR Synchronous DRAM chip. The webserver is the mini_httpd server, although thought to be Lighttpd. The drives of the World Edition are xfs formatted, which means that the drive can be mounted as a standard drive from within Linux if removed from the casing and installed in a normal PC.
The disk filesystems are also known to exist in a format created by linux multiple devices driver (Mdadm) which ultimately wraps an ext3 partition with some metadata that allows the inquiry of the position of the drive in a RAID set. Unfortunately, this makes mounting the drives outside of the enclosure a bit more complicated, it also requires a machine with a flavor of the Linux operating system. For example, the best way to mount the drives on a Linux flavored operating system after they have been removed from the enclosure is to use the following set of commands for mirrored RAID 1 disks.
$ sudo modprobe md
$ sudo mknod /dev/md4 b 9 4
$ sudo apt-get install mdadm
$ sudo mdadm --assemble /dev/md4 /dev/sdb4
$ sudo mkdir /media/xyz
edia/xyz $ sudo chmod -R 777 /me
$ sudo mount /dev/md4 /
mdia/xyz
Note that the above set of commands assume that your drives appear as /dev/sdb to linux. You can use a utility like gparted to determine which paths are relevant for your setup.
And alternately you can use this command set for mounting a multidisk spanning RAID 0 set in linux:
$ sudo modprobe md
$ sudo mknod /dev/md4 b 9 4
$ sudo apt-get install mdadm
$ mdadm -Cv /dev/md4 -l0 -n2 -c64 /dev/sdb4 /dev/sdc4
$ sudo mkdir /media/xyz
edia/xyz $ sudo chmod -R 777 /me
$ sudo mount /dev/md4 /
mdia/xyz
Note that the above set of commands assume that your drives appear as /dev/sda and /dev/sdb to linux. Again, you can use a utility like gparted to determine which paths are relevant for your setup.
Further details and support are available at the following My Worldbook wiki.

[edit]
Extending capabilities

The device can be 'unlocked' and accessed via SSH terminal (newer versions of WDH1NC10000 do not need to be "unlocked": MBWE SSH Access), meaning that the WD MioNetjava-based software can be disabled so the device can be run with an unrestricted Linux OS,[9] at the cost of voiding the warranty.[10] The unlocking makes it possible to install other software on MyBook (i.e. run a different webserver or an ftp server (such as vsftpd) on it, use NFS for mounting shared directories natively from Unix, or even install a bitTorrent client such as rTorrent,[11] etc.) Further information on unlocking the device and downloads you are going to need can be found here.

Saturday, February 20, 2010

FreeNAS & rsync

Step by Step How to Make a FreeNAS Box


Flash drive FreeNAS server
 Installing FreeNAS
FreeNAS in depth
Setting up RAID 5 on a FreeNAS server
Windows-backup-with-rsync-and-freenas
Using RSYNC for NAS to NAS Off-site Backups 
Backup FreeNAS using rsync to a rsync-server
Openfiler, Freenas and RSYNC 
List all Pages of FreeNAS wiki
Rsync allows synchronisation or backup of files in one direction. i.e. you can specify which version of each file you want mirrored to both locations.
To enable the RSync server on FreeNAS:
Go to: Services -> Rsync
In the Rsync Server Settings tab:
Map to user Guest; TCP 873
In the RSync Server Modules tab:
Click on the little + symbol near the bottom right of the table.
Name: FreeNAS_rsync_server_module_name (substitute for your own alternative)
Comment: your own identifier
Path: browse to server backup location
Others: leave blank or accept defaults
Click Save near the bottom
You then need to set up RSync client on the networked PC you will be backing up.
Ref: Daily Cup of Tech Delta Copy

Wednesday, May 20, 2009

SNAP RAID Recovery using SNAP OS

April 11, 2007 by Dick Correa
Filed under SNAP Server File System
SNAP Server NAS RAID Data Recovery

SNAP Appliance, now owned by Adaptec was one of the pioneers of the Network Attached Storage (NAS) technologies. Through the use of the Berkeley Software Distribution (BSD) and the UNIX File System (UFS), SNAP developed a reliable and easy method for using a mass storage device through a shared network. In order to do this SNAP used an abbreviated version of the file system in conjunction with a set of hard coded variables that allowed for a fast boot up, easier recovery facilities within the spectrum of the operating system, and a ROM based web interface that was closely tied to several of the standard UNIX/Linux/BSD recovery tools. However, that being said, when it came to catastrophic recovery this particular OS/FS marriage made it virtually impossible for any third party standard file system handler, or tool, to recover lost, or deleted data. The following is an outline of one of the basic data structures, the Super Block, and how it differs from the standard UFS file system. These differences are the ‘fly in the ointment’ when it comes to using standard UFS data recovery tools. Read my article on SCO Unix RAID Data Recovery for more insight on the UFS.

On-disk file system data structures are the key to data recovery. The knowledge of how a file system resides on the disk is the only way to recover from catastrophic data loss. Using on-disk data structures and their relationship with each other will help a recovery expert piece together lost data on a file system that will not mount. In essence, the data recovery technician creates a virtual file system using key data elements from the on-disk structure. These data elements go through a mathematical and geometrical scrutiny. This evaluation of the data must be strict enough to allow for corrupt data parsing, but flexible enough to build the file system from a partial data structure. In other words, a sort of ‘artificial intelligence’ is used to compare, evaluate, and assign data values to key data elements through the use of file system structure placement. A basic element of the file system in this particular case is the Super Block.

The Super Block is a broad spectrum definition of the entire file system. Although not defining file placement, and block usage, the Super Block is the crux of on-disk data element placement that will lead the data recovery technician to file name, inode definition, and ultimately data block placement. Data fields that reveal such values as total inodes, total data blocks, total cylinder groups, can be used to define a cohesive file system and in many cases rebuild a corrupted data structure. The Super Block defines coarse data that can be used to calculate cylinder group definitions that inevitably lead to directory definitions, and a methodology to build a file tree.

The Super Block is defined across the disk in each cylinder group. This fact alone can aide the trained data recovery technician in the alignment of the file system. Once aligned, it is a simple matter of back tracing directory name, inode definition, and data block in order to build a file tree. As an example the Super Block designates the primary inode block. When parsing the first cylinder group inode 0, and 1 are undefined and the 128 byte data elements are zeroed. However, inode 2 is defined, and can be traced to the root of the directory structure. Using recursion, one can easily define a full tree by using this single data element.

SNAP UFS File System Data Recovery

There are many more data elements that are an integral part of the SNAP UFS, however, the one basic element that is needed in order for third party UFS handlers to function is missing. Each on-disk data structure maintains an element that is unique to its particular type. This element is defined as a ‘MAGIC NUMBER’. This magic number, however derived, is a tell tale element that can be used by the technician to find certain data structures. For whatever reason, SNAP decided to ignore the magic number and it is not stored on-disk. This may be an indication that the SNAP file system designers did not want to carry extra data elements that were superfluous to the functionality and definition of the file system. It is a good strategy for saving precious space in a ROM perhaps, but is not a sound strategy if one is trying to piece together a file system and has no idea where to start. I am not trying to second guess the SNAP Appliance designers, it is merely a fact of the on disk structure and must be dealt with.

If a software engineer wishes to design, code and implement a SNAP Appliance UFS recovery handler then the magic number must be taken into consideration. There are several other data elements of the super block structure that must have certain values. These values can be boundary tested, and used to find other data elements that have a more traditional on-disk data structure. In other words, if the super block cylinder group element points to a particular sector on the disk, that sector can be loaded and masked with a cylinder group on-disk structure. The structure can then be boundary tested and if the testing proves positive then the original super block placement may be correct. Of course, several other elements must be tested, but if the tests return in a positive manner, it is very likely that you may have found your super block without the use of a magic number.

In the final analysis it is up to the data recovery technician to evaluate each SNAP Appliance, and the possibility of recovery. However, with calculator in hand, and hex editor on screen, a well versed data recovery technician can find the super block, and in that, use that key to unlock his clients lot data.

Sunday, November 23, 2008

How to setup Network attached Storage

Source July 17th, 2007

Network-attached storage (NAS) is a dedicated data storage technology. The NAS server provides centralized data storage, which is easily accessible to users who belong to different networks over the Internet. There are different applications that can be implemented using NAS, such as data storage and file sharing. The purpose of the NAS server that I am going to set up, is that of data storage. It is to be used to provide remote backup of the data in clients™ servers.

The Operating System

Next step I have to do is to decide on an OS to setup the NAS server, which is free and easy to use.

I came across the site http://www.openfiler.com/

Openfiler is a project for a open source Network Attached Storage (NAS) OS distribution. It was developed by Xinit Systems and provides a file-based NAS system and block-based Storage Area Networking (SAN) in a single framework. Openfiler brings together almost all storage networking protocols into a single framework.

Installation via VMware :

Openfiler is a standalone Operating System, which requires access to all system resources in order to function. I got confused on how to install it remotely. Then I came to know that it can be installed in a virtual machine environment such as VMware. I decided to try out first in a test server which had a 40GB hard disk.

A VMware Server installs on any existing server hardware .
It partitions a physical server into multiple virtual machines, and provides for more hardware utilization and flexibility. So my first task was to install the VMware server.

The following packages needs to be installed in the remote server – The VMware Server itself and also the Management Interface.
Also install the VMware Server Linux client package, both in the server and your local machine. The rpms for the packages can be downloaded from the VMware site and the installation steps too are documented there. The installation guide can be obtained from

http://pubs.vmware.com/server1/wwhelp/wwhimpl/js/html/wwhelp.htm

Once the VMware installation is complete, you need to connect to the server remotely using the VMware Server client package.
Login using the IP address of the server and root password.

Once you are connected to the VMware server, you need to create a new virtual machine. It would create a set of files that represent a new computer, with a blank, unformatted hard disk, onto which the new operating system can be installed. The virtual disk by default has its disk space preallocated at the time of creation. I created a virtual disk of about 20GB size. The virtual disks are physically located in the folder /var/lib/vmware/Virtual Machines/ .

The Images of CD-ROMs are usually .ISO files. The .iso image was downloaded to the folder that was created for the virtual disk in the remote server, using wget command in SSH. Now, use the virtual machine settings editor to connect the virtual machine’s CD-ROM drive to the .ISO image file, then Power ON the virtual machine. The Openfiler OS would start installing, and you would get a graphical installation screen as per the steps given here:
http://www.openfiler.com/docs/install/graphical_install.html
Once the installation is complete, you can start configuring Openfiler by pointing your browser at the host name or IP address of the Openfiler system. The interface is mounted on https port 446. e.g.
https://test.myserver.com:446.

Installation via Installer :

Now that everything went fine in the test server, I decided to give a try in the real server. But the actual server had a 2 TB hard disk, which made my task difficult. I was not able to use VMware, as the hard disk size was really huge to create virtual disks. So, I started thinking of other options. There was still the restriction of no physical access to the server.

Luckily, I got IPMI access to the server.
The Intelligent Platform Management Interface (IPMI) specification has a set of common interfaces to computer hardware which can be used to monitor system health and to manage the system remotely. The IPMI provided a Text console, which I could make use of in the installation purposes.

But the server wasn’t configured to show the grub menu over the serial console. This would prevent us from selecting alternate kernels during the boot process. I could find that, for grub to work with IPMI, it has to be enabled for the serial console. Follow the steps given below to do this.

Find the serial port number and speed used on your server:

# grep agetty /etc/inittab
On my server the console is connected to serial port 1 with a speed of 19200:<br />co:2345:respawn:/sbin/agetty<br />ttyS1 19200 vt100-nav<br />Now open /boot/grub/grub.conf, and add the following lines below “hiddenmenu”:<br />serial --unit=1 --speed=19200<br />terminal --timeout=80 console serial<br />Replace the port number , timeout and speed if necessary.<br />To test this out, reboot your server and then connect<br />to the serial console as soon as possible using IPMIView. <br />Eventually,after a minute or so, you should see the following message repeating:<br />Press any key to continue.<br />Press any key to continue.<br />Pressing a key at this point will launch GRUB on the serial console.<br />First off, you would need to download the network installation image for the Openfiler OS that you want to install. I was able to download one boot.iso for Openfiler from <br /><a href=”http://www.rpath.org/rbuilder/project/openfiler/release?id=5076″http://www.rpath.org/rbuilder/project/openfiler/release?id=5076<br />I downloaded the boot.iso image to the server itself, using the wget command. <br />Next, you need to create a temporary directory in which to mount the ISO image to get the files out of it:<br />mkdir /nas<br />mount -o loop<br />boot.iso /nas<br />You also need to create a directory in your /boot directory. The /boot should be on a partition of its own. Copy the boot files from the iso image to the folder created.<br /># mkdir /boot/nas<br /># cp -R /nas/* /boot/nas/<br />Next you need to find the appropriate initial RAM disk and kernel files amongst these boot files. These will generally be called “initrd-xxxxx” and “vmlinuz-xxxxxx” respectively. Now that you have the files in the boot partition, you need to configure GRUB to allow you to boot into the installation.<br />Add the following section to grub.conf file.<br />title NAS install<br />root (hd0,0)<br />kernel<br />/nas/isolinux/vmlinuz console=ttyS1,19200<br />initrd /nas/isolinux/initrd.img
This assumes that your boot partition is /dev/sda1 (or /dev/hda1) as indicated by the “(hd0,0)” part. If your /boot partition is different, you can alter the device accordingly. The “console=ttyS1,19200″ part is very important as it tells the installation program to use the serial console accessible through the IPMI View program for the installation.

Now, you should get the iso image for the openfiler as mentioned earlier. I had a second hard disk of 50GB, in the server. I mounted that as another partition and downloaded the iso image for openfiler to that partition.

Now, reboot the server and choose the NAS install from the grub menu. The installer would start running. Fill in the details appropriately. The installer gives different options for installing the OS, such as NFS, FTP, HTTP, Hard Disk, CDRom etc. I elected the Hard Disk option as my OS image was on the second hard disk. I selected the appropriate hard disk and gave the path to the iso image. Please note that Openfiler does not exist with any other Operating System. The installer would format the entire drive on which its being installed, before installing the packages. The installer successfully completed installing the Openfiler in the 2TB drive of my server in about 4-5 hours. The installation steps are the same as given earlier, http://www.openfiler.com/docs/install/graphical_install.html.
Only difference that it would be text based and not graphical in this case. You can partition the drive manually or automatically, as you prefer. Once the installation is over, Reboot the server and you would be able to get a new server with Openfiler OS installed.

Login to the Interface and configure the Openfiler as per your requirements. A very good manual is available here : http://www.openfiler.com/docs/manual/

The installation process was a Trial and Error method which took up a lot of my time . There may be other effective methods and there are other OS distributions available for NAS. The steps given above depict the way I set up my server.

References:

http://www.openfiler.com/

http://sourceforge.net/docman/?group_id=90725

http://www.vmware.com/support/pubs/server_pubs.html

http://www.znark.com/tech/serialconsole.html

http://www.cyberciti.biz/nixcraft/vivek/blogger/2004/03/how-to-mount-iso-image-under-linux.php


Articles by Reeshma Ajin About the author: Reeshma
Ajin works as Sr. Software Engineer in Bobcares.com. She has worked in Bobcares for over 4 years and mainly specializes in
Linux server administration.

Wednesday, November 5, 2008

NAS server Open Source software

List of open source implementations which allow a PC to be setup very quickly as a NAS server: