Bienvenido! - Willkommen! - Welcome!

Bitácora Técnica de Tux&Cía., Santa Cruz de la Sierra, BO
Bitácora Central: Tux&Cía.
Bitácora de Información Avanzada: Tux&Cía.-Información
May the source be with you!
Showing posts with label VNC. Show all posts

Thursday, April 25, 2013

Alt + Print Screen in ultraVNC


Print screen doesn't workPlease note that the behaviour of the "Print Screen" key (and certain other special Windows key combinations) in the Windows version of VNC Viewer can be modified by the "Pass special keys directly to VNC Server" setting. See
http://www.realvnc.com/products/enterprise/4.6/docs/af1016150.html#Raf14482
for details.
By default, this option is ON, so pressing "Print Screen" in a Windows VNC Viewer window will actually result in the key press being sent to the VNC Server machine (which will be interpreted differently depending on the OS running on that machine).
If you simply want to obtain a screen capture of the VNC Server machine and have it available on the VNC Viewer machine, you can either:
A) Leave this option on and handle all the screen capturing on the remote machine. E.g. on a Windows VNC Server machine, the "Print Screen" key will capture the screen to the clipboard, and it can be pasted into an image manipulation program such as Paint on that machine via keyboard/mouse input from the Viewer. The resulting file can then be transferred to the VNC Viewer machine via the File Transfer feature.
B) Turn this option OFF and handle the screen capturing on the local (VNC Viewer) machine. E.g. on Windows, pressing Alt + Print Screen will capture the active window, which you can ensure is the VNC Viewer window by clicking on it. Again, this will store an image in the Windows clipboard, and this can be pasted into Paint or another suitable application on the VNC Viewer machine.
=================
ascii VALUE 
ALT KEY 18 
PRINT SCREEN 154

https://forum.ultravnc.net/viewtopic.php?f=4&t=6551
There is a key combination which will allow you to take a snapshot of the screen. I found this back when I was on XP but now I'm on Vista and it was not working, I thought. It still down but with using a different shift hey.

How to Screen Print or Snapshot in VNC:
1. In the OPTIONS \ INPUTS tab, uncheck the "Pass special keys directly to the server" option.

2. To get a Screen Print press the following keys:
In XP: Shift + ALT + Print Screen
In Vista: right SHIFT + right ALT + Print Screen

(in Vista, if you try the left Shift key, it brings up a Vista high resolution option, you probably don't need the right ALT in Vista but the key combo is hard to hit trying to use it.)

Before I figured this out in Vista, I was just using the Vista built in "Snipping Tool" which works very well.
 =====================
Here is an AutoIt script that emulates the Alt-PrintScreen key press sequence. This executable program has to be located and run on the remote system. Once you run it, you could launch mspaint on the remote system to paste in your window capture.
The stand-alone executable program is here...
http://www.fcs.uga.edu/~john/AltPrintScreen.exe
or if you are not permitted to download .exe files...
http://www.fcs.uga.edu/~john/AltPrintScreen.rar
Here is the AutoIt3 source code...
Code: Select all
MsgBox(0, "Alt+PrintScreen", "This program will send
Alt+PrintScreen in 5 seconds, after you click the OK button." & @CR &
"This should give you time to move focus to the correct window." & @CR
& "Another dialog box like this one will appear after the Alt+PrintScreen
has been 'pressed'.")
sleep(5000)
send("!{PRINTSCREEN}")
MsgBox(0, "Alt+PrintScreen", "Alt+PrintScreen has been 'pressed'.")
http://msdn.microsoft.com/en-us/library/aa243025%28v=vs.60%29.aspx

Friday, August 19, 2011

VNC - windows firewall

VNC errror:  "Failed to connect to Server"

Even after opening ports 5500 - 5900, assigning Static IP to my computer at workas 192.168.1.221. Subnet 255.255.255.0 & default gateway 192.168.1.1. I m using the external IP 10.0.0.3( this is the Internet IP / External ...noted from my router configs) I STILL CANT CONNECT TO SERVER AT WORK...CANT FIGURE OUT WHY.??? Also in the security tab under Firewall tab - which is enabled obviously...Anonymous requests was checked ...I removed that too.But still cant figure out what going on.
I am doing what is required ..but nothing ...infact the error also doesnot change ...Always it says 
FAILED TO CONNECT TO SERVER.
-------------
Open following ports on the router or firewall: 5800 - 5901

Very often servers at work will have those ports closed to make sure no one from the outside tries to exploit them.
Talk to your system admin & see if one can be opened specifically for you ( if you're trying to do legit work from home).& BTW VNC server will show the only IP it can see which is the one from your work machine. That is not the IP you should use to connect from the outside. You need the IP of the server.
-----------

You router's external IP shows that there is another NAT device between your router and the internet (10.x.x.x addresses are private too meaning your router does not have direct connection to internet). You have to set up port forwarding in that device too to point to your router.
You will have:Internet -> The true gateway of your workplace -> (forward VNC port to 10.0.0.3) -> Your router at work -> (forward VNC port to 192.168.1.221) -> your work PCYou don't need to change anything under advanced routing.
------------------------
First of all you need to have Static IP Provided by ISP at both ends to connect each othere with VNC. Next is check that you can ping that m/c Or VNC Server from you Vnc viewer. If u get reply then u will get the acess. otherwise no.
-----------------------

Do you mean that I have to open the same ports ie 5900-5910 for both my work PC 192.168.1.221 and also open 5900-5910 for 10.0.0.3 which is router IP on the router Setup.
And I think you are right because when I tried to connect from the IP that I got from"whatsmyip.com It still says "CAnt connect to server"And later I used ping & telnet for the IP 138.89.188.xI am able to ping and after telnet it asks for pswd.
-------------------------

I think the way my network is setup is all creating problem. So I tested it on some other computers and BOOM!!....it works. 
But I didnot understand why the connection is slow....when I am working with excel/word files its fine...but when I work on unix based program Tech7 (if anybody has heard about it..)it takes too much of time & is slow
------------------------
How are you running the UNIX program? Do you have VNC server running on a UNIX box and you connect to that or do you connect VNC to a windows machine and then make an X connection to some UNIX server?You can get better speeds if you select better compression options for VNC.
TightVNC and UltraVNC offer superior compression to the vanilla RealVNC.
-------------------------
Slow connection ? Easy - your work network connects at least 100Mbit/second, maybe 1Gb, but over the internet broadband you might only be getting 5Mb download, 500Kb upload, plus a lot more latency in the various routinings involved.
--------------------------
Sorry for the bump to such an old post. I was having the hardest time getting my IP locked down in some kind of way, I came across an article at variableghz that helped me lock down my IP and get VNC working finally. Anyway, just thought that would be helpful for anybody else searching since this is what came up in my Google search along with everything else... !
=========================
by admin@variableghz.com
What is UltraVNC SC? It’s a solution for fast remote-access to a client’s system. It’s free, too.
What’s the difference between UltraVNC and UltraVNC SC? UltraVNC SC takes all of the complexities of setting up a VNC server, and puts the burden on the admin, rather than the client side. Forwarding ports, installing services, setting up passwords, configuring firewalls — all of that is transparent to the client. All the client has to do is double-click a custom *.exe that you set up ahead of time by following this guide.
So, let’s get started.
First, the prep work. You’re the admin, so you need to lock down your local IP and get your ports forwarded appropriately.
1. Determine your local IP. Start > Run > cmd > ipconfig — write down your local IP. Mine is 192.168.1.6. What’s your default gateway? Mine is 192.168.1.1, yours will likely be similar.
2. Log into your router administration panel by navigating to your default gateway address using your browser. (Note: more complex routers may have other methods of getting into the admin panel, check your documentation).
3. Forward port 5500 on your local IP address. (Not to be confused with 5900, the default VNC port — make sure you do 5500).
4. Configure your firewall to allow connections over port 5500 (this is really important, don’t forget!)
Now that you’ve got that all set up, you have a choice to make. You can compile the .exe with your current WAN IP, or you can lock it down using something like DynDNS, similar to the way you normally do with UltraVNC. I strongly recommend you lock it down using DynDNS, and use the DynDNS Updater on your system. So, with that in mind, let’s continue:
5. Head over to the UltraVNC SC “Create” section of their website and download custom.zip.
6. Inside custom.zip, you’ll find 6 files. These files are there for you to customize and then have UltraVNC SC compile them for you in the cloud. You can customize quite a bit with this, but for this tutorial we’re just gonna get the remote access up and running as fast as possible. Once you master this, you can then go back and tweak with all the settings and options and make a very “pretty” UI for your client.
7. Extract custom.zip and open up helpdesk.txt. Inside, you will see a *.ini-like file which contains defaults for all the settings you need to instruct UltraVNC SC what to compile in the final .exe.
8. Under the first [HOST] section (“Internet support”), change the default IP to be your DynDNS (or WAN IP) and be sure to leave the :5500 (port) at the end. Then delete the second [HOST] entry “Internet support encryption” because we won’t be using encryption in this guide. Save the helpdesk.txt file and close.
9. Go ahead and delete the rc4.key file, because we aren’t using encryption right now.
10. Highlight all the files and create a *.zip file. Call it whatever you want (do not have a folder inside of the *.zip, just the data).
11. Now, we need to “compile” the .exe with the UltraVNC SC website. So, head on over to the “Online Creator” section of their site. For reasons unbeknown to me, they require you to use the username: foo, password: foobar. Then upload your newly minted *.zip file.
12. Download the resulting *.exe, which will be named whatever you called your *.zip file.
Now you’re ready to give the *.exe to your client, right? Not just yet — now we have to set up your host computer to “listen” for clients which are going to try to connect to you via port 5500. To get the UltraVNC viewer, you’ll need to have the regular UltraVNC installed, and just choose Viewer if you don’t want the server as well during install.
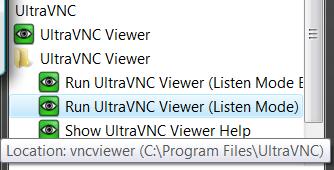
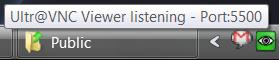
13. With the UltraVNC viewer installed, go to your start menu and find UltraVNC > UltraVNC Viewer (Listen Mode). Run it. When you do, you’ll see a green eye appear in your system tray.


Curiously, this icon is the same color as previous versions of UltraVNC server which would change from blue when idle, to green when connected. Nonetheless, you know it’s in listening mode by just hovering over it. Again, make sure your firewall isn’t blocking anything. If you want to “verify” that the port is listening, open up a command prompt and type netstat -a and check for port 5500 and a status of “Listening.”
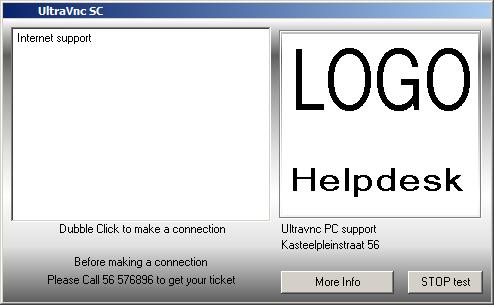
14. With all the aforementioned in place, your clients are ready to connect! Send them your *.exe and it will look like this by default:
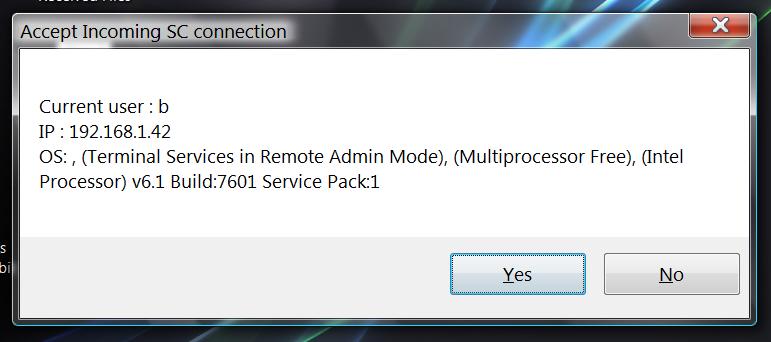
Most aspects of this awkward looking client executable are changeable. You’ll obviously want to change this if you plan to use this seriously. Your client simply has to double click “Internet support” to initiate the connection. When they do, you’ll be presented with a popup that looks something like this:
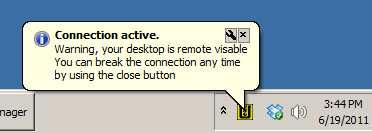
15. Click Yes and you will be able to see their desktop, and your client will be presented with this default, incorrectly spelled message:
Your client can close the connection by right clicking on the VNC icon on his/her system tray, and choosing close. Or you can close it at any time by just closing the UltraVNC Viewer window.
Important: My tests conclude that when doing an UltraVNC SC connection with a client running Windows Vista or 7 with Aero enabled, there is a 15-21 second delay even over lightning-fast connections. This is unacceptable. If you believe your client is running a system with Aero enabled, you must disable it or UltraVNC SC will be nearly unusable! Because your client is in dire need of remote assistance, they probably have no idea what Aero is — so make it easy for them and disable it via a simple batch script on their system which runs the following commands:
net stop uxsms (to disable Aero), and a pause with a message then, net start uxsms (to enable Aero). All you have to do is hit any key in the command prompt window before closing your session!
[disable and enable aero batch file]

net stop uxsms
echo off
cls
echo Press any key to re-enable Windows Aero.
pause
net start uxsms
exit

You will find that with Aero off, the speed is super quick. It seems a lot more complex than it really is with all the steps laid out like this — but it’s really not that bad. Once you’ve got it set up, it’s easy to deploy to all your clients. Good luck!

Saturday, July 23, 2011

VNC viewer

Source
Virtual Network Computing, or VNC, is a private and direct connection between two computers over the Internet. There is a server PC and a client PC and the client can view the desktop of the server of the VNC connection and even control the mouse and keyboard of the server. Picture a situation when you are at work and you need files are on your home PC, using a VNC viewer for Windows 7 you can connect to your home computer and download the files to your work computer. The usage of the VNC viewer can reduce costs of hardware because multiple users can use and control one system. This is very effective when you have expensive software and with only one license installed for one PC you can have multiple users accessing the software at the same time. You can even use the VNC viewer across different operating systems. For example, you can view a Linux desktop using a VNC viewer for Windows 7. There are a lot of software solutions for VNC for Windows 7. Here are the two best free VNC viewers for Windows 7.
TightVNC
TightVNC access control
TightVNC is a free remote control software package. You can see and control the desktop of a remote machine and use your local mouse and keyboard, just like you would do it sitting in the front of that computer. This free VNC viewer for Windows 7 can be implemented for free for both personal and commercial usage, with full source code available by the Company. This software solution can be very useful for tech support, education, and for many other purposes. It is cross-platform and available for Windows and UNIX with a Java client. TightVNC is compatible with standard VNC software, conforming to RFB protocol specifications.
UltraVNC
UltraVNC2
UltraVNC is another great free VNC viewer for Windows 7 that has great features like: File transfer, Video driver, Optional Encryption Plugins, MS Logon, Text chat, Viewer Toolbar, Java Viewer with File Transfer , as well as Auto scaling and Server Side Scaling, Multiple-Monitors-support, Repeater/Proxy-support, Auto reconnection, good performances and tons of other functionalities. It has a NAT to NAT connectors, which will help you to easily handle the most complex connection situations. UltraVNC runs under Windows operating systems (2000, XP, 2003, Vista, Windows 7) 32 and 64bit. 95, 98, Me, NT4 require v102. Its embedded Java Viewer allows you to connect (and make File transfers) from a simple Web Browser on any operating system supporting Java (Linux, Mac OS) to an UltraVNC server.
The Conclusion
These free VNC viewers for Windows 7 can be very useful tools, but these free software packages do not offer the best security. There are paid software solutions for VNC viewers that bring better security by offering connection encryption and other security options that will ensure your safety and protect your system from unauthorized access. If you plan to use VNC viewers regularly, investing in a more powerful and more secure paid VNC viewer would be wise.

Wednesday, May 25, 2011

SystemTools Remote Control Manager

Source
Compatible with all VNC-based remote control solutions
Integration with Hyena, or independent GUI or command line operation
FREE with full source code and documentation
The SystemTools Remote Control Manager (STRCM) provides a mechanism for installation, configuration, access, and uninstallation of remote control software products. The STRCM can be used either as a standalone application or integrated into Hyena v4.3 and later versions. Full source code is also provided, under GNU licensing.
Configuration of the STRCM options is made through a standard .INI file. The STRCM uses this configuration information to determine remote control viewing, installation, and other options. Although the STRCM was primarily designed for automatic installation and management of VNC-based remote control products, its flexible design allows the use of many other remote control products.
Primary Features Include:
Automatic Remote Control (RC) Software Installation
Automatic starting and stopping of RC Software
Optional automatic removal of RC Software services and files
(VNC only) Remote password and configuration
If you have ever wanted a console for your favorite remote control software product, the SystemTools Remote Control Manager may be the solution you have been waiting for. 
Download Now
View Demo

Tuesday, November 16, 2010

TightVNC in openSUSE

↑↑↑↑Installation & Configuration
Software: The RPMs are in the standard install media. GoTo Yast --> Software --> Software Management and search on vnc. Install the RPMs tightvnc and xorg-x11-Xvnc. Those RPMs will install both the viewer functionality and the server functionality. Use the Packman repository for the tightvnc RPM in openSUSE 11.1 and the standard repository (oss or vendor) for the tightvnc RPM in 11.2 and 11.3
For an openSUSE client where you wish to view the server by web browser, install also the java RPMs java-x_y_z-openjdk and java-x_y_z-openjdk-plugin (you can use either the sun or the openjdk RPMs).
Initialise Passwords: The first thing to do after installing the RPMs is initialise the vncserver process. Run the command vncserver for the first time. It will lead you through the setting of passwords, one to accept clients in an interactive mode and one for a view-only mode. Run the command in your normal user's console window and follow the instructions in the prompts.
Select the Desktop Manager: The default Desktop Manager that would be served to remote clients is TWM (Tab Window manager). The defaults are coded into the startup script xstartup located at /home/your_username/.vnc/xstartup. the default contents are as follows:
#!/bin/sh
xrdb $HOME/.Xresources
xsetroot -solid grey
xterm -geometry 80x24+10+10 -ls -title "$VNCDESKTOP Desktop" &
twm &
Most people want to change that to KDE4 or Gnome. To do that you edit the file called xstartup in your home directory and make the contents as follows:
  • For KDE4
  • #!/bin/sh
    /usr/bin/startkde
  • For KDE3.x as in openSUSE 10.x and 11.0, 11.1
  • #!/bin/sh
    /usr/bin/kde &
  • For Gnome
  • #!/bin/sh
    /usr/bin/gnome &
Note: the file xstartup is an executable script file. Make sure it remains executable. If it is not, then make it so with this console command: chmod +a /path_to/xstartup, or use your file manager GUI --> Properties --> executable.
↑↑↑↑Starting TightVNC Server (Manually)
Users who are logged on can start a server with a simple console command.
  • Starting the server in Suse versions 10.x: vncserver
  • Starting the server in Suse versions 11.x: dbus-launch vncserver
The vncserver command will start the next unused desktop in the sequence :1, :2, :3 ...etc. You can attach many options to the command line when starting the server. There are options specific to TightVNC on the TightVNC man page and you can also attach the options listed in the Xvnc man page.
I sometimes use one or more of three useful options when initiating a server:
  • the geometry option allows me to prescribe the screen so it will fit comfortably into viewers on client machines, e.g. -geometry 1024x768 or smaller.
  • The default window is :1 and this implies TCP ports 5801 and 5901. If you want to use a different port/window combination, use the :x option, where x is the display number. For example this command will start a server on window :6 with port associations 5806 & 5906: vncserver :6
  • The colour depth option is useful for low bandwith connections and for speeding up communications. You invoke the option like this: -depth 8 (use 8, 16 or 32). However at this point I should mention that options for speeding communications are best invoked from the client (see below).
Stitching this together gives an example I use on a server when I want to connect with my low bandwith, small screen laptop:
dbus-launch vncserver :6 -depth 8 -geometry 800x600
(Of course, you don't have to add any options if you simply want TightVNC's default settings.)
↑↑↑↑TightVNC Server Running as a Service

VNC -Opening Ports in Firewalls and Routers

Source

OpenSUSE firewall: Two areas need attention here. First is the "Zone" into which you place your netwok interfaces. Then there are the ports that you need to open to allow packets between those interfaces and the outside world.
You must associate your network interface with the External Zone in SuSEfirewall2. Go to Yast --> Security and Users --> Firewall --> Interfaces. Your network card or cards will be listed in the right-hand panel. Make sure they're in the External Zone.
Next, still in Yast's Firewall module, go to Allowed Services. In the right-hand panel, set the Selected Zone to External Zone. Below that is a drop-down list titled Services to allow. Two in that list are relevant here; viz: VNC and VNC mini-HTTP server. Leave the service called VNC Server alone; it's not for TightVNC. For tightVNC, the service VNC will open ports 5900 to 5999 for the XWindow viewer and the service VNC mini-HTTP server will open ports 5800 to 5899 for the web browser viewer. Use one or the other (or both), depending on your mode of communication. You can manipulate the appropriate service/s into the lower panel with the Add buttion.
For earlier releases of Suse/openSUSE the firewalling might be different. For earlier releases opening ports will work fine if you use the Advanced button and add the ranges 5800:5899 5900:5999 (as a space-separated list) into the TCP slot.
Windows firewall: Sometimes you will be asked when installing TightVNC as a service, whether you want the server to be permmitted by the firewall. Answer yes. Otherwise open ports as shown next or if you have additional misgivings open ports anyway. Windows only has the window :0 and so you mostly need be concerned only with the default port/s 5800/5900. However you may associate a different port of your choice with windows :0. To open a port go to Control Panel --> Windows Firewall --> Advanced --> Highlight the network interface and click Settings --> Add:
  • In Description put TightVNC.
  • In IP address enter the IP address of the workstation that you are using.
  • In External port enter the port number (e.g. 5900).
  • In Internal port enter the port number (e.g. 5900).
  • Make sure the radio button is activated for TCP, not for UDP.
  • Repeat the process for each other port you need, e.g. 5800.
ZoneAlarm: Look under Firewall --> Main --> Advanced and allow "Traffic over 1394".
Port Forwarding: Routers connect connect networks with different IP subnets. You should enable port forwarding in your router's configuration. Port forwarding allows passing external connections to computers in the internal network. Almost all routers support this type of redirection.
For example, to access a TightVNC server running on default ports, a router can be configured such hat TCP connections to port 5901 would be passed to the same ports of a particular machine with a specified private IP address (typically 192.168.x.x).
Here is an example of configuring port forwarding, assuming that TightVNC Server is running on the default ports 5800 and 5900, on a machine with IP 192.168.1.100:
Application    ¦ Start port ¦ End port ¦ Protocol ¦  IP Address   ¦ Enable
-----------------------------------------------------------------------
VNC_by_viewer  ¦    5900    ¦   5900   ¦   TCP    ¦ 192.168.1.100 ¦ yes
VNC_by_browser ¦    5800    ¦   5800   ¦   TCP    ¦ 192.168.1.100 ¦ yes
More examples can be found on www.portforward.com.

Saturday, October 23, 2010

Ultra VNC installation and configuration

After the configuration: remote control over Internet
If VNC is UNUSABLE over ADSL
VNC Deployment Troubleshooting
------------

http://www.uvnc.com/install/installation.html
http://www.uvnc.com/install/configuration.html

Admin Properties

The "Admin Properties" menu item in the system tray UltraVNC icon menu refers to Default Local System Properties (service mode) or Current User Properties (application mode) and allows for customizing several areas:
Admin Properties dialog

Configurations

Incoming connections
Accept Socket Connections
Should be activated for normal operation. The display number and ports to use can be configured or set to Auto which defaults to Display 0, Port 5900and JavaViewer port 5800. The port is always Display No + 5900.
Display
Defaults to 0.
Ports
Defaults to 5900 and 5800 for HTTP.
Enable JavaViewer (HTTP connect)
Allows to view a remote computer by opening a browser and go to http://remote-machine:http-port/
Allow Loopback Connections
Sometimes this could be helpful for tests. Normally it's not needed since the result is not very useful.
Loopback Only
Needed for tests. Connections from outside are not allowed.

When last client disconnects


In a helpdesk scenario, you normally "Do Nothing" when disconnecting. When administering servers via remote control, you might wish to either "Lock Workstation" or "Logoff Workstation" for security reasons.

Query on incoming connection


If enabled, every time someone tries to connect via UltraVNC, a pop-up dialog informs the user and asks the user to either accept or refuse the attempt. Configure the timeout for the dialog window and what action should be taken if the user clicked no button until timeout.

Keyboard & Mouse


Some situations (e.g. presentations) require that either the viewer or the remote computer don't input keyboard or mouse events. This can be configured by "Disable Viewer inputs" or "Disable Local inputs".

Multi viewer connections


Here you can configure the behavior if multiple viewers attempt to connect to the same UltraVNC server. "Disconnect all existing connections" implies that only one viewer can be connected at a time and the last one wins. "Keep existing connections" allows for several viewers simultaneously. "Refuse the new connection" implies that only one viewer can be connected at a time and the first one wins. "Refuse all new connections" ??

Authentication


"VNC Password" is a per-machine password and is required.
Require MS Logon
Activates MS-Logon I. Works on Windows 9x as well as Windows NT4/2000/XP. Requires computer and user to be in the same domain.
New MS Logon
Activates MS-Logon II. Allows for cross-domain authentication, i.e. computer is in domain A, user in domain B with a trust between A and B (typically in Active Directory). Works only on Windows NT4/2000/XP.
Configure MS Logon Groups
Opens the configuration dialog for MS-Logon authorization. For MS-Logon I there is a dialog allowing to configure 3 groups. MSLogon I group dialog
For MS-Logon II there is the standard Windows Security property page. MSLogon II group dialog


DSM Plugin


If there are any DSM (Data Stream Modification) Plugins available, their usage can be configured here. Currently there are several encryption plugins available.

Miscellaneous


Remove Wallpaper for Viewers
To reduce network traffic the wallpaper on the remote computer's desktop can be removed during the connection.
Enable Blank Monitor on Viewer Request
Allow viewers to disable the monitor if they request so.
Enable File Transfer
Enable the UltraVNC File Transfer.
Log debug info to the WinVNC.log file
Enable logging. The log file is in C:\WinNT\system32 if winvnc runs as service. The logging level can be configured in the registry.
Disable Tray icon
The icon in the system tray can be disabled to disallow users to change any settings.
Forbid the user to close down WinVNC
Disallow users to close down WinVNC.
Disable clients options in tray icon menu
Disable the "Properties" menu item in the system tray icon menu.
Capture Alpha-Blending
??
Enable Alpha-Blending Screen Blanking
Enable another method to disable the monitor.
Default Server Screen Scale
The server screen can be scaled down here.

Properties

The "Properties" menu item in the system tray UltraVNC icon menu refers to per user settings.
Properties dialog
Poll Full Screen
??
Poll Foreground Window
??
Poll Console Windows Only
??
Poll Window Under Cursor
??
Poll On Event Only
??
System Hook Dll
Provides DDI hooking, especially on Windows 9x.
Video Hook Driver
The video hook driver provides high speed and low CPU load on Windows 2000/XP/2003.
Check the Video Hook Driver
Here you can test the video hook driver, see it's version and whether it's currently active. Driver test dialog
Low Accuracy
Get higher speed with reduced accuracy.
Share only the Server Window Named
Do not share the whole desktop but only the window with the specified name.

TCP Port 5900

Source
A VNC server listens in using two ports. The particular port numbers are determined by the VNC display digit, due to the fact that a machine can run many servers. The most important of all is 59xx, where the display number is xx. This port is run by the VNC protocol.
For most servers ran on PCs, tcp port 5900, due to the display of 0 through default. Administrators should scan their networks for VNC servers that are open, usually on tcp port 5900. It is recommended that any of the VNC servers are upgraded that give the administrator a protocol over 3.3. The nmap’s service detection will reveal the protocol digit.
Other project’s VNC servers, such as UltraVNC or TightVNC could or could not be vulnerable, though some experts do not feel that they are. It appears though RealVNC servers may be vulnerable. Unfortunately, it does not seem to make certain the remote end’s software that is been ran. Only the protocol number is visible. It is also the view of most experts that upgrade to the latest release of RealVNC be facilitated, unless unauthorized access is what is desired. The binding of 127.0.0.1 to VNC daemon while tunneling the traffic of VNC through a SSH tunnel would provide stronger mechanisms for authentication. A search through one’s preferred search engine ‘VNC over SSH’ will yield results of how this can be accomplished, on your preferred platform.
Setting up a firewall that can access all the VNC servers from a remote location is possible, by administrators. Firstly, entries for port forwarding will need to be made. For example, the port 5900 of your PC from the TCP port 5900 that is external, and for multiple PCs, this is replicated as many times, for instance the port 5900 of your computer from the TCP port 5901, and so on. Following this, point to the outside IP address a viewer for VNC, where the initial PC will display ‘dispaly0’, and the second if any will display ‘display 1’ and so on. The relationship here is ‘display N = ‘TCP port 5900+N.’
The port number is 5900, it is a TCP as opposed to a UDP and its delivery is listed as yes. The protocol or name is listed as VNC; the port network is described as a Virtual Network Client or a Virtual network Computer. It is not on any lists of known Trojans or viruses.
Advanced features

VNC: dynamic IP for WAN connections

Connecting to an office PC from home?
I don't have a Static IP for my WAN Connections
Local ips( Local Area Network LAN)
10.0.0.0 - 10.255.255.255 16,777,216(ips avaliable Class A )
172.16.0.0 - 172.31.255.255 1,048,5769(ips avaliable Class B)
169.254.0.0 - 169.254.255.255 65,5369(ipsavaliable Class B)
192.168.0.0 - 192.168.255.255 65,536(ips availiable Class C)
More information on IPs at http://en.wikipedia.org/wiki/Private_IP_address
Private ips are not able to be used via the internet they will not work they are considered Private IP's
Your (Wide Area Network WAN) address it is an ip that is used to communicate with the internet it is the address that comes from your internet service provider (ISP)
To find out what your your wan ip address is
http://www.whatsmyip.org/
The problem comes in that this address is mostly dynamic (changes all the time) in this case you would need the dyndns service..Wink
Most Routers will support the use of a Dynamic Domain Name Service that
will let you connect via a hostname instead of an ip address. The routers configuration varies so much that is almost impossible to create a step by step document for this feature.
There Are Serval Free Dyndns sites available
www.dyndns.org
www.no-ip.com
basically you need to create an account with one of the service providers then program the router to send the update request when its ip changes
Most routers only need to know the following
The web address of the dyndns account
The username of the account
The password of the account

VNC: Failed to connect to server

uvnc.com/onlinehelp
Solution 1:
Symtom:
If windows firewall enabled on XP SP2
vncviewer ...Lookup server address ... Failed to get server address !
vncviewer can't reach vnc server by hostname address
remote desktop connection (mstsc.exe) can't reach remote desktop by hostname
Reason:
netbios name filtered, hostname blocked by windows firewall XP SP2
Workaround:
use ip address instead of the hostname address
or
disable windows firewall on XP SP2 if you have already an NAT/firewall on your broadband router,
so you can reach again yours vnc servers by hostname on your local area network (LAN)
manually add DNS IP address to your broadband router
or/and
exclude the vnc server/vnc viewer computer outside of DHCP range or reserve MAC address/hostname to DHCP range
Solution 2:
How to Debug "Failed to Connect to Server" 
How to Debug "Failed to Connect to Server" Version 2 (Updated 2007-4-6)
http://www.bevingtontechnologies.com/www/VNC/docs/debug_faile_to_connect_to_server_using_portqry.doc

http://www.bevingtontechnologies.com/www/VNC/docs/debug_faile_to_connect_to_server_using_portqry.pdf
_________________

----------------------------------------
How Do I Install UVNC As A Service
WinVNC must be installed and run as a service to be able to do this operation.
You can use the corresponding UltraVNC Server menu shortcut to install this service (from the Start Menu).
You can also do this using Command prompt:
C:\program Files\UltraVNC\WinVNC.exe -install
then :
- reboot the computer
or
- Execute: net start winvnc, in the command prompt.
  WinVNC is installed and run as a service
---------------------------
To access your computer remotely via VNC, it is necessary to open ports on your firewall :
  • 5800
  • 5801
  • 5900
  • 5901
I right clicked the (winvnc) icon in the system tray and chose (kill all clients)
then I double clicked the (Tightvnc viewer-Listen Mode), entered the IP adress and the password as usual ... and it worked.
====================
installing remotely via MS remote desktop - set password??
install any VNC flavor by remote desktop Terminal Service
and prevent VNC default password not set  
-------------------------------
UltraVNC as a service via RDP will not prompt to set default password no matter what options are chosen. UltraVNC as a service must be installed locally for it to work properly.
------------------------------------
1. I did a RDP connection to my server (which is HEADLESS)
2. I installed ultravnc. At this point I was having all the problems as everybody else
3. With registry editor, I browsed to HKEY_LOCAL_HACHINE\SOFTWARE and then created some the"ORL\WinVNC3\Default" keys (which are case-sensitive and without quotes):
a) created a key named ORL
b) under ORL I created another key called WinVNC3
c) under WinVNC3 I created on last key called Default
4. I then proceeded to install VNC as a service through the start menu, and nothing else (don't fiddle with any more ultraVNC icons for the moment).
5. Download the vncpwd application which you can find at http://www.sysworksoft.net/products/vncpwd.html and unpack it somewhere you can use (or you might just keep it somewhere like c:\windows\system32
6. run vncpwd from the command prompt as follows:
vncpwd /v:
(where is ther password of your choise
7. Restart the computer. This is very, VERY important. Restarding the service didn't worked for me and I was still getting the "no password" error. Only after I restarted the server that things worked out. 
-------------------------------------
DO NOT connect to the local console with RDP/TS! That is, DO NOT use mstsc /CONSOLE /V:server ! VNC is not compatible with servers who "have suffered" RDP/TS connect to local console.
I have no problems installing Ultravnc as service (and mirror driver) from remote desktop/TS - if I first populate HKEY_LOCAL_MACHINE/Software/ORL/WinVNC3 with the Password entry copied from another installation.
I have first installed Ultravnc as service on my local PC and configured default password. Then I export HKEY_LOCAL_MACHINE/Software/ORL/WinVNC3 from regedit to a flat file. This file can be copied to the RDP/TS server and imported with regedit. Once this is done, UltraVNC can be installed normally as service, and it will be ready to connect to with VNCviewer and the same default password as the original local PC. Then you can change password/auth.
-------------------------------------
create the registry value AuthRequired under HKEY_LOCAL_MACHINE\Software\ORL\WinVNC3 and set it to 0 (a DWORD value). That enabled "passwordless" VNC access, which isn't that bad in my case since I limited it to loopback only anyway (and I can keep the VNC service stopped when not needed). Also, MSLogon seems to work when I enabled that in the registry as well.
--------------------------------------
Immediately log in with VNC and start it as a service.
Now since VNC is hooking video as if we were sitting in front of a console rather than RDP's session stuff, we can attach to the newly started vnc service. Go to start->program files->Ultra VNC->Ultra VNC Server [folder]->Show Default Settings (Assuming everything is in the default places/names at least...)
Now set your password. Do a save and get outta there. Exit VNC client locally, and reconnect - now it prompts for password. Remove the authrequired key.

Friday, January 8, 2010

VNC - Failed to Connect to Server

http://www.techspot.com/vb/all/windows/t-10322-Cant-get-VNC-to-work-I-need-help.html

http://forums.techguy.org/networking/554231-tightvnc-failed-connect-server.html
1. vnc running as service on 5900
2. accept connections is ticked
3. password is set
4. display number and/or port set to auto
5. router port forward to correct internal ip which is static
6. zone alarm has been shut down
7. windows firewall disabled

http://forum.ultravnc.info/viewtopic.php?p=21158
Lookup server address ... Failed to get server address

If windows firewall enabled on XP SP2:
LAN and dynamic ip or static ip address same story
vnc viewer (vncviewer.exe) can't reach vnc server by hostname
remote desktop connection (mstsc.exe) can't reach remote desktop by hostname
reason:
netbios name filtered, hostname blocked by windows firewall XP SP2

workaround over LAN
try to reach ip address instead of the hostname address
or
disable windows firewall if you have already an NAT/firewall on your router


UltraVNC or any VNC or Remote Desktop is UNUSABLE over ADSL
http://forum.ultravnc.info/viewtopic.php?t=5082
Since a few weeks (months? ) it looks like that some internet providers LIMIT the bandwidth over ports above 1024... at least in France
(maybe an attempt to counter Peer to Peer ?).
Consequently all the softwares that use TCP or UDP ports > 1024 have become simply unusable over ADSL/Cable connections, even worse than over RTC modems.
When Web browsing still flies...
The solution is to configure your UltraVNC server (or other software) to use ports below 1024 (between 800 and 1024 for instance).
Here is how to configure UltraVNC for port 80 (http port, which will never be limited as it is used for web browsing Wink ). If you already have a web server listening on this port, use a port like 8xy or 9xy.
1. In WinVNC properties page: Ports: Main: 80 (or 8xy)
2. In your router ADSL Modem configuration: you must route port TCP 80 (or 8xy). Restart your modem/router
3. From the outside: run vncviewer with Server = YourServerIP::80 (or YourServerIP::8xy)
-> UltraVNC is flying again Crazy
This trick also works with any software that usually use high ports (like RDP and so on...)
_______________
UltraSam

http://www.sysworksoft.net/help/vncnbhood/
http://www.sysworksoft.net/support/manuals.html