Bienvenido! - Willkommen! - Welcome!

Bitácora Técnica de Tux&Cía., Santa Cruz de la Sierra, BO
Bitácora Central: Tux&Cía.
Bitácora de Información Avanzada: Tux&Cía.-Información
May the source be with you!

Wednesday, December 10, 2008

Vista Forced Driver Signature Signing

In 64-bit Windows Vista (x64 edition), Microsoft enforces requirement for loading of kernel-mode software such as device drivers, filter drivers and services to have Kernel Mode Code Signing (KMCS), especially driver binaries that load at boot time (”boot start drivers”) which must contain an embedded signature. Failing so, user will encounter various error messages below, for example:

  • This driver has been blocked from loading.
  • Can not connect to low level driver. Please reinstall The Driver under Local system administrator account or try to start driver manually using “Low Level Driver Installation” shortcut.
  • Can not load low level device driver. Please restart application.
  • Windows cannot verify the digital signature for this file. A recent hardware or software change might have installed a file that is signed incorrectly or damaged, or that might be malicious software from an unknown source.
  • Windows failed to start. A recent hardware or software change might be the cause.
  • Error code 0xc0000428.

Windows failed to start and cannot verify the digital signature

Worse still, the original command to disable the driver signature integrity check permanently from within Windows command prompt, “bcdedit -set loadoptions DDISABLE_INTEGRITY_CHECKS” has been muted in Windows Vista SP1 (prior to SP1 has also been removed via various hotfixes), which returns “an error occurred while attempting to reference the specified entry. The system cannot find the file specified” error message instead. Thus, most modified system files, such as patched tcpip.sys to increase concurrent half-open TCP/IP connection limit can be applied and used.

One way of workaround and resolution to the requirements of code signing with digital signature or certificate that Microsoft trusts problem is by pressing F8 during initial boot of the Windows Vista system, and then select Disable Driver Signature Enforcement in the “Advanced Boot Options” menu. However, the selection only good for the session, and user have to repetitively do the same thing (pressing F8 to disable signed driver enforcement) again and again on every system reboot. If the user forget the disable or turn off the forced driver signing ‘feature’, the system will probably crashes, or simply can’t use.

To make the task of turning off digital certificate signed driver mandatory requirement in x32 and x64 Windows Vista (yes, 32-bit Windows Vista has such security enforcement too, although less strict than 64-bit version) easier, Mr. Orange Sunshine has created ReadyDriver Plus which will allow user to automate the boot up Windows Vista process without driver singing enforcement. ReadyDriver Plus is based on ReadyDriver boot image by Uhlik which has to boot up from CD, floppy drive or USB drive. ReadyDriver Plus improves from original Ready Driver by allowing local hard disk installation, eliminating the need to boot from another device.

ReadyDriver Plus install itself as boot.bin file, and then modifies Windows Vista Boot Configuration Data (BCD), which is then read by Windows Boot Manager (the bootloader for Vista) to load ReadyDriver. When Windows Vista boot loader reads BCD, it loads ReadyDriver which will then makes the appropriate selection to disable Signed Driver Signature Enforcement, based on what user choose to install. So in a way, ReadyDriver Plus manages to permanently disable driver signing enforcement in Windows Vista, both x32 and x64, by automatically select “Disable Driver Signature Enforcement” option in the “Advanced Boot Options” menu on system startup.

Download ReadyDriver Plus 1.1.

ReadyDriver Plus

There are a few options that user can select during installation of ReadyDriver Plus. However, it’s recommended to leave all options as it’s (especially the /BOOT path, but must be the correct drive letter which Vista is installed), else it defeats the purpose to install ReadyDriver Plus. Dual-boot or multi-boot system should change the keystroke setting accordingly (ReadyDriver Plus will be installed as additional ‘OS’ item under Windows Vista, so you require 1 up stroke to reach Windows Vista OS. If you’re dual-boot, depending on location of Windows Vista on operating system selection menu, the automatic process may need 2 keystrokes to reach the item). Most user should be able to complete the setup by simply clicking “Next”.

ReadyDriver Plus supports both 32-bit and 64-bit (x86 and x64) versions of Windows Vista, including Windows Vista SP1 (Service Pack 1). Ready Driver Plus can be uninstall from Control Panel Programs and Features.

Free Ramdisk for Windows Vista, XP, 2000 and 2003 Server

Source

Ramdisk or RAM-Disk is a virtual hard drive based on software abstraction that treats a segment of random access memory (RAM) as secondary storage which is similar to hard disks, except with advantage that ramdisk is a lot faster and access time is greatly improved. As there is no mechanical moving parts involved, there won’t be question of wear and tear too. Ramdisk has one obvious downside, that it’s volatile and not solid state. Contents in Ramdisk is stored in computer RAM, which will be lost when the power of computer is switched off.

With these benefits and limit, ramdisk can be used to store frequently accessed yet less important temporary data to speed up the system performance, such as swap space for virtual memory, temporary files used for programs such as Internet Explorer, BT client, P2P eMule, compression utility, translation software and etc, frequently accessed data from a database

or used to hold uncompressed programs for short periods. From privacy point of view, Ramdisk is also a working drive for decrypted version of encrypted document, as all trace of the data will be wiped and deleted once power off.

There are plenty of Ramdisk driver and software available, such as RamDisk9xME, RAMDiskXP, RAMDiskSE and RAMDiskVE from Cenatek, RamDisk and RamDisk Plus from SuperSpeed, RAMDisk Enterprise Lite and Full version plus 64 MB limited free RAMDiskbased on Microsoft Ramdisk below from QSoft, and Ramdisk.sys driver for Windows 2000 from Microsoft published under KB257405. However, most of these Ramdisk drivers either is not free, or limit in its functionality especially on the size on RAM-disk. Some not even support Windows Vista.

The following freeware RRamdisk.sys, originally written by Gavotte based on Microsoft’s Ramdisk.sys, and later being added a GUI interface by lyh728 is not only free to use, it also stable, doesn’t have size limitation, supports popular FAT16,FAT32, NTFS filesystems, and supports Windows 2000 operating system and above including Vista.

Download Gavotte Ramdisk with GUI (ramdisk.zip).
Alternative download link.

To use Ramdisk, the most important requirement is that the system has a lot of memory, much a lot than the size of Ramdisk that you intends to create. It works on system with minimum 256 MB RAM, where you’re recommended not to set Ramdisk with size more than 64 MB.

Ramdisk Install Failed in Vista

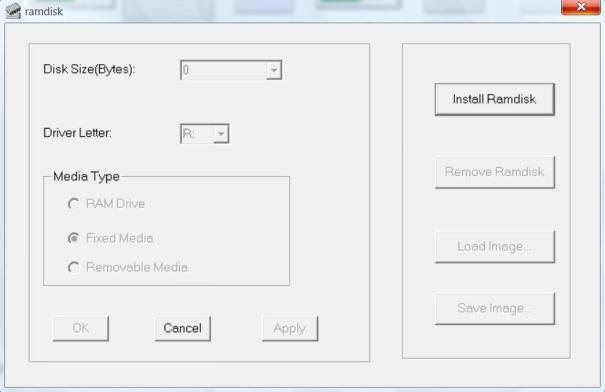
Installation and setup of Ramdisk is pretty simple. Unpack the zip archive to a folder, and run ramdisk.exe. In Windows Vista, you need to right click on it and select “Run as Administrator”, if not you will get a Failed error message. Click on Install Ramdisk to install RRamdisk.sys driver. Answer Yes or Allow if prompted with driver not signed with valid digital signature or can’t verify the publisher of this driver software warning message. Once Ramdisk is installed, all buttons that previously grayed out inactive are now activated.

Install Ramdisk

Now you can set the disk size in Bytes, configure the drive letter for the Ramdisk. You can also specify which media type is the drive - RAM Drive, Fixed Media or Removable Media (for simulating a floppy drive). The default choice, Fixed Media indicates that the Ramdisk is simulating a hard disk drive should work in most case. Click on OK when done with configuration. Note that if you modify the settings of the Ramdisk during the time when system process is accessing the Ramdisk, you will require to reboot the system. Caveat is that, if you put IE Temporary Internet files into the Ramdisk, you will always need to restart computer even though you’re not running IE.

Ramdisk in Vista

A additional drive, the Ramdisk with default drive letter R: (assuming you’re not changing it) will be created, and immediately accessible for usage.

Other buttons in the Ramdisk GUI are pretty obvious in usage. Use “Remove Ramdisk” to uninstall Ramdisk, or more specifically RRamdisk.sys driver from the system. Save Image… and Load Image… allows users to save or open an image file for the whole contents of Ramdisk, useful if you want to store data in Ramdisk in unaltered state to be open up later.

Ramdisk.exe accepts a image file as its argument so that the image file can be loaded automatically into the Ramdisk from command line. Potential usage include adding of “ramdisk imgfilename” to system boot up script such as autoexec.bat to load the data into memory disk.

There are more customization and other potential usage for Gavotte Ramdisk not included in the GUI. However, you need to manually edit the registry. These additional functions are maintained by addswap.exe and rdutil.exe which explained pretty well by the Readme (included in Page 2). In most case, you won’t need to come to this extent.

Office 2003 and 2007 -crack with OGA Patch

Source
Office Genuine Advantage (OGA) is another anti-piracy initiative by Microsoft on its popular business productivity product - Microsoft Office XP, Office 2003 and Office 2007. Similar to Windows Genuine Advantage (WGA), OGA requires users of the Microsoft Office software to validate their installed copy of Microsoft Office in order to download files from Microsoft Download Center, access updates or hotfixes from Office Update, and receive special offers for genuine users.

OGA is not to be confused with Office Product Activation that is mandatory required to during the installation process in order to use the Office software whereby users enter a serial product key that is validated online over the Internet or by phone by Microsoft to confirm that the product key has not been used on more personal computers than are permitted by the Microsoft Software License Terms. To crack Office XP/2003/2007 activation, you need a key generator that provides volume license key (Guide: How to change Office 2007 product key).

If you’re using a keygen-generated product key or publicly available leaked Office 2007/2003/XP serial number, especially the volume license key (VLK) that requires no activation when used, most of the keys no longer able to pass the OGA genuine validation test anymore with the following error message (Office 2007 as instance):

Office 2007 Failed Validation

This computer has failed validation.

Microsoft Office Enterprise 2007: Validation Failed

The product key used to install Office is not valid. It has been identified by Microsoft as a false key used with counterfeit copies of Office.

[0x80180108]

It’s likely that users who failed validation check may continue to use Microsoft Office as per normal and use Microsoft Updates to update critical patches. However, if you want to download add-ins, updates, templates, samples and tutorials, Smart Tags, Language Interface Packs and Software Development Kits (SDK) that require Genuine Office validation, you won’t be able to do so.

To bypass or crack the Microsoft Office 2007 and Microsoft Office 2003 OGA genuine validation, follow these steps:

  1. Install and activate Microsoft Office 2007 or other version of Office. If you intend to use the key-gen, you must install Enterprise edition.
  2. Download the patched ogacheckcontrol.dll.
  3. If you never validate your copy of Office, go to Genuine Microsoft Software web page, and run the Office Validation Assistant by using Internet Explorer (not Firefox as it will use different version of ActiveX component). This is to install the components required for Office validation. If you fail the validation - Office not genuine - simply ignore the message.
  4. Copy the cracked ogacheckcontrol.dll to the following location:

    Windows XP and Windows Vista (32-bit): \Windows\System32\
    Windows XP and Windows Vista (64-bit): \Windows\SysWOW64\

  5. Attempt to download Office files that require validation again. All downloads should work now.

The OGA Check Control crack works on Office 2007 Enterprise Edition, Office 2007 Blue Edition, Office 2007 Professional Edition, Office 2007 Pro Plus, Office 2007 Standard Edition and all Office 2003 Editions.

If you’re using invalid or blacklisted product key, you may have to change the Office product key (Guide: How to change Office 2007 product key). This is especially so if you’re using Microsoft Office 2007 Blue Edition.

Disclaimer: This patcher is for genuine Office user who having problem to pass genuine validation only. To use Office 2007, you must purchase a license. Alternatively, you can use for free OpenOffice.org, an equally good productivity suite.

Operation System: 32-bit or 64-bit (x86 or x64)?

Source
If you want to find out whether the system is installed with a 32-bit or 64-bit (Microsoft labels them as x86 or x64) based operating system, which requires specifically built software application (See x86 or x64 OS)
Windows Vista

Method 1

  1. Click Start, then click on Run or Start Search.
  2. Type msinfo32.exe and then press Enter key.
  3. In “System Information”, review the value for the System Type item:
    • For 32-bit editions of Windows, the value of the System Type item is x86-based PC.
    • For 64-bit editions of Windows, the value of the System Type item is x64-based PC.

Method 2

  1. Click Start, type system in the “Start Search” box, and then click system in the “Programs” list.
  2. The operating system appears as follows:
    • For a 64-bit version operating system: 64-bit Operating System appears for the “System type” under “System”.
    • For a 32-bit version operating system: 32-bit Operating System appears for the “System type” under “System”.

Method 3

  1. Click Start, type system in the “Start Search” box, and then click System Information in the “Programs” list.
  2. The operating system appears as follows:
    • For a 64-bit version operating system: x64-based PC appears for the “System type” under “Item”.
    • For a 32-bit version operating system: x86-based PC appears for the “System type” under “Item”.

Microsoft Windows XP Professional

Method 1

  1. Click Start, then click on Run or Start Search.
  2. Type msinfo32.exe and then press Enter key.
  3. In “System Information”, review the value for the System Type item:
    • For 32-bit editions of Windows, the value of the System Type item is x86-based PC.
    • For 64-bit editions of Windows, the value of the System Type item is x64-based PC.

Method 2

  1. Click Start, click Run, type sysdm.cpl, and then click OK.
  2. Click the General tab. The operating system appears as follows:
    • For a 64-bit version operating system: Microsoft Windows XP Professional x64 Edition Version appears under System.
    • For a 32-bit version operating system: Microsoft Windows XP Professional Version appears under System.

    Note is a placeholder for a year.

Method 3

  1. Click Start, click Run, type winmsd.exe, and then click OK.
  2. In the details pane, locate Processor under Item. Note the value.
    • If the value that corresponds to Processor starts with x86, the computer is running a 32-bit version of the Windows operating system.
    • If the value that corresponds to Processor starts with ia64 or AMD64, the computer is running a 64-bit version of the Windows operating system.

Microsoft Windows Server 2003

Method 1

  1. Click Start, click Run, type sysdm.cpl, and then click OK.
  2. Click the General tab. The operating system appears as follows:
    • For a 64-bit version operating system: Microsoft Windows Server 2003 Enterprise x64 Edition appears under System.
    • For a 32-bit version operating system: Microsoft Windows Server 2003 Enterprise Edition appears under System.

Method 2

  1. Click Start, click Run, type winmsd.exe, and then click OK.
  2. In the details pane, locate Processor under Item. Note the value.
    • If the value that corresponds to Processor starts with x86, the computer is running a 32-bit version of the Windows operating system.
    • If the value that corresponds to Processor starts with EM64T or ia64, the computer is running a 64-bit version of the Windows operating system.

Friday, December 5, 2008

"Esta página posee un riesgo...

... potencial de seguridad no especificado"
Es el mensaje o alerta de seguridad del Internet Explorer que aparece cada vez que se intenta abrir un documento de formato zip, si está en otro ordenador de la red.
Posible solución:
Iniciar Internet Explorer
En Herramientas --> Opciones de Internet --> pestaña Seguridad.
Ahi doble click en Intranet Local y luego en Sitios.
Desactivar la casilla Detectar redes intranet automáticamente si está seleccionada.
Activar todas las demás casillas de verificación
Luego: Aceptar, Aplicar y Aceptar.
Usar 7zip!!!

No se encuentra el archivo C:\Documents

forospyware.com


FS-Admin


Mensaje "No se encuentra el archivo C:/...//privacy_danger/index.htm"

Infeccion con el PSGuard virus
- Descarga la herramienta DelPSGuard.zip y ejecútala en Modo a Seguro

- Descarga el Super Antispyware instálalo y actualízalo... luego realiza un escaneo en Modo Seguro

- Pasa el Ccleaner y siguiendo los pasos de su manual utiliza las opciones Limpiador y Registro.

Thursday, December 4, 2008

DropMyRights

Source

First off, download DropMyRights, but when you unzip the file and click on the executable file within (after scanning it with an anti-virus scanner of course), you'll want to take note of the directory where the program is installed.

Then go to the Windows desktop, right-click on it, select "New" and then "Shortcut." Then, in the box underneath the text that reads "Type the location of the item," type or browse for the directory where the "DropMyRights.exe" program was installed (mine was under C:\Documents and Settings\MyDocuments\MSDN\DropmyRights\dropmyrights.exe). Keep this windows open for the time being and don't click any more buttons on it; we'll come back to it in a moment.

At this point, you just need to know the location of each program you want to run under a non-administrator account, in order to create a clickable icon on the Windows desktop and/or the Windows taskbar that you can use to start the program in limited-user mode whenever you want. For example, if you want to set up Internet Explorer, enter the location of "iexplore.exe" directly after the text you already entered in the shortcut location window above. Using the example above, the text you would enter would be: C\:Documents and Settings\MyDocuments\MSDN\DropmyRights\dropmyrights.exe "c:\program files\internet explorer\iexplore.exe"). Then hit "next" and give your shortcut a name. If you're devising a shortcut for Internet Explorer, you might just call it "IE."

Now, right-click on the icon you just created and select "Properties." The first tab that comes up should be "Shortcut," and lower down on that window should be a tab that reads "Change Icon." Click on that tab and you can change its icon so that anyone who clicks on it will think it is the default icon for Internet Explorer. A window of graphical icons will come up next; drag the scroll bar to the right and you should see the familiar IE icon. Select it and hit "okay," and the shortcut you just created on desktop should change its icon accordingly.

If you're fiddling with a PC that multiple users work on, you might want to go a step further and change the behavior of the IE icon on your "quick launch" taskbar (the one usually sitting in the lower left corner of your screen). Right click on the familiar IE icon there and select "Properties" from the pull-down menu. Enter the same information you typed into the "target" field for your desktop IE limited-user icon (if you don't remember, go back to the desktop, right click oJustify Fulln the icon you created, select "Properties," and then cut and paste the text in the "Target" field). After you're done, hit "okay," and you should be all set.

If you're still concerned that another user might accidentally evade your setup, click "Start", "Programs," and then either delete the Internet Explorer shortcut there by right clicking on it and selecting "delete," or rename that one as well using the same procedure described above.

If my instructions have left you lost or confused, Microsoft has published its own instructions on using this program (actually it's the same place where the pictures in this post come from, althought I find it rather amusing that the name of the directory Microsoft used as an example here is "warez," a slang term for pirated software.).

By Brian Krebs | April 18, 2006; 7:43 AM ET Safety Tips

Source2