Bienvenido! - Willkommen! - Welcome!

Bitácora Técnica de Tux&Cía., Santa Cruz de la Sierra, BO
Bitácora Central: Tux&Cía.
Bitácora de Información Avanzada: Tux&Cía.-Información
May the source be with you!

Monday, May 18, 2009

Damaged Hard Disk

Source
Bad sectors are the most common form of harddisk physical damage. They are early signs of disk crash as it deteriorates over time. A bad sector is a sector on the disk which data cannot be written or read due to a physical damage or inconsistencies of parity checking bits on disk (CRC or Cyclic Redundancy error). To recover your data, the best method is to copy its data to another hard disk before attempting to recover its data.
The new disk must be at least exactly the same size (check the number of LBA sectors) or larger; when larger, it's usually not a problem because the number of heads per cylinder and sectors per head will be the same if both disks use LBA mode. Windows may have some problems in dealing with bad sectors on a damaged hard disk, so the best solution is to use a Linux OS to copy data to another hard disk.
You can also use TestDisk to help analyze the sectors copied from a hard drive with physical problems onto a good drive.

TestDisk

TestDisk is OpenSource software and is licensed under the terms of the GNU Public License (GPL).

TestDisk is a powerful free data recovery software! It was primarily designed to help recover lost partitions and/or make non-booting disks bootable again when these symptoms are caused by faulty software, certain types of viruses or human error (such as accidentally deleting a Partition Table). Partition table recovery using TestDisk is really easy.

TestDisk can

  • Fix partition table, recover deleted partition
  • Recover FAT32 boot sector from its backup
  • Rebuild FAT12/FAT16/FAT32 boot sector
  • Fix FAT tables
  • Rebuild NTFS boot sector
  • Recover NTFS boot sector from its backup
  • Fix MFT using MFT mirror
  • Locate ext2/ext3 Backup SuperBlock
  • Undelete files from FAT, NTFS and ext2 filesystem
  • Copy files from deleted FAT, NTFS and ext2/ext3 partitions.

TestDisk has features for both novices and experts. For those who know little or nothing about data recovery techniques, TestDisk can be used to collect detailed information about a non-booting drive which can then be sent to a tech for further analysis. Those more familiar with such procedures should find TestDisk a handy tool in performing onsite recovery.

Recovery of cdrom session

Source

With multi-session cdrom, it is possible to delete files of previous session. Because the files are not really deleted, it is possible to recover them. To read files from the first session, run under Linux

mount /dev/cdrom /mnt/cdrom -t iso9660  -o session=0

Recovery of a lost and damaged NTFS

Source
Analyse Disk 81 - CHS 2434 255 63 - 19092 MB (Enh BIOS mode)
No partition is bootable

No partition is available.

Analyse Disk 81 - CHS 2434 255 63 - 19092 MB (Enh BIOS mode)
L FAT32 1275 1 1 2433 254 63 18619272 [NO NAME]

Only the second NTFS partition is found during Quick Search. Select Deeper Search to try to find more partitions.

Analyse Disk 81 - CHS 2434 255 63 - 19092 MB (Enh BIOS mode)
* HPFS - NTFS 0 1 1 1274 254 63 20482812
L FAT32 1275 1 1 2433 254 63 18619272 [NO NAME]

Both partitions have been found, but the first NTFS has been found using backup boot sector, we need to restore the boot sector. Choose Write and next choose Backup BS to copy backup boot sector over boot sector.

More:

Partition of a drive

Source
....
The criteria that Microsoft uses when partitioning a drive is as follows.
The boot sector always resides at sector zero, this is and industry requirement and not from Microsoft.
All OS boot partitions reside on a head boundary.
In the past there was a cylinder, head, sector layout for hard drives. This comes from before LBA addressing and when drives were extremely slow.
It was always advantageous that when a drive did a seek it would do as much work as possible while it was out on the platter since seek times were horrible.
So, in a single platter, dual head drive on bootup the drive would seek to Cylinder 0, Head 0, and Sector 1, read the bootstrap code at that address and execute it.
The bootstrap would have a table that included where the OS boot data was located.
Instead of seeking to a new area on the drive, the drive would just switch heads and read from Cylinder 0, Head 1, Sector 1.
That is where the OS boot record would normally be. In other words, it is by design that you lose the first 63 sectors of a drive.
In addition, every additional partition will start on a head boundary, so again you lose 63 sectors. If you are using extended partitions you will lose 126 sectors as one starts on head boundary 1 and the other starts on head boundary 0.
There is no way to avoid this, and even after LBA addressing was instituted and drive platter and head numbers became irrelevant. Microsoft, and the industry as a whole, kept this formula. I for one am glad as it makes data recovery much easier when there are a set of rules and these rules can be applied when looking for file system components.
In reference to partition sizes all partitions end on head 254.
The tools that create a partition know that and so when you type in you want your drive ‘C’ to be a 16 GB partition the following formula is used.
There are 63 sectors per track, and 255 tracks per cylinder.
There are 2048 sectors per megabyte of storage and 2097152 sectors per gigabyte of storage. Multiply 63 sectors time 255 tracks you get 16065 sectors per cylinder.
You want 16 GB, so you multiply 16 times 2097152 and that equals 33554432 sectors.
Now we divide 33554432 sectors by 16065 and we get 2088,666791 cylinders.
Truncate the value to 2088 and then take that value and multiply that times 16065 and that value is the actual space Microsoft will allot you for your partition.
In this case 15,99489212 GB of allocated partition space.
Sometimes fdisk will do something weird to optimize the storage but this calculation is fairly close.
In reference to the cluster size the smaller the cluster more of the disk is used, however, you sacrifice speed for small cluster sizes for two reasons.
How the OS buffers depending on cluster size and secondly smaller clusters tend to fragment more as it is easier to use all the space when the areas you can store things in is smaller.
In other words it is easier to store a mouse than an elephant.

Corruption of Master File Table

Source
[partial NTFS corruption following NDIS.SYS blue screen of death]

Symptom: Every time I cold boot the notebook, chkdsk will commence repair process. The screen displays ‘Inserting an index entry into index $o of file 25′ line after line until it said ‘Insufficient disk space to correct error in the index $o of file 25′. The Windows XP then allow me to logon but popup error message saying such and such folders is corrupted and unreadable. Some applications work fine but I noticed that while you can create/save file on C: drive, you can no longer delete nor change it. C: drive file system seems like being completely locked.

Answer A
Well repairing the partition is not going to help because the partition is intact. If the partition was not the drive would not boot. It sounds as if you may have some bad sectors on the drive. It was also interesting when chkdsk indicated that there was not enough disk space on the drive to reallocate index allocations. Sometimes it is best to get your data off of the drive to another media before it goes bad. So, that said, I would back up whatever important data you have to another drive ( external usb, DVD, CD etc ) Then I would check the amount of space used on the drive. If you disk is totally full I would delete whatever you can live without and uninstall any programs you don’t use. The run chkdsk again. If chkdsk can not resolve you problem then I would suggest starting from scratch.

Answer B
The problem exists with the file system itself and not the Master Boot record, or OS boot record. The Master File Table is corrupt and chkdsk is trying to repair. The situation with chkdsk is that it will destroy inodes and file pointers to the point where data cannot be recovered.
You sound like you may have one of two general problems. First, you may have bad sectors on the drive, and because they cannot be read it will show as a corrupt file system and chkdsk will try to run. Second, data was written to the MFT area of the file system and has corrupted the table. This can happen for so many reasons that it would not be prudent to list them here.
In order to solve this problem, I would pull the drive from the machine, place it in a USB sleeve and try to recover the data using DART for XP
http://www.dtidata.com/free_data_recovery_software/DART.zip
.
If DART hangs then that usually means there are bad sectors on the drive, then you may want to use Speed Clone
http://www.dtidata.com/free_data_recovery_software/Speed_clone_Demo.zip
.
To image the drive to another drive and then recover the data.

NTFS Partition Recovery

... with Free Partition Recovery

All things must start somewhere, when it comes to operating systems’; the partition sector is the single most important component in the boot sequence. When the partition sector is missing, corrupt, or set up improperly it can wreak havoc with the booting of your operating system. The partition sector is vulnerable to virus attacks, operating system anomalies, bad sector reads, and an ever increasing set of tools, fdisk included, that when used incorrectly can and will totally destroy an operating systems boot sequence.

In order to more clearly understand how the partition sector fits into the boot sequence, the following is a standard garden variety boot up.

When you turn on your computer several things happen. The first of which is the BIOS (Basic Input Output System) is executed by the CPU (Central Processing Unit). The CPU knows to load the BIOS on power up as there is a flag set at power on. The BIOS then jumps to a set of routines that will execute the POST (Power On Self Test). The POST will look at memory, some peripheral devices, and do some other house keeping procedures. The most important of these is determining the boot device. The boot device is stored in non-volatile read/write memory. If the boot device is set to a hard drive, then an industry standard interrupt 0×19 is called. This routine loads the first 512 bytes of the boot device, which in this case the hard drive, into memory location 0×7C00. The 512 bytes is a standard sector size. It then jumps to that address (0×7C00) and executes whatever it finds there.

If all goes well, the set of instructions executed will look at the partition entry data. The partition entry data is used to determine which partition is the boot partition. If it finds a boot partition in the partition entry list the instructions will then load a secondary set of instructions which the partition entry has pointed to. In the case of Windows the OS (Operating System) pre loader is now loading itself into memory. This type of OS loader is called a two phase loader and is very common. Take a look at the table below to help better understand the role of the partition sector entry data.

The format of a partition sector entry is as follows:
1.) Byte 1 Boot Partition Indicator (0×80 is bootable, 0×00 is not)

2.) Byte 2 Starting Head of the partition (255 or less)

3.) Byte 3-4 Starting Sector and Cylinder of the partition
This is set up as 10 bits for the Cylinder and
6 bits for the Sector (Sector Max 63, Cylinders Max 1024)

4.) Byte 5 File System Type (NTFS, FAT32 etc)

5.) Byte 6 Ending Head of the partition (255 or less)

6.) Byte 7-8 Ending Sector and Cylinder of the partition
This is set up as 10 bits for the Cylinder and
6 bits for the Sector (Sector Max 63, Cylinders Max 1024)

7.) Bytes 9 -12 Relative Sector to the partition sector. In other
words, where the actual partition starts.

8.) Bytes 13-16 Total sectors for this partition.

If any of this data is outside the stated parameters the partition will fail and consequently the boot sequence will stop. In order to clearly understand what happens when the partition sector is corrupt or damaged, the following is a list of scenarios.1. Boot Failure: System Halted
An error message that comes from the BIOS. Certain BIOS versions, especially the most recent revisions, take a look at the partition sector. The BIOS will perform some preliminary tests and one of the tests is the Partition Identifier. At the end of every partition sector is the value 0xAA55. If this indicator is missing then the BIOS assumes that this is not a partition sector and the aforementioned error message will be issued.

2. System reboots over and over
Although this is not an error message, it can happen if the relative sectors point to an invalid OS pre loader. A trap is set and if the data that is loaded is not executable machine most BIOS’s will reboot.

3. Invalid Partition Table
This error message comes from the partition boot code. If there are no boot devices then the boot code will enter an infinite loop after this message is displayed.

4. Error Loading Operating System
After a valid partition is found the LBA sector pointed to by the partition entry table will be loaded using INT 13. This is the operating system loader. If the code cannot be loaded into memory then the above message is normally displayed.

5. Missing Operating System
Once the operating system boot code is loaded it is checked for the 0xAA55 identifier in the same manner that the partition sector is tested. If this test fails, then the above message will be displayed.

Over the years the BIOS writers have gotten smarter, personal computer as well as operating system standards have been set and are normally followed. So many of the messages, as well as error checking is now handled by the BIOS. The messages I have mentioned are just a few, but, are very common; however, from BIOS to BIOS the messages as well as the error handling can differ greatly.

As you can clearly see the partition sector is of primary importance in the boot sequence. Without it nothing happens. In the future there may be ways to overcome the use of a partition sector, one would be to store the partition entry data in the BIOS, this would eliminate boot sector viruses as well as the possibility that the boot sector goes bad and becomes unreadable. However for now, we will work with what we have. The next segment will discuss how to do partition recovery using a simple piece of software.

How To Use The Software

Free Partition Recovery is an extremely powerful tool for anyone to use but this statement must be caveated with the fact that with power comes a degree of responsibility. In other words, use this tool with extreme caution as it can destroy your file system to the point of massive and possibly permanent data loss. That being said lets take a look at how we can put this tool to good use.

First, the software should be run from a master drive. There should be two drives in the system, your boot drive from where the software is executed, and the damaged drive. The damaged drive being the one with the corrupt or missing partition. Free Partition Recovery is designed to work on Windows XP type operating systems, so make sure that you have unzipped the file onto that type of operating system.

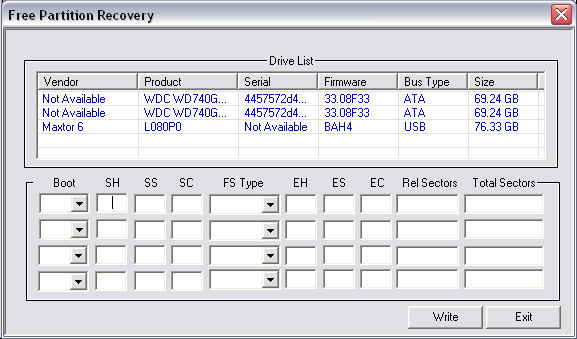
Once the Free Partition Recovery has been executed you will see in Figure 1.

Figure 1
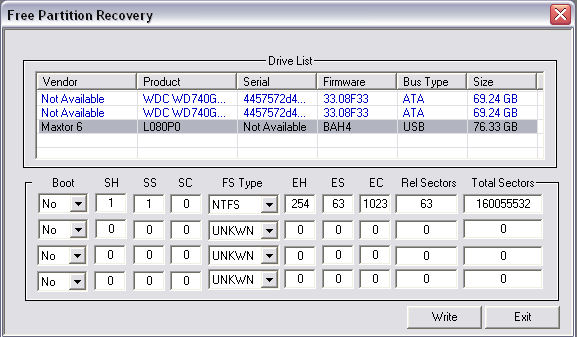
The top row displays all the physical drives currently active in your system. This will also include any external devices that can be mounted as a physical block device. An example of this would be the 80 GB Maxtor USB device. Once you choose a physical drive all partition entry data will be displayed as in Figure 2.

Figure 2
The partition entry data for this particular drive gives us a clear example of a drive that has been configured with one NTFS logical drive with the standard offset of 63 sectors, start head and sector of 1 and ending cylinder of 1023. These are classic values for a normal single logical drive setup.
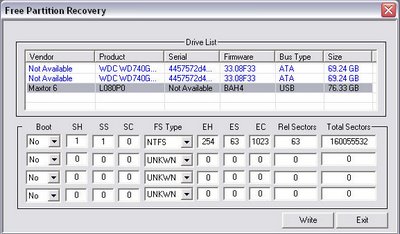
The other three entries are clear and not in use. These entries will be ignored by the OS loader. There is one other important item in this configuration. On the far left of Figure 2 of the first partition entry is the boot flag “No”. This indicates that this partition is ‘Not Bootable’. You can change that value buy using the drop down list (Figure 3)

Figure 3
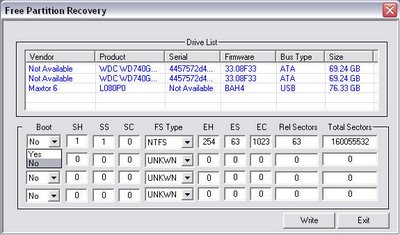
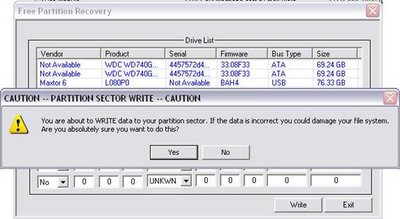
Once you have configured all of the partition entries to reflect the correct values all you need do is press the “Write” button. You will be presented with the following message box in Figure 4. A word of caution, once you write the data down to the partition sector, you must live with it. Please exhibit extreme caution.

Figure 4
You can download the free NTFS partition repair software here. For more info about freeware data recovery visit our free data recovery software page.