Bienvenido! - Willkommen! - Welcome!

Bitácora Técnica de Tux&Cía., Santa Cruz de la Sierra, BO
Bitácora Central: Tux&Cía.
Bitácora de Información Avanzada: Tux&Cía.-Información
May the source be with you!
Showing posts with label Vista. Show all posts

Wednesday, January 19, 2011

Can't install any antivirus

Fuente
it doesn't allow me to install any anti virus/ security software i have tried nearly all i can think of,
first thing i tried ..
i did extensive research on the problem and decided it may be a maleware infection so i attempted to install malwarebytes programm it installed succescfully but refused to run
with the following message
"run-time error 339
component "vbalsgrid6.ocx" or one of its dependencies not correctly registered: a file is missing or invalid"
after doing abit of research i tried the following fix where i renamed the download and went into the program files showed all the hidden files and attempted to rename all the .exe files but it wouldn't let me re name any of them it just seems to stay the same so i gave up on that area.
i noticed that my disk backup feature kept continuously reporting failed due to there being insufficient memory on my hard drive also on my connection status icon it seems to say the same thing when i mouse over it " not enough storage is available to complete this operation. this is untrue ofc as i have over 60g free space remaining
i followed up on this issue and attempted to fix it. following this error code
0x800700E
Solution 1
This issue can occur due to corrupt windows installer components. Please try the following steps to fix it:Step 1.Register Windows Installer
1. Press "Start" and choose "Run".
2. Type in "cmd" (without quotation marks) and press "OK".
3. In the command line, type in the following command and press Enter:
MSIexec /unregister
4. Then, type in the following command and press Enter:
MSIexec /regserver
After finishing the above steps, please check the result again. If the issue persists, please click "Start", click "Control Panel", and click "Add/Remove Programs" to check if Windows Installer 4.5 has been installed. If it has, please highlight and remove it. After that, please reinstall Windows Installer 4.5 from the following link.
Windows Installer 4.5 Redistributable
http://www.microsoft.com/downloadS/details.aspx?familyid=5A58B56F-60B6-4412-95B9-54D056D6F9F4&displaylang=en
After that, please check if we can install Windows Installer Cleanup Utility.
http://download.microsoft.com/download/E/9/D/E9D80355-7AB4-45B8-80E8-983A48D5E1BD/msicuu2.exe
Note: Please download it via IE and save it onto your desktop. Then, double click and install it.
What is the result? If the issue even exists, let's refer following steps to repair installer components.
Step 2.Replace the corrupted Windows Installer files:
==================
A. Enter Safe Mode:
1. Restart the computer.
2. Keep pressing the F8 key until the Windows Startup menu appears.
3. Choose Safe Mode, and press Enter.
Note: In Safe Mode, your system display and Desktop will look and perform differently than in Normal Mode. This is only temporary.
B. Replace the dll files:
1. Click Start-> Search.
2. Select "All files and folders", and then search for the following files:
MSI.DLL
MSISIP.DLL
MSIHND.DLL
MSIMSG.DLL
MSIEXEC.EXE
If we find any of the above files, please right click to rename this file to (such as MSI.old). Please understand that we may not find all the files listed above. If so, it is normal. Please continue to search for the rest of the files.
3. Put the Windows XP CD to CD-ROM.
4. Click Start->Run.
5. Type cmd and press enter.
6. In the DOS Window, type the following command and press Enter after every line.
expand -r D:\I386\msi.dl_ c:\windows\system32
expand -r D:\I386\msihnd.dl_ c:\windows\system32
expand -r D:\I386\msisip.dl_ c:\windows\system32
expand -r D:\I386\msimsg.dl_ c:\windows\system32
expand -r D:\I386\msiexec.ex_ c:\windows\system32
Note: I am assuming that your CDROM drive letter is "D". Please use the actual drive letter to substitute "D". There is a space before C:\WINDOWS.
7. Click start and choose run. Type “MSIEXEC /regserver” (without quotation mark) in the open box and click OK

Monday, October 26, 2009

Windows Defender: 0x800106ba

application failed to initialize 0x800106ba

Source

Go to http://support.microsoft.com/kb/290301/
This should load a description of Windows Cleanup Utility.
Scroll down the page and find 'Download the Windows Installer Cleanup", download it then run.

Then download a new version of Defender and install it, this should fix your problem
<hr />
Source
Windows Defender which was previously known as Microsoft AntiSpyware is an anti-spyware utility that built-in in Windwso Vista to detect, prevent, remove and quarantine spywares. Although it’s packaged with the operating system, and thus free of charge (or already been added into cost), not all users will need Windows Defender. Unfortunately there is no clear-cut way to remove or uninstall Windows Defender in Vista. Use the trick and hack below to disable Windows Defender in a way that as is Windows Defender is been uninstalled or removed.
The most easy way to to uninstall or remove Windows Defender in Vista (since you can’t actually uninstall it) is by disabling and turning off Windows Vista’s Windows Defender. Windows Defender provides an graphical user interface (GUI) to easily stop using Windows Defender in real-time protection checking, and disable and turn off Windows Defender service.
Note that a lot of guides have asked to disable Windows Defender service via Services in Control Panel and uncheck the startup item in System Configuration (MSConfig) in order to turn off Windows Defender and prevent it from starting up. This is uncessary, and it’s not a recommended way as any misstep will cause error message (explained below).


  1. Run Windows Defender from Start Menu.
  2. Click on Tools button.

    Tools of Vista Windows Defender

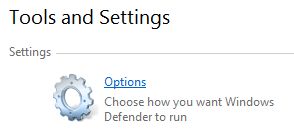
  3. Then click on Options link under “Tools and Settings” section.

    Options of Windows Defender in Vista

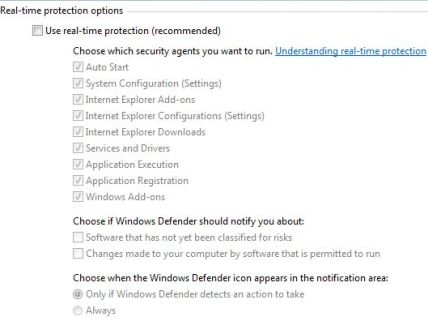
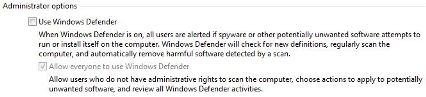
  4. Scroll down the “Options” page, and uncheck the check boxes of the following two settings:

    Use real-time protection (recommended) under “Real-time protection options”

    Disable Windows Defender in Vista

    Use Windows Defender under “Administrator options”

    Uninstall Windows Defender in Vista

    Note that both options MUST be unchecked for the Windows Defender service in Windows Vista to be completely stopped. Else, only real-time protection is disabled.

  5. Click on Save button.
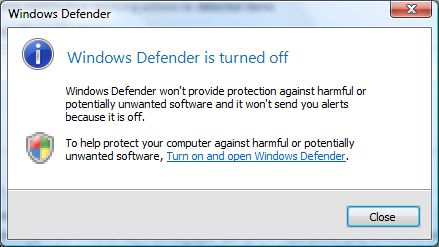
  6. A “Windows Defender is turned off” dialog message will appear, confirming that Windows Defender no longer runs. Once the Windows Defender is disabled, it’s sort of been uninstalled too, as any attempt to run the program will bring up “Windows Defender is turned off dialog window and unable to proceed to Windows Defender main window anymore.

    Windows Defender is turned off in Vista

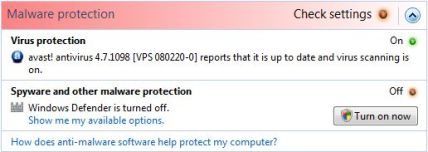
    Beside, Windows Security Center will display a red alert icon in notification area (system tray) which warns users about stop functioning of spyware and other malware protection software.

    Vista Security Warning on Disabled Defender

    Install your favorite anti-spyware software to remove this alert, or follow this disable alert hack.

    Beside, in Services of Control Panel, the Windows Defender service is automatically stopped, although the Startup Type is still set to Automatic. Do not try to manually stop and disable the Windows Defender service from Services panel, as it will cause the error message of “Application failed to initialized: 0×800106ba. A problem caused this program’s service to stop. To start the service, restart your computer or search Help and Support for how to start a service manually.”

To re-enable (i.e. reinstall) Windows Defender in Vista, run Windows Defender from Start Menu and turn it on again when prompted.


Tuesday, October 13, 2009

Creative MultiSpeaker Surround

First:
Free System Scan:liutilities.com
How many system related errors does your computer have?

As a SoftwarePatch.com user
you no longer need to guess... this Free System Scan will give you a complete diagnosis and deep scan of your registry for Errors and Conflicts.
System Scan

Sound Blaster Live! Driver Pack Full Package - XP/2000

This is the complete package for the Sound Blaster Live! Driver Pack (for Windows 2000/XP) that consists of:
Live! DriverPack
PlayCenter 3 (Version 3.02.52)
Recorder (Version no. 2.00.31)
MiniDisc Center (Version no. 1.01.15)
Remote Center (Version no. 1.40.26)
Note: Please unzip this package and run the EXE file for each driver and application separately. For more information on how to install the Sound Blaster Live! DriverPack correctly, please refer to the README_FIRST.TXT file.

Taken from mydigitallife.info:
Enable CMSS of Creative Sound Blaster Live! 24-Bit External in Vista x86 and X64


Creative MultiSpeaker Surround (CMSS) is a feature in Sound Blaster audio cards as part of EAX technology which allows stereo upmix from various sources such as MP3, WMA, or Wav to become 4.1, 5.1, 6.1 or 7.1 channels surround sound, depending on speaker setup and sound card model. CMSS works regardless of whether the typical stereo sources are Dolby Surround encoded or not, and works well with Dolby Pro Logic, WAVE, AVI and MIDI program material. Unfortunately, with latest Windows Vista driver from Creative for Creative Sound Blaster Live! 24-bit External sound card, CMSS is not supported. Here’s a little trick that allows SB Live! 24-bit External to support CMSS.

The hack should work in both 32-bit and 64-bit of Windows Vista, and is good as a workaround at least until Creative releases a proper Vista driver for the sound card.

  1. Disable integrated onboard sound.
  2. Remove all sound cards installed.
  3. Uninstall all drivers of previous installed sound cards, including Vista driver for SB Live! 24-bit External if it has already been installed.
  4. Remove all Creative software.
  5. Restart computer.
  6. Download the Basic Audio Applications for PC (consists of Device Manager, EAX Console & Speaker Settings).
  7. Download the audio driver for SB Live! 32-bit External for Windows XP:

    x86 / 32-bit
    x64 / 64-bit

  8. Extracted both the drivers and application setup installers downloaded with WinRAR or PowerAchiver.
  9. Plug in the Creative Sound Blaster Live! 24-bit External sound card. Windows Vista will detect the sound card and install it as USB Audio Device.
  10. Run the following setup program (setup.exe) in the sub-folder of the unpacked Basic Audio Application folder. Do not restart computer until you have finished install all three application:

    /setup/DevCon/setup.exe
    /setup/EaxCon/setup.exe
    /setup/SpkSet/setup.exe

  11. Restart computer now.
  12. After Windows Vista boots up, go to Device Manager in Control Panel -> System and Maintenance. Expand Sound, video and game controllers and right click on USB Audio Device, and choose “Update Driver Software”.
  13. Select “Browse my computer for driver software”, and input the following location path inside the unpacked WinXP SB Live! driver folder:

    x64: /Drivers/Win2k/SBKS64.inf
    x86: /Drivers/Win2k/kscombo.inf

  14. After the driver is updated, reboot.
  15. After booting up, go to Control Panal again, select Hardware and Sound -> Sound. Highlight Speakers and then select “Configure”. In the Speaker Setup configuration wizard, select Stereo and Front left and right.
  16. Run Creative Speaker Settings and select the correct speaker type under Speaker/Headphone Selection section. Do not sync with Control Panel.
  17. Run the Creative EAX Settings. Under CMSS-3D, select (tick) Enable, and choose CMSS. Do not select Stereo Surround as the sound channels won’t come out from every speaker, and make sure Stereo Focus is 0%.

Enjoy CMSS surround sound in Windows Vista.

Monday, March 16, 2009

BAD Vista

The BadVista Campaign
Surprises inside Microsoft Vista's EULA
No virtualization for you!
Right now, consumers and businesses can buy two versions of Windows XP for their desktops: Home and Professional. Let's review the choices they're going to face, including pricing, when Vista rears its head:
  • Starter (OEM pricing only)
  • Home Basic ($199, or $99 upgrade)
  • Home Premium ($239, or $159 upgrade)
  • Business ($299, or $199 upgrade)
  • Enterprise (OEM pricing only)
  • Ultimate ($399, or $259 upgrade)
Product differentiation among market segments is common and makes good sense. But this is ridiculous. Six different versions?

Wednesday, December 10, 2008

User Account Control

User Account Control (UAC), or unknowingly mistaken as User Access Control is new security feature in Windows Vista. The main display of UAC is the occasional pop up dialog box asking for user’s permission needed by Windows or for user to enter administrator’s password to perform the operation or run a program especially setup executable, installer or system tools. UAC also affects command prompt (Cmd.exe) with errors such as “The requested operation requires elevation” or “Access Denied” when not running in elevated command prompt with full privileges.

The annoying symptom happens because User Account (Access) Control or UAC forces all processes to run in lower elevation mode with limited privileges. When a program or process requires access to system files, folders or registry hives that only administrator can access, UAC launch a consent prompt to allow user to give approval or enter administrator’s credential to higher elevation with full administrator’s rights.

For user who find the constant UAC elevation approval request annoying, and confident that you can maintain the security of computer from infection without the help of UAC, it’s possible to turn off and disable UAC. Turning User Account Control off potentially fix compatibility issue where UAC prevents some programs, applications, components, processes or games from running properly even if authorization is given to elevate its privileges, as delay in execution as may break certain real-time functions.

There are a few ways that you can use to turn off the UAC, but most home and personal users should find method to disable UAC via Control Panel easiest to do. User Account Access Control, when turned off and disabled., will affect all users on the computer.

Method 1 - Turn Off UAC via Users Accounts Control Panel

  1. Click Start and then open Control Panel.
  2. In the Control Panel, click User Accounts and Family Safety.

    Disable UAC

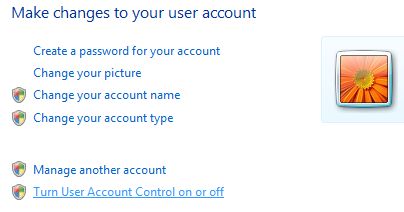
  3. Click User Accounts.

    Turn Off UAC

  4. Click Turn User Account Control on or off.

    Turn Off and Disable User Access Control in Vista

    When prompted that Windows needs your permission to continue, press Continue button or enter the administrator’s password.

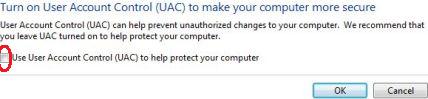
  5. Clear the tick or check mark on the check box beside the option to Use User Account Control (UAC) to help protect your computer.

    Turn Off and Disable User Account Control in Vista

  6. Click OK.
  7. When prompted that computer must be restarted to apply the changes, reboot the computer.
  8. To enable the UAC, simply tick or select the checkbox again.

Method 2 - Disable UAC Using Registry Editor

  1. Run Registry Editor by typing RegEdit in Start Search or command prompt.
  2. Registry Editor, navigate to the following registry key:

    HKLM\Software\Microsoft\Windows\CurrentVersion\Policies\System

    where HKLM is HKEY_LOCAL_MACHINE.

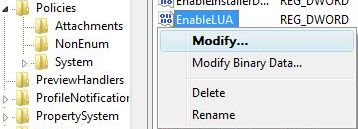
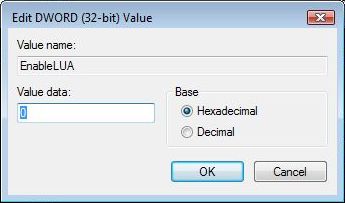
  3. Right click on EnableLUA registry subkey and choose Modify or double click on EnableLUA registry value name in the right pane to modify the setting.

    Disable UAC via EnableLUA

  4. On “Edit DWORD (32-bit) Value” dialog box, set the new value data as 0.

    Turn of UAC via Registry Setting

  5. Exit from Registry Editor.
  6. Restart the computer.
  7. To enable the UAC again, simply change back the value data of EnableLUA to 1.

Method 3 - Turn Off UAC Using MSConfig System Configuration Utility

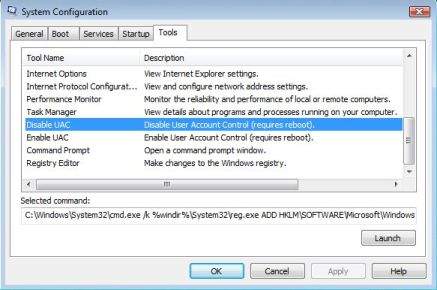
  • Type MSConfig in Start Search box or Run command (open by pressing Win+R) and hit Enter key.

    When prompted that Windows needs your permission to continue, press Continue button or enter the administrator’s password.

  • In System Configuration window, click on the Tools tab.
  • Scroll down and locate to select Disable UAP or Disable UAC option in the item list.

    Disable User Access Control with MSConfig

  • Click the Launch button.
  • A command prompt window will open and automatically execute and run scripted process to disable UAC.
  • On completion, The operation completed successfully message will be shown. Close Cmd.exe window when done, and then exit form MSConfig.
  • Restart computer for changes to apply and become effective.
  • To return UAC to on status, simply select Enable UAP or Enable UAC, and then click on Launch button.

Method 4 - Disable UAC Using Group Policy (Active Directory GPO or Local Group Policy)

Note: Windows Vista Home Premium and Home Basic editions do not have Local Group Policy Editor.

  1. Click Start and then type GPEdit.msc in the Start Search box and hit Enter key to open the Group Policy Editor.

    Note: If you’re using Active Directory Domain GPO which controls many computers, open Group Policy Management Console by click on Start, and then type GPMC.msc in the Start Search and hit Enter key from a Windows Vista computer that is a member of the AD domain. In the Group Policy Management Console (GPMC) window, browse to the respective GPO which is linked and enabled to the OU (organization unit) or domain where the Vista computers are located, then edit it.

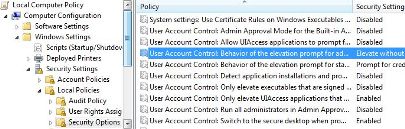
  2. Navigate and browse to Computer Configuration -> Windows Settings -> Security Settings -> Local Policies -> Security Options.
  3. In the right details pane, there are a few User Account Control related policies. Right click each of the following policies and configure or change the value to the new value indicated below after the dash (-):
    • User Account Control: Behavior of the elevation prompt for administrators - Elevate without prompting
    • User Account Control: Detect application installations and prompt for elevation - Disabled
    • User Account Control: Run all administrators in Admin Approval Mode - Disabled

    Turn Off User Access Control using Group Policy

  4. Restart the computer to make the changes effective.
  5. To re-turn on UAC, revert back to original values of the policies, which is Enabled and Prompt for Consent.

Method 5 - Disable User Access Control from Command Prompt

  1. Open an elevated command prompt.
  2. Run the following command to disable and turn off UAC:

    C:\Windows\System32\cmd.exe /k %windir%\System32\reg.exe ADD HKLM\SOFTWARE\Microsoft\Windows\CurrentVersion\Policies\System /v EnableLUA /t REG_DWORD /d 0 /f

  3. To re-enable and turn back on the User Account Control, run the following command:

    C:\Windows\System32\cmd.exe /k %windir%\System32\reg.exe ADD HKLM\SOFTWARE\Microsoft\Windows\CurrentVersion\Policies\System /v EnableLUA /t REG_DWORD /d 1 /f

  4. Reboot the computer for the changes to take effect.

Note: After disabling and turning off UAC, a red X shield icon of Windows Security Center will be displayed in the notification area (system tray). My Digital Life has the guide to remove the Windows Security Center warning icon and messages.

Tuesday, November 4, 2008

Linux ntfsfix on Vista

Source
I wanted to test ntfsfix /dev/sda1 to see what would happen. This was a very bad idea. Windows vista refuses to boot since then. It goes up to the first windows splash screen with the moving horizontal pattern, and nothing more.
What can I do to correct this miserable action?
linux version is kubuntu, kernel 2.6.22-14 and linux-ntfs is 1.13.1-6
Thanks in advance

linux-ntfs 1.13.1 is not compatible with Vista
as you found out... You need at least linux-ntfs 2.0.0 for Vista support.
The easiest way to fix your volume is to allowing windows 2000 or XP to mount it. That will reset the correct flags and Vista will be able to mount it.
Alternatively you need to write a tool (or modify ntfsfix.c) to clear
the VOLUME_MOUNTED_ON_NT4 bit in the volume flags - where we set the VOLUME_IS_DIRTY flag would be the place to edit ntfsfix.c just add something like thus:
flags &= ~ VOLUME_MOUNTED_ON_NT4;
after the line:
flags = vol->flags | VOLUME_IS_DIRTY;
Compile and run and with some luck it should fix your volume.

Monday, October 13, 2008

What's wrong with Vista?

Source
Microsoft's new Windows Vista operating system is a giant step backward for your freedoms.
Usually, new software enables you to do more with your computer. Vista, though, is designed to restrict what you can do.
Vista enforces new forms of “Digital Rights Management (DRM)”. DRM is more accurately called Digital Restrictions Management, because it is a technology that Big Media and computer companies try to impose on us all, in order to have control over how our computers are used.
Technology security expert Bruce Schneier explains it most concisely:

Windows Vista includes an array of “features” that you don't want. These features will make your computer less reliable and less secure. They'll make your computer less stable and run slower. They will cause technical support problems. They may even require you to upgrade some of your peripheral hardware and existing software. And these features won't do anything useful. In fact, they're working against you. They're digital rights management (DRM) features built into Vista at the behest of the entertainment industry—And you don't get to refuse them.

DRM gives power to Microsoft and Big Media.
  • They decide which programs you can and can't use on your computer
  • They decide which features of your computer or software you can use at any given moment
  • They force you to install new programs even when you don't want to (and, of course, pay for the privilege)
  • They restrict your access to certain programs and even to your own data files

DRM is enforced by technological barriers. You try to do something, and your computer tells you that you can't. To make this effective, your computer has to be constantly monitoring what you are doing. This constant monitoring uses computing power and memory, and is a large part of the reason why Microsoft is telling you that you have to buy new and more powerful hardware in order to run Vista. They want you to buy new hardware not because you need it, but because your computer needs it in order to be more effective at restricting what you do.
Microsoft and other computer companies sometimes refer to these restrictions as “Trusted Computing.” Given that they are designed to make it so that your computer stops trusting you and starts trusting Microsoft, these restrictions are more appropriately called “Treacherous Computing”.

Even when you legally buy Vista, you don't own it.
Windows Vista, like previous versions of Windows, is proprietary software: leased to you under a license that severely restricts how you can use it, and without source code, so nobody but Microsoft can change it or even verify what it really does.

Microsoft says it best:

The software is licensed, not sold. This agreement only gives you some rights to use the software. Microsoft reserves all other rights. Unless applicable law gives you more rights despite this limitation, you may use the software only as expressly permitted in this agreement. In doing so, you must comply with any technical limitations in the software that only allow you to use it in certain ways.

To make it even more confusing, different versions of Vista have different licensing restrictions. You can read all of the licenses at http://www.microsoft.com/about/legal/useterms/default.aspx.
It's painful to read the licenses, and this is often why people don't object to them. But if we don't start objecting, we will lose valuable freedoms. Here are some of the ridiculous restrictions you will find in your reading:

  • If your copy of Vista came with the purchase of a new computer, that copy of Vista may only be legally used on that machine, forever.
  • If you bought Vista in a retail store and installed it on a machine you already owned, you have to completely delete it on that machine before you can install it on another machine.
  • You give Microsoft the right, through programs like Windows Defender, to delete programs from your system that it decides are spyware.
  • You consent to being spied upon by Microsoft, through the “Windows Genuine Advantage” system. This system tries to identify instances of copying that Microsoft thinks are illegitimate. Unfortunately, a recent study indicated that this system has already screwed up in over 500,000 cases.
Free software like GNU/Linux does not require you to consent to these absurd licensing terms. It is called free software because you are free to make as many copies as you want, and to share it with as many friends as you want. Nobody will be monitoring your actions or falsely calling you a thief.

...
...

Bad Vista Campaign

The BadVista campaign is an advocate for the freedom of computer users, opposing adoption of Microsoft Windows Vista and promoting free (as in freedom) software alternatives.
Read more...

Sunday, October 12, 2008

Jeroen Kessels Defrag

Source
Free GNU software
JkDefrag is a disk defragmenter and optimizer for Windows 2000/2003/XP/Vista/2008/X64.
Completely automatic and very easy to use, fast, low overhead, with several optimization strategies, and can handle floppies, USB disks, memory sticks, and anything else that looks like a disk to Windows.
Included are a Windows version, a commandline version (for scheduling by the task scheduler or for use from administrator scripts), a screensaver version, a DLL library (for use from programming languages), versions for Windows X64, and the complete sources.
How it works
JkDefrag is based on the standard defragmentation API by Microsoft, a system library that is included in Windows 2000, 2003, XP, Vista, and 2008. Most defragmenters are based on this API, including the free defragmenter that comes with Windows and many commercial defragmenters. Basically all JkDefrag does is send "move this file to that location" commands to the API. JkDefrag does not modify the disk by itself, and is therefore extremely solid.

Defragmentation and optimizing will not only make a harddisk faster, but also lengthen it's life span. The disk will have less work to do and therefore have less wear and tear. Secondly, the sorting optimization strategies (see the "-a" option) will refresh all the magnetic data on your harddisk. However, defragmenting and optimizing is work, so excessive defragmenting and optimizing can actually cause more wear and tear than it prevents. JkDefrag is therefore set for "fast" optimization by default, intended to be used on a daily basis. The other optimizations should only be used occasionally.

What is "disk fragmentation"?
Imagine a book split into several parts, some pages are over here, other pages in another room on another floor altogether. You will have to walk a lot when you need to read the book. It may sound silly, but this is exactly what happens to files on your harddisk. Defragmentation will put all the parts (fragments) back together, making your computer a lot faster.
What is "disk optimization"?
Imagine a big library with lot's of books, spread out all over the building and not sorted whatsoever. There is an index telling you exactly where every book is, but you will have to walk a lot when you need several books. This is exactly what happens on your harddisk, the files that belong to an application can be all over the place, anywhere on the harddisk. Optimization will bring all the files together in one place, leaving the rest of the harddisk empty, and will sort the files, for example alphabetically.
How safe is it?
JkDefrag is based on the standard defragmentation API by Microsoft, a system library that is included in Windows 2000, 2003, XP, Vista, and 2008.
Most defragmenters are based on this API, including commercial defragmenters.
Basically all JkDefrag does is send "move this file to that location" commands to the API. It does not touch the disk by itself, and is therefore extremely solid. If your disks use NTFS then you're even safe when the computer crashes in the middle of defragmenting.Nevertheless, it's still a good idea to backup before defragmenting, just like with other defragmenters, because the heavy use of the harddisk may trigger a hardware fault (disk crash), and/or overheating (disk, power supply, controller chipset, etc.).

Do I have to "checkdisk" before running JkDefrag?
Feel free to do so, but it's not necessary. JkDefrag is totally solid and cannot get confused by a corrupted disk. And even if it could then nothing bad can happen, because JkDefrag does not write to disk itself. Everything is done through the Windows defragmentation API, and Windows is quite smart about handling corrupted disks.
How do I specify an option, or select a single disk (or folder or file)?
If you don't know how to use the Windows commandline, then take a look at the GUI wrappers, see the "Contributed by other people" chapter.
Another way is to create a shortcut to "JkDefrag.exe", open the properties of the shortcut, and add the desired commandline options (for example "-a 7") or the name(s) of the disk/folder/file (for example "C:") to the end of the "target" line. For example:
          "C:\JkDefrag\JkDefrag.exe" -a 7
"C:\JkDefrag\JkDefrag.exe" D:

Tip: In the same properties window you can select "minimized".
Tip: See the JkDefrag "-q" option to exit automatically when finished.

Where is the Stop button?
All versions of JkDefrag can be stopped safely at any time, there is no risk of losing data or corrupting your disk.
You can use all the usual ways to stop a Windows program, such as pressing ALT-F4,
clicking the 'x' in the top-right corner, via the pull-down menu in the taskbar, or by killing the program via the task manager or another utility.
The commandline program can be stopped the same way, plus by pressing CTRL-C, or BREAK. It may take a bit of time for the program to actually stop, JkDefrag will finish the current file in the background.

Release date: August 31, 2008

JkDefrag-3.36.zip
Download for Windows 2000/2003/XP/Vista/2008479kb
JkDefrag64-3.36.zip
Download for X64 versions of Windows 2003/XP/Vista/2008488kb

Source
The used colours are:

• Black: empty

• Grey: in use by unknown data
  • Dark-green: Spacehogs
  • Light-Green: defragmented
  • Yellow: fragmented
  • Red: unmovable
  • Pink: system files

• White: busy

arrow beginning of the diskdrive

---------------------------------------------------------
Source
JkDefrag option Gui
JkDefragGUI is an Graphical User Interface which allows you to easily select all the features JkDefrag, a freeware defragmentation tool made by Jeroen Kessels has to offer. But is can do a lot more. JkDefragGUI can schedule a defragmentation, install JkDefrag or it's screensaver but can also do some small maintenance to your computer. It can be used to schedule a defragmentation of your systemfiles like pagefile and registry files. JkDefragGUI also supports CCleaner which can be used instead of the internal cleaning function. It can also erase any information which is left behind on your harddisk after erasing files. JkDefragGUI was created for people who don't have the skills of an advanced user but still want to use the powerful features JkDefrag has to offer or for those people who like a GUI instead of using the command line. JkDefragGUI is compatible with Windows 2000, Windows XP, Windows Vista, Windows 2008, U3 capable flash memory and with BartPE pre-installed environment.
A. Main Strategy:

Action:
- analysing only (action 1)
- analysing and defragmenting (action 2)
- defragmenting and optimising (action 3)
This
optimisation strategy is very suitable for day-to-day use. It moves a
minimum of data on the hard disk and finishes very quickly, but will
not fill all the gaps on the disk. The strategy scans for gaps on the
disk and fills them with files from above.
- full optimisation (action 4) [since v3.14 removed]
This
optimisation strategy is for incidental use once in a while. It takes a
lot of running time and data movement because it tries to fill all the
gaps on the disk. The strategy is the same as for fast optimisation,
plus the files just above a gap are moved away until the gap can be
completely filled with files from above.
- sorted optimisation (actions 7 - 11)
All
the sorting optimizations will create fragments. This is by design, it
is not a bug. These sorting optimizations are for incidental use once
in a while. They take a lot of running time and data movement because
they rewrite all the data on the disk. The strategies vacate a small
area on disk and then fill it up again with the files in the selected
order.
  • sort by name (action 7): very good for fast program starting. The files used by a particular program will be very close together on disk.
  • sort by size (action 8): placing all the small files together at the begin of the disk will dramatically reduce the average file seek time.
  • sort by last access (action 9): files that have not been accessed in a while are probably unimportant and are best sorted to the back.
  • sort by last change
    (action 10): placing files together that change a lot (for example
    databases and log files) will speed up regular operation of the system.
  • sort by creation time (action 11): the oldest files on the disk are likely to be important system files, for example used when Windows is booting.

 
- force together (action 5):
Intended
for partition resizing. All movable files are moved to the beginning of
the disk, even if it means fragmenting them to fill gaps that cannot be
filled otherwise.
- move to end of disc (action 6):
Move
all the files to the end of the disk, making more room at the beginning
of the disk. Intended for big and rarely used files such as log files,
backup archives, installation files, and such.
JkDefragGUI screenshot 1JkDefragGUI screenshot 2

Bugs and lack of apps plague 64-bit users

Vista boosters say that the 64-bit edition of the operating system runs applications faster and can address a lot more system memory than its 32-bit counterpart.
Just don't tell that to Vince Heiker, a retired IT executive in the Dallas area who has used 64-bit Vista for some time — and hates the OS.
All versions of Vista have serious compatibility glitches, including problems with Office 2007, but the 64-bit release also suffers from a lack of applications written to take advantage of that version's ability to address more than 4GB of RAM.
More...

Norton User Account Control

Source
User Account Control (UAC) is a new security feature in Microsoft Windows Vista that changes the architecture of the access token creation process and prevents users from logging on with full administrative rights.
While the intent of this feature may have been enhanced security, all too often users need administrative rights for tasks like installing/updating programs, and many software applications need access to run properly.
The User Account Control tool has been designed to replace the Vista UAC, to simultaneously make your system more secure while significantly improving user-friendliness.
By default, any application launched by an administrator is running with a filtered, standard user access token. When the administrator attempts to perform a task, the UAC prompts the user to approve the action. This can lead to poor user experiences because the prompts can be slow to display, and appear frequently and without warning. What’s more, because the UAC may give a false sense of security since other processes can still access the desktop, it actually raises security concerns.
The net effect is that many users find the UAC security clearance and prompting process annoying, especially those who are a computer’s only user and have all the latest Norton Internet Security software installed and updated.
The User Account Control tool will collect user input as well as information on applications causing prompts. The data will be processed to improve the comprehensiveness and robustness of the white list, which will be updatable while running the tool online.
Download UAC = limited user UAC in quiet mode = file and registry virtualisation only plus IE in protected mode, other limited user triggers are auto-elevated (quietely without prompt)
Norton's tool = limited user + remember for the executable triggering the action In this context:
UAC OFF = a bad choice
UAC in quiet mode = better than UAC off, but auto elevation provides an open door, then a second choice
UAC tool = good balance between security and useability, my first choice
UAC ON = best in theory, but in practice user are trained to auto allow everything reducing the security effect to "near zero".

Saturday, October 11, 2008

Suprimir o substituir un fichero del sistema

Fuente (no confiable acorde con wot.com!) Cuidado!
De suprimir o de substituir un archivo en Windows Vista esto no
es siempre tan fácil como suena puesto que los ficheros del sistema son
protegidos mejor por el sistema de ficheros que en XP. Hay dos pasos
que usted necesita hacer para poder substituir o suprimir un fichero
del sistema:
  • Primero usted necesita tomar la propiedad del archivo. Funcionamiento takeown /f “trayectoria y nombre del archivo” to take ownership from a command prompt.
  • Después, usted necesita dar a su cuenta permisos completos del control en el archivo. Funcionamiento cacls “trayectoria y nombre del archivo” /G :F

RegRun Reanimator | Rogue SW Reanimator

Source (Software ruso!)
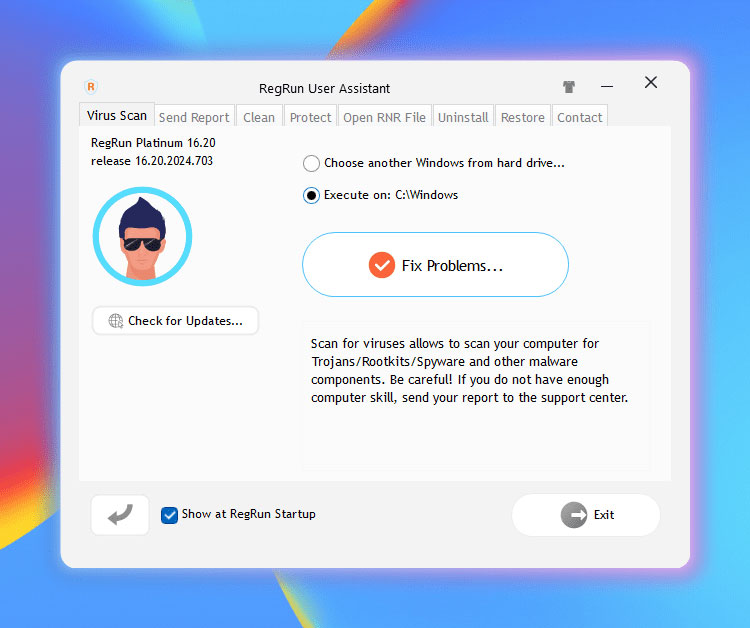
Reanimator is a free of charge software for removing Trojans/Adware/Spyware and some of the rootkits.
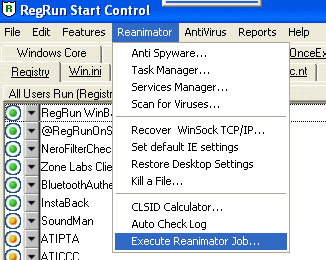
Reanimator does not contain any adware/spyware modules.
Supported Windows 95/98/Me/NT4/2000/XP/2003/VISTA.
Compatible with all known antiviral software. Download
---------------------------------------------------------

NTOSKRNL.DLL is a user mode rootkit. It hides its presence in the registry and in the loaded modules listing.

You could not delete it using standard Windows deletion methods.


Removal Instructions

  1. Download our special software:
    RegRun Reanimator
    Unzip it to any folder on your hard drive.
  2. Open Reanimator.exe. Open "Reanimator" menu, "Execute Reanimator Job". Choose "ntsystem.rnr" file. "NTSYSTEM.RNR" job contains the procedure for activating RegRun Partizan and deleting the ntsystem.exe and ntoskrnl.dll at reboot.
    You will see the "RegRun Partizan" on the Windows blue boot screen in the same moment when Windows checking hard drives.
    Look at the messages on the screen to be sure that the dangerous files are deleted.
  3. Restart your computer. Open Reanimator and choose "Scan for Viruses" to be sure that it is complete.
  4. Visit our Support center if you have any questions.
    Open a support ticket and attach your detailed system report made by RegRun Reanimator.
  5. To remove Partizan from your computer, open Reanimator.exe, go to "Features", "Partizan".
    Click on the "Remove" button.


Rogue SW: Triunfo Reanimator (shitware engañifle)
Fuente (Sitio marcado como no fiable en wot.com!) Cuidado!

Instrucciones de eliminación de triunfo Reanimator
Triunfo Reanimator es uno de las últimas versiones del software falsificado del anti-spyware Reanimator que pone en peligro el mundo de computadoras.
Gane Reanimator se instala generalmente sobre su PC sin su permiso, con Vundo Trojan, virus o software falso. El triunfo Reanimator exhibirá alarmas falsas del sistema o alarmas falsas de la seguridad para trampear a usuario para comprar la versión pagada del triunfo Reanimator, para quitar el potencial y los problemas divulgados. ¡Los mensajes de error probables incluyen, “Windows han detectado la infección del spyware! Se recomienda para utilizar las herramientas especiales del antispyware para prevenir pérdida de los datos. Windows ahora descargará e instalará el antispyware más actualizado para usted. Haga click aquí para proteger su computadora contra spyware!” No sólo hace su máquina retrasar dramáticamente, también pondría su aislamiento y datos en riesgo.

Utilidad de la detección de SpyHunter* Spyware de la transferencia directa.

Instrucciones manuales de eliminación:

Pare los procesos de Reanimator del triunfo:
Triunfo Reanimator.exe

Encuentre y suprima estos archivos de Reanimator del triunfo:
Triunfo Reanimator.exe
Triunfo Reanimator.lnk
Triunfo Reanimator.url
Triunfo Reanimator.lnk de Uninstall

Quite los valores del registro de Reanimator del triunfo:
HKEY_LOCAL_MACHINE \ SOFTWARE \ Microsoft \ Windows \ CurrentVersion \ Uninstall \ triunfo Reanimator

Wednesday, July 16, 2008

Impossible de mettre à jour

... Antivir

Suite à l'installation de l'antivirus "Antivir" vous n'arrivez pas à le mettre à jour ? Pas de panique.
Problème : Lorsque vous cliquez sur "Start Update", rien ne se produit?
Cause : Une mauvaise désinstallation de Norton.

Résolution

Automatique

  • Télécharger ce fichier .ZIP : http://www.avira.com/documents/utils/tools/reg_appdata_winvista.zip
  • Enregistrer ce fichier compressé sur le Bureau
  • Une fois téléchargé, faire un clic droit sur le fichier > Extraire tout > Suivant > Suivant > Terminer
  • Il suffit d'exécuter le fichier .REG obtenu, et d'accepter la fusion avec le registre.

Manuelle (script tiré du .reg)

  • Ouvrir le bloc-notes et y copier/coller ceci :
Windows Registry Editor Version 5.00
[HKEY_LOCAL_MACHINE\SOFTWARE\Microsoft\Windows\CurrentVersion\explorer\Shell Folders]
"Common AppData"="C:\\ProgramData"
  • Cliquer sur Fichier > Enregistrer sous...
  • Dans Nom du fichier, mettre Antivir.reg
  • Dans Type, sélectionner "Tous les fichiers"
  • Cliquer sur Enregistrer.
  • Il suffit d'exécuter Antivir.reg et d'accepter la fusion avec le registre.
Lancer une mise à jour d'Antivir.