Bienvenido! - Willkommen! - Welcome!

Bitácora Técnica de Tux&Cía., Santa Cruz de la Sierra, BO
Bitácora Central: Tux&Cía.
Bitácora de Información Avanzada: Tux&Cía.-Información
May the source be with you!
Showing posts with label remote access. Show all posts

Wednesday, April 10, 2013

lmistart.html Logmein does not function

500 Server Error (0x5aa) lmistart.html System error: Insufficient system resources exist to complete the requested service. (1450)
 Error HTTP 500 Internal server error (Error interno del servidor)
http://www.checkupdown.com/status/E500_es.html 
Introducción
El servidor web (que corre el sitio web) encontró una condición inesperada que le impidió completar la solicitud del cliente (por ejemplo, su navegador web o nuestro robot CheckUpDown) para acceder a la URL requerida.
Es un error "comodín" generado por el servidor web. Básicamente, algo salió mal, pero el servidor no puede ser más específico sobre la condición del error en su respuesta al cliente. Además del error 500 que se le notifica al cliente, el servidor web debería generar algún tipo de registro de error interno que dé más detalles sobre qué falló. Localizar y analizar estos registros depende de los operadores del servidor web del sitio.
Errores 500 en el ciclo HTTP
Cualquier cliente (por ejemplo, su navegador web o nuestro robot CheckUpDown) sigue el siguiente ciclo cuando se comunica con el servidor web:
  • Obtiene una dirección IP del nombre IP del sitio (la URL del sitio sin el encabezado "http://"). Esta búsqueda (la conversión del nombre IP a dirección IP) es provista por los servidores de nombre de dominio (DNS).
  • Abre una conexión de socket IP hacia esa dirección IP.
  • Escribe un flujo de datos HTTP a través de ese socket.
  • Recibe un flujo de datos HTTP en respuesta desde el servidor web. Este flujo de datos contiene códigos de estado cuyos valores son determinados por el protocolo HTTP. Analiza este flujo de datos en busca de códigos de estado y otra información útil.
Este error ocurre en el paso final mencionado arriba cuando el cliente recibe un código de estado HTTP que reconoce como "500".
Arreglo de errores 500 - General
Este error solo puede ser resuelto a través de correcciones al software del servidor web. No es un problema del lado del cliente. Depende de los operadores del servidor web del sitio el localizar y analizar los registros que pueden dar más información sobre el error.
====================
http://social.technet.microsoft.com/Forums/en-US/w7itproui/thread/42e2a200-defe-4c6b-a1b3-606836dcfabb/
 Windows Modules Installer - Error 1450 Insufficient System Resources
Resolution -
1) If you are receiving the "Low Registry Space" error, set the Registry Size Limit to "unlimited":
HKEY_LOCAL_MACHINE\System\CurrentControlSet\Control
Key: RegistrySizeLimit
Type: REG_DWORD
Value: 0xffffff (4294967295)
2) Reboot
3) As a Administrator open a Command Prompt and run "SFC /SCANNOW". The command should complete successfully and if any errors were found, they should be corrected.
This was posted on the ESRI forums, from someone who noticed that Visual Studio 2008 was related to the error. Personally I'm not sure if it was VS, or just installing the .net framework. Here's the link for more chatter on the topic... http://forums.esri.com/Thread.asp?c=93&f=1148&t=287391

--------------------
Helped my problem as well: http://social.technet.microsoft.com/Forums/en-US/w7itproinstall/thread/8d4ebdf4-9f69-4505-a7e2-0f2e1c6debb8
--------------------
I had the same problem. I change the registry value HKEY_LOCAL_MACHINE\System\CurrentControlSet\Control\RegistrySizeLimit to 0xffffff and the problem finished. Now I can use windows update and turn on or offf windows features
=========================
 Backup program is unsuccessful when you back up a large system volume

=========================
http://www.chicagotech.net/netforums/viewtopic.php?f=1&t=15456
The closest solution I found was
http://support.microsoft.com/kb/304101/en-us
--------------------
You may have to change two registry settings. You must always change the first setting. Depending on the configuration of your system, you may also have to change the second setting.
Registry setting 1
1.Click Start, click Run, type regedit in the Open box, and then click OK.
2.Locate and then click the following registry subkey:
HKEY_LOCAL_MACHINE\SYSTEM\CurrentControlSet\Control\Session Manager\Memory Management
3.On the Edit menu, point to New, and then click DWORD Value.
4.Type PoolUsageMaximum as the entry name, and then press ENTER.
5.Right-click PoolUsageMaximum, and then click Modify.
6.Click Decimal.
7.In the Value data box, type 60, and then click OK.

Important
◦Use 60 as your initial value. If your backup does not succeed, use 40 as your value. If that does not work, you must change the behavior of your backup program to reduce the demand of paged pool. If the value works, you may want to increase the value by approximately 25 percent until the backup does not work. If the backup is unsuccessful, use the second registry setting that is described in this article.
◦Make sure that the value for this registry setting is not more than 60.
◦If you are using the /3GB switch, use 40 as your initial setting. Note that this value is a percentage value.
8.Quit Registry Editor.
9.Restart your computer.
Because you must test these settings during the most stressful backups, you may have to wait a month for a whole backup cycle to complete if you are not sure which backup consumes the most resources. Because of this situation, Microsoft recommends that you test low values first. For more information, click the following article number to view the article in the Microsoft Knowledge Base:
312362 (http://support.microsoft.com/kb/312362/ ) Server is unable to allocate memory from the system paged pool
Registry setting 2
1.Click Start, click Run, type regedit in the Open box, and then click OK
2.Locate and then click the following registry subkey:
HKEY_LOCAL_MACHINE\SYSTEM\CurrentControlSet\Control\Session Manager\Memory Management
3.On the Edit menu, point to New, and then click DWORD Value.
4.Type PagedPoolSize as the entry name, and then press ENTER.
5.Right-click PagedPoolSize, and then click Modify.
6.Click Hexadecimal.
7.In the Value data box, type a value of FFFFFFFF, and then click OK.

Important
◦Setting PagedPoolSize to 0xFFFFFFFF (-1) allocates the maximum paged pool instead of other resources to the computer. This is typically required on a domain controller or a terminal server. By default, most Windows 2000 systems seem to be limited to a paged pool maximum size of 160 MB. You can verify this by downloading the kernel debuggers from the public Web site and opening a kernel dump in the debugger that you want to use. The command to use is !vm. This shows a paged pool maximum of 163840 KB, for example. Adding this value reduces the Page Table Entries (PTEs) that are available on a system and extends the paged pool maximum to 343 MB in Windows 2000. The paged pool maximum size can be extended to a larger value in Windows Server 2003.

Note The default and maximum paged pool values for Windows Server 2003 are much larger than in Windows 2000. Typically, the Windows Server 2003 values are at least 50 percent higher than the values found in Windows 2000. These larger values makes it more unlikely that you will experience the issue where paged pool values contribute to the problem that is described in this article. However, it is still possible that this issue may occur.
◦This value restricts the system PTEs that are available. PTEs are another unrelated system resource that your system uses. This setting may cause your operating system to stop unexpectedly and to display a stop 0x3F error on a blue screen when it starts. You can recover from this by using the Last Known Good restart option on the system restart menu or recovery console. Use Performance Monitor to view the Free System Page Table Entries counter. You can add the PagePoolSize setting if the observed free values are over 40,000.
◦If you are running /3GB and /PAE together, do not set this setting without extensive testing and before you establish exactly how many system PTES you must have in your environment. You will probably see values in the range of 10,000-20,000 free. Use the articles to configure paged pool memory but never drop below 10,000 free system PTEs. Do not set this to any other value if you are using the /3GB switch. The only supported values are 0, 0A000000, and FFFFFFFF.
8.Quit Registry Editor.
9.Restart your computer.
For more information about how to avoid and resolve this problem, click the following article numbers to view the articles in the Microsoft Knowledge Base:
256004 (http://support.microsoft.com/kb/256004/ ) How to troubleshoot "STOP 0x0000003F" and "STOP 0x000000D8" error messages in Windows Server 2003, Windows XP, and Windows 2000
Back to the top
Windows NT 4.0
Important This section, method, or task contains steps that tell you how to modify the registry. However, serious problems might occur if you modify the registry incorrectly. Therefore, make sure that you follow these steps carefully. For added protection, back up the registry before you modify it. Then, you can restore the registry if a problem occurs. For more information about how to back up and restore the registry, click the following article number to view the article in the Microsoft Knowledge Base:
322756 (http://support.microsoft.com/kb/322756/ ) How to back up and restore the registry in Windows
Note You must be using Windows NT 4.0 Service Pack 6a.
Resolve the first problem
1.Start Registry Editor (Regedt32.exe).
2.Locate and then click the following registry subkey :
HKEY_LOCAL_MACHINE\SYSTEM\CurrentControlSet\Control\Session Manager\Memory_Management
3.On the Edit menu, click Add Value, and then add the following registry value:
Value name: UnusedFileCache
Data type: REG_DWORD
Radix: Decimal
Value data: 15
Note This number represents the percent of pool that can be consumed by unused segments. A value of 0 indicates that the system will use the default behavior that is similar to Windows NT 4.0 Service Pack 3. A value of 5 through 40 indicates that the system will trim the unused file cache based on pool usage. 5 is most aggressive (that is, it increases the size of the cache the least) and 40 is least aggressive (that is, it lets the cache grow the largest before it trims the cache.)

Important
◦Use 15 as your initial value. If your backup does not succeed, use 5 as your value. If this does not work, you must either change the behavior of your backup program to reduce the demand of paged pool, or you must upgrade to Windows 2000, where more than double the paged pool is available (for more information, see the "Windows 2000" section). If this value works, you may want to increase it by approximately 20 percent until the backup is unsuccessful. If the backup is unsuccessful, use the second registry setting that is described in this article.
◦If you are using the/3GB switch, use 5 as your initial setting.
4.Quit Registry Editor.
5.Restart your computer.
Because you must test these settings during the most stressful backups, you may have to wait a month for a whole backup cycle to complete if you are not sure which backup consumes the most resources. Because of this, Microsoft recommends that you test low values first. For more information, click the following article number to view the article in the Microsoft Knowledge Base:
171458 (http://support.microsoft.com/kb/171458/ ) Windows NT may fail on request to open large files
Resolve the second problem
One possible resolution is to restrict the backup so that it backs up one file at a time. This may or may not work depending on the sizes of the files to be backed up. (It is expected to work on files that are smaller than 180 gigabytes [GB].) You can also try this resolution if you are backing up several large files, but each file is smaller than 180 GB. You must follow the steps to resolve the first problem also. For files larger than 180 GB, no workaround exists. Therefore, you must upgrade the system to Windows 2000. If you try to back up the system remotely as a workaround, you will experience the same problem.
1.Start Registry Editor (Regedt32.exe).
2.Locate and then click the following registry subkey:
HKEY_LOCAL_MACHINE\SYSTEM\CurrentControlSet\Control\Session Manager\Memory_Management3.On the Edit menu, click Add Value, and then add the following registry value:
Value name: DisablePagedPoolHint
Data type: REG_DWORD
Radix: Decimal
Value data: 1
4.Quit Registry Editor.
5.Restart your computer.
=====================================
http://support.microsoft.com/kb/304101/en-us
When you try to create a backup by using NTBackup.exe or by using a third-party backup program that uses the NT Backup API, the backup may not be completed successfully. This behavior may occur even if you run the program locally on the server. Additionally, you may experience one or more of the following symptoms:
  • One or more of the following error messages appear in the application log:
    Error message 1
    ERROR 1450: Insufficient system resources exist to complete the requested service.

    ERROR 1450: / hex 0x5aa ERROR_NO_SYSTEM_RESOURCES

    Operating system error 1450 Insufficient system resources exist to complete the requested service.

    Write on "device" failed, status = 1450
    Error message 2
    ERROR 1130: Not enough server storage is available to process this command.

    ERROR 1130 / hex 0x46a ERROR_NOT_ENOUGH_SERVER_MEMORY

    Backup or restore operation terminating abnormally.
  • Event ID 2020 and Event ID 2021 messages may be generated by the Server service.

    Note Typically, Event ID 2020 and Event ID 2021 messages do not appear.
  • If you are running the Hewlett-Packard (HP) OmniBack backup program, you may receive an error message that is similar to the following:
    [81:78] C:\foldername\file.name
    Cannot read 57256 bytes at offset 436176408(:1): ([1450]
    Insufficient system resources exist to complete the requested service.).
  • If you view the Performance tab in Windows Task Manager, you notice that nonpaged kernel memory is very low.
Note You may receive these error messages for reasons that are not related to the problem that this article describes. If you receive these error messages only when you back up large system volumes, the two most probable causes are those that this article describes.

To help determine if you are experiencing this problem, start Windows Task Manager, and then click the Performance tab. At the lower right, locate the Kernel Memory (K) area, and then note the value for Paged. You may experience this problem in Microsoft Windows 2000 or in Microsoft Windows NT 4.0 when this value reaches approximately 160 megabytes (MB). Alternatively, you may experience this problem in Microsoft Windows Server 2003 when this value exceeds 160 MB. If you have set the registry key for paged pool memory to a higher value, you will not experience this problem until a much higher value of paged pool memory is used (the problem may occur when the paged pool memory usage reaches about 80 percent of the set value). If you have the gflags setting turned on for pool tags and if you use the Poolmon utility, you see a higher usage of the MmSt tag. This is the pool tag that is used to map the operating system memory that is used to track shared files.

CAUSE

The two causes of this problem are related. The more frequent cause is listed first:
  • More files are open than the memory cache manager can handle. As a result, the cache manager has exhausted the available paged pool memory.
  • The backup program has tried to back up a file whose size is larger than the backup API can access on that version of the operating system. This has the same result (that is, the paged pool is exhausted).

    Note This second issue is more likely to occur on a Microsoft Windows NT 4.0-based computer.
The resolution for each problem differs depending on whether you experience the problem in Windows Server 2003, in Microsoft Windows 2000, or in Windows NT 4.0.

RESOLUTION

Windows Server 2003 and Windows 2000

Important This section, method, or task contains steps that tell you how to modify the registry. However, serious problems might occur if you modify the registry incorrectly. Therefore, make sure that you follow these steps carefully. For added protection, back up the registry before you modify it. Then, you can restore the registry if a problem occurs. For more information about how to back up and restore the registry, click the following article number to view the article in the Microsoft Knowledge Base:
322756 How to back up and restore the registry in Windows


You may have to change two registry settings. You must always change the first setting. Depending on the configuration of your system, you may also have to change the second setting.

Registry setting 1

  1. Click Start, click Run, type regedit in the Open box, and then click OK.
  2. Locate and then click the following registry subkey:
    HKEY_LOCAL_MACHINE\SYSTEM\CurrentControlSet\Control\Session Manager\Memory Management
  3. On the Edit menu, point to New, and then click DWORD Value.
  4. Type PoolUsageMaximum as the entry name, and then press ENTER.
  5. Right-click PoolUsageMaximum, and then click Modify.
  6. Click Decimal.
  7. In the Value data box, type 60, and then click OK.

    Important
    • Use 60 as your initial value. If your backup does not succeed, use 40 as your value. If that does not work, you must change the behavior of your backup program to reduce the demand of paged pool. If the value works, you may want to increase the value by approximately 25 percent until the backup does not work. If the backup is unsuccessful, use the second registry setting that is described in this article.
    • Make sure that the value for this registry setting is not more than 60.
    • If you are using the /3GB switch, use 40 as your initial setting. Note that this value is a percentage value.
  8. Quit Registry Editor.
  9. Restart your computer.
Because you must test these settings during the most stressful backups, you may have to wait a month for a whole backup cycle to complete if you are not sure which backup consumes the most resources. Because of this situation, Microsoft recommends that you test low values first. For more information, click the following article number to view the article in the Microsoft Knowledge Base:
312362 Server is unable to allocate memory from the system paged pool

Registry setting 2

  1. Click Start, click Run, type regedit in the Open box, and then click OK
  2. Locate and then click the following registry subkey:
    HKEY_LOCAL_MACHINE\SYSTEM\CurrentControlSet\Control\Session Manager\Memory Management
  3. On the Edit menu, point to New, and then click DWORD Value.
  4. Type PagedPoolSize as the entry name, and then press ENTER.
  5. Right-click PagedPoolSize, and then click Modify.
  6. Click Hexadecimal.
  7. In the Value data box, type a value of FFFFFFFF, and then click OK.

    Important
    • Setting PagedPoolSize to 0xFFFFFFFF (-1) allocates the maximum paged pool instead of other resources to the computer. This is typically required on a domain controller or a terminal server. By default, most Windows 2000 systems seem to be limited to a paged pool maximum size of 160 MB. You can verify this by downloading the kernel debuggers from the public Web site and opening a kernel dump in the debugger that you want to use. The command to use is !vm. This shows a paged pool maximum of 163840 KB, for example. Adding this value reduces the Page Table Entries (PTEs) that are available on a system and extends the paged pool maximum to 343 MB in Windows 2000. The paged pool maximum size can be extended to a larger value in Windows Server 2003.

      Note The default and maximum paged pool values for Windows Server 2003 are much larger than in Windows 2000. Typically, the Windows Server 2003 values are at least 50 percent higher than the values found in Windows 2000. These larger values makes it more unlikely that you will experience the issue where paged pool values contribute to the problem that is described in this article. However, it is still possible that this issue may occur.
    • This value restricts the system PTEs that are available. PTEs are another unrelated system resource that your system uses. This setting may cause your operating system to stop unexpectedly and to display a stop 0x3F error on a blue screen when it starts. You can recover from this by using the Last Known Good restart option on the system restart menu or recovery console. Use Performance Monitor to view the Free System Page Table Entries counter. You can add the PagePoolSize setting if the observed free values are over 40,000.
    • If you are running /3GB and /PAE together, do not set this setting without extensive testing and before you establish exactly how many system PTES you must have in your environment. You will probably see values in the range of 10,000-20,000 free. Use the articles to configure paged pool memory but never drop below 10,000 free system PTEs. Do not set this to any other value if you are using the /3GB switch. The only supported values are 0, 0A000000, and FFFFFFFF.
  8. Quit Registry Editor.
  9. Restart your computer.

Tuesday, February 19, 2013

Remote Desktop Connection and Remote Assistance

Habilitar Conexión a Escritorio Remoto en Windows 7: Remote Desktop Connection
La conexión de escritorio remoto permite conectar y acceder a cualquier computadora ubicada en la red local o en internet desde una computadora local.Al establecer la conexión a una computadora remota, es posible administrar fácilmente todo los recursos de red, ejecución de programas, archivos e impresoras.
Por defecto, esta funcionalidad incorporada por Windows 7 está deshabilitado para evitar el acceso indebido por parte de otros usuarios.
How to Enable Windows 7 Remote Desktop Connection
A continuación se detallan los pasos para configurar la conexión al escritorio remoto de una computadora con Windows 7 Ultimate a otra computadora con Windows 7 Ultimate.
Computadora local o equipo cliente: Con estos pasos se habilita automáticamente el ingreso de equipos remotos y se crea el permiso respectivo en el firewall.
Windows-7-Remote-Desktop-Connection-1.Xie
- Abrir la Configuración de acceso remoto por cualquiera de las 2 formas:
Hacer clic en Inicio, luego clic derecho sobre Equipo y seleccionar Propiedades del menú contextual mostrado.
Hacer clic en Inicio Panel de control > Sistema y seguridad > Sistema

- Seleccionar Configuración de Acceso remoto del panel izquierdo.
- De la ventana Propiedades de sistema, seleccionar la pestaña Acceso remoto
Seleccionar “Permitir las conexiones desde equipos que ejecuten cualquier versión de Escritorio remoto (menos seguro)” de la sección Escritorio Remoto.
- Posiblemente se muestre un mensaje de notificación debido a que la computadora tenga habilitado el estado de suspensión o hibernación. Hacer clic en Aceptar.
- Hacer clic en el botón Opciones avanzadas y marcar el check “Permitir que este equipo se conecte de forma remota”, clic en el botón Aceptar
- Clic en Aplicar y Aceptar
Computadora Remota o host
Windows-7-Remote-Desktop-Connection-2.Xie
- Abrir Conexión a Escritorio remoto de cualquiera de las dos formas:
Hacer clic en Inicio, luego seleccionar Accesorios y hacer clic en “Conexión a Escritorio remoto”
En la caja de búsqueda el menú Inicio escribir “escritorio remoto” y seleccionar “Conexión a Escritorio remoto” de la categoría Programas.

- Es posible configurar la configuración de pantalla, recursos compartidos, velocidad de conexión. Todo esto desde Opciones.
- Hacer clic en la pestaña General para configurar el inicio de sesión
- Ingresar el nombre del equipo y usuario de que tratarnos de conectarnos
- Clic en Conectar y cuando solicita la clave, ingresar la clave respectiva del usuario anteriormente ingresado.
- Clic en Conectar y cuando muestre el mensaje de error de autenticación, simplemente hacer clic en SI.
- Esperar a que la conexión se realice satisfactoriamente.
=================
social.technet.microsoft.com/Forums/es/wsades/thread/0a54825a-065e-48f9-b236-39a0f441d0e8
Cuando utilizas terminal server, Windows Server crea una nueva sesion virtual, lo que permite que el sistema operativo admita multiples sesiones concurrentes. Ahora bien, si quieres acceder a la sesion actual, en este escenario, utilizas el switch de mstsc /console.
El usuario con el que se hace login en un servidor TS deber pertenecer al grupo local "Remote Desktop users" o ser Local Admin y/o Domain Admin.

En un sistema cliente, no puedes trabajar con multiples sesiones, lo cual lleva a que la sesion actual se cierre para poder conectarse.
Si  quieres conectarte a cualquier usuario y permitir que el vea lo que vas trabajando en la consola, no puedes hacer esto a traves de los servicios de terminal server. La opcion disponible para tal requerimiento es la Asistencia Remota de Windows, o alguna de las tantas aplicaciones de terceros que permiten hacer esto.
 --------------------
En Windows existen tanto permisos, como derechos de usuario para realizar acciones. Pienso que lo que te puede faltar revisar es la parte de derechos de usuario, especificamente el de permitir el inicio de sesion a este equipo a traves de servicios de terminal server.
Esto lo encuentras en el editor de politicas de grupo, Configuracion de equipo - Configuracion de Windows - Configuracion de seguridad - Directivas Locales - Asignacion de Derechos de usuario. Debes revisar el derecho que dice Permitir inicio de sesion a traves de servicios de terminal server, verifica que el grupo al que quieres permitir el acceso por Escritorio remoto este agregado en esa lista, como por ejemplo el grupo de Usuarios de Escritorio Remoto.
Por otra parte, la asistencia remota la puedes habilitar en la pestaña Remoto, de las propiedades de sistema.

Administering Remote Assistance in Corporate Environments

There are several issues to consider when managing and administering Remote Assistance in the corporate environment or large organization. You can specify an open environment where employees can receive Remote Assistance from outside the corporate firewall. Or you can restrict Remote Assistance via Group Policy and specify various levels of permissions such as only allowing Remote Assistance from within the corporate firewall.

Configuring Port 3389 to Enable Remote Assistance

Remote Assistance runs over the top of Terminal Services technology, which means it needs to use the same port already used by Terminal Services: port 3389. For more information about using and configuring ports, see this Microsoft Knowledge Base article.
Note: If the person who is being helped is behind a firewall, NAT, or ICS, Remote Assistance will still function as long as the person being helped initiates the session via Windows Messenger. However, as stated above, Remote Assistance will not work in cases when the outbound traffic from port 3389 is blocked.

Using Remote Assistance in a Home Network

If you are using Personal Firewall or NAT in a home environment, you can use Remote Assistance without any special configurations. However, if you have a corporate-like firewall in a home environment, the same restrictions apply: you would need to open Port 3389 in order to use Remote Assistance.

Monday, November 7, 2011

Gitso -reverse VNC connections


Gitso is to support others.
Gitso is a frontend to reverse VNC connections. It is meant to be a simple two-step process that connects one person to another's screen. First, the support person offers to give support. Second, the person who needs help connects and has their screen remotely visible. Because Gitso is cross-platform (Linux, OS X and Windows) and uses a reverse VNC connection, it greatly simplifies the process of getting support. 
Using Gitso
Downloads

More Lin-Win-Lin remote access apps

VNC in Ubuntu 11.04 Fix
Vino, the VNC server that’s set up by default in Ubuntu 11.04, has a huge problem: it doesn’t refresh after the initial login. You can click and type and it’ll register, but it won’t actually redraw the screen. The following post has the solution:
http://ubuntuforums.org/showpost.php?p=10775950&postcount=13
In terminal, write the command:
gconf-editor

Then navigate to: desktop / gnome / remote_access. 
Enable the "disable_xdamage" setting.
 ===========  ============
ubuntu-remote-desktop-builtin-vnc-compatible-dead-easy
===========   ===========
RealVNC Server on Ubuntu
[1] Install VNC Server to operate Ubuntu with GUI from remote Windows client.
root@dlp:~#aptitude -y install vnc4server
root@dlp:~#
su - narwhal
# switch to a user who set VNC
narwhal@dlp:~$vncpasswd
# set VNC password
Password:
# any password you like to set
Verify:
narwhal@dlp:~$
vncserver :1
# start
xauth: file /home/narwhal/.Xauthority does not exist
New 'dlp:1 (narwhal)' desktop is dlp:1
Creating default startup script /home/narwhal/.vnc/xstartup
Starting applications specified in /home/narwhal/.vnc/xstartup
Log file is /home/narwhal/.vnc/dlp:1.log
narwhal@dlp:~$
vncserver -kill :1
# stop
Killing Xvnc4 process ID 10540
narwhal@dlp:~$
vi .vnc/xstartup
# add follows
exec gnome-session &
# start with diplay number '1', screen resolution '800x600', color depth '24'
narwhal@dlp:~$
vncserver :1 -geometry 800x600 -depth 24
New 'dlp:1 (narwhal)' desktop is dlp:1
Starting applications specified in /home/narwhal/.vnc/xstartup
Log file is /home/narwhal/.vnc/dlp:1.log-----------------------------------
[2] Install VNC viewer on client computer next. Download from the site below to install.

http://www.realvnc.com/products/free/4.1/download.html

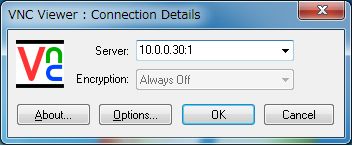
Start VNC viewer after installing. Then following scrren is shown. Input [(Server's hostname or IP address):(display number)] like following example.


===========    ===========

Start a VNC Server on Ubuntu on Boot
Ubuntu makes many things easy. For example, with Gnome, it's very simple to set up remote access to your desktop with the included Vino application. The only problem is that to get the VNC server running, you have to be logged in! Luckily, it's not too difficult to create a script which starts up the server as soon as your system boots. This is especially handy if you are running a headless server, or are using the primary display for other purposes. In this case, my server runs MythTV on the normal X server connected to my TV, but starts up Azureus and K3B in a VNC session so I can access them without bothering those watching TV.
To set it up, follow these steps:
  1. First, install the TightVNC server. This VNC server has excellent compatibility with clients, and provides reasonable compression for slow networks. It can be installed with Synaptic, or with sudo aptitude install tightvncserver.
  2. Set up the VNC server for the user you wish to log in as. When you run "vncserver" for the first time, it will ask you to set a password. VNC authentication is not the strongest encryption available, so be sure to firewall your server from all but trusted machines. Better yet, deny direct access to VNC and only allow SSH tunnelled or VPN connections. To launch programs or a session when your VNC session starts, modify ~/.vnc/xstartup. Here is my copy of xstartup: it runs an icewm session, Azureus, and K3B. For Gnome, try running "gnome-session", and for KDE, try "startkde".
 more at source
==========    ===========
Adjust your firewall:
sudo ufw allow proto tcp from any to any port 5900:5999
VNC server setup for Ubuntu 11.04 (Natty Narwhal)
simpler configuration!


==========    ===========
Empathy
If not installed use Ctrl - Alt - T
sudo apt-get install empathy
First enable the "Remote Desktop" option through System - Preferences - Remote Desktop and checked the service for this task 
You typically do not need to set up the share desktop feature before you use it. All you need is to make sure that the person on the other end is using Empathy. Simply right click on the person's name and select "Share My Desktop..."
alt text
You'll get this message while the other person gets a prompt.
alt text
The other person will see your desktop
When you're done there will be a final message to make sure the person is disconnected:
alt text
If the menu entry is grayed out it means that either the other person doesn't have support for it or you might be using a protocol that doesn't support the feature.
 --------------------------------------
 There is currently only one protocol-implementation in Telepathy (the library on which Empathy is built) that supports this: “gabble”, which implements XMPP (Jabber). Other protocols or other implementations of the XMPP-protocol, including local-XMPP (“People Nearby”), don't support it (yet).
So IF both you and the other person use XMPP with the Gabble plugin (the “Jabber” option in the Accounts dialog), it should work out of the box like Jorge explains.
Fortunately, it's easy & quick to set up a Jabber account; there are hundreds of servers that allow you to register an account from inside Empathy, or you can use your existing google account.

Friday, August 12, 2011

Sesión de acceso remoto

Requisitos básicos
  • Tener problemas técnicos que otros especialistas informáticos no solucionan (si es un equipo armado, quizá sea mejor que vaya personalmente a comprobar si la inestabilidad del equipo no es un logro del "armador o técnico"
  • Tener una conexión aceptable al mundo internetiano
  • NO tener ya una pérdida de datos (si eso ocurre...
    apague el PC y llama ya: 77644057)
  • Capacidad de razonamiento semilógico y expresión aceptables
    (Capacidad de seguir indicaciones, sin perder el pánico;-)) ni sufrir repentinos dolores de cabeza)
  • Conocimiento básico del PC
    Saber usar un navegador, instalar e iniciar o activar un programa 
  • Confíar en mi integridad profesional y persona, tal como yo confío
    que no eres un sinvergüenza más d'esta plurinación (antes: Bolivia)
Requisitos secundarios, pero deseables 
  • Dejarse de formalismos vanos.. (aceptar el tuteo, puesto que somos mortales d'esta tierra)
  • Uso de servicios telefónicos de mensajería SMS (Short Message System)
  • Uso de parlantes mono, stereo o sistema de audio 7.1 
    micrófono con filtro anti-improperios (configurado a volumen aceptable)
  • Capacidad de remuneración o gratificación
    [acepto gratamente favores de ateos y pecadores (as) , etc.]
    vivo en Santa Cruz de la Tierra, BO (multicultipluri)
  • Si eres profesional y tienes un sueldo aceptable, no consideres que
    debas remunerar mis servicios como a un pongo, empleada o albañil
 Con TeamViewer puedes comunicarte conmigo desde cualquier lugar y ordenador con acceso a Internet.
 En un navegador descargas el programa de soporte rápido (teamviewer_QS.exe) de
http://teamviewer.com/es/index.aspx que está bajo el rectángulo verde de la página
( Flecha verde Unirse a la sesión)
Lo instalas, lo inicias y me llamas (77644057) o si prefieres mandarme el identificador de usuario TeamViewer y la contraseña... puedes usar SMS por tu teléfono. O por http://bolivia-sms.com
Es todo.. con eso podemos ver tu equipo y analizar lo básico

Tuesday, October 26, 2010

Hamachi² for Linux

community.logmeinrescue.com/t5/Hamachi/hamachi-2
LogMeIn Hamachi² for Linux (Beta) – command line version
Updated: 09/15/2010
The beta release of LogMeIn Hamachi² for Linux is a secure VPN client for the Linux platform, offering connectivity from dispersed environments to your resources. Currently this version has a command line interface only.
Download the installer from here:
32 bit version:
64 bit version:
Please make sure you have the LSB 3.0 (or above) package installed prior to attempt installing the product.
If you had an older version of Hamachi for Linux, please make sure you uninstall it prior to attempt installing the latest software and read the README file located in the download package.
We're interested in your feedback. Once you've tried the client, please let us know about your experience at hamachi-feedback@logmein.com. Your feedback will help define the priorities of further development of the product.
Please remember: this is Beta software and is in no way meant to be used in a production environment.
-----------------------------
my current workaround for hamachi2 in linux.
Install Virtual Box on your linux server
Spend a few hours getting virtual box to run in headless mode.
Install virtual box on your desktop PC
Install a copy of XP into a VM and chop out everything except for networking and the required software to run Hamachi2
Transfer the VM from your desktop to the server
Launch the VM on the server!
Make sure you have Hamachi set up in Gateway mode and assign the virtual XP box as the gateway. 
--------------------------
Si bien la definición de Wikipedia no lo menciona, cabe aclarar que es una aplicación Zeroconf. La versión para GNU/Linux funciona bastante bien a pesar de estar en fase beta. Al momento de escribir este post, la versión más reciente es la 0.9.9.9-20. Al descargar el tar.gz, y descomprimirlo, obtenemos un directorio con algunos archivos de hamachi, y el directorio tuncfg.
Descargas de Hamachi: https://secure.logmein.com/products/hamachi/list.asp
Archivos para GNU/Linux: http://files.hamachi.cc/linux/
TuncfgLa descarga incluye el demonio “tuncfg“, que encapsula la funcionalidad que precisa Hamachi a nivel del usuario root, y debe ejecutarse antes de usar Hamachi (a menos que se quiera usar Hamachi únicamente desde la cuenta administrador). El código fuente de Tuncfg se distribuye bajo licencia BSD.
Ingresando al directorio tuncfg, le damos a ‘make install’, y se instala automáticamente en el directorio /sbin.
Instalando HamachiPara instalar hamachi en /usr/bin, nos dirigimos al directorio raíz del paquete que descargamos, y ejecutamos como root:
make install
Luego de ser instalado, hay que ejecutar tuncfg como root también:
sudo /sbin/tuncfg
Para cada usuario con el que se quiera usar Hamachi, es necesario inicializar el programa (generar par de claves ciptográficas, y el directorio ~/.hamachi, donde se guardan las claves, la configuración, y el estado). Para inicializar usamos:
./hamachi-init
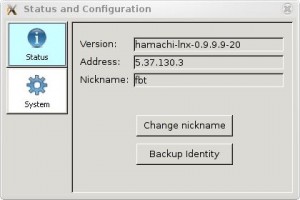
Hamachi, a zero-config virtual private networking utility, ver 0.9.9.9-20 version : hamachi-lnx-0.9.9.9-20
pid : 15834
status : logged in
nickname : fbt
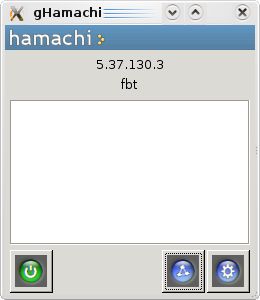
A la hora de usar Hamachi, tenemos dos opciones. La primera es con la consola, ejecutándolo a mano y aprendiendo los comandos. Todo está muy bien documentado en el archivo readme del programa. Con “start” lo ejecutamos, con “stop” lo detenemos, y “login” nos permite loguearnos. Pero existe otra opción: gHamachi. gHamachi es un cliente gráfico en GTK para Hamachi.
Una vez instalado el Hamachi como explique en el post anterior, abrimos la consola nuevamente
control + alt + t
Ahora ponemos
wget http://penguinbyte.com/software/ghamachi/download/2/?filename=gHamachi_gtk2.tar.gz
o descargamos directamente

http://www.wuala.com/Lifehacker%20Fun%20File%20Swap/Software/For%20Linux/gHamachi_gtk2.tar.gz/
una vez descargado tipeamos
tar vxfz gHamachi_gtk2.tar.gz
sudo chmod +x ghamachi
y ejecutamos con
./ghamachi
Podemos dejarlo andando simplemente descargando el archivo tar, darle permiso de ejecución a ghamachi, y ejecutarlo:
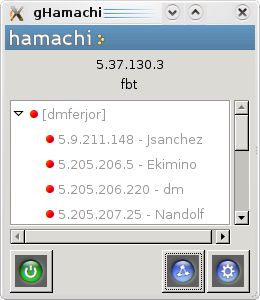
gHamachi
gHamachi
gHamachi - Status
gHamachi - Status
gHamachi - conectado

Haguichi provides a graphical frontend for Hamachi  on Linux that integrates smoothly into your GNOME desktop. Haguichi is free and open source software licensed under GPLv2.
Features
* Fully customizable commands
* Notification bubbles
* Rich tooltips
* Sortable and collapsible networklist
Install Haguichi in ubuntu
First you need to download .deb package from here once you have .deb package install this by double clicking or using the following command
sudo dpkg -i haguichi_0.9.0_i386.deb
-------------------------------
You can get GUIs:
http://hamachi-gui.sourceforge.net/download.html (still works on ubuntu 9.04)
http://php-gtk.eu/apps/yahg (untested)
The last hamachi for linux version and a gui (untested):
http://code.google.com/p/quamachi/


Download haguichi-1.0.1-5.1.noarch.rpm from openSUSE Factory from an official repository.

MTU and logmein services

I just couldn't open the www.logmein.com page (or secure.logmein.com for that matter). I only got a "Connection Reset" error.
I found the answer, of all places, on a MAC Safari forum.
http://discussions.apple.com/thread....sageID=6017681
The problem seems to be Gutsy's default MTU network setting, which is 1500. You will have to change this to 1472, or you won't be able to access the secure logmein page. The MTU value determines the max packet size in TCP/IP networks.
The simplest (and temporary until the next reboot) way to change this value is to enter the following command in terminal (this assumes you use eth0 to connect to the Internet, otherwise edit accordingly)
"sudo ifconfig eth0 mtu 1472"
If you can access the logmein page after changing this setting, then you can attempt (it's a bit complex depending on user/configuration) to make the change permanent.
This method worked for me:
"sudo gedit /etc/network/interfaces"
add the following line to the eth0 configuration info
"MTU 1472"
reboot or restart network services using
"sudo /etc/init.d/networking restart"
I use a static IP address. I have heard of this simple method not working when using DHCP so you could do some research here
http://ubuntuforums.org/showthread.p...light=mtu+size

NX technology -Neatx

NX technology is a computer program that handles remote X Window System connections, and attempts to greatly improve on the performance of the native X display protocol to the point that it can be usable over a slow link such as a dial-up modem. It wraps remote connections in SSH sessions for encryption.
It is developed by Gian Filippo Pinzari at the Italian software company NoMachine. The NX scheme was derived from that of DXPC - the Differential X Protocol Compressor project.[1]
NX software is currently available for Windows, Mac OS X, Linux, and Solaris. NoMachine has clients available for Windows and Mac OS X, and Google makes a freely available Open Source GPL2 version of the server called NeatX[2].[2]

Contents
1 Technical details
==================
Neatx is an Open Source NX server, similar to the commercial NX server from NoMachine. If you're not familiar with NX, these links might help:

Neatx was developed by Google for an internal project. That project is now finished, and the source was released for the community to use/develop/benefit from. A couple of Google employees are doing sporadic releases and maintenance in their spare time.
==================
Next Generation Remote Display NX is an exciting new technology for remote display. It provides near local speed application responsiveness over high latency, low bandwidth links. The core libraries for NX are provided by NoMachine under the GPL. FreeNX is a GPL implementation of the NX Server and NX Client Components. 
[Download]
Here is a good place to get started with FreeNX:
http://ubuntuforums.org/showthread.p...ghlight=freenx
You may also want to look at NoMachine's website www.nomachine.com for the web companion to help with connections using a web site. It requires more setup, but it's worth it.
Finally, unless you use FTP (you should use SFTP anyways) you can use port 21 on your firewall and redirect it to port 22 to the machine you want inside. On the other hand, if your router doesn't support that feature (sadly some are removing it) you can change the SSH port on your Ubuntu machine to 21 as most employers do not block this port. As a last resort you may have to forfeit the web interface and use port 80 for SSH.
On the side of hamachi, I have successfully been able to get it to work, but you need to make hard links for the ssl libraries, because the libraries it looks for are older than the ones supplied with Gutsy. I have made the hard links and they work just fine. So it is definitely possible to send your request through hamachi if you want to. However, for speed sake I would recommend using the port 21 approach if you can, since no one should use FTP anymore IMHO.

interoperable remote access for Linux


Source
Can a Linux computer control a LogMeIn computer?
LogMeIn is currently in the open beta phase of testing for our Linux remote control plugin, which will allow users to use their Linux based machine to control Windows and Mac OSX hosts.
For more info, please check out our Labs page for more info.
We have tested on Ubuntu 7.10 and up, OpenSUSE 10.3 and above, and others, but the plugin should work on any LSB 3.1 compatible Linux distribution.
This initial beta supports 32-bit x86 based machines running Firefox 2 or 3.  You can find detailed install instructions for quite a few Linux distributions in this forum post.
Alternatively, Linux can also connect to a Windows or Mac OSX host via the use of our legacy Java interface.. To use this, you will need to install the Java Runtime Environment. Most Linux distributions can install this from their Package Managers (RPM for Redhat based, Synaptic for Debian based, etc.). Sun provides an RPM package at the link below.
This implementation is typically done with Firefox as the browser.  Click here for an important note regarding enabling the Java plugin for FIrefox on Linux.
If you would like to install manually, or do not use RPM to install packages
sudo apt-get install sun-java6-plugin
or have issues with the package manager install, try installing from source from the following link. Note, when controlling the LogMeIn computer you will need to go to Preferences - Remote Control Settings and disable remote printing then click Apply for the Remote Control feature to load properly and not with errors, since this isn't supported in Java on Linux.
To install the RPM or source install of Java Runtime Environment use this link. http://java.com/en/download/manual.jsp
Regarding the response received from Logmein tech: the Java interface does not work as well as the ActiveX interface, so it would be good if they were made aware how many people want an equivalent to the ActiveX interface for Linux.
One advantage that Logmein has over VNC, is that it runs an agent on the target machine, which helps in traversing NAT and firewalls, without having to open ports in your router. It reaches out from behind the firewall and gives you access. With VNC, one has to open a port or two in order to log in. If you already have a ssh port open, you can tunnel through it, without opening extra ports, however when dealing with a family member that's far away and not as computer literate, Logmein is a foolproof solution for supporting those loved ones.
You don't have to configure any firewalls, like adding NAT-entries. The LogMeIn-client which resides on the users computer, periodically 'pings' to the LogMeIn-server over HTTP. So, the LogMeIn-server knows always at what IP-address the client is available, and there is always a path through firewalls to this client (maybe that's called firewall punching or something like that).
logmein provides what is basically a vnc service for free, but they do more than that; the vnc connects out to their server and allows you to vnc past any form of network protection, so instead of vncing to a machine that's port forwarded behind a router; you are connecting and logging into logmein, selecting the computer you want from a list of online computers that you have installed logmein on under your LMI account. Then they allow you to initiate a chat with a user if they've been active recently, or you can just remote control the pc. in the paid (pro) version you can use the print dialog to print document from the remote computer on a local printer. you can do the same for audio, play with a remote audio player and hear locally.
You're able to drag and drop files between logmein and the local computer, and even start "mini meetings" where you invite other people to connect to your logmein and use it as a whiteboard/presentation. they're working on a mac version of the vnc server right now (i think it's in released beta) and the logmein client actually works on most operating systems including linux, but the server is only available for windows and mac(beta)... (they do have a similarish service that is also available for linux, but it is only trial/paid and is billed per a few different periods, two being monthly and yearly (1 month 1-5 licenses 4.95ea, 1 year 1-5 licenses 3.25ea) and is a instant, zero configuration VPN setup, which allows you to manage multiple vpns and join/part/delete them at will per computer basis; i could see this being very convenient in a corporate environment, but i do with it had also been offered for free.
---------------------------------- 
Accessing my Windows machines at home from my Laptop running Ubuntu:
1] Install WINE
2] Download a portable version of Firefox for Windows
3] Access as before using Firefox for Windows in WINE
----------------------------
If you have a public IP with open ports VNC works great
As far as I am concerned, the free version of VNC (I don't know any other version) doesn't have any of this neat firewall-punching technics of logmein. I found it unpractical to configure VNC unless there is a really important reason for doing so. To make things worse: When the user uses DHCP, as most networks do, setting up VNC really becomes a nightmare. With some smart routers, you can set up a path to a computers name or MAC-address, rather than its IP-address. Or otherwise, you have to assign the specific computer a static IP-address, which is often not an option, or use some esoteric tricks that I do not want to know about. 
----------------------------
A much "simpler" way of accessing a remote computer that is behind a firewall. Initiate a "Reverse SSH tunnel" on that computer. It's particularly easy in Ubuntu, here is one of many links that come up in Google:
http://articles.techrepublic.com.com...ml?tag=nl.e011
My main complaint about VNC is it's dogslow compared to logmein or nomachine, Even fine tuning for less colors, compression, etc. does not help much but in contrast it is 100% free and you actually know what is happening and it is not provider dependent like logmein.
----------------------------
Note: Installation of NX Server for Linux requires the download and installation of three packages: client, node and server. The client is needed because it ships libraries used by the node. The node is needed because it ships tools needed by the server. Furthermore, the SSH server daemon (SSHD) needs to be up and running on each of the NX Node machines since NX relies on the mechanism provided by the SSH subsystem for handling user authentication. 
Download the RPMs Change your working directory to the location where you saved the package and install it by running from a console: 
# sudo rpm -i nxclient-3.4.0-7.x86_64.rpm 
# sudo rpm -i nxnode-3.4.0-14.x86_64.rpm 
# sudo rpm -i nxserver-3.4.0-14.x86_64.rpm 
If you don't have the sudo utility installed, log on as superuser ("root") and run the commands without sudo. 
Note: Click here for detailed instructions on how to install the NX Client, NX Node and NX Server packages. The NX service can be controlled by the command 
/usr/NX/bin/nxserver --status|--start|--stop|--restart
Additional commands are available to configure the server. Try 
/usr/NX/bin/nxserver --help for more information. 
Please, don't forget to download and read the NX Server Administrator's Guide available here.
--------------- 
There are services for dynamic IPs (when your ISP changes it, this can be a hassle). The method I use to get them to show locally to each other (without the more sophisticated VPN type setups) is called hamachi. It was bought out by logmein.com and is available for linux/mac/windows and is free. 
The reason I state this is that is allows a virtual 2nd nic (atleast under windows) and gets it so that all the computers setup under the client appear to be on one network. 
Essentially it is for those of us that know of VPNs (or even those who don't) but want it to work easily and (from what I can tell) securely, oh and free. 
The best though I can see is setup tightVNC or NX and hamachi on the linux box in question and simply tunnel using the hamachi IP of the linux box (see hamachi.cc for all the details on mac/linux install) and it will resolve the issue of any IPs that change.
--------------------
I have a remote server set up at a colo facility that I run some sites off of. I set up a virtual server with ssh listening on port 9022, and ports 10000-10199 wide open for incoming connections (no service running on them). Let's call this host "middleman".
Next, I have a script on my laptop (let's call this host "endpoint" by the way) that tries to keep a reverse tunnel open to the ssh server on port 9022 on "middleman". I have it hardcoded for now to forward port 10074 on "middleman" to port 22 on "endpoint".
Finally, I have the NX client loaded on my work desktop and set up to connect to port 10074 on "middleman", and viola, I get my desktop on "endpoint".

So - how to automate this and make it available for others to use, as well as integrate this into a web-based client? I have a mysql and apache server available if anyone has ideas - I can code some stuff and am willing to give others access. If we could write a script for the "endpoint" users to put in their init.d as a service, and automate code to "connect-the-dots" on the "middleman" server, we could have it acting like logmein does.
Now the downside to this. The way I set it up above requires all the traffic to pass through the "middleman". Is there some way to have the "middleman" only negotiate a direct connection between the client and endpoint, and NOT pass all the gui traffic through? I can't imagine that logmein does this, somehow they have to be setting up a direct connection. The bandwidth bill would be huge otherwise.
A sidenote also. I notice that shadow sessions are much slower than regular unix kde or gnome sessions. Anybody know why or how to fix or improve this? It slows down almost to VNC speed when shadowing for me, but a gnome sessions just blaze along like you were at the console.
--------------------
ntrconnect is working exactly the same way like logmein but guess...
It has a Linux server!!!!!
it has a free version without all the features available but the remote desktop is there

Just install it (It has a graphical installation) and then run

Code:
sudo /usr/local/NTR/NTRconnect/NTRservice
But the news are not just good. There is no linux client available! How stupid!??
Anyway I tested that using a windows virtual machine as a client and it worked perfectly
--------------------
http://www.teamviewer.com
The client runs under Wine.
xrdp.sourceforge.net/


this should be a resume:
In all cases these solutions have no port or dynamic ip problems.
Q: can i access a Windows machine from linux/windows by browser and without installing anything?
A. yes, just install logmein server in your windows machine
Q: does logmein has a linux server version?
A: right now, it doesn't
Q: how can i access my linux box in a secure form, without port mapping or dynamic ip issues?
A: you can do it in several ways:
1) install hamachi in both machines, and run any remote desktop software you like (any vnc like) using the hamachi ip of the remote machine
(these seems to be alternatives to logmein, go ahead and try them)
2) try NoMachineNX http://www.nomachine.com/
3) try Bomgart http://www.bomgar.com/linux/
4) try NTRconnect http://www.ntrconnect.com/
Note: there is gHamachi (a GUI for hamachi in linux)

Thursday, July 29, 2010

Wake on LAN

Source
Hoy en día hay mucha gente que tiene en casa un ordenador conectado a Internet casi siempre encendido y al que se puede acceder desde cualquier lugar, normalmente por SSH en sistemas UNIX (aunque también hay servidores SSH para sistemas Windows, son menos frecuentes, porque las posibilidades que tenemos en la shell de Windows son muy limitadas) y por VNC o RDP en Windows. En muchos casos, es bastante normal que además de ese ordenador siempre encendido se tenga algún otro que sólo se enciende cuando se está en casa.
Pero hay veces que, estando lejos, nos puede interesar encender ese otro ordenador de forma remota porque necesitamos un fichero que tenemos en él o necesitamos hacer algo en él. Para esas situaciones, lo mejor es tener el Wake on LAN (WoL) preparado en esa máquina y las utilidades necesarias para activarlo en la máquina que no solemos apagar.
El WoL es posible en los PCs actuales gracias a las fuentes de alimentación ATX que, cuando el ordenador está apagado, siguen alimentando a ciertas partes de la placa base permitiendo asimismo el Wake on Ring y la posibilidad de arancar el PC sólo pulsando una tecla del teclado o que se encienda a una determinada hora.
(More at source)

Friday, May 29, 2009

Acceso remoto: Virtual Network Computing

TightVNC Software
TightVNC is a free remote control software package. With TightVNC, you can see the desktop of a remote machine and control it with your local mouse and keyboard, just like you would do it sitting in the front of that computer. TightVNC is:
  • free, GPL-licensed, with full source code available;
  • useful in remote administration, remote customer support, education, and for many other purposes;
  • cross-platform, available for Windows and Unix, compatible with other VNC software.

Announcements
[Mar 05, 2009] TightVNC 1.3.10 is available for download. This version fixes various bugs, includes a number of impovements and introduces a version of TightVNC for U3 flash drives. Read the complete announcement...

[Oct 23, 2008] TightProjector 1.1.0 is available for download. TightProjector is a solution for broadcasting the desktop of a Windows computer over the local-area network. Read more and/or download... (opens new window)

Download Now!
Visit the download page to get your free copy of TightVNC.

tightvnc-1.3.10-setup.exe (Windows executable)
tightvnc-1.3.10_javabin.zip Java (viewer only)

Recommended Add-ons

  • To achieve best performance under Windows 2000, Windows XP and above, download and install DFMirage mirror display driver (free download). TightVNC Server can use this driver to detect screen updates and grab pixel data in a very efficient way.


VNC -the original cross-platform remote control solution

Diagram of how VNC works across a network.

VNC is remote control software which allows you to view and fully interact with one computer desktop (the "VNC server") using a simple program (the "VNC viewer") on another computer desktop anywhere on the Internet. The two computers don't even have to be the same type, so for example you can use VNC to view a Windows Vista desktop at the office on a Linux or Mac computer at home. For ultimate simplicity, there is even a Java viewer, so that any desktop can be controlled remotely from within a browser without having to install software.
VNC is in widespread active use by many millions throughout industry, academia and privately. There are several versions to choose from, including a free version and some substantially enhanced commercial versions.
You can read more about how VNC can be used here.
VNC Free Edition for Windows XP-2003

Monday, May 4, 2009

Log me in

Computers of other people will NOT be added to your own profile.
To see somebody else's computers that have been assigned to you as secondary user you have to select that secondary user profile in the "My computers" screen! Computers of other people will NOT be added to your own profile.
Logmein.com
Logmein Community

Sunday, April 5, 2009

TeamViewer

Remote Desktop Sharing
TeamViewer establishes connections to any PC or server all around the world within just a few seconds.
You can remote control your partner's PC as if you were sitting right in front of it.

Tuesday, November 11, 2008

Gitso

Source
Usage
First, the person giving support needs to:
  1. Launch Gitso.
  2. Click on "Give Support"
  3. Click "Connect"

Second, the person who needs help, needs to:

Note: The person who is giving support needs to have port 5500 open to their machine which requires a port forward on a NATed network.

How it Works

Using Python and wxWidgets, Gitso utilizes other applications for the actual VNC work:

Reviews

VNC reverse connections

Source
Step 1: Setup your side
You are running Windows You are running Mac OS X
1. If you have a router, make sure to forward port 5500 to your computer. If you're not sure how to do this, check here.
2. Download tightvnc-1.2.9_x86_viewer.zip 2. Download Mark Lentczner's version of Chicken of the VNC
3. Unzip vncviewer.exe to your Desktop 3. Unzip Chicken of the VNC to your Desktop
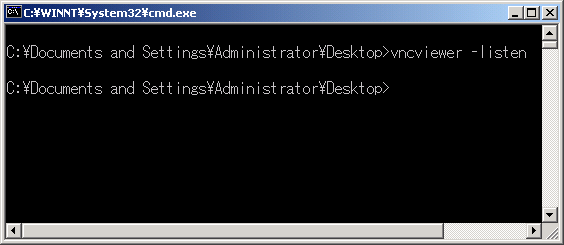
4. Open a command prompt and cd to your Desktop path 4. Double click Chicken of the VNC
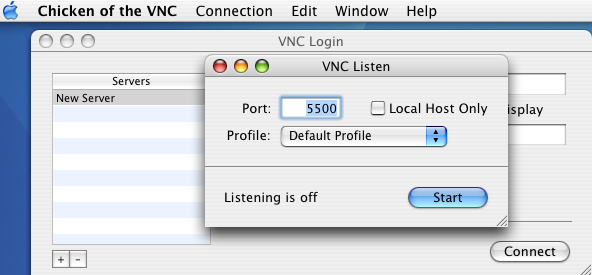
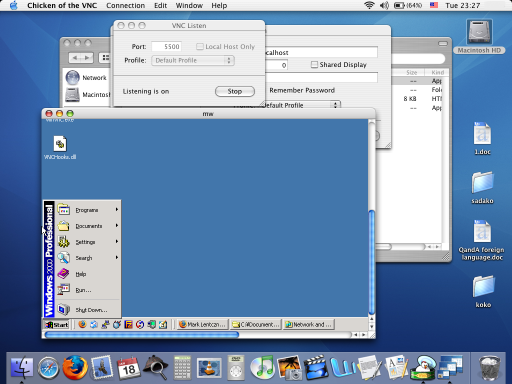
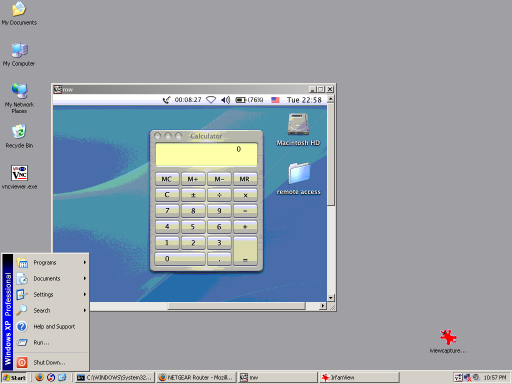
5. Type: vncviewer -listen and press Enter. screenshot 5. Click Connection > Open Listener... > Start. screenshot
6. You are now ready to accept connections from your customer.

Step 2: Setup customer side

Customer is running Windows Customer is running Mac OS X
1. Download tightvnc-1.2.9_x86.zip 1. Download Mark Lentczner's version of OSXvnc
2. Extract WinVNC.exe and VNCHooks.dll from tightvnc-1.2.9_x86.zip 2. Unzip OSXvnc to your Desktop
3. Send WinVNC.exe and VNCHooks.dll to customer
(optionally, combine the two into a single executable with PEBundle and/or compress with UPX)
3. Send OSXvnc to customer
4. Have customer double click WinVNC.exe, type anything into the "Password:" box, and press OK. screenshot 4. Have customer double click OSXvnc
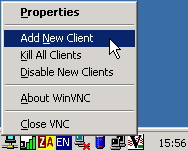
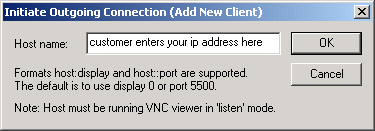
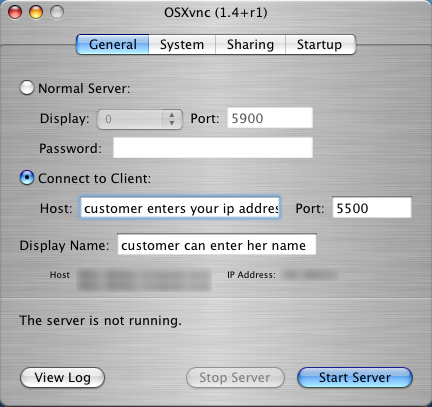
5. Have customer right click on WinVNC icon in system tray, choose "Add New Client", and type in your IP address. screenshot 1 | 2 5. Have customer click "Connect to Client", enter your IP address in the "Host" box, and click "Start Server". screenshot
6. You will now be able to control customer's computer from your own. When finished, right click VNC tray icon on customer's Desktop and choose "Close". Customer may delete the VNC file(s) you sent. screenshot 6. You will now be able to control customer's computer from your own. When finished, click "Stop Server" on customer's machine. Customer may delete OSXvnc if desired. screenshot

Alternatives & Updates:


  1. Gitso is my current favorite - open source, cross-platform (Linux, Mac, and Windows), and just one click! Blog post
  2. The easiest alternative for Windows users: Zolved Free Remote Control. Requires no port forwarding on either side. Highly recommended.
  3. UltraVNC SC (Single Click) is an excellent alternative for Windows users.
  4. Yannis Tsopokis has put together VCE_Remote, an open source wrapper to make things even easier for the customer.
  5. EchoVNC works through firewalls and routers via a packet relay server.