Bienvenido! - Willkommen! - Welcome!

Bitácora Técnica de Tux&Cía., Santa Cruz de la Sierra, BO
Bitácora Central: Tux&Cía.
Bitácora de Información Avanzada: Tux&Cía.-Información
May the source be with you!
Showing posts with label VPN. Show all posts

Friday, June 7, 2013

Windows Remote Desktop

http://www.howtogeek.com/131961/how-to-access-windows-remote-desktop-over-the-internet/
How to Access Windows Remote Desktop Over the Internet
image
We’ve covered several solutions for accessing your desktop remotely over the Internet, including TeamViewer and VNC. However, if you have a Professional edition of Windows, you already have Windows Remote Desktop installed.
By default, Windows Remote Desktop will only work on your local network. To access Remote Desktop over the Internet, you’ll need to use a VPN or forward ports on your router.
Before you continue, enable Remote Desktop on your computer and ensure you can access it from other computers on your local network.
Set Up a VPN
If you create a virtual private network (VPN), you won’t have to expose the Remote Desktop server directly to the Internet. Instead, you’ll first have to join your computer to the VPN. Your remote computer will act as if it’s part of the same local network as the computer running the Remote Desktop server. This will allow you to access Remote Desktop and other services only exposed on your local network.
There are a number of VPN applications you can use to create your own VPN, from complicated servers you configure by hand to easy-to-use graphical applications. We recommend LogMeIn Hamachi – download and install it on the computer you want to Remote Desktop to. Click here for more information on setting up Hamachi.

Once you’ve created an account, you can log into Hamachi on another computer and join both computers onto the same “Hamachi network.” They’ll act as if they’re connected directly, even if you’re doing this over the Internet.

You can now use the Remote Desktop Connection application on your computer to connect to the Remote Desktop server. Use the IPv4 address of the other computer, which is displayed in the Hamachi window while you’re connected.

Forward TCP Port 3389
You can also skip the VPN and expose the Remote Desktop server directly to the Internet. If you do this, ensure you have strong passwords set up on your computer. You wouldn’t want malicious people logging into your computer remotely.
We’ll go over the process quickly here. For more detailed help, read our in-depth guide to port forwarding. If you follow that guide, ensure you forward TCP port 3389 to the computer running Remote Desktop.
First, locate the IP address of the computer running Remote Desktop. On the computer running Remote Desktop, open the Control Panel, click View network status and tasks, and click the name of your current connection to the right of Connections. Click the Details button and note the number displayed to the right of IPv4 Address. (Click here for more detailed step-by-step instructions to find your computer’s IP address.)

Next, access your router’s web interface. If you don’t know its address, it’s probably the same as the “IPv4 Default Gateway” address in the Network Connection Details window. Plug this address into your web browser’s address bar to access the router’s web interface.
Log into the router and locate the Port Forwarding section. Forward TCP port 3389 to the IPv4 address you located earlier.

You can now log into Remote Desktop over the Internet – connect to your network’s external IP address, also known as its public IP address.

If you’ve forwarded ports, you may want to set up a dynamic DNS service so you can always connect, even if your network’s IP address changes. You may also want to set up a static IP address on the computer running the Remote Desktop server. This will ensure that the computer’s internal IP address won’t change – if it does, you’ll have to change your port forwarding configuration.

Saturday, April 20, 2013

hide.io

https://www.hide.io
Watch Hulu, Netflix and other IPTV services when being abroad.
free Monthly data transfer 2 GB
Available protocols PPTP, L2TP, IPSec (IKEv1 and IKEv2), OpenVPN. SSTP and SOCKS

Wednesday, April 17, 2013

VPN connections


VPN provider USA IP which allows free trial/demo VPN accounts.
The demo access is unlimited in time but you are required to reconnect after every 7 minutes. But that should work fine to have “emergency” access on facebook till the block gets removed.
To access the VPN service please follow these instructions:
1. Download USAIP.pbk from here and save the file to your desktop.
2. Double click on the USAIP.pbk file on your desktop.
An application will start as shown below:
3. Select one of the USAIP PPTP connections from the dropdown and click on Connect . (L2TP is also available on Windows7 and VISTA computers, but on XP and 2000 you may need to follow the additional steps at the red hand icon below, in the errors section to the right)
A new window will appear. Enter your username and password as:
username: demo
password: demo
4. Click on Connect, and your computer will now connect to the USAIP VPN network.

Thursday, March 21, 2013

Comodo Unite ports

rss Comodo Unite (EasyVPN) - CUnite
Appendix 2 - How to improve performance by using direct connections
In order to establish direct connections between clients (highly recommended), system administrators have to open certain ports on both client computers and NAT/Firewall (if applicable).

Ports need to connect to servers:
  • TCP 443 connect to Unite server/web server
  • UDP 8000 for p2p mediator server
Ports needed for clients to connect to each other:
  • UDP 12000 -13000 – to build direct, peer-to-peer, connection between clients
Unite attempts to use a random port between 12000 and 13000 for P2P connections. Unite tries to bind to one available port in this range, moving to the next if it happens to be in use by another application. Some firewalls or routers may entirely block network traffic on this range. If this range is not available the Unite server will establish a relayed connection instead.

Background

All connection requests to other machines in your network are initially brokered by the Comodo Unite server. Upon receipt of the connection request, the server will first attempt to set up a direct, peer-to-peer connection between the computers. If it cannot establish a direct connection, then it executes the next best option of establishing a relayed connection.
  • A direct connection is, as the name suggests, a straight connection between computers in a Unite network (peer to peer connection).
  • In contradistinction, a relay connection means the Unite server acts as 'middle man' between the two computers in the network. Computer A connects to the Unite server and the Unite server connects to Computer B. All information sent from Computer A will pass through a secure, encrypted tunnel through the server to Computer B.
Why Are Direct Connections Better?

  • Speed - With direct connections, data is passed directly back and forth rather than being redirected through the extra hop of the Unite server. Relayed connections are always going to suffer from a certain lag due to this simple fact.
  •  Reliability- A direct connection will decrease or eliminate the effect of any server issues on your network (for example, server downtime, slow response times during times of high traffic).
============================================

Logmein additional Information for  (TCP  443)

You can set a static UDP listening port and TCP handshake port by configuring it in  
System - Preferences - Settings - Advanced Settings under Peer Connections.  Complete both values if you have multiple Internet connections.

Note:
If you are behind a router you must forward the port's UDP/TCP traffic from your router to the machine.  Follow the instructions for your router from PortForward.com.  If you have multiple machines behind the same router, you will need to choose different ports for each to avoid conflicts.
 
============================================

  I wanted to forward ports 30001 TCP and 30001 UDP to Computer B, just to make eMule work with HighID. But unfortunately, Computer B couldn't get access to these ports with Comodo enabled on Computer A (with ICS).

After many probes I have found a solution!

You need to use the Application Rules, NOT the Global Rules!

In the Application Rules click ADD and bring on the Running Applications window. Then select "Windows Operating System" on the top.
Now create a rule for it:

Action: Allow
Protocol: TCP/UDP
Direction: Incoming

Source address: Any
Destination address: Any
Source port: Any
Destination port: THE PORT OR PORT RANGE YOU WANT TO FORWARD

It has to be like this to make it work! And of course you have to add this rule in the host computer, that runs the ICS.
How do I open ports in Comodo?
Open up the GUI for CFP 3 (2007), go to Firewall-Advanced-Network Security Policy-Global Rules and select Add, then add those rules:

Action: Allow

Protocol: TCP

Direction: In/Out

Source Address: Any

Destination Address: Any

Source port: Any

Destination Port: 3689


Action: Allow

Protocol: UDP

Direction: In/Out

Source Address: Any

Destination Address: Any

Source port: Any

Destination Port: 5353

Wednesday, December 5, 2012

Network Load Balancing and VPN -Windows 2k3

(Windows 2003 help)
Best practices
Properly secure the Network Load Balancing hosts and the load balanced applications.
  • Network Load Balancing does not provide additional security for the load balanced hosts and can not be used as a firewall. It is therefore important to properly secure the load balanced applications and hosts. Security procedures can typically be found in the documentation for each particular application. For example, if you are using Network Load Balancing to load balance a cluster of Internet Information Services (IIS) servers, you should follow the procedures and guidelines for securing IIS. To view the IIS 6.0 product documentation, install IIS and then see Microsoft Internet Information Services, or install IIS and then open the IIS User Interface (the IIS snap-in) and click Help.
  • The Network Load Balancing subnet must be physically protected from intrusion by unauthorized computers and devices in order to avoid interference from unauthorized heartbeat packets.
  • If you use the optional host list with Network Load Balancing Manager, ensure that only users in the local Administrators group have access to the host list file. For other general information on best practices for securing servers, see Best practices for security and the Microsoft Windows Resource Kits Web site (http://www.microsoft.com/). For tips about installing IIS, see Installing Internet Information Services (IIS). To open the IIS snap-in, see Opening Internet Information Services (IIS).

Use two or more network adapters in each cluster host whenever possible. Two network adapters, however, are not required.

  • If the cluster is operating in unicast mode (the default), Network Load Balancing cannot distinguish between single adapters on each host. Therefore, any communication among cluster hosts is not possible unless each cluster host has at least two network adapters.
  • You can configure Network Load Balancing on more than one network adapter. However, if you use a second network adapter to address this best practice, make sure that you install Network Load Balancing on only one adapter (called the cluster adapter). For more information, see Multiple network adapters.

Use only the TCP/IP network protocol on the cluster adapter.

  • Do not add any other protocols (for example, IPX) to this adapter.

Use Network Load Balancing Manager.

  • You can configure many Network Load Balancing options through either Network Load Balancing Manager or the Network Load Balancing Properties dialog box accessed through Network Connections. However, Network Load Balancing Manager is the preferred method. Using both Network Load Balancing Manager and Network Connections together to change Network Load Balancing properties can lead to unpredictable results.

Do not enable Network Load Balancing remote control.

  • The Network Load Balancing remote control option presents many security risks, including the possibility of data tampering, denial of service and information disclosure. It is highly recommended that you do not enable remote control and instead use Network Load Balancing Manager or other remote management tools such as Windows Management Instrumentation (WMI). Firewall blocking remote control commands If you choose to enable remote control, it is vital that you restrict access by specifying a strong remote control password. It is also imperative that you use a firewall to protect the Network Load Balancing UDP control ports (the ports that receive remote control commands) in order to shield them from outside intrusion. By default, these are ports 1717 and 2504 at the cluster IP address. Use remote control only from a secure, trusted computer within your firewall.
    For more information on the remote control parameter, see Remote control. For more information about strong passwords, see Strong passwords.

Enable Network Load Balancing Manager logging.

  • You can configure Network Load Balancing manager to log each Network Load Balancing Manager event. This log can be very useful in troubleshooting problems or errors when using Network Load Balancing Manager. Enable Network Load Balancing Manager logging by clicking Log Settings in the Network Load Balancing Manager Options menu. Check the Enable logging box and specify a name and location for the log file. The Network Load Balancing Manager log file contains potentially sensitive information about the Network Load Balancing cluster and hosts, so it must be properly secured. By default, the log file inherits the security settings of the directory in which it is created, so you might have to change the explicit permissions on the file to restrict read and write access to those individuals who don't need full control of the file. Be aware that the individual using Network Load Balancing Manager does require full control of the log file. For more information, see How to.

Verify that the following is true for cluster parameters, port rules and host parameters:

  • Cluster parameters and port rules for each unique virtual IP address are identical across all hosts
    Each unique virtual IP address must be configured with the same port rules across all hosts that service that Virtual IP address. However, if you have multiple virtual IP addresses configured on a host, each of those virtual IP addresses can have a different set of port rules.
  • Port rules are set for all ports used by the load-balanced application. For example, FTP uses port 20, port 21, and ports 1024–65535). Always click Add after setting a port rule. Otherwise, the port rule will not appear in the list of rules, and the rule will not take effect.
  • The dedicated IP address is unique and the cluster IP address is added to each cluster host.
  • Affinity is set to Single or Class C when you are using UDP or Both for your protocol setting. For more information, see Cluster parameters, Host parameters, and Port rules.

Verify that any given load-balanced application is started on all cluster hosts on which the application is installed.

  • Network Load Balancing does not start or stop applications.

Verify that the following is true for the dedicated IP address and the cluster IP address:

  • Except in the case of a virtual private network (VPN),both the dedicated IP address and the cluster IP address must be entered during setup in the Network Load Balancing Properties dialog box and also in the Internet Protocol (TCP/IP) Properties dialog box.Make sure that the addresses are the same in both places. However, if you are configuring a VPN load balancing cluster, you should not configure the dedicated IP address. On a VPN, only the cluster IP address should be present on each of the cluster hosts because clients running Windows 95, Windows 98, or Windows NT 4.0 may be unable to connect to the cluster if the dedicated IP address is configured on the Network Load Balancing cluster hosts. If you omit this step, the cluster will converge and appear to be working properly, but the cluster host will not accept and handle cluster traffic.
  • The dedicated IP address is always listed first (before the cluster IP address) in the Internet Protocol (TCP/IP) Properties dialog box. This will ensure that responses to connections originating from a host will return to the same host. For more information, see To set up TCP/IP for Network Load Balancing.
  • Both the dedicated IP address and the cluster IP address must be static IP addresses. They cannot be DHCP addresses.

Ensure that all hosts in a cluster belong to the same subnet and that the cluster's clients are able to access this subnet.

  • No cluster interconnect is used by Network Load Balancing other than the subnet in which the cluster is located. You should therefore not connect two network adapters in an effort to create a system area network (SAN) for which there is no need.

Perform moves of a cluster host according to the following guidelines:

Verify that all cluster hosts are operating in either unicast or multicast mode, one or the other, but not both.

Always begin Network Load Balancing command-line commands with "nlb.exe".

For more information, see Nlb.

Do not enable Network Load Balancing on a computer that is part of a server cluster.

  • Network Load Balancing can interfere with server cluster's use of network adapters and Microsoft does not support this configuration. Instead, use separate Network Load Balancing and server clusters.
For more information on server clusters, see Windows Clustering.

Avoid uninstalling Network Load Balancing.

  • There is typically no need to uninstall this feature. Network Load Balancing is an integral part of the products in the Windows Server 2003 family and does not need to be installed or uninstalled separately.

Tuesday, December 4, 2012

sshuttle

http://www.borfast.com/blog/easy-and-secure-vpn-alternative
But it's still pretty annoying not being able to access anything other than HTTP, POP, IMAP and SSH on port 22. Everything else was blocked, no Bittorrent, no UDP anywhere and I couldn't even choose to use different DNS servers, which made it a real pain to work, since I frequently need to use SSH to ports other than 22.
Enter sshuttleAfter having more trouble than I should to set up and maintain my own VPN, I happened to stumble upon sshuttle, which is a little gem that allowed me to achieve my goal of overcoming the restrictions of the University network in a much easier way than with a VPN.
Transparent proxy server that works as a poor man's VPN. Forwards over ssh. Doesn't require admin. Works with Linux and MacOS. Supports DNS tunneling.
You need a server you have SSH access to - but you don't necessarily need root access on the server. On your local machine you also need Python and root access.
You can get it either by git clone git://github.com/apenwarr/sshuttle or sudo apt-get install sshuttle. I prefer the git method, as it's easier to keep it up to date. I heard that Mac users can also use brew install sshuttle.
And finally, you use it like this:
sshuttle --dns -vr ssh_server 0/0
And bam, from now on, all the traffic from your local machine will be tunnelled through the server - including DNS requests! I read that people use this to overcome the great firewall of china - how cool is that? :)
There are a few options available, so if you want to do more with it, I suggest you read the docs on GitHub

OpenVPN configuración client-server

http://openvpn.net/index.php/download/access-server-downloads.html
OpenVPN Access Server is a full featured SSL VPN software solution that integrates OpenVPN server capabilities, enterprise management capabilities, simplified OpenVPN Connect UI, and OpenVPN Client software packages that accommodate Windows, MAC, and Linux OS environments. OpenVPN Access Server supports a wide range of configurations, including secure and granular remote access to internal network and/ or private cloud network resources and applications with fine-grained access control. 
http://openvpn.net/index.php/download/community-downloads.html
 =============================
 http://openvpn.net/index.php/access-server/download-openvpn-as-vm/202.html?osfamily=Virtual%20Appliance%20Windows%20%28VHD%29&ex=1
Using the OpenVPN Access Server Windows (VHD) Virtualization Version [It uses Ubuntu]
Virtual Appliance Windows (VHD) Version of OpenVPN Access Server to Begin Downloading

Using the OpenVPN Access Server Virtual Appliance For Windows (VHD) Virtualization Version
Release with Access Server v1.8.4

Initial Setup of Access Server
The first time the virtual appliance boots, you will be queried for some information. First, you must agree to the End User License Agreement (EULA). Next, you will be asked to enter some basic settings that the OpenVPN Access Server needs to initialize itself. These settings may be safely defaulted by pressing 'Enter'.
At the end of the boot sequence, the appliance window will turn to a blue background and show the URL of the appliance management interface. Enter this URL into a browser to continue the setup. You will likely receive a browser warning about the web server SSL certificate not being recognized. You can safely ignore these warnings.
On the appliance management interface, enter the username and password for the appliance. The initial credentials are:
Username: root
Password: openvpnas
See the Virtual Appliance section of the FAQ for information on how to change the root password.
The Admin Account for OpenVPN-AS needs to be setup through terminal by doing the following:
Change the password:
passwd openvpn
You will then be prompted to set a password for the user openvpn, after setting the password you can login to the Admin UI with the Username openvpn and the password you set.
Once logged in, you will be directed to the "System Information" page which gives you basic control over the virtual appliance. You can reboot, shut down, or change the network settings of the appliance.
Note:Keep in mind that the appliance will acquire its own IP address from DHCP that is separate from the IP address of the VMware host machine. You can use this DHCP-assigned address, or enter a fixed IP address under the "Network" tab.
The next step is to log into the OpenVPN Access Server Admin Web UI. On the "System Information" page, click on the "AS Admin Login" link located in the upper right corner of the page. You will receive another certificate-related browser warning at this point; that warning can also be ignored. At the Access Server Admin Web UI login page, enter the same username and password you entered previously for the appliance management interface.
Once logged in to the Access Server Admin Web UI, follow the instructions in the "Welcome to the Access Server Admin UI" information box to complete configuration of the Access Server.

=============================
OpenVPN: Manual para GNU/Linux y Windows 7 32bits y 64bits. Cliente/Servidor. SSL/TLS
OpenVPN es un cliente/servidor VPN tanto para equipos GNU/Linux como para Windows.
¿Para qué sirve hacer esto?
Para conectarnos a internet de una manera segura desde cualquier red ya sea cableada o WiFi, con cifrado WEP/WPA o sin cifrar. Todo el tráfico irá cifrado a través de un Túnel desde el AP que nos conectamos hasta nuestra casa y desde allí saldrá a internet, es como estar en nuestra casa. Lo malo es que debes tener una buena velocidad de subida, ya que de eso dependerá en mayor medida tu velocidad de bajada (a no ser que la red donde te conectes tenga menos bajada que la velocidad de subida de tu conexión).
También sirve en caso de no redigirir el tráfico, para poder acceder a los recursos compartidos de nuestra casa como puede ser imprimir desde la Universidad, copiarnos archivos desde el disco duro compartido de casa etc.
La VPN será SSL/TLS, y podemos encontrar dos tipos, TUN y TAP.
TUN: El controlador TUN emula un dispositivo punto a punto, es utilizado para crear túneles virtuales operando con el protocolo IP. De esta forma se puede encapsular todos los paquetes que se transporten a través de él como datagramas TCP o UDP (más adelante veréis que escogemos UDP en lugar de TCP, y preguntaréis que por qué ya que TCP es conectivo, fiable y Orientado a conexión). Las máquinas que queden detrás de cada uno de los extremos del enlace pertenecerán a subredes diferentes.
TAP: Simula una interfaz de red Ethernet, más comúnmente conocido como modo puente o bridge, estos túneles virtuales encapsulan directamente paquetes ethernet. Esta situación permite empaquetar entramados diferentes al IP. Las máquinas situadas detrás de cada uno de los extremos del enlace pueden operar como parte de la misma subred (si se utiliza el protocolo IP). El modo de funcionamiento puente es particularmente útil para enlazar usuarios remotos, ya que éstos pueden conectarse a un mismo servidor y virtualmente formar parte de la red principal.
En el manual usaremos TUN.
En este manual os voy a explicar cómo hacerlo en GNU/Linux, aunque en esencia, es lo mismo para Windows, únicamente cambian los comandos en la consola (cmd.exe), los certificados y las llaves, son los mismos para los dos, es decir, puedes crear TODO en GNU/Linux y luego pasarlo a Windows para usarlo (ya sea cliente o servidor), únicamente deberás cambiar la extensión del cliente/servidor .conf por .ovpn
Voy a explicaros como realizar la configuración más segura posible.
- Usaremos una llave RSA para crear CA.key de 2048bits sin afectar lo más mínimo al rendimiento de la VPN.
- La llave simétrica será AES-256bits-CBC (Encadenamiento de Cifrado en Bloque) uno de los más seguros (OpenVPN incluye todo esto, no hay que “programarlo” ni nada parecido).
- Incluiremos TLS/AUTH una firma HMAC adicional para todos las negociaciones SSL/TLS para la verificación de la integridad. Cualquier paquete UDP que no posea la firma HMAC correcta es bloqueado. La firma HMAC TLS-AUTH provee un nivel de seguridad adicional mas allá del que provee SSL/TLS, de esta forma nos protegemos de ataques DoS, escaneo de puertos y le ahorramos trabajo al servidor (porque si esto falla al intentar la autenticación lo corta y no lo sigue intentando).
- Protocolo UDP en lugar de TCP porque es más fuerte frente a ataques DoS y escaneos de puertos (UDP es no conectivo, no fiable, no orientado a conexión).

GNU/Linux Ubuntu

OpenVPN Logo
Instalamos Openvpn con el siguiente comando desde los repositorios:
sudo apt-get install openvpn
Ahora vamos a copiar los archivos easy-rsa y sample-config-files a /etc/openvpn/ (previamente hemos ido al directorio con la orden cd).
ubuntu@ubuntu:/usr/share/doc/openvpn/examples$ ls
easy-rsa sample-config-files sample-keys sample-scripts
Copiamos easy-rsa y sample-config-files a /etc/openvpn/
ubuntu@ubuntu:/usr/share/doc/openvpn/examples$ sudo cp -R easy-rsa/ /etc/openvpn/
ubuntu@ubuntu:/usr/share/doc/openvpn/examples$ sudo cp -R sample-config-files/ /etc/openvpn/
Ahora nos metemos en el directorio de trabajo y veremos muchos ficheros:
ubuntu@ubuntu:/etc/openvpn/easy-rsa/2.0$ ls
build-ca build-key-server Makefile sign-req
build-dh build-req openssl-0.9.6.cnf.gz vars
build-inter build-req-pass openssl.cnf whichopensslcnf
build-key clean-all pkitool
build-key-pass inherit-inter README.gz
build-key-pkcs12 list-crl revoke-full
Ejecutamos el siguiente comando para crear una carpeta en este directorio donde almacenaremos las claves:
mkdir keys
Es en este directorio donde se almacenaran las llaves privadas (.key), los archivos de requerimiento de certificado (.csr) y los certificados (.crt) y otros archivos.
- Las llaves .key son PRIVADAS, han de ser copiadas por un medio seguro.
- Los certificados .crt y el requerimiento .csr puede pasarse sobre un medio inseguro (emails, messenger).

Generar la llave y el certificado para la Autoridad Certificadora (CA).

En esta parte vamos a crear los certificados y las llaves para la CA, para el servidor y para el cliente, nos logueamos en la consola como root (siempre como root para dejarnos de líos).
Ahora vamos a editar el archivo “vars”.
Nos situamos en el directorio de trabajo:
cd /etc/openvpn/easy-rsa/2.0/
gedit vars
- Ahora modificamos KEY_COUNTRY, KEY_PROVINCE, KEY_CITY, KEY_ORG y KEY_MAIL a vuestro gusto, pero no podéis dejarlo en blanco.
- También modificamos la ruta donde están las KEYS, ya que luego haremos un ./clean-all y si no está la ruta correcta, dará error.
- El tamaño de la llave RSA es controlado por la variable KEY_SIZE en el archivo vars, por tanto en lugar de tener 1024 (bits), ponemos 2048 (bits) si queréis más seguridad (recomiendo 2048).
Una vez lo hayáis modificado, guardamos y salimos, os debería quedar algo así:
# easy-rsa parameter settings
# NOTE: If you installed from an RPM,
# don’t edit this file in place in
# /usr/share/openvpn/easy-rsa –
# instead, you should copy the whole
# easy-rsa directory to another location
# (such as /etc/openvpn) so that your
# edits will not be wiped out by a future
# OpenVPN package upgrade.

# This variable should point to
# the top level of the easy-rsa
# tree.
export EASY_RSA=”`pwd`”

#
# This variable should point to
# the requested executables
#
export OPENSSL=”openssl”
export PKCS11TOOL=”pkcs11-tool”
export GREP=”grep”

# This variable should point to
# the openssl.cnf file included
# with easy-rsa.
export KEY_CONFIG=`$EASY_RSA/whichopensslcnf $EASY_RSA’

# Edit this variable to point to
# your soon-to-be-created key
# directory.
#
# WARNING: clean-all will do
# a rm -rf on this directory
# so make sure you define
# it correctly!
export KEY_DIR=”/etc/openvpn/easy-rsa/2.0/keys/”

# Issue rm -rf warning
echo NOTE: If you run ./clean-all, I will be doing a rm -rf on $KEY_DIR

# PKCS11 fixes
export PKCS11_MODULE_PATH=”dummy”
export PKCS11_PIN=”dummy”

# Increase this to 2048 if you
# are paranoid. This will slow
# down TLS negotiation performance
# as well as the one-time DH parms
# generation process.
export KEY_SIZE=2048

# In how many days should the root CA key expire?
export CA_EXPIRE=3650

# In how many days should certificates expire?
export KEY_EXPIRE=3650

# These are the default values for fields
# which will be placed in the certificate.
# Don’t leave any of these fields blank.
export KEY_COUNTRY=”XXXX”
export KEY_PROVINCE=”XXX”
export KEY_CITY=”XXXX”
export KEY_ORG=”XXXXX”
export KEY_EMAIL=”XXXXX@XXX.com”
En el mismo directorio tecleamos lo siguiente para limpiar todos los archivos que haya en /keys/.
source ./vars
./clean-all

Parámetros Diffie Hellman

Vamos a generar estos parámetros necesarios para el servidor.
En consola y en el mismo directorio de siempre (/etc/openvpn/easy-rsa/2.0/)
./build-dh (recuerda ejecutarlo como root)
Os saldrá algo parecido a esto:
root@Portatil:/etc/openvpn/easy-rsa/2.0# ./build-dh
Generating DH parameters, 2048 bit long safe prime, generator 2
This is going to take a long time
……………………………….+……………….++*++*
……………………………….+……………….++*++*
root@Portatil:/etc/openvpn/easy-rsa/2.0#
Nota: los guiones anteriores eran simples guiones, estos que vienen a continuación y que por ejemplo están antes que initca son dos guiones juntos, parece que es uno largo pero no.

Creación certificado para la CA

Ahora creamos el certificado para la CA:
./pkitool –initca
Os saldrá algo como esto:
root@Portatil:/etc/openvpn/easy-rsa/2.0# ./pkitool –initca
Using CA Common Name: vpn CA
Generating a 2048 bit RSA private key
…….+++
………….+++
writing new private key to ‘ca.key’
—–
root@Portatil:/etc/openvpn/easy-rsa/2.0#

Generación de certificado y llaves para el SERVER

./pkitool –server servidor
Nos saldrá algo así:
root@Portatil:/etc/openvpn/easy-rsa/2.0# ./pkitool –server servidor
Generating a 2048 bit RSA private key
…………………………+++
…………………………………..+++
writing new private key to ‘servidor.key’
—–
Using configuration from /etc/openvpn/easy-rsa/2.0/openssl.cnf
Check that the request matches the signature
Signature ok
The Subject’s Distinguished Name is as follows
countryName PRINTABLE:’XX’
stateOrProvinceName PRINTABLE:’XXX’
localityName PRINTABLE:’XXX’
organizationName PRINTABLE:’XXXX’
commonName PRINTABLE:’servidor’
emailAddress :IA5STRING:”XXXXXX”
Certificate is to be certified until Jun 19 09:40:27 2020 GMT (3650 days)

Write out database with 1 new entries
Data Base Updated
root@Portatil:/etc/openvpn/easy-rsa/2.0#
Todos los valores los obtiene del archivo VARS, y el Common Name lo obtiene de “servidor” que está a continuación de “–server”.

Generación de certificado y llaves para el CLIENTE

./pkitool cliente1
Nos saldrá algo así:
root@Portatil:/etc/openvpn/easy-rsa/2.0# ./pkitool cliente1
Generating a 2048 bit RSA private key
………………………….+++
………………………………………….+++
writing new private key to ‘cliente1.key’
—–
Using configuration from /etc/openvpn/easy-rsa/2.0/openssl.cnf
Check that the request matches the signature
Signature ok
The Subject’s Distinguished Name is as follows
countryName PRINTABLE:’XX’
stateOrProvinceName PRINTABLE:’XXX’
localityName PRINTABLE:’XXX’
organizationName PRINTABLE:’XXX’
commonName PRINTABLE:’cliente1′
emailAddress :IA5STRING:’XXXX’
Certificate is to be certified until Jun 19 09:41:34 2020 GMT (3650 days)
Write out database with 1 new entries
Data Base Updated
root@Portatil:/etc/openvpn/easy-rsa/2.0#
Para generar más clientes hacemos lo siguiente:
source ./vars
./pkitool cliente2
Si queremos el tercero hacemos:
source ./vars
./pkitool cliente3
Antes de crear cada certificado debemos ejecutar source ./vars (por si queréis más).
Ahora nos vamos a:
cd /etc/openvpn/easy-rsa/2.0/keys/
Y veremos todas las claves (comando ls para verlas).

Generar llave TLS-AUTH

openvpn –genkey –secret ta.key (donde ta.key es la llave que deberemos usar tanto en el servidor como en el cliente).
En la configuración del servidor (servidor.conf o servidor.ovpn) deberemos poner:
tls-auth ta.key 0 (0 de Incoming)
En la configuración del cliente (cliente.conf o cliente.ovpn) deberemos poner:
tls-auth ta.key 1 (1 de Outgoing)
A continuación os pongo una tabla de qué es cada cosa.
Tabla VPN
Podemos agruparlos por carpetas para mayor comodidad siguiendo la tabla ya que por ejemplo ca.crt tiene que estar en todos los clientes/servidores (servidor, cliente1, cliente2, etc).

Archivo de Configuración del Cliente (client.conf)

Viene una pequeña guía de para qué sirve cada comando, tenéis que modificar:
- remote my-server-1 1194 ya que aquí deberemos poner el host dyndns que tengáis, Host en DynDNS para servidores domésticos como FTP, VPN, servidor de juegos o servidor WEB : Manual DynDNS
- ca ca.crt cert client.crt y key client.key lo debéis cambiar por el nombre que le habéis puesto a cliente, en este caso cliente1, cliente2 y con la RUTA COMPLETA al archivo para evitarnos problemas, quedaría así:
ca /etc/openvpn/easy-rsa/2.0/keys/ca.crt
cert /etc/openvpn/easy-rsa/2.0/keys/cliente1.crt
key /etc/openvpn/easy-rsa/2.0/keys/cliente1.key
-En el siguiente fragmento veis el TLS-AUTH que usaremos, quitamos e punto y coma (;) y lo activaremos, el ta.key también ponemos la ruta completa de la ta.key.
# If a tls-auth key is used on the server
# then every client must also have the key.
tls-auth ta.key 1
- Como hemos elegido un cifrado AES-256-CBC pues lo ponemos:
# Select a cryptographic cipher.
# If the cipher option is used on the server
# then you must also specify it here.
cipher AES-256-CBC
Y ya tenemos el cliente listo.
La ruta completa de cada archivo (ca.crt cliente1.key etc, no hace falta ponerla siempre y cuando el client.conf esté en la misma carpeta que ellas, pero para no tener problemas pues ponemos la ruta completa).

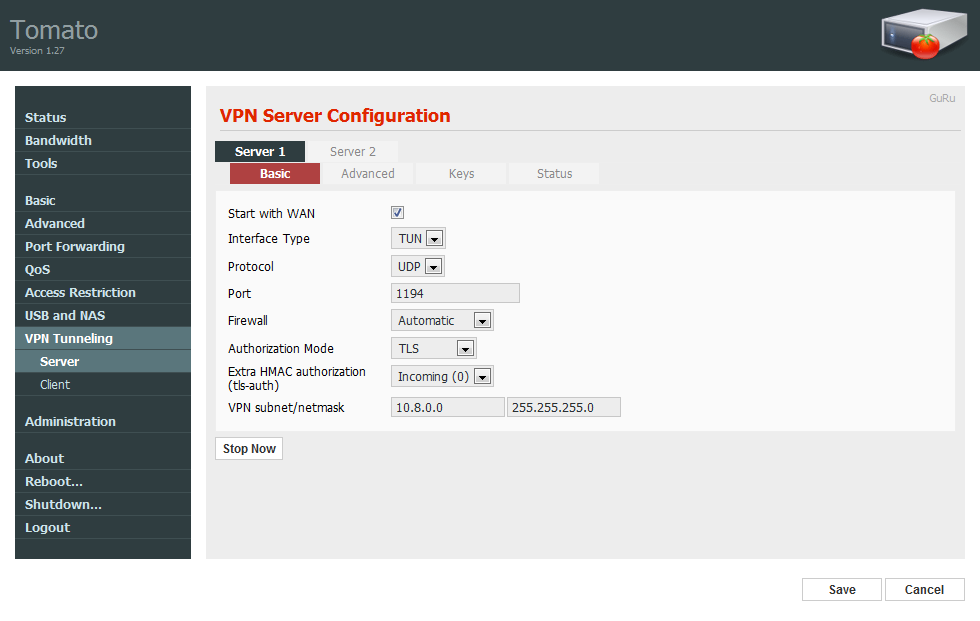
Archivo de Configuración del Servidor (server.conf)

- En el servidor debemos poner la IP interna que tendremos en la red para escuchar, el puerto, si es el de por defecto no habrá que tocarlo.
- Ponemos las rutas completas de los siguientes archivos:

ca ca.crt
cert server.crt
key server.key
- dh dh2048.pem ya que lo hemos puesto de 2048 bits.
- El rango del servidor no hace falta tocarlo, el cifrado que hemos elegido y la TLS-AUTH.

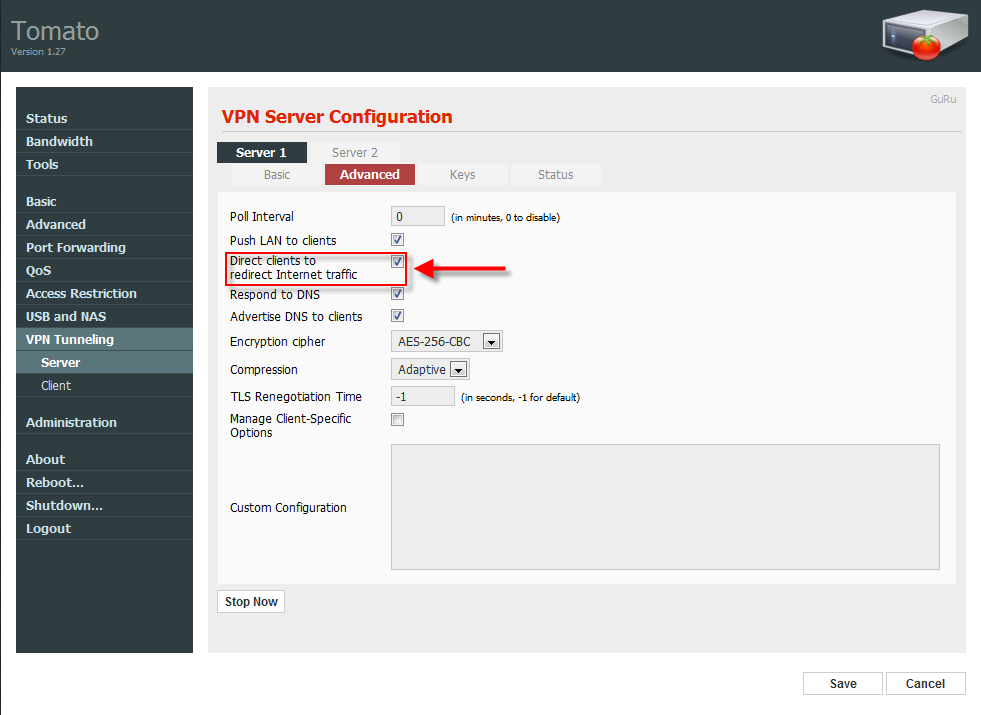
Aquí no he explicado con detalle la configuración del servidor, porque poca gente va a tener un ordenador con GNU/Linux o Windows encendido dedicado únicamente a esto, es mucho más cómodo un router con firmwares de terceros como Tomato y el correspondiente módulo OpenVPN donde es todo gráfico, a continuación os pongo unas capturas de pantalla para que lo veáis junto con el LOG del router al arrancar la VPN.
Nota: las claves se meten en las casillas haciendo un gedit ca.crt (por ejemplo), copiamos y pegamos todo lo que aparece en el gedit y listo! (sí, todos esos símbolos y letras).
Click en la foto para ampliarla y verla mejor.
Tomato VPN
Tomato VPN
Tomato VPN

Pruebas de conectividad:

Log de inicio de OpenVPN en el router:
Jun 21 18:14:39 router daemon.notice openvpn[344]: OpenVPN 2.1.1 mipsel-unknown-linux-gnu [SSL] [LZO2] built on Feb 17 2010
Jun 21 18:14:39 router daemon.warn openvpn[344]: NOTE: OpenVPN 2.1 requires ‘–script-security 2′ or higher to call user-defined scripts or executables
Jun 21 18:14:42 router daemon.notice openvpn[344]: Diffie-Hellman initialized with 2048 bit key
Jun 21 18:14:42 router daemon.notice openvpn[344]: Control Channel Authentication: using ‘static.key’ as a OpenVPN static key file
Jun 21 18:14:42 router daemon.notice openvpn[344]: Outgoing Control Channel Authentication: Using 160 bit message hash ‘SHA1′ for HMAC authentication
Jun 21 18:14:42 router daemon.notice openvpn[344]: Incoming Control Channel Authentication: Using 160 bit message hash ‘SHA1′ for HMAC authentication
Jun 21 18:14:42 router daemon.notice openvpn[344]: TLS-Auth MTU parms [ L:1558 D:166 EF:66 EB:0 ET:0 EL:0 ]
Jun 21 18:14:42 router daemon.notice openvpn[344]: TUN/TAP device tun21 opened
Jun 21 18:14:42 router daemon.notice openvpn[344]: TUN/TAP TX queue length set to 100
Jun 21 18:14:42 router daemon.notice openvpn[344]: /sbin/ifconfig tun21 10.8.0.1 pointopoint 10.8.0.2 mtu 1500
Jun 21 18:14:42 router daemon.notice openvpn[344]: /sbin/route add -net 10.8.0.0 netmask 255.255.255.0 gw 10.8.0.2
Jun 21 18:14:42 router daemon.notice openvpn[344]: Data Channel MTU parms [ L:1558 D:1450 EF:58 EB:135 ET:0 EL:0 AF:3/1 ]
Jun 21 18:14:42 router daemon.notice openvpn[407]: Socket Buffers: R=[108544->131072] S=[108544->131072]
Jun 21 18:14:42 router daemon.notice openvpn[407]: UDPv4 link local (bound): [undef]:1194
Jun 21 18:14:42 router daemon.notice openvpn[407]: UDPv4 link remote: [undef]
Jun 21 18:14:42 router daemon.notice openvpn[407]: MULTI: multi_init called, r=256 v=256
Jun 21 18:14:42 router daemon.notice openvpn[407]: IFCONFIG POOL: base=10.8.0.4 size=62
Jun 21 18:14:42 router daemon.notice openvpn[407]: Initialization Sequence Completed
Cliente:
root@Portatil:/etc/openvpn# openvpn client.conf
Tue Jun 22 12:08:24 2010 OpenVPN 2.1.0 x86_64-pc-linux-gnu [SSL] [LZO2] [EPOLL] [PKCS11] [MH] [PF_INET6] [eurephia] built on Jan 26 2010
Tue Jun 22 12:08:24 2010 NOTE: OpenVPN 2.1 requires ‘–script-security 2′ or higher to call user-defined scripts or executables
Tue Jun 22 12:08:24 2010 /usr/bin/openssl-vulnkey -q -b 2048 -m
Tue Jun 22 12:08:24 2010 Control Channel Authentication: using ‘ta.key’ as a OpenVPN static key file
Tue Jun 22 12:08:24 2010 Outgoing Control Channel Authentication: Using 160 bit message hash ‘SHA1′ for HMAC authentication
Tue Jun 22 12:08:24 2010 Incoming Control Channel Authentication: Using 160 bit message hash ‘SHA1′ for HMAC authentication
Tue Jun 22 12:08:24 2010 LZO compression initialized
Tue Jun 22 12:08:24 2010 Control Channel MTU parms [ L:1558 D:166 EF:66 EB:0 ET:0 EL:0 ]
Tue Jun 22 12:08:24 2010 Data Channel MTU parms [ L:1558 D:1450 EF:58 EB:135 ET:0 EL:0 AF:3/1 ]
Tue Jun 22 12:08:24 2010 Local Options hash (VER=V4): ’9e7066d2′
Tue Jun 22 12:08:24 2010 Expected Remote Options hash (VER=V4): ’162b04de’
Tue Jun 22 12:08:24 2010 Socket Buffers: R=[124928->131072] S=[124928->131072]
Tue Jun 22 12:08:24 2010 UDPv4 link local: [undef]
Tue Jun 22 12:08:24 2010 UDPv4 link remote: [AF_INET]XX:1194
Tue Jun 22 12:08:24 2010 TLS: Initial packet from [AF_INET]XX:1194, sid=0e6c8016 fc84b328
Tue Jun 22 12:08:27 2010 VERIFY OK: depth=1, /C=XX/ST=X/L=XX/O=Xa/CN=XX/emailAddress=XX.com
Tue Jun 22 12:08:27 2010 VERIFY OK: nsCertType=SERVER
Tue Jun 22 12:08:27 2010 VERIFY OK: depth=0, /C=XXX/ST=XX/L=xxx/O=xxxx/CN=xxx/emailAddress=xxx
Tue Jun 22 12:08:30 2010 Data Channel Encrypt: Cipher ‘AES-256-CBC’ initialized with 256 bit key
Tue Jun 22 12:08:30 2010 Data Channel Encrypt: Using 160 bit message hash ‘SHA1′ for HMAC authentication
Tue Jun 22 12:08:30 2010 Data Channel Decrypt: Cipher ‘AES-256-CBC’ initialized with 256 bit key
Tue Jun 22 12:08:30 2010 Data Channel Decrypt: Using 160 bit message hash ‘SHA1′ for HMAC authentication
Tue Jun 22 12:08:30 2010 Control Channel: TLSv1, cipher TLSv1/SSLv3 EDH-RSA-DES-CBC3-SHA, 2048 bit RSA
Tue Jun 22 12:08:30 2010 [servidor] Peer Connection Initiated with [AF_INET]87.220.30.11:1194
Tue Jun 22 12:08:33 2010 SENT CONTROL [servidor]: ‘PUSH_REQUEST’ (status=1)
Tue Jun 22 12:08:33 2010 PUSH: Received control message: ‘PUSH_REPLY,route 10.10.3.0 255.255.255.0,dhcp-option DOMAIN RED_LOCAL,dhcp-option DNS 10.10.3.1,redirect-gateway def1,route 10.8.0.1,topology net30,ping 15,ping-restart 60,ifconfig 10.8.0.6 10.8.0.5′
Tue Jun 22 12:08:33 2010 OPTIONS IMPORT: timers and/or timeouts modified
Tue Jun 22 12:08:33 2010 OPTIONS IMPORT: –ifconfig/up options modified
Tue Jun 22 12:08:33 2010 OPTIONS IMPORT: route options modified
Tue Jun 22 12:08:33 2010 OPTIONS IMPORT: –ip-win32 and/or –dhcp-option options modified
Tue Jun 22 12:08:33 2010 ROUTE default_gateway=10.10.2.1
Tue Jun 22 12:08:33 2010 TUN/TAP device tun0 opened
Tue Jun 22 12:08:33 2010 TUN/TAP TX queue length set to 100
Tue Jun 22 12:08:33 2010 /sbin/ifconfig tun0 10.8.0.6 pointopoint 10.8.0.5 mtu 1500
Tue Jun 22 12:08:33 2010 /sbin/route add -net xxx netmask 255.255.255.255 gw 10.10.2.1
Tue Jun 22 12:08:33 2010 /sbin/route add -net 0.0.0.0 netmask 128.0.0.0 gw 10.8.0.5
Tue Jun 22 12:08:33 2010 /sbin/route add -net 128.0.0.0 netmask 128.0.0.0 gw 10.8.0.5
Tue Jun 22 12:08:33 2010 /sbin/route add -net 10.10.3.0 netmask 255.255.255.0 gw 10.8.0.5
Tue Jun 22 12:08:33 2010 /sbin/route add -net 10.8.0.1 netmask 255.255.255.255 gw 10.8.0.5
Tue Jun 22 12:08:33 2010 Initialization Sequence Completed
Ahora tenemos tres opciones para conectaros a la VPN:
- Tecleando en consola el comando “sudo openvpn cliente.conf” y no cerrando la consola (ya que si no cierra la conexión).
- Automatizando el inicio de la VPN en el sistema, con lo cual siempre pasarás por la VPN aunque la red sea segura, y eso conlleva no tener la máxima velocidad posible (redirigimos internet).
- Poniendo OpenVPN en el network manager de forma gráfica y ada vez que queramos conectarnos dar 2 clicks y listo.
Esta última forma es la más útil al menos para mí, os voy a poner como hacerlo.

Usar Network-Manager para hacer la conexión OpenVPN (con gráficos y sin consola).

Vamos a instalar OpenVPN para el network-manager (plugin).
sudo apt-get install network-manager-openvpn
SOLUCIÓN a: Openvpn falló porque no había secretos vpn válidos
Una vez instalado (y reiniciado el sistema a ser posible) hacemos:
sudo gedit /etc/dbus-1/system.d/nm-openvpn-service.conf
Y debe poner obligatoriamente lo siguiente:
“-//freedesktop//DTD D-BUS Bus Configuration 1.0//EN”
“http://www.freedesktop.org/standards/dbus/1.0/busconfig.dtd”>


Guardáis datos, salís del gedit y reiniciáis el ordenador (también vale reiniciar sólo el network-manager pero tardas menos así), ya nos os dará el famoso error de: Openvpn falló porque no había secretos vpn válidos.
Nota:
Realmente lo único que haces es intercalar esta línea de código:


Entre las otras dos, pero os puse el código entero para que no os compliquéis la vida.
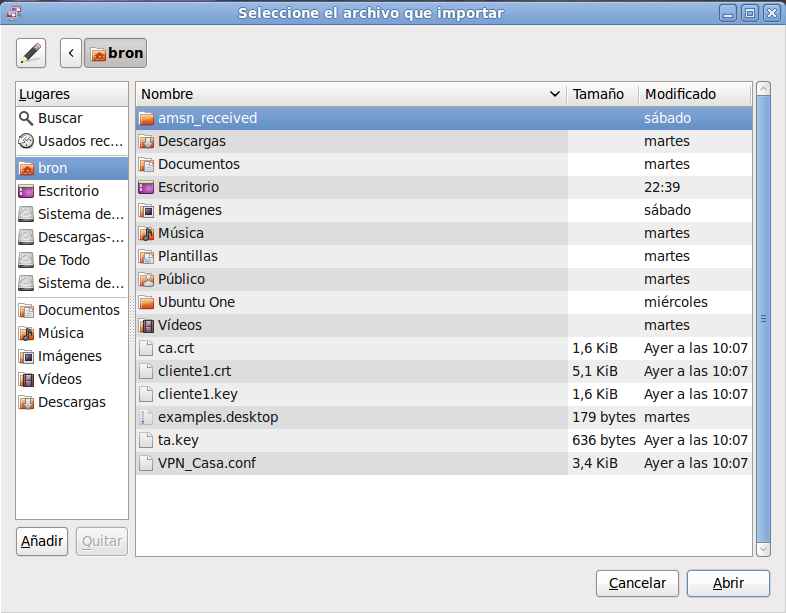
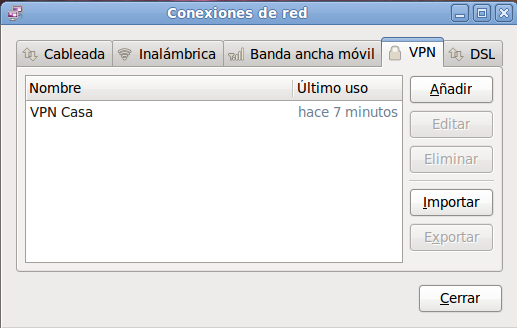
Ya tenemos el plugin openvpn para network manager puesto a punto para configurarlo, ahora vamos a importar la configuración cliente.conf de tal forma que en 4 clicks tengamos todo listo.
En esta pantalla seleccionamos “Importar“:
Network Manager OpenVPN
Buscamos el archivos .CONF y doble click:
Network Manager OpenVPN
A continuación y SIN TOCAR NADA, le damos a APLICAR:
Network Manager OpenVPN
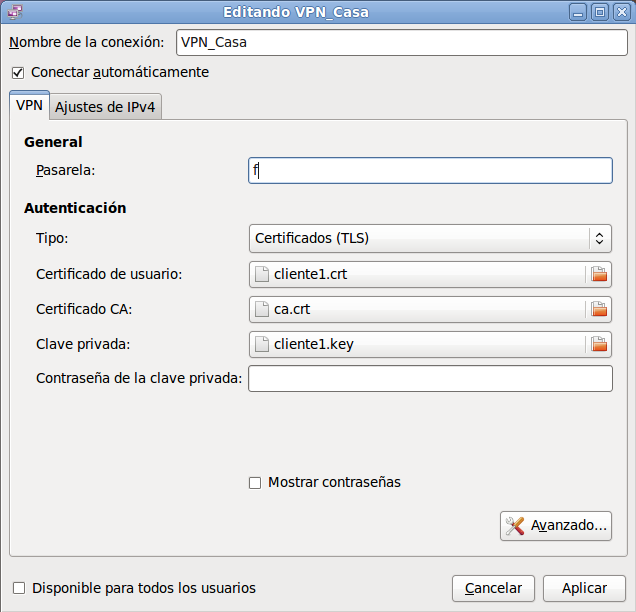
Y ya la habremos importado:
Network Manager OpenVPN
Una vez que hemos hecho esto, basta con dar click izquierdo sobre el network-manager, nos vamos a conexiones VPN y seleccionamos la conexión que hemos importado anteriormente, en 15 segundos estaremos conectados y nos podrá un candado sobre el network-manager, si no funciona ejecutad el cliente.conf manualmente con el siguiente comando (si tampoco conecta, repasa los archivos .CONF).
sudo openvpn cliente.conf
Nota: aquí tenéis el HOWTO oficial de OpenVPN:
http://openvpn.net/index.php/open-source/documentation/howto.html
 
Windows 7
La creación de los certificados es exactamente en Windows que en GNU/Linux, sólo cambian los comandos a usar, incluso podéis hacer los certificados en GNU/Linux y llevarlos a Windows sin cambiar de extensión, únicamente el server.conf y cliente.conf han de pasar a extensión .ovpn, nada más.
Lo primero que vamos a hacer es bajarnos la última versión de OpenVPN y configurar el GUI adecuadamente.
Descargamos la última versión OpenVPN desde aquí:
http://openvpn.net/index.php/open-source/downloads.html
La instalamos normalmente, con derechos de administrador (por supuesto), una vez instalado todo, reiniciamos el equipo (aunque no es necesario).
Ahora nos vamos al icono del escritorio y pulsamos click derecho sobre él y seleccionamos PROPIEDADES, en la pestaña COMPATIBILIDADModo de Compatibilidad para Windows XP (Service Pack 3) Ejecutar como administrador“, tal y como tenéis en la imagen: seleccionamos y seleccionamos la casilla de ”
OpenVPN Windows7
Y ya os debería funcionar correctamente, si os funciona sin hacer esto pues perfecto, pero a mí no me funcionó.

Generar la llave y el certificado para la Autoridad Certificadora (CA).

Ejecutamos el CMD.EXE con permisos de administrador (clic derecho ejecutar como administrador).
Nos vamos al directorio de trabajo de OpenVPN carpeta easy-rsa con el comando cd.
- Renombramos vars.bat.sample a vars.bat y lo abrimos con el bloc de notas para rellenar las key_country, key_province etc.
- El tamaño de la llave RSA es controlado por la variable KEY_SIZE en el archivo vars, por tanto en lugar de tener 1024 (bits), ponemos 2048 (bits) si queréis más seguridad (recomiendo 2048).
Salimos y guardamos.
Ejecutamos el comando vars (en c:\archivos de programa\openvpn\easy-rsa)
A continuación ejecutamos clean-all.bat, nos creará una carpeta nueva “keys” donde almacenaremos las claves.

Parámetros Diffie Hellman

Vamos a generar estos parámetros necesarios para el servidor.
Ejecutamos el comando: build-dh y empezará el proceso.

Creación certificado para la CA

Renombramos openssl.sample a openssl (sin el sample).
Ejecutamos en consola build-ca para crearlo y ponéis lo mismo que habéis rellenado en vars (key_country etc) y cuando te pida common name poned openvpn-ca (por ejemplo).

Generación de certificado y llaves para el SERVER

Ejecutamos: build-key-server server para crear el servidor, el common name se obtiene del segundo “server”.

Generación de certificado y llaves para el CLIENTE

Ejecutamos: build-key cliente1 para crear el primer cliente y así con los demás que queramos.

Generar llave TLS-AUTH

En el directorio easy-rsa ejecutamos: openvpn –genkey –secret ta.key y se nos pondrá en ese mismo directorio.
Nota: son dos guiones, no uno sólo.
Ahora nos toca configurar el client.ovpn (client.conf en GNU/Linux) con esto, se hace exactamente igual que en GNU/Linux y tiene las mismas opciones y TODO IGUAL.
El servidor es también igual que en GNU/Linux.
Los archivos que debéis pasar al servidor y clientes, hacedlo por un medio seguro con las .key.
Aquí tenéis la misma tabla que puse arriba:
Tabla VPN
Aquí tenéis el manual oficial de OpenVPN:
http://openvpn.net/index.php/open-source/documentation/howto.html

Pruebas de conectividad e iniciación:

Como supongo que usaréis Windows como cliente para conectaros a una VPN que esté en un servidor con GNU/Linux o en un router con firmwares de terceros, os voy a enseñar como arrancarlo mediante la interfaz gráfica.
Copiamos ca.crt, cliente1.crt, cliente1.key, ta.key y cliente.ovpn a la carpeta Openvpn/config/, en el cliente.ovpn no hace falta poner la ruta entera de ca.crt y todos los demás, ya que están en la misma carpeta.
Una vez que ya tenemos el servidor a punto, todos los archivos del cliente en la carpeta config, iniciamos el OpenVPN GUI que tenemos en el escritorio.
Recuerda: ejecuta en modo de compatibilidad XP Service Pack 3 y con derechos de administrador.
Clic derecho sobre el icono y pulsamos connect, esperamos hasta que se conecte y nos de LUZ VERDE (si hacemos click derecho sobre el icono y le damos a “Show Status” nos mostrará el LOG de conexión).
Windows Cliente VPN
Y ya estamos conectados a la VPN en Windows 7.
Espero que os haya gustado…y si tenéis alguna pregunta hacedla y os responderé (si sé).
Manual realizado por Sergio de Luz (Bron) para REDESZone.net

Access Server

NAS is also the abbreviation for network-attached storage.
----------------
Remote Access Server
A server that is dedicated to handling users that are not on a LAN but need remote access to it. The remote access server allows users to gain access to files and print services on the LAN from a remote location. For example, a user who dials into a network from home using an analog modem or an ISDN connection will dial into a remote access server. Once the user is authenticated he can access shared drives and printers as if he were physically connected to the office LAN.
See the Server Types page in the Quick Reference section of Webopedia for a comparison of server types.
 http://searchnetworking.techtarget.com/definition/network-access-server
A network access server (NAS) is a computer server that enables an independent service provider (ISP) to provide connected customers with Internet access. A network access server has interfaces to both the local telecommunication service provider such as the phone company and to the Internet backbone.
The server authenticates users requesting login. It receives a dial-up call from each user host (such as your computer) that wants to access the Internet, performs the necessary steps to authenticate and authorize each user, usually by verifying a user name and password, and then allows requests to begin to flow between the user host and hosts (computers) elsewhere on the Internet.
The term network access server may refer to a server devoted entirely to managing network access or to a server that also performs other functions as well. A network access server can be configured to provide a host of services such as VoIP, fax-over-IP, and voicemail-over-IP as well.
One of the most well-known network access servers, the AS5800, is made by Cisco Systems. It is a workhorse product that is referred to as a carrier-class universal access server.

Getting started with NAS
To explore how NAS is used in the enterprise, here are some additional resources:
Moving from DAS to NAS:In this tip, Rick Cook discusses how SMBs can benefit from adding storage to their existing networks in the form of NAS.
Small-midsized business NAS product evaluation: This article compares and contrasts four very different NAS systems: the Buffalo TeraStation Pro II Pro, the Reldata 9240, the Synology RS407, and the Western Digital MyBook World Edition WDG1NC5000N.
NAS FAQ: In this FAQ, Ashish Nadkarni answers today's most common NAS questions.

Cisco Lab How To Configure An Access Server
http://openvpn.net/index.php/access-server/download-openvpn-AS.html

Wednesday, November 7, 2012

OpenVPN Access Server Windows (VHD) Virtualization Version

http://openvpn.net/index.php/download.html
openvpn.net/index.php/access-server/download-openvpn-as-vm
Select the Virtual Appliance Windows (VHD) Version of OpenVPN Access Server to Begin Downloading

Using the OpenVPN Access Server Virtual Appliance For Windows (VHD) Virtualization Version
Release with Access Server v1.8.4
IntroductionOpenVPN Access Server is available as a Virtual Hard Disk for deployment on Windows. To use the virtual appliance, you must download the Virtual Hard Disk and run it with Hyper-V or Virtual PC (such as Hyper-V 2008 R2, Hyper-V 2008 R2).

In order to upgrade from OpenVPN Access Server 1.6.1 to 1.8.4 you will need to do the following:
1. Download the Appliance at the top of this page and configure it.
2. Run the following commands in the virtual machine command prompt:

wget http://swupdate.openvpn.net/as/openvpn-as-1.8.4-Ubuntu8.i386.deb
dpkg -i openvpn-as-1.8.4-Ubuntu8.i386.deb

The package is updated while preserving the configuration (including license information and all keys/certificates) from the previous Access Server installation.

Downloading and Running the Virtual Machine on Hyper-V

Once Hyper-V has been installed, download the OpenVPN Access Server virtual appliance. The
virtual appliance is distributed as a .ZIP archive file and may be obtained from the link at the top of this page.
After downloading the virtual appliance ZIP file, expand the ZIP file into the desired directory. On Windows, you can expand the ZIP archive by right-clicking on the file and selecting "Extract All".
To load the extracted virtual machine into your Hyper-V manager:
  1. Open up your Hyper-V Manager
    (in windows server 2008 this can be done by Navigating to: Start>Administrative Tools>Hyper-V Manager)
  2. Once the Hyper-V manager is loaded you can click: New>Virtual Machine (found at the top right of the Hyper-V Manager window)
  3. You will then be prompted to enter a name, create any name you desire. After this you will be prompted to enter in the desired memory (Minimum requirement: 256 Megabytes). You will then be prompted to select an Network adapter, ignore this for now, Linux require legacy adapters when running under Hyper-V.
  4. At the next window you will be prompted to create a Virtual Hard Drive, since we already have a Virtual Hard Disk created you will use this instead so check the radio button to enable the use of an existing Virtual Hard Disk. Now you need to browse and select the extracted OpenVPN-AS_1.6.1.vhd file. After this you can click finish.
  5. After Hyper-V manager has created the virtual machine you will need to setup a legacy adapter for this virtual machine. You can do so by selecting the newly created virtual machine and clicking the "Settings" link located near the bottom right of the Hyper-V Manager interface. Once the settings window is open navigate over the "Add Hardware" area (found near the top left of the settings window). Select "Legacy Network Adapter" and click add. Under the Network Menu select your Virtual Network. Keep the MAC Address info set to "Dynamic" after that you will need to click the check box that says "Enable spoofing of MAC Addresses". Click Apply proceed to the next step. *Note: If you are running Hyper-V 2008 (non-R2) you will not have the option to enable Mac Spoofing, instead you will need to use a mac address from your allocated mac addresses via the Virtual Network Settings in Hyper-V.
  6. Start the virtual machine if it does not start automatically. Next, click inside the appliance window to select it for input. (When the appliance window is selected, the mouse pointer will vanish. Press Control-ALT+Left Arrow to return to your computer.)

Initial Setup of Access Server

The first time the virtual appliance boots, you will be queried for some information. First, you must agree to the End User License Agreement (EULA). Next, you will be asked to enter some basic settings that the OpenVPN Access Server needs to initialize itself. These settings may be safely defaulted by pressing 'Enter'.
At the end of the boot sequence, the appliance window will turn to a blue background and show the URL of the appliance management interface. Enter this URL into a browser to continue the setup. You will likely receive a browser warning about the web server SSL certificate not being recognized. You can safely ignore these warnings.
On the appliance management interface, enter the username and password for the appliance. The initial credentials are:
Username: root
Password: openvpnas
See the Virtual Appliance section of the FAQ for information on how to change the root password.
The Admin Account for OpenVPN-AS needs to be setup through terminal by doing the following:
Change the password:
passwd openvpn
You will then be prompted to set a password for the user openvpn, after setting the password you can login to the Admin UI with the Username openvpn and the password you set.
Once logged in, you will be directed to the "System Information" page which gives you basic control over the virtual appliance. You can reboot, shut down, or change the network settings of the appliance.
Note:Keep in mind that the appliance will acquire its own IP address from DHCP that is separate from the IP address of the VMware host machine. You can use this DHCP-assigned address, or enter a fixed IP address under the "Network" tab.
The next step is to log into the OpenVPN Access Server Admin Web UI. On the "System Information" page, click on the "AS Admin Login" link located in the upper right corner of the page. You will receive another certificate-related browser warning at this point; that warning can also be ignored. At the Access Server Admin Web UI login page, enter the same username and password you entered previously for the appliance management interface.
Once logged in to the Access Server Admin Web UI, follow the instructions in the "Welcome to the Access Server Admin UI" information box to complete configuration of the Access Server.

Install and configure OpenVPN on your DD-WRT Router

First: (READ, install and configure, create certificates, transfer it to DD-WRT router)
http://www.howtogeek.com/64433.....rt-router/
Then:
Howto-configure-openvpn-on-your-dd-wrt-router
Does anybody know which iptables rule(s), if any, I need to add/remove in order to allow my OpenVPN clients to use my LAN's local DNS server as well?
Some key info:
-DD-WRT v24-sp2 (12/20/11) vpn-small (SVN revision 18024)
-Router: Linksys WRT160Nv3
-LAN: 192.168.7.0
-Local-Gateway / Local-DNS : 192.168.7.1
-OpenVPN-LAN: 192.168.77.0
-"No DNS Rebind" option is Disabled
-Redirect Gateway is enabled, so that all traffic is routed through the VPN.
-I did add push "dhcp-option DNS 192.168.7.1" on the OpenVPN server.
-Local DNS works fine on LAN
-I can ping from LAN to OpenVPN-LAN and viceversa. Yes, ping to local-DNS (192.168.7.1) also works.
I'm currently able to access the Internet over the VPN, but only if I either use an external (public) DNS or use plane IP addresses (no DNS at all). That is, the VPN clients fail to resolve with the local DNS. I suspect either dns requests or dns replies are being dropped by iptables (?)
Can anybody shed some light?

----------------------------------
OK, actually I found a solution for what I wanted. So I thought I'd post it here as a potential future reference for others...
Note: I won't write much details, I'll assume some technical expertise... also, please do realize the previous post has all the key info to follow this one.
1  Granting your OpenVPN clients Internet access:
you need to do NAT on the OpenVPN traffic properly with the following iptables rule, just save it as Firewall under the Administration - Commands tab.
iptables -t nat -A POSTROUTING -s 192.168.77.0/24 -o vlan2 -j SNAT --to-source $(nvram get wan_ipaddr)
2 Getting DNSMasq to resolve for your OpenVPN clients:
you need to tell DNSMasq to also listen on your virtual (OpenVPN) LAN by adding this flag in "Additional DNSMasq Options" under your Services - Services tab.
interface=tun0
----------------------------------
I recently happened to upgrade to a WRT160NL router [firmware: DD-WRT v24-sp2 (07/20/12) std]. In this router the interfaces bear different names. So, in order to maintain the same scenario as described above, you need to update the instructions in my first post as follows:
In 1/: replace vlan2 by ethx, where ethx = your WAN interface (in my case: eth1), i.e. your public IP
In 2/: replace tun0 by tunx, where tunx = your local OpenVPN interface (in my case: tun2), i.e. 192.168.77.1/24

Monday, November 5, 2012

DD-WRT Configuration VPN server

http://www.howtogeek.com/51772/how-to-setup-a-vpn-server-using-a-dd-wrt-router/
Before setting up the VPN Server, you must first make sure your installed build of DD-WRT includes the PPTP VPN features. The DD-WRT feature list shows this as “PPTP / PPTP Client” on their chart. Check the installed version on your router (which you can see in the upper right corner on the configuration pages) against the chart. If the feature is not included in your build, you will need to flash your router with a DD-WRT version which does include the “PPTP / PPTP Client”.
image
To turn on the PPTP VPN Server, navigate to the Services tab and then the VPN sub-tab and select the option to enable the PPTP Server.

Once enabled, several previously hidden options will appear. Configure them as follows:
  • Server IP: Public IP address of the router
  • Client IP(s): List of local IP’s (respective to the VPN network) to use when assigning IP addresses to clients connecting through the VPN. In our example, we are setting aside 5 IP addresses (192.168.16.5, .6, .7, .8, .9) for use by the VPN clients.
  • CHAP-Secrets: User name and passwords for VPN authentication. The format is “user * password *” (user[space]*[space]password[space]*), with each entry on its own line. In our example, there is just a single accepted user name (jfaulkner) and password (SecretPassword1).
You can view detailed documentation on all of these options by clicking the “Help more…” link on this page on the right side of the DD-WRT configuration.

Once you are finished, click the Apply Settings button to push the configuration through to your DD-WRT router and you are finished.

Connecting to the PPTP VPN Server
Configuración de VPN en DD-WRT

Thursday, October 25, 2012

Network diagnostic tools


Tomato RAF -VPN

http://victek.is-a-geek.com/virtual/tomatok26/vpn-server.html
http://victek.is-a-geek.com/virtual/tomatok26/vpn-client.html
Para configurar la VPN podéis seguir este manual:
OpenVPN : Conéctate a cualquier red de forma segura mediante OpenVPN. Manual para GNU/Linux y Windows 7 32bits y 64bits. Cliente/Servidor. SSL/TLS

Thursday, October 18, 2012

OpenVPN - Manual para GNU-Linux y Windows 7

This summary is not available. Please click here to view the post.