Bienvenido! - Willkommen! - Welcome!

Bitácora Técnica de Tux&Cía., Santa Cruz de la Sierra, BO
Bitácora Central: Tux&Cía.
Bitácora de Información Avanzada: Tux&Cía.-Información
May the source be with you!

Wednesday, October 31, 2012

Unknown Device Identifier


http://www.zhangduo.com/udi.html
Unknown Device Identifier enables you to identify the yellow question mark labeled Unknown Devices in Device Manager. And reports you a detailed summary for the manufacturer name, OEM name, device type, device model and even the exact name of the unknown devices. With the collected information, you might contact your hardware manufacturer for support or search the Internet for the corresponding driver with a simple click. With this utility, you might immediately convert your unidentified unknown devices into identified known devices and find proper driver on the Internet and contact the hardware device manufacturer or vendor. Known devices recognized by Microsoft Windows will also be analyzed independent of the operating system.
You are suggested to do a thorough driver backup with My Drivers after you have identified all the unknown devices with their proper device drivers software installed.

Supported OS: Windows 95, Windows 98, Windows 98SE, Windows Me, Windows 2000, Windows XP, Windows Server 2003, Windows Server 2008, Windows Vista, Windows 7, Windows 8, and Windows Server 2012. Future OS are supported via the online update. You might even run the small freeware utility from CD or floppy.

Saturday, October 27, 2012

D-Link DIR-615 DIR-625 and DD-WRT

openwrt supports Ubicom RISC processors they are also multithreaded great link to read to find out more about the D-link routers http://linux.sys-con.com/node/969790
dlink.com/us/en/support/product/dir-625-rangebooster-n-router
http://images.anandtech.com/reviews/networking/draftn-part2/features-lg.png
Forum DIR-625
DIR-625 is based on hardware of  Ubicom (no way, there is no Linux support available, then no DD-WRT)
Ubicom(R) Announces OpenWRT Compliant Router Platform
 Ubicom(R), Inc., a leading provider of networking and multimedia processor solutions, announced today the availability of a Linux-based OpenWRT compliant router platform that runs on the Ubicom IP7100 Router Gateway Evaluation board. At Interop 2009, the company will demonstrate the platform that allows OEMs and ODMs to rapidly develop router products for consumer, SOHO, and SMB markets.
The platform includes comprehensive reference router software that is easily customizable. The reference router software also comes with Ubicom's StreamEngine(TM) QoS technology that can automatically classify and prioritize latency-sensitive traffic. Ubicom's rigorous software quality assurance that includes regression, white box and black box testing has been applied to this platform to ensure quality.
"We are excited to be working with Ubicom on a truly unique multi-processing platform. The combination of the Ubicom hardware and OpenWRT platform presents a fascinating glimpse into the future of open source consumer friendly devices; we look forward to future collaboration," said Mike Baker from OpenWRT.
The solution is powered by Ubicom's IP7100 series network processor and includes four Gigabit LAN ports, a Gigabit WAN port, a USB 2.0 port, two MPCI connectors, and a UART console. The IP7100 network CPU can cost effectively deliver up to 1 Gbps of system level performance and features networking interfaces such as RGMII, PCI, and T1/E1, along with on-chip hardware acceleration engines for QoS, VPN, and voice codecs. Tools for configuration enable developers to quickly configure the processor interfaces and functionality, while the GDB debugger can be used to step through code. The advanced Profiler tool leverages the ability of the IP7100 processors to run a profile thread real time non-intrusively and collect rich profile data such as CPU and memory utilization per function.
The Ubicom IP7100 family of network processors featuring the UBICOM32(TM) multithreaded architecture can be clocked at frequencies up to 600MHz. When compared with a single-threaded RISC processor, designers can expect two to three times the performance at the same frequency for most applications. Designers can also use a wide range of interface options via Ubicom's software I/O technology.
Availability
The Ubicom OpenWRT Router Platform is available now. For more information, go to developer.ubicom.com. The IP7100 family of network processors is in volume production. For more information, go to www.ubicom.com/ip7000.
=====================
Guide to DD-WRT (custom firmware) for DIR-615
Intro
Reading this forum one can only reach one conclusion - that people are unhappy with the factory firmware supplied by D-Link for its DIR-615 routers. Which is sad, because in terms of hardware, DIR-615 is a solid product, capable of good performance.
It's true that some problems are solved with a firmware update, when one is available, but more often than not, users are stuck with issues that severely impact their Internet experience and no fix in sight. However, before starting throwing routers out and spending money on new ones (yes, I've read a lot of people saying that), users should be aware that there is another option at their disposal, in the form of a custom open source firmware called DD-WRT.

What is DD-WRT and things to know before running with it
DD-WRT is a custom open source firmware for routers, based on the Linux kernel, which is developed and maintained by a community of programmers. Originally written for the extremely popular WRT54G Linksys router, the software has since evolved to support a wide array of devices from many manufacturers.
DD-WRT is very powerful and unlocks access to advanced networking features that factory firmwares don't provide. It is so popular that some home networking equipment manufacturers like the UK-based Buffalo Technology pre-install a custom version of it on their routers. All of this sounds appealing? Good, but first you should be aware of a few things.
For one, installing a custom firmware on a D-Link device theoretically voids the warranty. I say theoretically, because practically if the router is not completely fried, you should be able to flash the factory firmware back and chances are no-one will tell the difference. Even if it's completely dead I doubt anyone will attempt to repair it and see what you had on it. Chances are, your supplier will just replace it, but don't blame me if that doesn't happen.
Second thing you should know is DD-WRT exposes a lot of settings the average user has no idea about. My advice is not to mess around with anything you don't know and then complain that it doesn't work as expected anymore. Of course, set WAN, wireless security, port forwarding and the usual stuff, but for the rest I learned that default settings work best.

Where do I get DD-WRT from?
Well, it's not that straight-forward as you might think. The DD-WRT developers release individual builds for each router model and/or hardware revision (that's a lot I know). A particular router model/revision is not "officially" supported and added to the DD-WRT database until someone donates such a device to the DD-WRT dev team for development and testing purposes. However, there are unofficial builds for many models/revisions that are tagged as "work in progress" and much of the time they are stable enough to use without any concern of critical bugs.
So now, back to our model of interest - the mighty DIR-615, which D-Link should be congratulated for, because it's a very decent product (hardware-wise) for a very good price. The DIR-615 comes in many "flavors" (hardware revisions or versions). Amongst the ones that I know are: B1, B2, C1, C2, E1, E2, E3, E4, D1, D2, D3, D4, H1, H2, I1.

Here is where to get the DD-WRT build for your particular revision.
B1, B2:  Sorry. No build for you guys. Cry
C1: ftp://dd-wrt.com/others/eko/BrainSlayer-V24-preSP2/[most_recent_date]/dlink-dir615c1/ DO NOT flash r16454! Read warning.
C2: Try the one for C1. It might work, but I don't have confirmation. If you test it and it works post on this topic so I can update this info. DO NOT flash r16454! Read warning.
D1, D2, D3, D4: ftp://dd-wrt.com/others/eko/BrainSlayer-V24-preSP2/[most_recent_date]/dlink-dir615d/
E1: ftp://dd-wrt.com/others/eko/BrainSlayer-V24-preSP2/[most_recent_date]/dlink-dir615e1/
E2: Might work with the one for E1 (above) or the one for E3 (below). Please confirm on this topic if you get it working.
E3: ftp://dd-wrt.com/others/eko/BrainSlayer-V24-preSP2/[most_recent_date]/dlink-dir615e3/
E4: ftp://dd-wrt.com/others/eko/BrainSlayer-V24-preSP2/[most_recent_date]/dlink-dir615e4/
H1, H2: ftp://dd-wrt.com/others/eko/BrainSlayer-V24-preSP2/[most_recent_date]/dlink-dir615h/
I1: ftp://dd-wrt.com/others/eko/BrainSlayer-V24-preSP2/[most_recent_date]/dlink-dir615i1/
Note: The [most_recent_date] is at this time 07-20-12-r19519, so the folder you should be looking in is ftp://ftp.dd-wrt.com/others/eko/BrainSlayer-V24-preSP2/2012/07-20-12-r19519/. However, new builds are constantly released so check the most recent date folder in ftp://dd-wrt.com/others/eko/BrainSlayer-V24-preSP2/ regularly.
WARNING: DO NOT flash r16454 from ftp://dd-wrt.com/others/eko/BrainSlayer-V24-preSP2/2011/03-17-11-r16454/ or your wireless controller will stop working.

How do I install DD-WRT?
In each of the folders corresponding to your router's revision, you will find two or more files. The ones with "factory" in their name, like dlink-dir615d-factory-webflash.bin are for initial flashing from D-Link's factory firmware to DD-WRT. The flash should always be performed over a WIRED and not wireless connection. You can do it in two ways:
1. From the D-Link firmware's Web interface. Go to Tools > Firmware and under "Firmware Upgrade" press Browse, select the DD-WRT file and hit Upload.
2. From the router's Emergency Room Web interface. To access the Emergency Room Web interface follow these steps:

  • Unplug the router's power cord and wait 20 seconds.
  • Get a pin, push the RESET button and KEEP IT PRESSED.
  • Connect the power cord back (while still keeping the reset button pressed)
  • Keep the reset button pressed for an additional 5 seconds after connecting power cord and then release. At this point you should see the power button blinking orange.
  • Connect over a WIRED connection to the router and set your network adapter IP MANUALLY to 192.168.0.2
  • Open http://192.168.0.1 in a browser. You should see a white page with a Browse and Upload button.
If the DD-WRT flash works, reboot your router and set your Ethernet adapter to obtain IP automatically then try to access http://192.168.1.1 .
How do I update to a new DD-WRT build?
In each of the folders corresponding to your router's revision, you will find a .BIN file that does NOT contain "factory" in its name. This file is to be used for update if you already have an older DD-WRT build installed on your router.
From the DD-WRT interface go to Administration > Firmware Upgrade. Hit browse, point to the file, hit upgrade and wait. When it's finished check out the build date in the upper right corner to make sure it updated.
Warning: Leave "Don't Reset" option alone if you don't want all your settings to be reset to defaults.
How do I restore the original D-Link factory firmware?
Obtain the latest firmware for your revision from D-Link's support site for your region. Go into the Emergency Room Web interface using the steps provided above in the installation section of this guide. Flash the firmware file from the Emergency Room Web interface.
Frequently Asked Questions
This will be updated in time with answers to your most common questions.
PS: Excuse my spelling and/or grammar mistakes. English is not my native language. Suggestions and comments are appreciated.
Changelog:
Oct. 11 2012 - Updated the guide with links to the DD-WRT builds for H1, H2 and I1. Also updated the most recent date for DD-WRT releases and the link to the folder.
« Last Edit: October 11, 2012


Friday, October 26, 2012

Telnet on NT6.1

Install Telnet Client

421 out of 462 rated this helpful - Rate this topic
Updated: March 24, 2010
Applies To: Windows 7, Windows 8, Windows Server 2008, Windows Server 2008 R2, Windows Server 2012, Windows Vista
Telnet Client is not installed by default on Windows 7, Windows Server 2008 R2, Windows Vista, or Windows Server 2008. The procedures to install Telnet Client vary based on the operating system you are using:
Membership in the local Administrators group, or equivalent, is the minimum required to complete this procedure.
On Windows 7, Windows Server 2008 R2, Windows Server 2008 or Windows Vista you can use the following command line procedure to install Telnet Client.
  1. Open a command prompt window. Click Start, type cmd in the Start Search box, and then press ENTER.
  2. Type the following command:
    pkgmgr /iu:"TelnetClient"
    
  3. If the User Account Control dialog box appears, confirm that the action it displays is what you want, and then click Continue.
  4. When the command prompt appears again, the installation is complete.
On Windows Server 2008, you can use the Role Management tool to install optional components.
  1. Start Server Manager. Click Start, right-click Computer, and then click Manage.
  2. If the User Account Control dialog box appears, confirm that the action it displays is what you want, and then click Continue.
  3. In the Features Summary section, click Add features.
  4. In the Add Features Wizard, select Telnet Client, and then click Next.
  5. On the Confirm Installation Options page, click Install.
  6. When installation finishes, on the Installation Results page, click Close.
On Windows 7, Windows Vista, you can use the Windows Features tool to install optional components.
  1. Click Start, and then click Control Panel.
  2. On the Control Panel Home page, click Programs.
  3. In the Programs and Features section, click Turn Windows features on or off.
  4. If the User Account Control dialog box appears, confirm that the action it displays is what you want, and then click Continue.
  5. In the Windows Features list, select Telnet Client, and then click OK.

Concepts

Install Telnet Server

Winsock reset

Inicio-->Ejecutar
netsh winsock reset
Si el problema persiste descargar y ejecutar  WinsockFix, reiniciar
Puede que tengas que volver a configurar las propiedades de tu conexión.
Programas recomendados para la seguridad en este enlace

Thursday, October 25, 2012

Solutions over DD-WRT

Network diagnostic tools


DD-WRT and (Strong)VPN

Proceed either to PPTP or OpenVPN setup!
Once you have flashed your router with dd-wrt - we do have some setup pages to help you with the installation of your VPN account on the router.

For OpenVPN SSL VPN Acounts - there are two methods, Script method is the easiest, SCP we have the how to only for customers with Windows Systems:

1.) Script Method -
How to load OpenVPN on your DD-WRT using script method

2.) SCP File Transfer Method For Windows Users -
(requires a Windows system to transfer the file over scp to the router)
(please note Mac and other OS can use this method as well, we just don't have a "how to" for it yet, you can google how to do it if you like)
Video on setting up your StrongVPN OpenVPN Account with a DD-WRT Router using SCP file transfer method
=============== 
Top Reason VPN Won't Connect - For the most common problems with VPN accounts that don't connect during initial setup.
Top 12 Reasons you can't connect to your VPN:
Hi we have constructed this page to help customers that are having problems connecting to their VPN account. Some customers are unable to connect with PPTP VPN. Here are some general reasons and troubleshooting you can do.
1.) Software Firewall - Have you checked your firewall software? The easiest way to test if it's conflicting with your VPN connection is to disable it and try the connection again. If this allows you to connect to the VPN you'll need to setup an exception in order to use the VPN while it's running. This will vary depending on your firewall software, but in general you will need to allow outgoing connections to port 1723 and the GRE protocol (47) also allowed. Alternatively you could set an exception for all traffic to the VPN server address.
2.) Can you even reach the server ? - Ping the VPN server you are going to connect to. Here's a quick how to on that: http://strongvpn.com/ping_screens.shtml
3.) Router - It's possible your router doesn't support or isn't configured for PPTP VPN Passthrough. To test this, try connecting to the Internet without the router and see if it works. In other words plug your computer directly into your modem device bypassing the router.
4.) Another Computer - Do you have a 2nd PC you can try the account on, or a friends computer at another location? If so try it out. The VPN account will work on any PC, anywhere.
5.) Error in Creation - This one is odd but it does happen. For whatever reason sometimes the second time when you create a VPN connection it will work. So delete your first one, and try again. Remember our tutorials are here: http://strongvpn.com/setup.shtml
6.) Reboot - As always, a reboot on your devices can't hurt. System resources can run low and cause all sorts of problems. Try to reboot your PC, Router, and Modem, then once the PC returns start VPN before openning any applications (skype, browser, etc.)
7.) Edge, EVO and 3G modems - Some Mobile Carriers block PPTP on their devices or supply devices such as the Huawei e220 modem that doesn't support PPTP connections. You might want to contact your ISP and check to see if that's the case.
8.) Country - You may be in a country or with an ISP that blocks PPTP VPN connections, such as Oman, UAE, Belize and others. If so it's possible your ISP is blocking, check with your friends and see if they confirm this. Another option would be to contact your ISP directly to ask.
9.) When entering in the password, make sure there is not a space at the end, since when you copy/paste the password sometimes a space is added at the end and that password will not be accepted
10.) Vista UAC - Customers have found that disabling UAC will sometimes allow OpenVPN and even our PPTP connections to work. It's worth a shot, here is the page on how to.
11.) Live Chat Support - We are not perfect, and sometimes a VPN account delivered to you may have an issue with it. A quick check with Live Chat Support can confirm that the account is in good working order (or not) for you..
12.) Check your computer time. If your date or year is off or not correct, this can actually cause quite a few problems. Please check to make sure your Time and Date are accurate.

If you find you're still unable to use our PPTP VPN switching to our OpenVPN plan should allow for you to connect.

If you are receiving some error codes, here are some real common numbers and Microsofts explanation of them:
Error Codes: Error 806
Error Codes: Error 619

Top 1 Reasons you can connect to your VPN, but can't use Internet:

1.) We only allow 1 connection per login, so if you can connect but can't surf the Internet or see any websites, your login and password has been compromised or you have shared your account with another person/computer. Disconnect both computers and connect just one account, it will work fine.

Top 4 Reasons you can connect to your VPN, but can't see a particular website:

1.) DNS - It's possible if you are in a country such as China, they have hijacked DNS settings for particular sites such as facebook. As a remedy we suggest changing your DNS server settings to ours, which are:

Primary 216.131.95.20
Secondary 216.131.94.5

If you can see Youtube.com via the link below, it's a DNS issue:
http://64.15.120.233/
2.) Browser Cache - Your Cache may need to be cleared as your old information from when you try to connected before is in there. You could also connect from a browser you have yet to connect to the site from.
3.) Time Zone - Try changing your time zone to the time zone in the area of the website you want to connect to.
4.) Reboot - If all else fails, reboot and try.

Top 5 Reasons Why Your OpenVPN (SSL) can't connect.

1.) If you are on Windows 7 please ensure you are running OpenVPN as administrator. You can do so by right clicking on the OpenVPN icon prior to running it, and click "Run as Administrator".
2.) Please make sure you are running the latest version
3.) Please make sure you have placed the files in the c:\program files\openvpn\config folder unzipped. If not there will be no option to connect.
4.) If you are running Vista, chances are you need to disable UAC, more info here
5.) Disable any security software that is running and try to connect, if it works then make an exception in your security software.

Misc Tools

Useful Downloads

=============
 

Network Attached Storage -DIY

Fabrica tu NAS (Servidor de Archivos en Red) : Introducción
Unas capturas del equipo funcionando desde la última actualización, ya tiene 4Terabytes de capacidad.
Menú de estado del Servidor de Archivos en RedEl microprocesador de la máquina es Atom, mínimo consumo energético y mínima disipación de calor.
Fabrica tu NAS. Componentes. 1ª Parte
las normas a tener en cuenta serían:
CPU
Podemos utilizar cualquier CPU de 32 o 64 bits, de un núcleo o múltiples núcleos pero debemos reducir su consumo al mínimo: En los diferentes NAS montados se han usado; Atom 330, Celeron, Athlon XP, Pentium 2, Pentium 3, Pentium 4, AMD64 zócalo 939, Intel E8500, etc …  los resultados son muy iguales entre ellos (refiriéndose al rendimiento del sistema, no a las características del sistema). Las partes más sensibles que darán un rendimiento al sistema son el interface de red (tarjeta ethernet) y la compatibilidad del chipset de la placa base para controladora de los discos duros.
CONTROLADORAS
El software FreeNAS incluye drivers para los chipset más comunes y en ultimo caso siempre nos queda el recurso de comprar una tarjeta ethernet Gigabit (6-9€uros). Cuidado con el tipo de zócalo de la placa base al comprar la tarjeta de red (ISA, PCI..). Si tenemos problemas con las controladoras de disco duro de nuestra placa base, están dañadas o precisamos de más puertos para instalar discos duros adicionales podemos recurrir a una controladora externa en placa base, el modelo recomendado es la Promise SATA300 TX4 que dispone de 4 puertos SATA a 3GB de transferencia (unos 45€ en Ebay). Os recuerdo de nuevo que debéis aseguraros del zócalo interface de vuestra placa madre al adquirir estos componentes adicionales.
RAM
Sobre la memoria RAM recomendada por experiencia; 512MB es suficiente para FreeNAS versión 0.7.x , sin embargo para la nueva versión FreeNAS 8 que se encuentra en fase de pruebas (beta) se recomienda 1GB.
LISTA DE MATERIALES
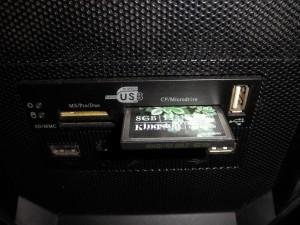
En esta foto podéis observar el NAS sencillo que hemos montado. La lista de materiales es:
*- Placa ATOM 330 con 4GB de RAM, tarjeta gráfica integrada, Ethernet Gigabit. Consumo = 18 Watios. Precio = 117€
*- Fuente de alimentación ANTEC 450W (gastar el dinero en una buena fuente, estará en marcha las 24 horas) = 67€
*- 4 Discos duros de 1TB (varias marcas…) o los discos duros que se hayan quedado pequeños… Precio medio = 70€ /unidad.
*- Memoria Compact Flash y lector de memorias multiples. = 20€
*- Caja. Precio = 27€
Consumo total del sistema funcionando (promedio) = 52 Watios.

La unidad lectora de tarjetas de memoria y la memoria compact flash dónde instalaremos el sistema operativo del NAS, así usaremos la capacidad total de los discos duros y podremos realizar un cambio de disco duro rápido en caso de problemas.

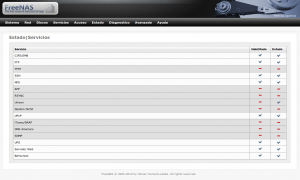
En esta otra captura podéis ver todos los servicios que están funcionando en el NAS, no figura en la lista el servidor de impresora y el servidor de archivos de música (Subsonic) que puedes usar para escuchar música cuando estés de viaje desde el navegador de Internet, ya explicaremos la configuración e integración de estos servicios adicionales.

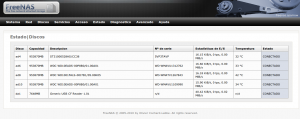
Y en esta otra captura el estado de los discos duros con información adicional sobre su temperatura de trabajo.

Seguiremos más a fondo en la siguiente entrega resolviendo las preguntas y dudas que os van surgiendo y comenzando la configuración del equipo con los componentes que he descrito en la lista de materiales. Ya falta poco para comenzar a disfrutar de tu servidor NAS sin gastarte dinero en sistemas operativos no dedicados y sin tener control sobre lo que haces, aquí te ayudamos a ser el director de tu proyecto!.

Fabrica tu NAS. Componentes. 2ª Parte
Existen dos versiones del sistema operativo FreeNAS que básicamente están diferenciadas por el tipo de CPU que use nuestro ordenador; Intel (i386)  o AMD (amd64).
Dentro de estas dos ramas tenemos dos versiones más, la imagen integrada (embedded) y la versión extendida (LiveCD). Las diferencias entre ambas versiones es que con la imagen integrada ocupa menos espacio en la memoria CF o USB de nuestro NAS pero no permite realizar cambios ni tampoco instalar programas adicionales. La imagen integrada es más rápida de arranque. Si no pensáis instalar funciones adicionales en el FreeNAS (servidor de impresión, servidor web de mp3 o video) es suficiente la imagen integrada.
Aconsejamos trabajar con la versión extendida correspondiente al modelo de CPU que use nuestra placa base, si nuestra CPU es de 32 bits instalaremos la versión Intel(i386), si nuestra CPU es de 64bits instalaremos la versión AMD (amd64).
Para instalar la imagen extendida debemos quemar la imagen (ISO) en un CD. Para instalarla lo mejor es usar un reproductor de CD/DVD con USB puesto que no necesitamos tener la grabadora instalada en el FreeNAS, es una tontería gastar el dinero y tener en el NAS un componente que solo es necesario cuando instalemos el sistema operativo.
La dirección url para descargar la versión de FreeNAS es; http://sourceforge.net/projects/freenas/files/

Network software and tools

http://www.redeszone.net/descarga-software/ 
Seguridad Informática
Auditorías Wireless:
WiFiSlaX 3.1
WiFiWay 1.0 Final
EtherChange para cambiar la MAC en Windows
Verificación MD5
Dongles
Neobit11
SQL Inyección
Programa para Inyección SQL
Desbloquear PDF
FreePDF Unlocker
Redes
Descargar iPERF
Descargar JPERF
Descargar NetTraffic
Wireless
SecureW2 Windows 7
Canales WiFi:
inSSIDer
WirelessNetview
Optimización
TCPOptimizer Windows XP, Vista, 7
tecnicambalandia.blogspot.com/ network-diagnostic-tools.html

Tomato RAF -VPN

http://victek.is-a-geek.com/virtual/tomatok26/vpn-server.html
http://victek.is-a-geek.com/virtual/tomatok26/vpn-client.html
Para configurar la VPN podéis seguir este manual:
OpenVPN : Conéctate a cualquier red de forma segura mediante OpenVPN. Manual para GNU/Linux y Windows 7 32bits y 64bits. Cliente/Servidor. SSL/TLS

Tomato RAF

Español, La versión de Tomato RAF es una modificación hecha por Victek del firmware original Tomato publicado por Jon Zarate. Es un firmware alternativo para los modelos de router Linksys-Cisco/Asus/Netgear/Ovislink. El objetivo de estas modificaciones es ampliar y mejorar las funciones de la versión original.
English, Tomato RAF's version is a mod made ​​by Victek from the original Tomato firmware released by Jon Zarate. It's an alternative firmware for Linksys-Cisco/Asus/Netgear/Ovislink Router model. The purpose of these modifications is to extend the functionality of the original version.
---------------------
The Tomato/Victek's Tomato Firmware Club 
DD-WRT is getting heavier and heavier with all the un-needed stuff. they have included a lot of un-needed stuff and the router tends to hang from time to time because of this (the older ones were just fine tongue.gif). Next I've tried OpenWRT , it rocks but pretty much you'll have to configure everything by hand and it sucks big time for lazy people like me. Then i came across with Tomato. At first after trying it out , it seems to be lacking of something. Eventually , I fell in love with it as its simple , easy to use and has a superb QoS functionality (you'll only get that sort of QoS if you pay for the DD-WRT firmware) and as for OpenWRT you'll have to use SSH/Terminal and do it via the terminal (command prompt). Overall , it seems to be pretty good  
Tomato is a small, lean and simple replacement firmware for Linksys' WRT54G/GL/GS, Buffalo WHR-G54S/WHR-HP-G54 and other Broadcom-based routers. It features a new easy to use GUI, a new bandwidth usage monitor, more advanced QOS and access restrictions, enables new wireless features such as WDS and wireless client modes, raises the limits on maximum connections for P2P, allows you to run your custom scripts or telnet/ssh in and do all sorts of things like re-program the SES/AOSS button, adds wireless site survey to see your wifi neighbors, and more. 
Routers that are known to work with Tomato:
Linksys WRT54G v1-v4, WRT54GS v1-v4, WRT54GL v1.x, WRTSL54GS (no USB support)
Buffalo WHR-G54S, WHR-HP-G54, WZR-G54, WBR2-G54, WBR-G54, WZR-HP-G54, WZR-RS-G54, WZR-RS-G54HP, WVR-G54-NF, WHR2-A54-G54, WHR3-AG54
Asus WL500G Premium (no USB support), WL500GE
Sparklan WX6615GT, Fuji RT390W, Microsoft MN-700 
---------------------
im runnning ddwrt v24 now on WRT54g v2.2. If i want to switch to Tomato.
Just flash it on conf page?
--------------
YES! you can just flash it using normal method. But keep in mind you need to restart your settings. 
Do a hard reset as DD-WRT config doesnt work with Tomato. So you'll have to do a hard reset after flashing and re-configure your router 
--------------
I suggest to use Tomato if your router have large memory, eg. 32MB or above.  
en.wikibooks.org/wiki/Tomato_Firmware
WIKIZONE de Tomato RAF
Simulador Web de Tomato RAF : Prueba el firmware Tomato RAF sin instalarlo en tu router

=======================
Tomato RAF para tu router
Un enrutador (router en inglés) es un dispositivo de hardware que procesa una señal ethernet y permite distribuirla a varias máquinas en una red.
Hasta el momento el desarrollo del firmware Tomato creado por Jon Zarate ha servido para pocos modelos concentrándose en el WRT54G de Linksys.
Las modificaciones aportadas por otros aficionados a estos dispositivos extienden la compatibilidad de este firmware a modelos de otras marcas y funciones adicionales. En la actualidad este firmware en sus versiones modificadas ya puede utilizarse con varios modelos de otras marcas; Asus, Buffalo, D-Link, Linksys, etc…
Redeszone será el portal de difusión de estos firmwares modificados por Victek y su Tomato RAF. De momento pulsa en este enlace para conocer las últimas versiones creadas http://www.adslzone.net/postx249261-0-0.html y contribuye con tus comentarios al desarrollo del mismo. En la web de Victek (Vicente Soriano) http://victek.is-a-geek.com encontrarás información más completa sobre modelos compatibles.
victek.is-a-geek.com/tomato english
Firmware Tomato RAF


Tomato RAF v.1.28.121006 (WRT54GL) Especial para 50Mb Ono.
Tomato RAF 1.28.121006
Kernel 2.4 MIPSR1
Tomato RAF 1.28.8515 ND. Versión estándar para WRT54GL y routers sin USB.
Tomato RAF 1.28.8520 ND + USB + VPN. Version para ASUS WL-500gP, 520gU y routers MIPSR1 con USB.
Tomato RAF 1.28.8525 ND + VPN. Versión estándar para WRT54GL y routers sin USB con VPN
Kernel 2.6 MIPSR1
Modelos soportados:
Linksys WRT54GL – ASUS WL500W – ASUS WL520GU – Buffalo WHR-G54S – Buffalo WHR-HP-G54 – DLink DIR320 – Ovislink WL1600GL  …..
(Ver la tabla completa de modelos en http://victek.is-a-geek.com )
Tomato RAF 1.28.9001. Portal cautivo. Versión para WRT54GL/Buffalo/Ovislink WL1600G y routers sin USB. ACTUALIZADO: 13, Mayo, 2011.
Tomato RAF 1.28.9001 USB+VPN+Portal Cautivo. Versión para ASUS WL-500gP v1 & v2 y routers MIPSR1 con USB y 8MB de Flash. ACTUALIZADO:13, Mayo, 2011.
Tomato RAF 1.28.8800 USB+Bittorrent (Transmission) incorporado. Esta versión es para ASUS WL-500gP v1 & v2 y routers MIPSR1 con USB y 8MB flash. ACTUALIZADO: 19, Marzo 2011. No incluye Portal Cautivo
Kernel 2.6 MIPSR2
Tomato RAF 1.28.9001. Routers con 4MB Flash (MIPSR2.Kernel 2.6) SIN USB + Portal Cautivo. Para ASUS RT-N10, RT-N12, Linksys E1000 v1, WRT160N v1 & v3, WRT310N, WRT320N. ACTUALIZADO: 13, Mayo, 2011.
Tomato RAF 1.28.9001. Routers con 8MB Flash (MIPSR2.Kernel 2.6) Extended + VPN + USB + Portal Cautivo. Para ASUS RT-N16/ Linksys WRT610N. ACTUALIZADO 13, Mayo, 2011.
Tomato RAF 1.28.9001. Versión específica para Linksys E2000, Extended Sysinfo + VPN + Portal Cautivo. ACTUALIZADO: 13, Mayo, 2011.
Tomato RAF 1.28.9001. Versión específica para Linksys E3000, USB + Extended Sysinfo + VPN +  Portal Cautivo. ACTUALIZADO: 13, Mayo, 2011.
Tomato RAF 1.28.9001. Versión específica para Linksys E4200, USB + Extended Sysinfo + VPN + Portal Cautivo. ACTUALIZADO: 13, Mayo, 2011.
Tomato RAF 1.28.8950. Sólo para routers con 8MB Flash (MIPSR2.Kernel 2.6) Transmission + VPN + USB. Para ASUS RT-N16 / Linksys WRT610N. ACTUALIZADO 19, Marzo, 2011.

  1. Tomato RAF : Nuevas versiones de Tomato RAF disponibles para descarga
  2. Tomato RAF 1.28.9007 : Nueva versión de este firmware alternativo para múltiples routers
  3. Firmware Tomato RAF, versiones actualizadas
  4. Tomato RAF : Nuevas versiónes BETA para sacar el máximo rendimiento a tu router
  5. Servidor WEB en Tomato RAF : Instala un servidor web casero en Tomato RAF

DD-WRT -OTRW

dd-wrt.com/wiki/index.php/Optware,_the_Right_Way
NOTE: Optware, The Right Way is for broadcom devices only.

This is the latest, greatest and easiest way to enable Optware on your Router. It is recommended that you have a router with USB capable storage (Harddisks (must be self-powered), flash-drives etc.) and the LATEST build! (preferably freshly flashed)
For BrainSlayer builds. Common routers use broadcom or broadcom k26. Choose the appropriate newest build, then navigate the directories.
For Eko Builds, K26 here All Others Here
The SD/MMC Method is working thanks to DHC Darkshadow. For USB users, you wont be needing JFFS2, so DISABLE it! Another aspect to note is that some of these services (i.e Twonky) consume alot of CPU resources, so make sure you check your resource consumptions.

Default Services that will be installed:
  • Bash instead of shell in busybox - (LFS support)
  • Automounting, Unmounting and Hotmounting of storage devices - Automatically mounts all recognized partitions and filesystem formats (including NTFS in K26).
  • Network printing with Watchprinter - Plug a USB printer into your router and let anyone on the LAN (or even WAN) print.
  • Torrent transmission with watchdog - Including Bittorrent transmission with Web Administration
  • Pre-configured Samba share - Samba provides file and print services for various Microsoft Windows clients and can integrate with a Windows Server domain, either as a Primary Domain Controller (PDC) or as a domain member. http://www.samba.org/
  • NFS File Sharing - It is now possible to share files via NFS in a pure Linux environment.
  • Xinetd - A replacement for inetd, the internet services daemon. Controls user defined network services such as printing and SWAT (Samba Web Administration Tool) http://www.xinetd.org/
  • Pound - A lightweight open source reverse proxy program suitable to be used as a web server load balancing solution. http://www.apsis.ch/pound/
  • Vlighttpd - Allows you to get a 2nd IP on your system and run virtual hosting there.
  • Pixelserv - A super minimal webserver, it's one and only purpose is serving a 1x1 pixel transparent gif file. Using some creative firewalling (netfilter/iptables) rules you can redirect some webrequests (for adds for example) to pixelserv. http://proxytunnel.sourceforge.net/pixelserv.php
  • AsiaBlock - A custom iptables firewall that is configurable to block certain countries from accessing your Webserver, FTP or just general Web surfing.
  • Worldblock - Very similar to Asiablock, other than the fact that it is for blocking everything except your country. To properly use this service, you must know how to use Vi editor to add your country.
  • StopHack - This CRON script will check /var/log/messages for pound entries that are malicious and put the IP's in /opt/etc/asia.spam. The AsiaBlock service MUST be running for this to work.
  • Stophammer - Similar to stophack, only it provides firewall services that increase your network security in a very respectable fashion. See Service examples below to understand how it works.
  • Vim with proper terminal support - Vim is an advanced text editor that seeks to provide the power of the de-facto Unix editor 'Vi', with a more complete feature set. http://www.vim.org/about.php
  • Siproxd - A masquerading SIP Proxy Server. Siproxd is a proxy/masquerading daemon for the SIP protocol. It handles registrations of SIP clients on a private IP network and performs rewriting of the SIP message bodies to make SIP connections work via an masquerading firewall (NAT). It allows SIP software clients (like kphone, linphone) or SIP hardware clients (Voice over IP phones which are SIP-compatible).
  • Fixtables - This service is used to fix a firewall rule-set bug that is present in all K26 firmwares. K24 is not affected. The service also contains VITAL security measures against current DD-WRT builds! It is highly recommended to use.
  • Zabbix - Zabbix offers advanced monitoring, alerting and visualization features today which are missing in other monitoring systems, even some of the best commercial ones. This service blows away SNMP, Cacti, Wallwatcher, etc. For more information, search the forums and check out the website! http://www.zabbix.com/features.php
  • Reloc_syslogd - A service that is designed to extend the size of DD-WRT's syslogd and integrate kernel logging into /opt/var/log/messages
  • Service tool - Control all of these services. (Usage explained below)
  • Services running as other users than root
  • Other various useful tools such as net and storage diagnostics..
In my opinion, Everyone with a router that has storage device capabilities should take advantage of this! You will NOT regret it, even if it can be a time consuming process! If you are worried about formatting to a Linux filesystem and it's compatibility with windows, check out this thread from the forum on using the Windows NT Filesystem (NTFS)!

Getting Started

This method does NOT support Atheros based routers. if you want opkg for these type of routers see this thread.
These routers have been verified with Optware. If you have had success, please edit this section and add your model and name (add your name if model is already listed):
  • Asus RT-N16 (gatorback)
  • Linksys E3000 / E4200v1 (basmaf)
If starting from scratch, you will need to first format and partition your harddisk (ext2 or ext3), flashdrive or SD card (ext2 ONLY) Linux filesystem. Ext2 should be used for flashdrive because it does not use journaling (like ext3). It is much easier than you think, and can be accomplished via a Linux Live boot-CD. There will be NO changes to your PC whatsoever, and it is very simple to implement.
[gatorback]: In the WL-520GU (4MB firmware) only ext3 is supported, however a module ext2.o can be inserted in the kernel at bootup. Module and details are published here: [1] The WL-520GU does not have enough hardware to support a typical OTRW install.

Drive Preparation and Prerequisites

Before you can utilize this extremely beneficial addition to your USB capable router, you must follow these important instructions:

How to - Format and Partition External Storage Device


This must be done for Optware to work correctly!

Connecting the Drive to your Router

NOTE:

The are reports of flash drives that do not work: [2]
For users with small /opt partitions (Less than 256MB, such as flashdrives and SD/MMC cards) use this as your start-up script:


mount -o noatime -t ext3 /dev/scsi/host0/bus0/target0/lun0/part1 /opt
For external HardDrives, use the following method:


1. In the DD-WRT web GUI screen, on the Services USB tab enable the options for:
  • Core USB support
  • USB 2.0 support (Asus WL520gU routers must use USB 1.1 drivers only!)
  • USB storage support
  • Printer Support (optional)
  • ext2/ext3 File System support - Only for builds older than SVN 15501 !! The new system automatically selects FS type.
  • FAT File system support (optional, but try enabling this if your USB won't mount, even if you aren't using FAT FS) - Only for builds older than SVN 15501 !! The new system automatically selects FS type.
  • Automatic Drive Mount
  • In the Disk Mount Point drop-down menu, mount to /opt
2. From the DD-WRT web GUI screen, click on Save Settings, then Apply Settings 3. If everything was done correctly, this should appear on your Services -> USB Tab:

DD-WRT en TP-Link

DD-WRT : Recopilación de manuales de configuración
Instalar DD-WRT y volver nuevamente el firmware original del router
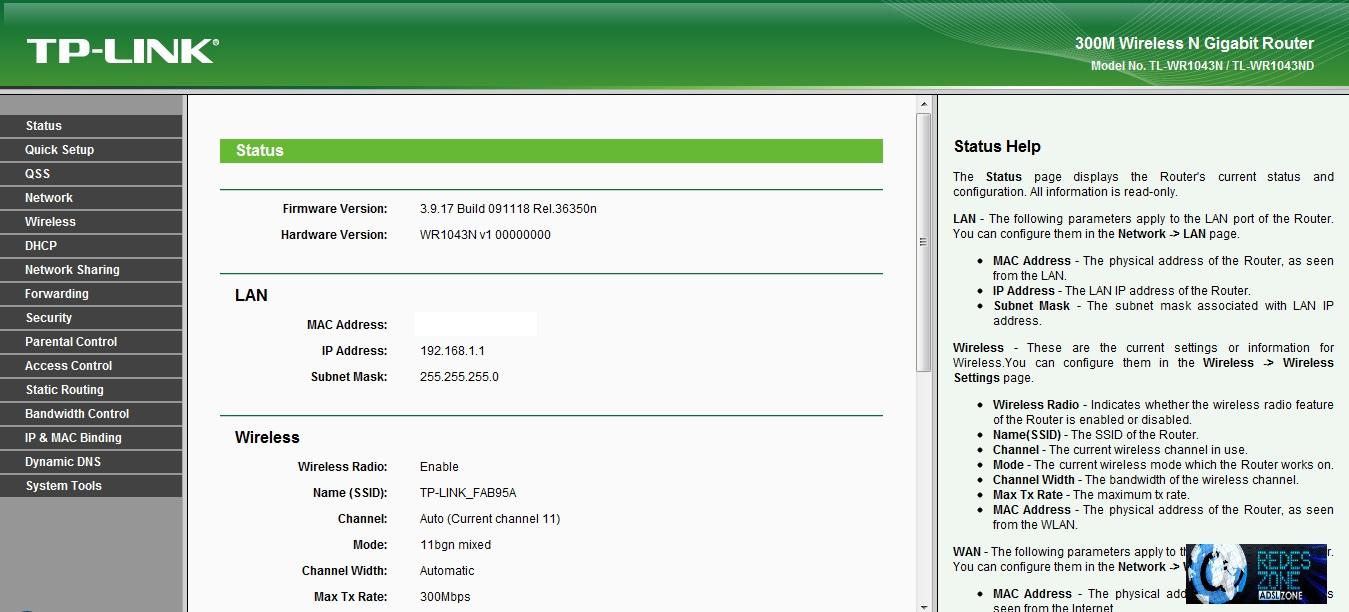
En este manual vamos a aprender como se puede instalar al router TP-Link TL-WR1043ND el firmware basado en Linux DD-WRT.
También, para las personas que una vez instalado no les guste el firmware, os daremos la solución de cómo se puede volver otra vez al firmware original del router.
A continuación tenéis el completo manual.

Instalación del firmware DD-WRT
Necesitaremos una versión del firmware que sea compatible y estable con este router. En nuestro caso, para este manual y los sucesivos utilizaremos la versión v24 – sp2. A continuación os ponemos el enlace de descarga del firmware
Firmware DD-WRT para TP-Link WR1043ND
Comenzamos el proceso:
1.-Conectamos el router y el ordenador mediante un cable ethernet. Nunca hacerlo mediante conexión WiFi, ya que si por un casual perdéis la conexión durante el proceso de carga del nuevo firmware, podéis dejar el router como un bonito pisapapeles blanco con tres antenas.
2.-Accedemos el menú de configuración web del router tecleando en el navegador la puerta de enlace: 192.168.1.1
El usuario y la contraseña son los que vosotros habéis fijado o bien los que venían por defecto en el router (admin/admin)
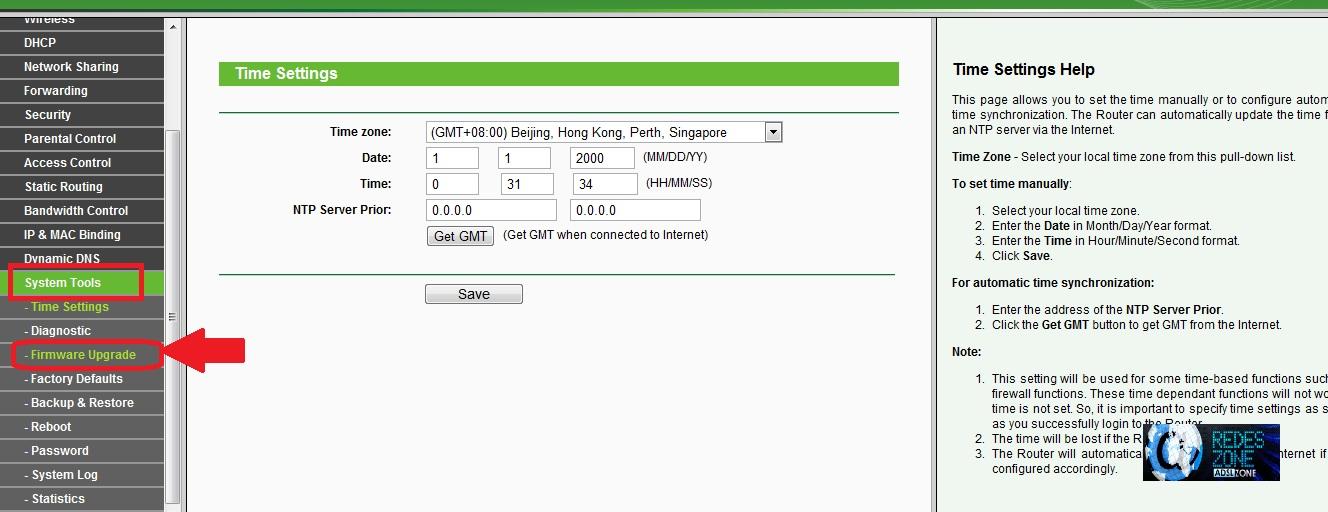
3.-Vamos a dirigirnos a Herramientas del sistema (System tools), y una vez desplegamos ese menú accedemos a Actualización de firmware (Firmware upgrade)
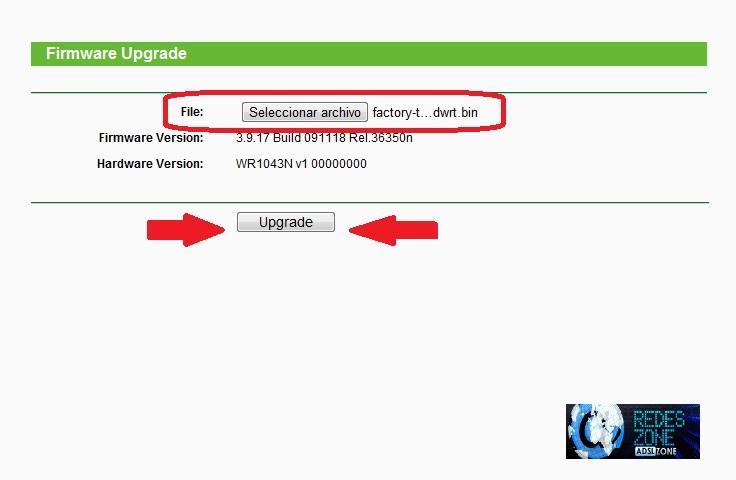
4.- Elegimos el fichero que nos hemos descargado y pinchamos en Actualizar (Upgrade)
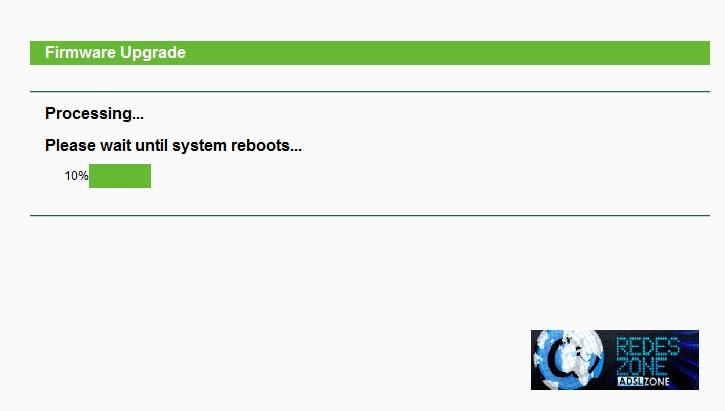
Tarda alrededor de 2 minutos en completar el proceso
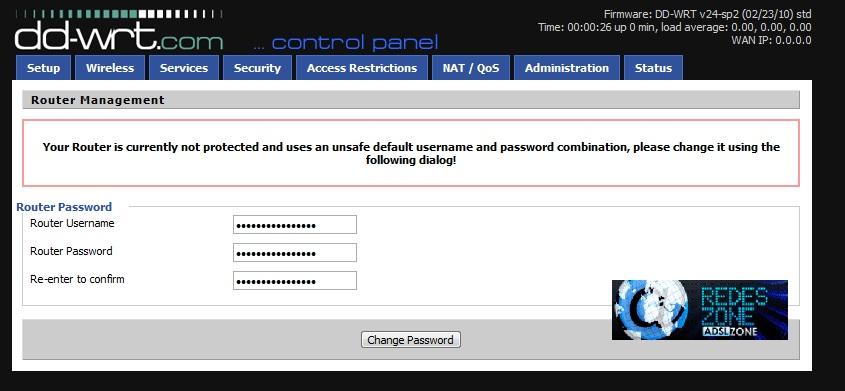
5.- Una vez el router se ha reiniciado, veréis la interfaz de DD-WRT.

Desinstalación del firmware DD-WRT para instalar el firmware original del router

Aunque a muchos de vosotros pueda daros miedo hacerlo, se trata de un proceso sencillo y que si se siguen los paso no pasará nada. Será necesario utilizar un pendrive con formato FAT (ni FAT32 ni NTFS), y una versión del firmware original del router que os ponemos a continuación:
Firmware original TP-Link WR1043ND
Antes de comenzar el proceso es necesario habilitar en el router, si no lo habéis hecho, el soporte para la conexión USB y que se monten de forma automática.
Lo configuraremos de la siguiente manera:
El router se reiniciará de manera automática y nos mostrará la siguiente pantalla si ya hemos conectado el pendrive
Existen dos formas de realizar el proceso.

Primer método

1.-Copiar el fimrware en el pendrive e insertarle en la entrada USB del router
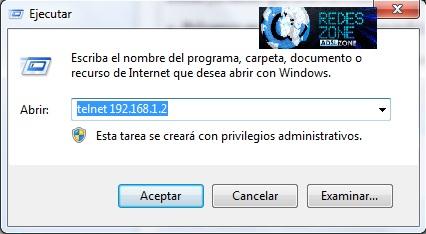
2.- Conexión Telnet al router( En Windows: Inicio/Ejecutar y tecleamos telnet “puerta de enlace” donde “puerta de enlace” se sustituye por la puerta de enlace que tenga nuestro router, si no la hemos cambiado es 192.168.1.1 .
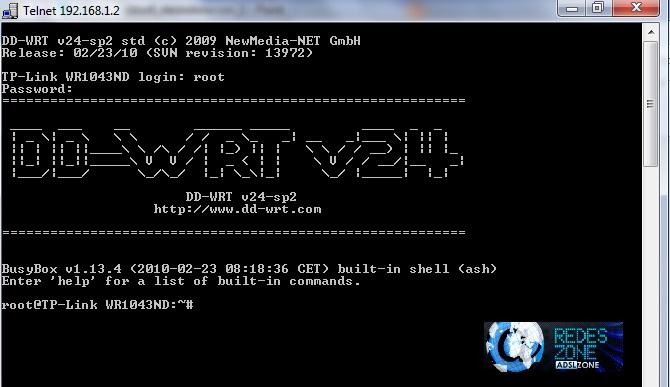
Nos pedirá un usuarios y una contraseña. El usuario es root, mientras que la contraseña es la que nosotros hemos configurado en el router o bien la que venía por defecto.
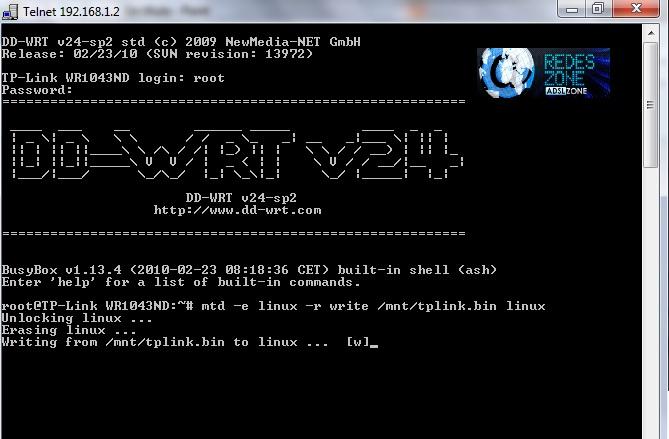
3.-Vamos a proceder al borrado del firmware DD-WRT y la instalación del original. Tecleamos en la consola el siguiente comando:
mtd -e linux -r write /mnt/ linux
en el que debe sustituirse por el nombre del fichero que contiene el pendrive añadiendo la terminación .bin
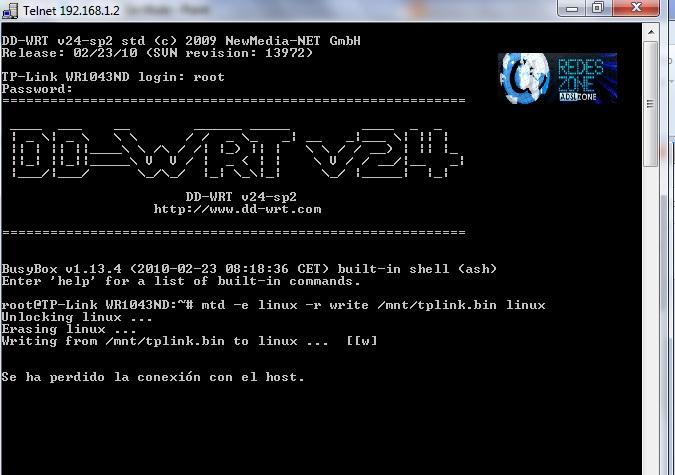
4.-Posteriormente puede aparecer lo siguiente por la consola de Telnet (debería ser este orden)
o incluso indicar que se ha perdido la conexión con el host. Cuando acabe de reiniciarse el router, al ingresar nuevamente la puerta de enlace, tendremos nuestro firmware original en el router.

Segundo método

Se necesita igualmente el pendrive con el firmware, pero a diferencia del primero, que utilizabas Telnet, esta vez vamos a utilizar la propia consola de comando que el router posee en la interfaz web
1.- Accedemos al router poniendo la puerta de enlace y ingresando nuestro usuario y contraseña
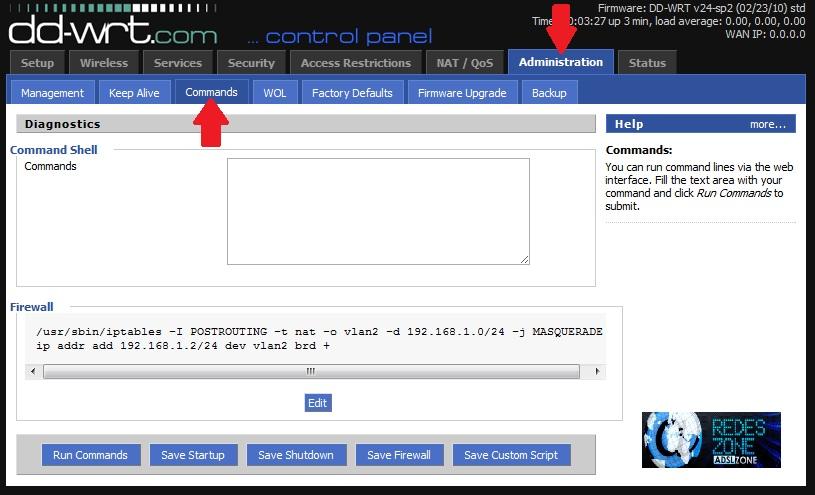
2.- Nos dirigimos a Administración/Comandos
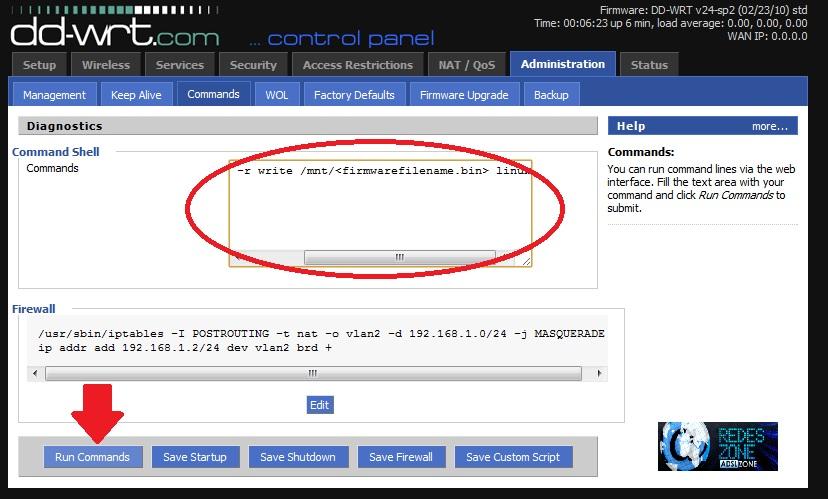
3.-En la pequeña ventana que tenemos metemos el siguiente comando:
mtd -e linux -r write /mnt/ linux
donde ya sabéis que debéis de sustituirle por el nombre del fichero y añadir la terminación.
4.- Pulsamos en Ejecutar (Run Commands)
5.- Después de un breve periodo de tiempo y de que el router acabe de reiniciarse, tendremos nuestro router de nuevo con el firmware de fábrica.

Port Forwarding Troubleshooting

dd-wrt.com/ Port_Forwarding_Troubleshooting
Introduction
This page explains how to troubleshoot common port forwarding troubles to figure out what the problem really is so that you can fix it. There can be many problems including multiple layers of NAT (router behind another router), misconfiguration of the port forward, software firewalls on the host being forwarded to, unexplainable behavior caused by not hard resetting the router, etc. You should first familiarize yourself with how to configure Port Forwarding before trying to troubleshoot it.
WARNING: Loopback is currently broken in build 15760 and higher but is easily fixed with iptables. See [Ticket 1868] for more information.
Basic Troubleshooting
Did You Hard Reset?
The only cases I've seen of genuine bugs with port forwards in DD-WRT have been unexplainable behavior of the underlying iptables rules that was fixed by hard resetting and reconfiguring from scratch. If you have made few changes from the default configuration then you should try this first. If you have a lot of changes then you'll likely want to test other possibilities first since most problems are user error anyways.
Check the WAN IP
Start by going to the router's GUI with your web browser and checking what the router's WAN IP is.
  • If the WAN IP is 0.0.0.0 then you're using the device in an OSI layer 2 bridge/switch configuration (WAP, WDS, CB, RB) or you have no internet connection. If it's the former then no port forwards are needed on this router because the device is not doing NAT or routing. If it's the latter then you need to fix your internet connection which is a different matter not discussed here.
  • If the WAN IP begins with 192.168.x.x, 172.[16-31].x.x, or 10.x.x.x then the router is behind another router that is also doing NAT. You must configure that router to either DMZ or port forward to the DD-WRT router.
  • Any other WAN IP is likely a public (routable) address that just needs a properly configured port forward on the router.
Test Loopback
Some ISP's block certain ports or even do deep packet inspection (OSI layer 7) so to determine if the port forward is working you should try to access it from within your LAN using NAT loopback. This test will only work if you're using a client program that allows you to specify the IP and port to connect to. If you don't have an obvious client program capable of this (like a web browser to connect to a HTTP server) then you can use Nmap to check if the port is open.
To test a single TCP and UDP port number with Nmap, use the following options:
nmap -sT -sU -p [port] [IP Address]
  1. Go to the Security -> Firewall page in the GUI
  2. Uncheck Filter WAN NAT Redirection (it is by default) which means loopback will be allowed. If you disabled the SPI firewall then you will have to enable it temporarily to be able to change this setting.
  3. Make sure that the host that you're forwarding to is listening on the port being forwarded to. ie. make sure that the PC is running the program that you're trying to forward the port for so that it will accept the connections. If you do not have a program listening on the destination port then it will appear closed!
  4. Connect to the router's [WAN IP]:[external port being forwarded] from any device on your LAN using your client program or Nmap.
If loopback failed then you likely have either a software firewall on the host, or a hardware firewall or NAT router between the router and the host. If loopback worked then you likely have either a hardware firewall or NAT router between the router and the ISP, or your ISP is blocking the traffic.
  • Temporarily disable all firewalls and retest.
  • If you have another NAT router then you need to configure the first router to port forward/DMZ to the second router's WAN IP and the second router to port forward to the host. Try loopback on the other router's [WAN IP]:[external port being forwarded] too.
  • If you suspect that your ISP is blocking it because the router has a public IP and loopback worked then you need to remove all routers and connect the host directly to your ISP. If your host doesn't get an IP from your ISP then you may need to unplug your modem for a few minutes to have it release the MAC address binding.
  • If the port forward still fails then you need to look at the iptables rules to see if it's bugged/misconfigured or hard reset it if you didn't at the start. Telnet/SSH to the router, run the commands below, and post the output in a new forum thread.
iptables -t nat -vnL PREROUTING
iptables -vnL FORWARD

Friday, October 19, 2012

optimal Maximal Transfer Unit


Source
The default MTU sizes for different network topologies
Article ID: 314496 -
This article applies to a different version of Windows than Windows 7
This article was previously published under Q314496
SUMMARY
The maximum transfer unit (MTU) specifies the maximum transmission size of an interface. A different MTU value may be specified for each interface that TCP/IP uses. The MTU is usually determined by negotiating with the lower-level driver. However, this value may be overridden.

MORE INFORMATION
Each media type has a maximum frame size. The link layer is responsible for discovering this MTU and reporting the MTU to the protocols above the link layer. The protocol stack may query Network Driver Interface Specification (NDIS) drivers for the local MTU. Upper-layer protocols such as TCP use an interface's MTU to optimize packet sizes for each medium.

If a network adapter driver, such as an asynchronous transfer mode (ATM) driver, uses local area network (LAN) emulation mode, the driver may report that its MTU is larger than expected for that media type. For example, the network adapter may emulate Ethernet but report an MTU of 9180 bytes. Windows accepts and uses the MTU size that the adapter reports even when the MTU size exceeds the usual MTU size for a particular media type.

The following table summarizes the default MTU sizes for different network media.
   Network             MTU (bytes)
   16 Mbps Token Ring        17914
   4 Mbps Token Ring          4464
   FDDI                       4352
   Ethernet                   1500
   IEEE 802.3/802.2           1492
   PPPoE (WAN Miniport)       1480
   X.25                        576    
APPLIES TO
  • Windows Server 2008 R2 Standard
  • Windows Server 2008 R2 Enterprise
  • Windows Server 2008 R2 Datacenter
  • Windows Server 2008 Standard
  • Windows Server 2008 Enterprise
  • Windows Server 2008 Datacenter
  • Microsoft Windows Server 2003 R2 Standard Edition (32-bit x86)
  • Microsoft Windows Server 2003 R2 Enterprise Edition (32-Bit x86)
  • Microsoft Windows Server 2003 R2 Datacenter Edition (32-Bit x86)
  • Microsoft Windows Server 2003 R2 Standard x64 Edition
  • Microsoft Windows Server 2003 R2 Enterprise x64 Edition
  • Microsoft Windows Server 2003 R2 Datacenter x64 Edition
  • Microsoft Windows Server 2003, Standard Edition (32-bit x86)
  • Microsoft Windows Server 2003, Enterprise Edition (32-bit x86)
  • Microsoft Windows Server 2003, Datacenter Edition (32-bit x86)
  • Microsoft Windows Server 2003, Standard x64 Edition
  • Microsoft Windows Server 2003, Enterprise x64 Edition
  • Microsoft Windows Server 2003, Datacenter x64 Edition
  • Windows Vista Home Basic
  • Windows Vista Home Premium
  • Windows Vista Ultimate
  • Windows Vista Business
  • Windows Vista Enterprise
  • Windows Vista Home Basic 64-bit Edition
  • Windows Vista Home Premium 64-bit Edition
  • Windows Vista Ultimate 64-bit Edition
  • Windows Vista Business 64-bit Edition
  • Windows Vista Enterprise 64-bit Edition
  • Microsoft Windows XP Home Edition
  • Microsoft Windows XP Professional
  • Microsoft Windows XP Professional x64 Edition
===============================
RWIN / TCP Window Size Problem
change the MTU setting in Windows 7
You also might try this...
  1. Open a command line window as an Administrator (ie. right click on All Programs > Accessories > Command Prompt and select Run as administrator) ...
  2. Type the command netsh and wait for prompt
  3. Type the command interface and wait for prompt
  4. Type the command ipv4 and wait for prompt
  5. Type the command set subinterface "Local Area Connection" mtu=xxxx store=persistent
NOTE: before changing the MTU is a good practice to disable TCP autotuning
netsh interface tcp set global autotuning=disabled
I am going to see if the machine continues to work and if so do a  
netsh interface tcp set global autotuning=normal
since I did not get an immediate fix until I change the MTU and I think autotuning setting change did nothing to resolve the issue
===============================
netsh interface ipv4 set subinterface "Conexión de área local or Local Area Connection" mtu=1402 store=persistent
netsh interface ipv4 show subinterface


===============================
Adjusting MTU settings
MTU problems may result in degraded network service, but may not affect some users' abilities to access the required applications, so sometimes MTU problems go unreported. Other times, MTU problems cause severe lags in network logon times, cause email attachments and other functions within Outlook to fail, and cause applications to stop functioning entirely. Note that, by default, the MTU on Windows operating systems is 1500 (Ethernet) and that a change to 1492 may resolve some, but not all, problems.
You may want to use MTU DOS Ping Test to determine the optimal MTU setting.
 The MTU must be set to the same setting on all your PC NICs and router. 
When using VPN, there is additional overhead and you may need to reduce the MTU to 1400 if you experience difficulties accessing email, web, or DSL connectivity problems.

blog.warcom.com.au/adsl-modems-2/best-mtu-and-mru-settings-for-adsl2-modems/
We’re often asked what the best MTU and MRU settings from customers, in order to optimise internet connections.
So let’s get started!
1.) Go to Start, and type ‘CMD’ in the search field. (in Windows/XP/Vista).
2.) At the command prompt:ping www.google.com -f -l 1942
pingone Best MTU and MRU settings for ADSL2 Modems?
3.) You will notice that the above results indicate that the packet needs to be fragmented.
4.) You now need to lower the packet size, until the packets ‘do not’ fragment. (try 1450, 1440, 1430, 1420, 1400, etc)!
pingtwo Best MTU and MRU settings for ADSL2 Modems?
5.) Begin increasing the packet size in small increments until you find the largest size that “does not” fragment.
6.) Add 28 to that number (IP / ICMP headers) to get the optimal MTU setting. If the largest packet size from ping tests is 1450, add 28 to 1450 to get a total of 1478 which is the optimal MTU setting.
pingthree Best MTU and MRU settings for ADSL2 Modems?
7.) Change the MTU settings, using the instructions here: Google