Bienvenido! - Willkommen! - Welcome!

Bitácora Técnica de Tux&Cía., Santa Cruz de la Sierra, BO
Bitácora Central: Tux&Cía.
Bitácora de Información Avanzada: Tux&Cía.-Información
May the source be with you!

Sunday, April 22, 2012

Hosting Git repositories

The Easy (and Secure) Way
Update (12-12-2010): For additional features not present in gitosis, check out gitolite.
Update (08-10-2008): For topics not covered here, I encourage everyone to read the gitosis README, bundled with the distribution. There is also an example.conf configuration file that illustrates more features than I have covered here.
I have been asked more and more these days, "How do I host a Git repository?" Usually it is assumed that some access control beyond simply read-only is involved (some users have commit rights). With access control comes issues of security, and that's a whole other bag of cats. This post is about presenting an answer to this question, without the fuss.
The rest of this article will be a tutorial showing you how to host and manage Git repositories with access control, easily and safely. I use an up and coming tool called gitosis that my friend Tv wrote to help make hosting git repos easier and safer. It manages multiple repositories under one user account, using SSH keys to identify users. However, users do *not* need shell accounts on the server, instead they will talk to one shared account that does not allow arbitrary commands. Git itself is used to setup gitosis and manage the Git repos, which pleases the recursion-seeking orthogonal CS-side of my brain.
Assumptions: I take my examples from a Ubuntu Linux server. While I haven't tested other systems, I imagine different Linux distributions, FreeBSD, OS X, etc... would be similar. Gitosis is written in Python, so you should have a copy of Python installed as well.
Enough talk, let's get down and dirty.

Install gitosis

gitosis is a tool for hosting git repositories (I'm repeating myself for those who skim :)
The first thing to do is grab a copy of gitosis and install it on your server:

cd ~/src
git clone git://eagain.net/gitosis.git
Notice that gitosis is extremely light-weight. The clone takes a mere couple seconds. Less is more, and I like that a lot.
Next, install it like so:

cd gitosis
python setup.py install
Don't use --prefix unless you like self-inflicted pain. It is possible to install gitosis in a non-standard location, but it's not nice. Read the Caveats section at the bottom and then come back here.
If you get this error:

-bash: python: command not found
or

Traceback (most recent call last):
  File "setup.py", line 2, in ?
    from setuptools import setup, find_packages
ImportError: No module named setuptools
You have to install Python setuptools. On Debian/Ubuntu systems, it's just:

sudo apt-get install python-setuptools
For other systems, someone tell me or leave a comment, so I can update this section and improve this tutorial.
The next thing to do is to create a user that will own the repositories you want to manage. This user is usually called git, but any name will work, and you can have more than one per system if you really want to. The user does not need a password, but does need a valid shell (otherwise, SSH will refuse to work).

sudo adduser \
    --system \
    --shell /bin/sh \
    --gecos 'git version control' \
    --group \
    --disabled-password \
    --home /home/git \
    git
You may change the home path to suit your taste. A successful user creation will look similar to:

"Device Not Ready" error message.

Testing the external enclosure's hard drive.
The external enclosure's circuits may be damaged.
You MAY need to buy a new external enclosure, or connect the drive internally to a computer, before you can attempt to repair the data damage.
If you have another drive you can install in it so you can test whether the enclosure works fine, try that.
If you can't do that and have any doubts about that, connect the drive internally to a computer before you attempt to repair any data damage. According to my experiences you can't run the hard drive manufacturer's diagnostics on the hard drive when it's in the USB enclosure.
Testdisk - get the Stable version:
http://www.cgsecurity.org/wiki/Test...
Glary Undelete:
http://glary-undelete.en.softonic.com/
PC Inspector (freeware)
http://www.snapfiles.com/get/pcinsp...
Zero assumption Recovery
http://www.z-a-recovery.com
The demo is limited
It will only recover 'up to' four folders per run
But you can make multiple runs
Really good, but you have to pay for it.
GetDataBack
http://www.runtime.org/
.....
Lots of file recovery programs
...................

Apparently, the Windows version of Seagate's SeaTools can test any hard drive brand when it's in an external enclosure.(The bootable Dos version of it CANNOT.)
Do the long test.
SeaTools
SeaTools for Windows
System Requirements:
  • Microsoft Windows 7, Vista, XP or 2000.
  • Microsoft .NET Framework v4.0 - Available for download (approximately 48 MB) from www.microsoft.com. Search the site for .NET 4.0 or go directly there.
  • VGA 1024x768 or greater graphics capability.

SeaTools for Windows tests SATA, USB, 1394, ATA (PATA/IDE) and SCSI drives. It installs onto your system. SeaTools for Windows is completely data safe.
 If the drive passes SeaTools for Windows, your troubleshooting can move to other areas.

Go To Download

EaseUS Todo Backup


EASEUS Todo Backup 4.0.0.5
EASEUS Todo Backup 4.0.0.5EASEUS Todo Backup is a backup and restore utility.
Choose EaseUS Todo Backup Free It is the world's first all-in-one backup & system disaster recovery software special for home users. It performs complete backup & recovery with multi-ways, such as one-click system backup, incremental disk and file backup, network shared file backup, dynamic volume backup, and automated schedule backup, etc.
Note:
1. EaseUS Todo Backup Free is free for home users only. Any use for commercial purpose is not allowed.
2. Free Edition is out of free tech support. Find more EaseUS Todo Backup versions with free tech support service.
Backup Benefits


Recovery Benefits


Full Recovery Benefits
Special Benefits
  • Improved! Support Windows 8 Consumer Preview.
  • Clone disk or transfer disk data (GPT disk included) to upgrade your hard disk without reinstalling operating systems and applications.
  • Explore backup image file to restore at a granular level or directly copy & restore files and folders from backup image in Windows Explorer.
  • Automatically delete old images to save disk space.

Software for Toshiba drives

www.semicon.toshiba.co.jp/eng/event/news/
========================

TOSHIBA Disc Creator 2.1.0.6
TOSHIBA Disc Creator 2.1.0.6Toshiba Disc Creator is a program for creating CDs, DVDs and HD DVDs.

NTI Backup NOW! 5.1.5.506
NTI Backup Now Standard Edition a lite version that backs up and restores files.
  • Publisher: NewTech Infosystems
  • Last updated: April 19th, 2008
NTI Shadow 3.7.7.10
NTI Shadow 3.7.7.10
NTI Shadow is an award-winning, easy-to-use backup solution.
  • Publisher: NewTech Infosystems
  • Last updated: December 7th, 2011

Source
toshiba
Get the latest NTI updates, downloads and promotions


NTI Backup Now EZ NTI Backup Now EZ
Download NTI Backup Now EZ update here:
Click Here
NTI Echo NTI Echo
No new software updates are available
NTI Pocket Data Backup NTI Pocket Data Backup
No new software updates are available
Take me to the Toshiba Support Home Page


NTI corp 
NTI Backup Now EZ
NTI Backup Now EZ update patch
Windows 7 / Vista / XP
NTI OEM Versions
NTI Backup Now EZ 1.1.2.51
NTI Backup Now EZ 1.1.2.77a
February 22 2010
========================
storage.toshiba.com/archived models
Toshiba Portable Hard Drive
320 / 500 / 640GB* / External / USB 2.0  


 Service Bulletin  – Important information for NTI's Backup Now EZ

To ensure proper installation of NTI's Backup Now EZ software, it is recommended that you install the software to the default directory shown in the software. If you choose to change the default installation directory, you must create a new folder to ensure trouble free operation.
Click below to download the latest version of NTI's Backup Now EZ. This service pack includes all the latest feature enhancements, Windows 7 compatibility and critical updates.
Backup Now EZ v1.1.2.77.zip
NOTE This update is mandatory for all users that have not yet installed Backup Now EZ on their computers. It includes all the latest feature enhancements and is Windows 7 compatible.

Backup Now EZ Patch (1.1.2.51 to 1.1.2.77).zip
NOTE This is an update for current users of Backup Now EZ. It includes minor feature enhancements and ensures Windows 7 compatibility. This update is recommended for all users that have already installed Backup Now EZ on their computer

Special offers & software patches are specific to the software bundled with Toshiba USB hard drives. Update Patch
------------------------------------
Toshiba STOR.E ART 4 External Hard Drives are pre-loaded with NTI Backup Now EZ, enableing data backup and data protection through 256-bit data encryption.
The STOR.E ART 4 family ships a 500GB model (118.9 x 79 x 13.5mm / 154 grams) with red graphical accents, and 750GB and 1TB drives (118.9 x 79 x 16.5mm / 186 grams) with blue and white trims, respectively. 
====================
storage.toshiba.com/storage-services-support/software-utilities
----------------------
Partition Alignment Tool for Toshiba Generation One Advanced Format HDDs
Most recent computer operating systems (OSs) have been designed to work effectively with Generation One AF HDD supporting 512 emulation. Generation One AF HDD may deliver superior performance as compared to legacy 512 byte per sector drive models when properly configured with the host file system,. In PC applications, the host file system is primarily determined by the OS installed on the computer.
Toshiba offers the Paragon Partition Alignment Tool (PAT) to align partitions on Toshiba Generation One AF HDD for optimal system and application performance. To determine if your Toshiba HDD will benefit from alignment, please refer AF table below. The table outlines which OS can benefit from the assistance of PAT.
This downloadable tool is available to licensed single system users of Toshiba HDDs.
Recommended reading:
Refer table of OS to PAT usage (Do not use for encryptedpartitions.)
Operating System PAT Usage Guidelines for Toshiba Generation One AF HDD
Windows® 7 (32- or 64-bit) - factory installed Not necessary
Windows® 7 (32- or 64-bit) - non-factory installed
pre-Service Pack 1 (SP1) versions
Recommended
Windows® 7 (32- or 64-bit) - non-factory installed
Service Pack 1 (SP1) or above
Not necessary
Windows Vista®, SP1 and above
1 partition drive configurations
Not necessary
Windows Vista®, SP1 and above
1 partition drive configurations
Recommended
Windows Vista®, without SP Recommended
Windows® XP (32- or 64-bit) Recommended
Windows Server® 2003 Recommended
Windows Server® R2 2003 Recommended
Windows Home Server® version 1 Recommended
Windows Home Server® Recommended
Windows Server® 2008 Not necessary*
Windows Server® 2008 R2 Not necessary*
Windows® PE 3.0 and below Recommended
Other Windows® OSs not listed above Upgrading to an newer OS if using AF drives.
Apple Mac OS X 10.4 and above Not necessary
Linux Ubuntu 8.04 and below Recommend using a Linux partition utility; (see FAQ)  PDF (47kB)
Linux kernel 2.6.34 and below Recommend using a Linux partition utility; (see FAQ)  PDF (47kB)
Open SuSE Linux Recommend using a Linux partition utility; (see FAQ)  PDF (47kB)
Note: PAT may not be suitable for Toshiba Generation One AF HDDs alignment activities involving multiple client systems or disk image cloning; (see FAQ).  PDF (47kB)
Preparation before download PAT
see more at link
PAT Download
Multi-language software will allow you to select one of ten languages during install.
Recommended reading:
http://www.toshibastorage.com/
 ===========================
Toshiba and Security
While consumers continue to amass "digital valuables" and recognize the need for privacy protection, Toshiba enables convenience, performance and security with backup software and self-encrypting drives. Learn more arrow

Pre-loaded software
Whether backing up your entire system, or packing up the pictures, files, music and videos you need to bring, our portable hard drives can help. They come with pre-loaded software (Canvio 3.0 models only) to save you the time and expense of buying the right back-up app. And they make restoring data just as easy.
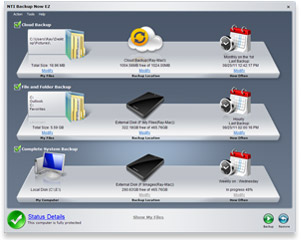
Backup Software Screenshot
Enabling Cloud Storage
Cloud computing is an important and compelling new tool for IT managers. Click the Learn more arrow to watch the video: "Storage in the Age of Cloud Computing".  
Extremely Accurate

NTI Backup Now

NewTech Infosystems
NTI Backup Now EZ 
Software Updates
NTI corp
NTI Backup Now EZ
NTI Backup Now EZ update patch
Windows 7 / Vista / XP
NTI OEM Versions
NTI Backup Now EZ 1.1.2.51
NTI Backup Now EZ 1.1.2.77a
February 22 2010
storage.toshiba.com/drivers/Win7_Patch/Backup_Now_EZ_v_1.1.2.77.zip
From NTI: Incremental backups for both Complete System and File&Folder backups. Supports a wide range of destination including internal & external hard drives, pen drives, optical drives, and network & NAS drives. Destination Capacity Alert to warn you when your destination is getting full. CPU Priority settings to allow for faster backups or faster PC programs. Supports Compression and secure 256-bit Encryption Restore Features. Boot from USB hard drive or CD/DVD disc. One-click restore automatically prepares your replacement hard drive and restores your entire PC in a snap. Restore to same size hard drive, larger hard drive, or even a smaller hard drive. Multiple restore points to restore Backup Now EZ supports a wide variety of backup devices allowing you the flexibility to choose where and how to back up. External USB hard drives with their high capacities and portability are an excellent choice for backing up your computer. CDs and DVDs are great for archiving your data to store in a safe place for advanced users. NAS and network drives are fully supported.
The Toshiba UK site indicate that the NTI Backup Now EZ software must be installed on your internal hard drive, not on the external hard drive.
You could try going to Control Panel - display set to Classic view - Programs and Features, Un-installing the Backup Now EZ software, and installing it again by downloading and installing the latest version of it found at the first link here:
How to make a backup and restore by using the "NTI Backup Now EZ" software

If that doesn't help, you need to repair the data damage on the external hard drive by using a data recovery program .
OR - you could delete the data on the external hard drive and make a brand new backup.
 ==========
Source

Backup Features

  • Incremental backups for both Complete System and File & Folder backups.
  • Supports a wide range of destination including internal & external hard drives, pen drives, optical drives, and network & NAS drives.
  • Destination Capacity Alert to warn you when your destination is getting full
  • CPU Priority settings to allow for faster backups or faster PC programs
  • Supports Compression and secure 256-bit Encryption
  • Restore Features
    • Boot from USB hard drive or CD/DVD disc
    • One-click restore automatically prepares your replacement hard drive and restores your entire PC in a snap!
    • Restore to same size hard drive, larger hard drive, or even a smaller hard drive.
    • Multiple restore points to restore

    Three Easy Steps to Protect Your Digital Life
     
    1 - File Selection Made Easy
    With just a few clicks of the mouse, we have made it easy for you to select all of your important files. The most commonly used files are grouped into four categories: Multi-Media. Office. Email, and Internet for a quick and easy selection process. Just select the ones you want and Backup Now EZ will search your entire computer and back up the specified file types. The advanced tab gives the flexibility for even more choices to choose specific files and folders.
     
    2 - Various Backup Destinations
    Backup Now EZ supports a wide variety of backup devices allowing you the flexibility to choose where and how to back up. External USB hard drives with their high capacities and portability are an excellent choice for backing up your computer. CDs and DVDs are great for archiving your data to store in a safe place for advanced users. NAS and network drives are fully supported.
     
    3 - Flexible Scheduling
    Back up your data when you want by scheduling your backups to run hourly, daily, weekly, monthly, or even on-demand: meaning only when you press the backup button. Just set it once and forget it! Backup Now EZ will automatically back up your data per your set schedule. Backing up your computer is now a straight forward and worry free task.

    Quick and Easy Data Recovery
     
    Rapid Restore
    If the unthinkable happened and you need to restore your computer. Backup Now EZ makes it as simple as clicking the restore button. Within a few minutes you will be up and running like nothing had ever happened. You can even choose to restore to a different point in time. For example, before your computer was infected with a virus or corrupted by some type of malware.

     
    Pick Your Files to Restore
    If you only need a specific file or folder, simply select the file you need from your backup set and restore it to its original location. You can also choose to restore to a different location of your choosing. The quick search feature will search your backup set for a specified file to assist you in finding that hard to find file.

     
     Status at a Glance
    Opening the job status window displays an at-a-glance status to let you know if everything is all right or if something needs your attention. Two easy to read pie charts display the condition of your backup device. In addition, with our calendar view you can quickly check the status of your past, current, and future backups.
    __________________________
    para
    producto Toshiba:
    Serie StorE art de 2,5 pulgadas,
    Serie StorE art 3 de 2,5 pulgadas
    Para crear una copia de seguridad y restaurar la unidad de disco duro con el software "NTI Backup Now EZ", siga los pasos que se indican a continuación:
    Recomendamos descargar e instalar la versión más reciente de "NTI Backup Now EZ" empleando el siguiente vínculo:
    StorageSolutions/ExternalHardDrives/USB_Portable Ext_Hard_Drive
    www3.toshiba.co.jp/storage/english/dl/index.htm
    toshiba.com/computers/storage/portable/canvio-3/HDTC605XK3A1 
    toshiba.com/computers/storage/portable/canvio-3/HDTC610XK3B1
    http://freakshare.com/files/ixej2tp6/dr64ent1.rar.html 
    1. Instalación del software "NTI Backup Now EZ"

      • Ejecute el archivo setup.exe, elija el idioma preferido y pulse "Aceptar"


      • Se preparará la instalación


      • Tras la preparación, podrá iniciarse la instalación. Pulse "Siguiente" para continuar


      • Deberá aceptar el contrato de licencia y luego pulsar "Siguiente"


      • Ahora puede elegir el formato de la copia de seguridad del disco duro (en este ejemplo, hemos seleccionado FAT32), tras lo cual deberá pulsar "SIGUIENTE"


      • Elija la carpeta de instalación para el software de copia de seguridad (el lugar en el que desea instalarlo) y pulse "SIGUIENTE"


      • Una vez finalizada la instalación, deberá reiniciar el PC. Haga clic en "Finalizar" para reiniciar.


      • El software quedará instalado. Continúe con la copia de seguridad (paso 2)
    2. Cree una copia de seguridad de su PC en la unidad de disco duro externa

      • Inicie el software EZ Backup

      • Haga clic en "Modify" (modificar) en el área "Complete System Backup" (copia de seguridad de todo el sistema)


      • Seleccione "Destination Capacity Alert" (alerta sobre capacidad del destino) y, si lo desea, establezca una contraseña. Una vez hecho esto, haga clic en "Finish" (finalizar)


      • Para iniciar la copia de seguridad, haga clic en "Yes" (sí)


      • El software le notificará cuando la copia de seguridad haya finalizado.
    3. Restauración del sistema

      • Arranque desde la unidad de disco duro USB, en la que está almacenada la copia de seguridad (en portátiles Toshiba, pulse F12 para acceder al menú de dispositivos de arranque y seleccione USB)

      • Una vez que haya arrancado la unidad de disco duro, aparecerá una pantalla de restauración (Restore Screen). Seleccione el punto de restauración y pulse "Restore" (restaurar) para comenzar.


      • ¡Asegúrese de que ha guardado todos los datos del PC, ya que la restauración borrará la unidad de disco duro! Haga clic en "Aceptar"


      • La restauración comenzará a ejecutarse...


      • Una vez finalizada la restauración, haga clic en "Aceptar" para reiniciar el PC


      • Ahora el PC estará en el mismo estado en el que se encontraba cuando creó la copia de seguridad.
    =======================
    NTI Backup Now 5.5
    NTI Backup Now 5.5  Standard Edition a lite version that backs up and restores files and folders on your Windows PC with the same easy-to-use and powerful features.
    • What is new?
      • [New] Enhanced Performance for faster backups
      • [New] Incremental Drive Image Backup for Complete System Backup and Restore
      • [New] Support for Microsoft Volume Shadow Copy Service (VSS) - Open files can be backed up without having to close the running program(s)
      • [New] Customized Description Fields in Backup Job - You can enter the backup job's information to show when and why it was created
      • [New] Create a Bootable Image Restore CD/DVD - Quickly restores an entire hard drive including the operating system, all data and applications
      • [New] Restore points allow you to easily go back and restore from a particular point in time
    • With NTI Backup Now 5.5, protecting your data is as easy as 1-2-3!
      (what - where - when and how - to backup)
    Computer Backup Made Fast and SimpleThe included NTI Backup Now EZ software scans your system and recommends the best coverage for your computer. Choose from three backup strategy options:

    • Back up your files to the cloud.
    • Back up your files and folders to your Canvio 3.0 portable hard drive.
    • Back up everything saved on your computer.
    Or, choose all three for the most comprehensive coverage.
    Click the restore button and you can recover a file or folder. Boot to your Canvio 3.0 portable hard drive and it will restore all the files saved on your computer. Toshiba even includes a utility to burn a boot CD/DVD to make the process even simpler.
    Secure your backup files with password-protected data encryption, (up to 256-bit), to help keep your backup safe and prevent unauthorized access. The Drive Space Alert monitor will keep an eye on your drive and let you know when it is getting full.
    in the box
    For advanced users, Toshiba’s added the ability to customize your backup routine. Options include the ability to select only the most common file types, (like work documents, pictures, movies, music, etc.), change how often your backup takes place (hourly, daily, weekly, etc.), and change the threshold settings on the Drive Space Alert.

    Wednesday, April 18, 2012

    Re-registering a dll file -Seven


    Please note that, on a 64-bit Windows operating system, there are two versions of RegSvr32.
    The 64-bit version is %systemroot%\System32\regsvr32.exe
    The 32-bit version is %systemroot%\SysWoW64\regsvr32.exe
    Ensure you're using the right one.
    regsvr32 path & filename of dll or ocx

    ====================
    How to register DLL files in Windows 7
    Register DLL files
    Registering DLL files is quite simple, all you need to know is the command to register DLL files and the name of the DLL file that you want to register.
    The command to register the files manually is called regsvr32. Now let’s take a quick look at the syntax of regsvr32:
    /u Used to unregister DLL files
    /s If you don’t want any dialogs you can use the “s” for silent option
    /c Get the console output
    /n Register DLL file without DllRegisterServer
    /i Register DLL file with DllInstall (or DllUninstall if /u is specified)
    With option /i you can pass an optional command via /i:cmdline.
    DllInstall is used only for application installation and setup.

    Manually Register DLL files via Command Prompt

    So, to register DLL files, simply open up an elevated command prompt and run commands like:
    regsvr32 shell32.dll
    regsvr32 shdocvw.dll
    …
    If you successfully re-register a DLL file, you should get a message like this one:
    DllRegisterServer in shell32.dll succeeded.
    RegSVR32 - Register DLL files
    Re-registering a DLL file manually can often help to solve problems, so you might want to look into it if you have problems with DLL files. As you can see from the command line option above, you can also unregister DLL files. Read our guide how to unregister DLL files if you want to know how it works.
    ====================

    Register/Un-Register DLL Files With RegSvrHelper In Windows
    What Are DLL’s And Why To Register Them?

    DLL stands for Dynamic Link Library. It is basically a shared library which is used for developing software. These files usually have the extension .ddl or .ocx, so when you register the DLL files, the information regarding these files is stored in the Windows registry.How To Register DLL With RegSverHelperRegSvr32 is the default windows utility which lets you register the DLL’s, but it is a command line based and for most users it becomes difficult to work with it. Try RegSvrHelper out, it is a free, portable and easy to use tool which offers an awesome GUI interface to register/unregister the DLL’s.
    RegSverHelperIt basically uses regsrv32 at the backend to register/unregister any particular DLL. It does not have any error messages of its own. If you encounter any error message while using it, then it will be generated by RegSvr32. Simply browse and select the DLL of your choice and click the Register or Un-Register button.
    It works flawlessly on Windows XP, Vista and Windows 7. It keeps the last 20 files that you registered/unregistered in its cache so that you may view the recent history. Enjoy!

    Cabinet file corrupt

    The cabinet file ' ' required for this installation is corrupt and cannot be used 
    This error is often caused by a firewall or virus software running on your computer. Try the following:
    1. First turn off your firewall or virus software if you have one before downloading.
    2. Open a dos box (Start -> Run -> cmd)
    3. Type in
    msiexec /unregister (press enter)
    msiexec /regserver (press enter)
    Now try installing the program (without firewall or virus programs turned on or running)
    This could be caused by files in your TEMP directory. During the installation process, Windows temporarily puts installation files in this directory. At the end of the installation process, Windows is supposed to delete them, but sometimes it does not. If there are files left in there from another installation, it could interfere with the installation. Try deleting all files and subfolders in your TEMP directory, and then retry the installation.
    The TEMP directory is usually located at:
    C:\Documents and Settings\username\Local Settings\Temp