Bienvenido! - Willkommen! - Welcome!

Bitácora Técnica de Tux&Cía., Santa Cruz de la Sierra, BO
Bitácora Central: Tux&Cía.
Bitácora de Información Avanzada: Tux&Cía.-Información
May the source be with you!

Tuesday, January 15, 2013

stop error 0xc000000e on RAID

======================
======================
I got 3 drives on my PC, both connected to a Intel ICH9R. 2 are RAID-1 which is Vista C: system drive. 1 is a JBOD D: drive.
Strangely, when I unplug D: drive, system will fail to boot on winload fail, status 0xc00000e.
There is no page file on D: drive, but I can't remove it via Disk Manager.
However, from disk manager, D: drive is Disk 0: and C: drive is Disk 1:
I did a bcdedit to change all reference to C: disk, but no luck
--------------------------------
Note: Please ensure that the DVD-ROM is the first booting device.
1. Please insert the Windows Vista DVD and reboot the computer.
2. When we are prompted to press a key to boot from the DVD, please press Enter or the space bar.
3. Choose your language settings, and then click Next.
4. Click Repair your computer.
5. Select the operating system you want to repair, and then click Next.
6. On the System Recovery Options menu, click Startup Repair. Startup Repair might prompt you to make choices as it tries to fix the problem, and if necessary, it might restart your computer as it makes repairs.
En pos del eterno upgrade, parece que muchas veces se termina haciendo complejo lo que antes no lo era y funcionaba bien. Así como GRUB en  su última encarnación abandonó su simple configuración mediante un sencillo archivo de texto para pasar a ser un conjunto de complicados archivos con scripts, en el Windowverse atrás quedaron esas épocas en las que el menú de arranque se definía desde un minimalista archivo de texto llamado boot.ini. Desde Windows Vista en adelante toda la información de arranque se guarda en una carpeta llamada boot ubicada en la unidad del sistema, y la información de los sistemas a bootear, es decir, los datos que antes figuraban cargados en el boot.ini de Windows XP y anteriores,  ahora residen codificados en el archivo binario oculto bcd.log, al cual por ende no podemos modificar exitosamente con un simple editor de texto.
image
Pero lo que es peor de todo este nuevo esquema es lo caprichoso que es el nuevo Windows Boot Manager. Mientras que clonar un Windows pre-Vista era una tarea bastante directa y sin sobresaltos, cuando clonamos una unidad que contiene un Windows Vista, 2008 o 7 y luego deseamos arrancar desde tal casi seguro nos vamos a encontrar con el famoso error con status 0xc000000e, y en particular con uno de los mensajes correspondientes al mismo que aprendí a odiar: The Boot Selection failed because a required device is inaccesible (puede estar también en el idioma de nuestra instalación), el cual nos apunta confusamente a un problema de controladores, llegando incluso al descarado extremo de no encontrar nuestra instalación de Windows desde la sugerida opción de reparación del DVD de instalación.
Pero el problema es más simple de lo que el nuevo boot manager de Windows nos quiere hacer creer, y es que simplemente ya no sabe donde está la partición que debe bootear. Para repararlo debemos ingresar a la línea de comandos desde la mencionada opción de recuperación del DVD de Windows 7 o Vista, y utilizar la única herramienta autorizada a modificar la configuración de arranque, bcdedit. ¿Alguien dijo que es una forma más de MS para joder a los que tienen un Windows trucho? Puede ser, aunque ciertamente también jode a quien quiera hacer un upgrade de disco rígido en un equipo de marca de los que no traen el DVD original del SO sino una partición o DVD de recuperación.
Lo primero que debemos hacer, una vez que llegamos a la línea de comandos desde la opción de recuperación, es ingresar el comando bcdedit sin ningún parámetro y observar la salida. Una instalación de Windows 7 normal y sin problemas debería entregar una salida como la siguiente:
image
Dentro de esta serie de líneas, las que les debemos prestar especial atención en este caso son las que dicen device y osdevice. Como ven, en el caso del ejemplo existen tres ocurrencias en total de las mismas, y vemos como en el caso del Administrador de arranque de Windows apuntan a la partición identificada como C:, mientras que en el Cargador de arranque de Windows lo hace a la D:. Esta situación, en la que cuando entramos desde el Entorno de Recuperación de Windows (Windows RE) vemos dos particiones distintas mientras que cuando ingresamos desde el sistema operativo en sí vemos sólo una, es otra característica nueva que existe desde Windows Vista, pero que recién en Windows 7 se volvió el esquema de instalación por defecto en todo disco sin formatear. En las ediciones Bussines, Enterprise y Ultimate de estos sistemas es posible separar los archivos de arranque del sistema en una pequeña partición al inicio del disco, llamada justamente partición de arranque, separada de la principal donde se contiene al resto del SO, y que vista desde el administrador de unidades de Windows nos figurará comoreservada por el sistema. Este es un escenario que requiere el sistema de cifrado Bitlocker de Windows para funcionar, y que también es útil para incluir herramientas de recuperación como Windows RE y hacer un poco más difícil la infección del sistema por parte de ciertos tipos de malware que sólo están preparados para infectar la unidad del sistema principal. Además, este es el caso del ejemplo de la imagen; lo que hay que tener en cuenta es que para Windows 7 en particular a la partición de arranque no se le asigna una letra de unidad cuando el SO está en línea. Por lo que la partición D: que vemos desde el entorno de recuperación es en realidad nuestro disco C:, mientras que la de arranque figura como C: en este caso. Si no existe partición de arranque y todos los archivos del sistema residen en la misma partición principal, sólo deberíamos ver la letra correspondiente a la misma en todos los casos.
Ahora bien, ¿que es lo que pasa en esta configuración de arranque cuando obtenemos el status code 0xc000000e y nos dice que “el arranque falló porque un dispositivo requerido es inaccesible”? Normalmente veremos que en las variables device y osdevice habrá un valor identificado como unknown, lo que equivale a decir que el administrador de arranqué de Windows olvidó donde estaba la partición que debía arrancar. Para solucionarlo primero debemos saber cuáles son las letras asignadas a nuestras particiones de arranque y/o de sistema desde el entorno de recuperación, lo cual lo podemos hacer invocando al Bloc de Notas, para lo cual tecleamos notepad desde la línea de comandos de Windows RE y luego elegimos la opción Guardar; desde ahí podemos ver todas las unidades del sistema y cuáles son las letras que les fueron asignadas. Luego debemos tener en cuenta que en el Administrador de arranque de Windows deberá ir la letra de la partición de arranque, mientras que en el Cargador de arranque de Windows la del sistema, y en caso de existir sólo la última, por supuesto, la misma en todos los casos.
Estos valores debemos corregirlos ingresándolos a través de la herramienta bcdedit, de la siguiente forma:
bcdedit /set {identificador-del-SO} device partition=X:
En el ejemplo de la imagen vemos que el identificador de nuestro Windows 7 es bootmgr para la partición de arranque, y como ya sabemos que la misma está identificada como C: desde el entorno de recuperación, deberíamos ingresar:
bcdedit /set {bootmgr} device partition=C:
Siguiendo con el ejemplo, para luego corregir los valores del Cargador de arranque de Windows deberemos ingresar:
bcdedit /set {default} device partition=D:
bcdedit /set {default} osdevice partition=D:
Hecho esto sólo resta reiniciar y observar si el sistema levanta como corresponde.
============================
I have gone through replacing a System Reserved partition. This assumes a normal install and no other partition modifications have been made. It will not work on a UEFI install......If you choose not to replace the System Reserved partition, which is probably the best choice, you can make the OS partition active and do the Startup Repair, and it may take several times (2 or 3) to make it work correctly, and running Startup Repair 3 times will repair the Recovery F8 options capability.

But if you want to replace the System Reserved Partition, you can only have 4 primary partitions or 3 primary partitions and one Extended partition in Windows 7. So, if you already have those, you will not be able to add another. Any questions, ask before you start.

In Diskpart, you can use the first 3 letters instead of typing out the entire word. For instance, par can be used instead of partition. 

A command window can be opened from the Select Language page of the Install/Repair. Hit Shift+F10 to open the window and type Diskpart.

With Diskpart open type the following:

list disk

select disk 0
 < this will depend on which disk is your boot disk from above.

lis par

Sel par 1
 < this will probably be your OS partition if you deleted the System Reserved partition, but make sure.

detail par

Now look at the results. If the partition is active, it will indicate it as such here. (Active: Yes)

If you do not want to recreate the System reserved partition, you can make the partition active by:

active <** See Info below

Then check it again to make sure.

exit
exit


to close the Command window and continue with the repair.

**If you want to replace the System Reserved partition, then do not set the other partition as active. Instead follow these instructions to replace the partition and set it to active, then continue with the repair, and it will take 2 or 3 repair attempts with reboots between.

Note: this procedure worked fine on my system, but replacing a partition might lead to the loss of the OS partition if it was mistakenly overwritten, this is why I do not give the new partition a size.

With Diskpart already open, and using the results from the partition listing above (number and type), enter the following.

create par primary offset=1024

If your drive had no space unallocated, except for the deleted System Reserved Partition, you would not need the Offset. But without the offset, the partition will be put in unallocated space behind the other partitions.

format fs=ntfs label="System Reserved" quick

Active


You can now check the partitions again if you like, but note the partition for the Reserved partition may not show as Partition 1, so don't worry.

When you are ready, type exit twice to leave the command prompt and continue with the repair.

rebuilding RAID

RAID has never ever been a replacement for backups.
Without backups you will eventually lose data!
http://aplawrence.com/Linux/rebuildraid.html
Simple mdadm RAID 1 not activating spare
=======================
h20000.www2.hp.com/support/SupportManual/c00378986.pdf
support.dell.com/support/edocs/storage/RAID/SAS6iR/en/HTML/bio.htm
manuals.lacie.com/en/manuals/d2-2big-5big-network2/raid
forums.anandtech.com/showthread.php?t=300318
I have a fix for the AMD RaidXpert issue which does not require you to delete your Raid setup.
1) As posted, verify which drive is your data drive. It should be pretty easy because it will be the only drive in your raid view. Or follow the instructions above to find the drive you have your data on.
2) Reboot and go into your raid bios (-F) for my board but your's may differ.
3) Now I'm going from memory - should have written it down.
4) Go to Raid view I believe this is Number 1.
5) you should see your raid drive and your single drive
6) Define a new raid (don't remember which control sequence it is but, it's at the bottom of your screen)
7) Your single drive should appear as the only drive available.
8) In the options make the drive "raid ready"
9) Select it as assigned
10) Give it a name
11) Verify your settings
13) Don't initialize the drive
14) Reboot
15) In Windoze open the Raidxpert page.
16) Under Spare drives you will now have the "create" option available.
17) Click Create
18) Select the drive you marked as "raid-ready" (this should be the only drive)
19) Click Go
20) Your Raid 1 or Raid 5/10 should automatically see this drive as available and start rebuilding the drive system.
21) if not you can hit rebuild under the logical drive view once you select your raid drive.
The key is with a new system, the Raid Bios sees a new drive as a single drive which is not part of any raid system. This is kind of a safe guard, you don't want the system to take any drive you plug in as the new spare. So - as I said the key is to make your new drive "Raid-Ready" so that the raid system knows this drive is it's spare and can rebuild your Raid system.

This board gave me the right hint to go the "Raid-Ready" idea because I needed a spare drive not a single drive.

Using RAID 1 (Mirror) with the Onboard LSI MegaRAID SATA
[...]
After the Operating System is installed:
To check the status of the logical disk, you should use ServerView RAID and look at to see the initialization status (see picture below).
ServerView RAID is installed by default if you install using the ServerStart media. To log into ServerView RAID use the Administrators
username and password.

If the status of the logical array is 'initialized', then all is well, but if, as above, it says "uninitialized", you need to run the MDC (Synchronization) process.

By right clicking on the logical array you will see a menu pop up (as in the picture) which gives you the options of:
Start initialization: DO NOT CLICK ON THIS.
It will erase the contents of the logical disk. The option is only provided for the addition of a secondary array (not the primary O/S)
Start MDC (Media Data Check): (For SAS and SATA)
This is the correct tool for making the array consistent.
Depending on the size of the disks, the MDC may take a long time.
When the MDC is complete, the status of the array will change to being ‘initialized’
MDC is similar in functionality to the ‘check consistency’ setting associated with SCSI.

Managing the replacement of a RAID disk.
By default the adapter is set to do a automatic rebuild when a new disk is added.
(The disk is marked for recovery as the OptionROM is initialized on boot)

This is defined in the OptionROM (Ctrl-M) under [ Objects / Adapter / Auto Rebuild = enabled ]
This can also be set in ServerView RAID.

If automatic rebuild does not work, then also check that [Objects / Adapter / NewDevice = 'Auto Configuration'].
If for some reason, one of the disks has gone off line and is still believed to be ok, then you can force a rebuild.
You can do this in the OptionROM or ServerView RAID (recommended)
DO NOT SELECT THE OPTION TO BRING THE DISK ONLINE.  This assumes that the data on both disks is still identical and the master disk has
not been accessed since the failure occurred. Bringing the disk online may cause corruption which may not be immediately visible (for several months).
The correct procedure is to use the REBUILD option.
https://forums.geforce.com/default/topic/356349/pc-components/nvraid-how-to-rebuild-degraded-arrays/1
Instructions for failure of Raid 1 (mirroring) 
First, you'll need to know which drive is on which SATA controller and mark them accordingly with a label on the drive. Note - The drive connected to Sata 0 is likely the bootable drive so if your operating system isn't booting up after a failure, simply reverse the drive positions, i.e. move the Sata 1 drive to the Sata 0 position (or swap cable positions on the motherboard). This should allow it to now boot into Windows. 
Once you've identified which drive goes to which Sata controller, test each drive by running the manufacturer drive test on them. (I have two WD drives mirrored and the mirror became corrupted and subsequent testing showed both drives good so not all corruptions are due to bad drives). If both drives are good, be sure to connect the drive labeled 0 to the SATA 0 connector and connect the other drive as well and go into the NVIDIA BIOS menu. Select each drive and look at it to see which is on controller 0 and which is on controller 1. Delete the drive on controller 1. Exit and save and boot into Windows and the NVRAID utility should automatically begin rebuilding the array. 
Note: If the mirror has been degraded for some time and much data has been written to it that is critical, it is important to isolate the drive that has the current information on it. To do this, hook up each drive to SATA 0 and boot to Windows (assuming each drive is not mechanically compromised) and check to see which drive has the current data on it. If the data is critical and the drive is failing mechanically, i.e. bad sectors, you'll need to look into data recovery. Which ever drive is most current would be connected to Sata 0 controller.
-----------------------------
I've got an ASUS A8N-VM-CMS Micro ATX motherboard with RAID 1 activated on 2 Maxtor SATA2 160Go hard disks drives.
After a brutal shutdown, my array goes degraded.
- Going into the Nvidia RAID bios utility by pressing F10 doesn't allow me to rebuild the array typing the R key do nothing (like you)
- Going under Windows and launching the Nvidia MediaShield utility doesn't allow me to rebuild the array ()
Then :
- Switch off the computer
- Open the computer
- Unplug the sata/ide cable from 1 of your 2 drives
- Reboot the computer
- Shutdown the computer and switch off
- Re-plug your sata/ide drive
- Press F10 on boot to go into the RAID bios utility and select R to rebuild, press F7 to confirm.
- Windows is now starting, and if you launch the Nvidia mediashield utility you will see that the rebuilding process is in progress.
PS : During this, i had to redefine the boot disk, bios config was lost, but don't know why.
--------------------------
I have the same problem but my circumstances are a bit different.
OS = Windows Small Business Server 2003.
HDD = Dual 200GB SATA Western Digital
DRIVES ARE ON SATA 1 AND SATA 2
RAID 1 MIRROR
OS resides on these drives.
To test the recovery from a degraded mirror, I unplugged SATA 2 from my setup while the computer was off to simulate drive failure during power outage. Computer is turned back on and the OS boots no problem. Once in Windows, Media Manager shows a degraded mirror - no problem. I powered down the computer, reconnected the drive, turn the computer back on. The raid is still degraged and Media Manager does not allow me to rebuild the array.
Your instructions are a bit vague and did not work for me. My solution was to enter the RAID setup (pressing F10 on startup), delete one of the drives from the array then add it back in by pressing F6. VOILA - raid mirror shows healthy again.
I am testing the fault tolerance of this NEW server so there is currently no data to lose. If you are doing this on an active system (server or not) then BACKUP YOUR DATA FIRST! I am able to risk all at this point since I am in testing mode.
Once back in Windows, Raid Manager shows raid is rebuilding. This process is slow so be patient. While the raid mirror was degraded, I created some new folders and made copies of some drivers that I had on the hard disk. It is now synchronizing the two drives.
I am going to repeat this a few times to ensure I have the process down correctly.
-----------------------------
I have a MSI K9N SLI board with a AMD 64 dualcore chip, onboard NVraid controler with Mediashield utility of jun 2006 running Vista 64 enterprice edition running with a mirror set on two SATA WDC WD2500 drives.
Using the system my set broke up showing a raid failer in a message box at the bottom of my screen and at next boot i got the message that new device drivers were being installed. When i tried to open my previous document I pannict because the total directory it was in was missing. Using search i foud it however on a D drive....which I should not have. But in 'My computer' I found that I suddenly had two drives... The C drive missed my wanted directory so I presume that C must have been the failing drive in the set.
Rebooting I also noticed in the Media shield utility the two drives...
Could also like You not rebuild etc...etc...
I followed your guide line and deleted my drive 0 as it must have ben my failing drive C then I could activate the rebuild command. had to hassle however in some sub commands to add a free drive in the set (my original deleted 0 drive) and got the statement on both drives that it got the status Rebuild.
I waited several hours concluded however that it was just sitting there doing nothing. I presumed that it might need the operating system to be alive and tried to boot.
Ahg.... got like one of you previuos mentiond into a bootmaster and looping every time i tried to boot telling me my drive was not bootable insert the installation disc etc..
I was able to boot from my instaltion disk on my CD/DVD and choose the repair option. I found a damaged boot block etc... and repaired it.
I rebooted my harddrives after that and was lucky...It came alive.
After that The harddrives came alive and were active for several hours in rebuilding them selfs.
My big concern in this case is however...It seems that for rebuilding a mirrorset the OS must be up...
What if my 0 drve was totaly damaged or replaced. should one make a new installation than? will it rebuild from a good mirror drive after that???

Monday, January 14, 2013

Configuración de mail servers

messengeradictos.com/hotmail/noticias/hotmail-soporta-pop3-y-smtpWindows Live Hotmail ha añadido, por fin, soporte para el protocolo de correo POP3 que permite consultar nuestra bandeja de correo desde otras interfaces distintas a la de Hotmail que soporten el mismo.
Lo pedíamos a gritos, y desde luego era extraño que el equipo de Hotmail no hubiera dado soporte a POP3 desde hace ya bastante tiempo, sobre todo siendo una de las formas más usadas de verificar el correo electrónico de forma offline o en otros dispositivos sin necesidad de acceder a la página de Hotmail.
Para los que no sepan de qué estoy hablando, POP3 (Post Office Protocol versión 3) es un protocolo que permite a las aplicaciones que lo soporten consultar los mensajes de correo electrónico almacenados en un servidor, permitiendo al cliente de correo establecer una conexión, descargar el correo nuevo, y desconectar, siendo posible leer estos mensajes sin necesidad de estar conectados para leerlos. SMTP (Simple Mail Transfer Protocol) es lo mismo, pero que permite el envío de correo a otros usuarios.
Gracias a esta nueva función será posible consultar nuestros correos de Hotmail sin necesidad de limitarnos a usar programas de escritorio como Windows Live Mail u Outlook, dado que cualquier cliente que soporte POP3 y SMTP (la inmensa mayoría) podrán realizar la tarea. Para ello, necesitamos configurar nuestro cliente de correo con las siguiente configuración:
Servidor correo entrante POP: pop3.live.com (puerto 995)
Cifrado: SSL
Nombre de usuario: Tu dirección de correo electrónico de Hotmail (ejemplo@hotmail.com).
Contraseña: La contraseña para acceder a la cuenta arriba especificada.
Servidor correo saliente SMTP: smtp.live.com (puerto 25)
Autentificación: Sí (verificar que esta casilla está activada, de lo contrario no podremos conectar).
Cifrado: TLS/SSL
IMAP???
----------------------
http://www.coam.org/configurar/pag6.html
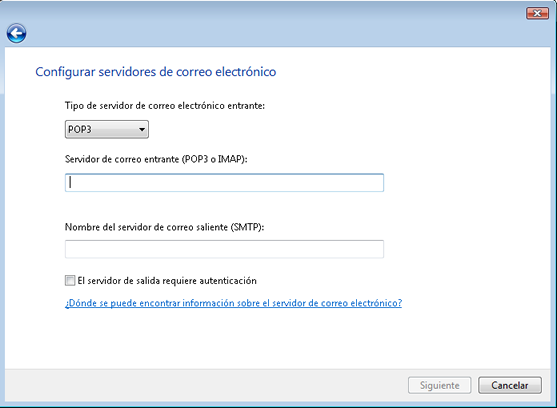
Escriba los nombres de los servidores según corresponda:
YAHOO:
  • Servidor de correo entrante (POP3): pop.correo.yahoo.es
  • Servidor de correo saliente (SMTP): smtp.correo.yahoo.es
GMAIL:
  • Servidor de correo entrante (POP3): pop.gmail.com
  • Servidor de correo saliente (SMTP): smtp.gmail.com
HOTMAIL:
  • Servidor de correo entrante (POP3): pop3.live.com
  • Servidor de correo saliente (SMTP): smtp.live.com
Pulse Siguiente


Teclee como usuario: nombredeusuario. Como contraseña la que ha establecido usted con el proveedor correspondiente.

Marque No descargar mi correo electrónico ahora y pulse Finalizar
En la siguiente pantalla señale la cuenta que acabamos de crear y pulse Propiedades.
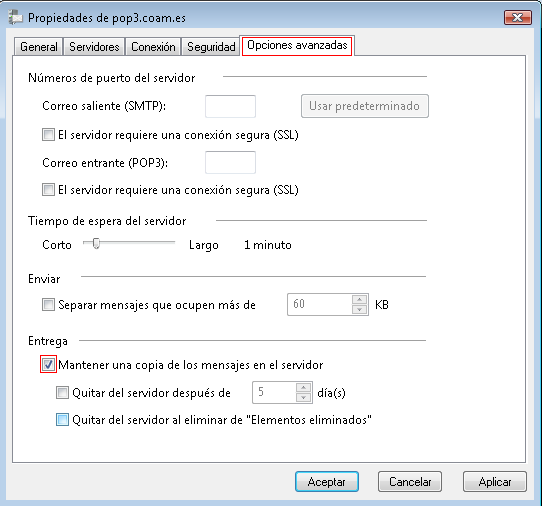
Seleccione la pestaña Opciones avanzadas e introduzca los parámetros que aparecen a continuación según la cuenta que esté configurando:
  • Yahoo
    • Correo entrante (POP3): puerto 995. Marcar SSL.
    • Correo saliente (SMTP): puerto 465. Marcar SSL.
  • Gmail
    • Correo entrante (POP3): puerto 995. Marcar SSL.
    • Correo saliente (SMTP): puerto 465. Marcar SSL.
  • Hotmail
    • Correo entrante (POP3): puerto 995. Marcar SSL.
    • Correo saliente (SMTP): puerto 25.
Si además desea guardar una copia en el servidor de sus mensajes, marque la casilla Mantener una copia de los mensajes en el servidor.


Pulse Aceptar en la pantalla actual y después pulse Cerrar
Para más información sobre la configuración de estas cuentas externas al COAM, deberá remitirse a los distintos servidores.

Friday, January 11, 2013

error 0x800f0a12

Windows 7 Service Pack 1 (SP1)- und Windows Server 2008 R2
windowspro.de/tipp/fehler-0x800f0a12-sp1-fuer-windows-7-und-server-2008-r2
Beim Installieren des Service Pack 1 für Windows 7 und Server 2008 R2 kann das Setup mit der Fehlermeldung 0x800f0a12 abbrechen. Eine Hilfeseite und ein Blog-Posting von Microsoft beschreiben verschiedene Ursachen und Lösungen für dieses Problem.
Probleme durch Multiboot mit Linux
Ein Grund für den Fehler 0x800f0a12 kann darin bestehen, dass im Rahmen einer Multiboot-Konfiguration mit Linux oder einem anderen Betriebssystemen die Partition mit der Bezeichnung SYSTEM nicht mehr als aktiv markiert ist. Bei einer Konfiguration aus GRUB plus einer Windows- sowie einer Linux-Partition ohne SYSTEM muss die Windows-Partition aktiv gesetzt werden. Am einfachsten geht dies über die Datenträgerverwaltung (diskmgmt.msc).
BCD-Speicher muss beschreibbar sein
Eine weitere Ursache für dieses Problem kann darin bestehen, dass die Setup-Routine nicht in den BCD-Speicher schreiben kann. Das passiert beispielsweise, wenn aus irgendeinem Grund automount deaktiviert wurde, so dass Windows nicht in der Lage ist, einer Partition automatisch einen Laufwerksbuchstaben zuzuordnen. In diesem Fall startet man diskpart (als Administrator) und findet mit Hilfe des Befehls automount heraus, ob dieses Feature deaktiviert wurde. Trifft dies zu kann man es mit
automount enable
wieder aktivieren. Nach einem Neustart von Windows sollte sich das SP1 installieren lassen.
Partition SYSTEM automatisch mounten
Die Hilfeseite erwähnt ebenfalls die Möglichkeit eines Mount-Problems der SYSTEM-Partition und empfiehlt die Ausführung von
mountvol /E
(ebenfalls als Administrator). Die sonst von diesem Dokument genannten Ursachen sind eher exotisch, etwa dass die Festplatte mit der Partition SYSTEM mittels Hot Swap während der Laufzeit des Systems entfernt wurde.
Ähnliche Beiträge

4 Kommentare

Bild von Rast
Rast (Besucher):
Nachdem ich die falsche Partiton auf "aktiv" gesetzt hatte und mir der Fehler "bootmgr is missing" blühte, erstellte ich die bootmgr mit Hilfe der unten genannten Anleitung wieder. (Azrael Gamer)
Danach konnte ich mühelos auch das SP1 WIN7 32bit installieren.
(D.h. es lag ein Fehler im Zugriff auf die Festplatten vor, mit Hilfe der Recover oder original DvD >> "Reparieren" ist das Problem behoben)
Nach langen Recherchen (fast) den ganzen Tag lang, konnte ich auf einer Seite DIE LÖSUNG finden. Für alle, die dasgleiche Problem haben, hier die Anleitung:
Try this method:
you can rebuild the BCD store by using the Bootrec.exe tool in the Windows Recovery Environment. To do this, follow these steps: - Get your Windows 7 installation DVD and pop it into your drive.
- Then restart your computer.
- Press a key when you are prompted.
- Select a language, a time, a currency, and a keyboard or another input method, and then click Next
- Click Repair your computer
- Click the operating system that you want to repair, and then click Next
- In the System Recovery Options dialog box, click Command Prompt
- Type bootrec /rebuildbcd and then press ENTER

• If Bootrec runs successfully, it will present you with the installation path of a Windows directory. To add the entry to the BCD store, type Yes . A confirmation message appears that indicates the entry was added successfully.
• If Bootrec cannot locate any missing Windows installations, you must remove the BCD store, and then you must re-create it. To do this, type the following commands in the order shown below: (Remember to press ENTER after each command)
bcdedit /export C:\BCD_Backup
ren c:\boot\bcd bcd.old
bootrec /rebuildbcd
- Restart the computer.
http://www.heise.de/newsticker/meldung/Pro...-1-1206714.html
Nachdem das Aktivsetzen der 100MB-Partition hat sich nichts geändert. ABER:
Nachdem man die Partition auf aktiv gesetzt hast, bootet man einfach vom BIOS aus direkt von der Festplatte mit Windows (geht leider nur, wenn Linux und Windows auf verschiedenen Festplatten sind).
Man umgeht damit dann den GRUB-Bootloader.
Dann installiert sich auch SP1.
============================
http://www.windows-7-forum.net/windows-7-sp1/24447-servicepack-sp1-fehler-0x800f0a12.html#post180117
"BCD-Speicher muss beschreibbar sein

Eine weitere Ursache für dieses Problem kann darin bestehen, dass die Setup-Routine nicht in den BCD-Speicher schreiben kann. Das passiert
beispielsweise, wenn aus irgendeinem Grund automount deaktiviert wurde, so dass Windows nicht in der Lage ist, einer Partition automatisch einen
Laufwerksbuchstaben zuzuordnen. In diesem Fall startet man diskpart (als Administ-rator) und findet mit Hilfe des Befehls automount heraus, ob dieses
Feature deaktiviert wurde. Trifft dies zu kann man es mit wieder aktivieren. Nach einem Neustart von Windows sollte sich das SP1 installieren lassen.

Partition SYSTEM automatisch mounten

Die Hilfeseite erwähnt ebenfalls die Möglichkeit eines Mount-Problems der SYSTEM-Partition und empfiehlt die Ausführung von "


Ich habe die Tipps ausprobiert, der SP1 ließ sich trotzdem mit der erwähnten Feh-lermeldung nicht installieren. Habe dann geprüft, ob die s. g. systemreservierte 100 MB Partition (mit dem BCD Store) aktiv ist. War sie. Habe dann dieser Partition einen Laufwerksbuchstaben gegeben. O. g. Einstellungen habe ich nicht verändert und dann das SP1-Update gestartet. Siehe da, es installierte sich problemlos, dauerte aber etwas. Nach Neustart wird das installierte SP1 angezeigt und danach habe ich den Laufwerksbuchstaben wieder entfernt. Und siehe da: Mein Maschinchen läuft ohne Probleme!!! 
============================
http://windows.microsoft.com/de-DE/windows7/windows-7-windows-server-2008
Befolgen Sie die nachfolgenden Anweisungen, um weitere Informationen zu diesem Fehler zu erhalten. Erweitern Sie anschließend den Abschnitt in diesem Thema, der sich auf die angezeigte Fehlermeldung bezieht, und befolgen Sie die Anweisungen.
  1. Klicken Sie auf die Schaltfläche StartSchaltfläche "Start", und geben Sie in das Suchfeld Eingabeaufforderung ein.
  2. Klicken Sie in der Ergebnisliste mit der rechten Maustaste auf Eingabeaufforderung, und klicken Sie dann auf Als Administrator ausführen. Administratorberechtigung erforderlich Wenn Sie aufgefordert werden, ein Administratorkennwort oder eine Bestätigung einzugeben, geben Sie das Kennwort bzw. die Bestätigung ein.
  3. Geben Sie bcdedit ein, und drücken Sie anschließend die EINGABETASTE.
  4. Notieren Sie sich die angezeigten Fehlermeldungen, und erweitern Sie den entsprechenden Abschnitt.

Der Fehler lautet "Der Speicher für die Startkonfigurationsdaten konnte nicht geöffnet werden. Zugriff verweigert."

Möglicherweise wurde eine Eingabeaufforderung ohne Administratorrechte geöffnet. Wiederholen Sie die vorherigen Schritte, und stellen Sie sicher, dass Sie in Schritt 2 Als Administrator ausführen auswählen.

Der Fehler lautet "Der Speicher für die Startkonfigurationsdaten konnte nicht geöffnet werden. Die angegebene Datei wurde nicht gefunden."

Dieser Fehler kann auftreten, wenn die Systempartition nicht eingebunden bzw. nicht für Windows zugänglich gemacht wurde. Gehen Sie folgendermaßen vor, um alle Laufwerke und Volumes erneut automatisch einzubinden:
Hinweis
  • Wenden Sie sich an den Systemadministrator, bevor Sie den Vorgang fortsetzen, und informieren Sie sich zunächst darüber, warum der Zugriff auf die Systempartition deaktiviert wurde, wenn Ihr Computer Teil eines Netzwerks in einer Organisation oder in einem Unternehmen ist.
  1. Klicken Sie auf die Schaltfläche StartSchaltfläche "Start", und geben Sie in das Suchfeld Eingabeaufforderung ein.
  2. Klicken Sie in der Ergebnisliste mit der rechten Maustaste auf Eingabeaufforderung, und klicken Sie dann auf Als Administrator ausführen. Administratorberechtigung erforderlich Wenn Sie aufgefordert werden, ein Administratorkennwort oder eine Bestätigung einzugeben, geben Sie das Kennwort bzw. die Bestätigung ein.
  3. Geben Sie mountvol /E ein, und drücken Sie die EINGABETASTE.
  4. Starten Sie den Computer neu, und versuchen Sie, SP1 erneut zu installieren.
Wenn das Problem durch die Eingabe von mountvol nicht behoben wird, erweitern Sie die folgenden Abschnitte, um Informationen zu möglichen Ursachen und Lösungen zu erhalten.

Weitere Fehler, einschließlich "Der Speicher für die Startkonfigurationsdaten konnte nicht geöffnet werden. Die Datenbank der Konfigurationsregistrierung ist beschädigt."

Alle weiteren Fehlermeldungen weisen auf ein Problem mit dem BCD-Speicher, einer Windows-Systemdatei hin. Das Neuerstellen des BCD-Speichers kann das Problem lösen.

Hinweis

  • Wenn Sie über benutzerdefinierte Einstellungen für die Startkonfiguration wie Einstellungen für duales Starten verfügen, gehen diese Einstellungen durch die folgenden Schritte möglicherweise verloren.
  1. Entfernen Sie alle Disketten, CDs und DVDs aus den Laufwerken des Computers, und starten Sie den Computer mithilfe des Netzschalters neu.
  2. Führen Sie eine der folgenden Aktionen aus:
    • Wenn auf dem Computer nur ein einziges Betriebssystem installiert ist, halten Sie beim Neustart des Computers die F8-TASTE gedrückt. F8 muss gedrückt werden, bevor das Windows-Logo angezeigt wird. Wenn das Windows-Logo angezeigt wird, müssen Sie den Vorgang wiederholen. Warten Sie, bis die Windows-Anmeldeaufforderung angezeigt wird, fahren Sie den Computer herunter, und starten Sie ihn dann noch einmal.
    • Sind auf dem Computer mehrere Betriebssysteme installiert, müssen Sie die Pfeiltasten verwenden, um das Betriebssystem hervorzuheben, das repariert werden soll. Drücken Sie dann F8, und halten Sie die Taste gedrückt.
  3. Verwenden Sie die Pfeiltasten, um auf dem Bildschirm Erweiterte Startoptionen die Option Computer reparieren hervorzuheben, und drücken Sie dann die EINGABETASTE. Wählen Sie die Windows 7-Installation für die Reparatur aus, wenn Sie dazu aufgefordert werden, und klicken Sie dann auf Weiter.
  4. Wählen Sie die Sprache und die Tastatureingabemethode aus, und klicken Sie dann auf Weiter.
  5. Wählen Sie den Benutzernamen des Administratorkontos aus, geben Sie das Kennwort ein, und klicken Sie anschließend auf OK.
  6. Klicken Sie im Dialogfeld Systemwiederherstellungsoptionen auf Eingabeaufforderung.
  7. Geben Sie Bootrec /rebuildbcd ein, und drücken Sie anschließend die EINGABETASTE.
  8. Starten Sie den Computer neu, und versuchen Sie, SP1 erneut zu installieren.

Hinweis

SARDU


http://www.pendrivelinux.com/sardu-multiboot-usb-creator-windows/ 
WARNING! I've been informed that SARDU is now potentially packaged with the malicious Adware "Win32/Somoto.A". As a result, I highly recommend you avoid using this tool. Back in Jan 2011, when this post was originally written, SARDU was a good clean tool! 
www.sarducd.it/

Changing attributes, rights and owner

right click over the folder -Properties
http://www.petges.lu
http://superuser.com/questions/222256/change-windows-7-file-permissions-from-command-prompt
cacls is deprecated in Windows 7. You need to use ICACLS instead of cacls.
ICACLS "filename" /grant "Users":F
----------------
To change permissions, use an administrator account on that machine to run CACLS. If you have UAC enabled, you may have to elevate the command prompt first by right-clicking on it and choosing "Run as Administrator".
You can use cacls as follows:
CACLS files /e /p {USERNAME}:{PERMISSION}
Where,
* /p : Set new permission
* /e : Edit permission and kept old permission as it is i.e. edit ACL instead of replacing it.
* {USERNAME} : Name of user
* {PERMISSION} : Permission can be:
      o R - Read
      o W - Write
      o C - Change (write)
      o F - Full control
For example, to grant your user account full (F) control to files, you would use the following command (typed in an elevated Windows command prompt):
CACLS files /e /p %USERNAME%:f
Read complete help by typing following command:
cacls /?
------------------
If, for any reason, files have become disassociated with the administrator account in Windows 7, using ICACLS will NOT restore them.
You are forced to manually click EACH file, one at a time, and select Properties > Security tab > Advanced button > Permissions tab > Continue button.
If enabled, approve UAC prompt for Permissions Editor for Files and Folders and Uncheck Include inheritible permissions from thsi object's parent. Click the Remove button when prompted, then re-enable Include inheritible permissions, click OK.
This will restore your accesss to the file.
Using ICACLS *.* /RESET does not work; it ends in error "Access is denied" for the files in question.

windows - How to take ownership of files from the command line

Windows 7 Access Denied: Permission & Ownership
http://www.windowsnetworking.com/articles-tutorials/windows-7/New-Command-Line-Tools-Windows-Vista-Windows-7.html

Saturday, January 5, 2013

MULTIPLE_IRP_COMPLETE_REQUEST

http://www.networksteve.com/windows/topic.php/Blue_Screen_MULTIPLE_IRP_COMPLETE_REQUEST%C2%A0__Stop_0x00000044/?TopicId=6224&Posts=9
I've activated again the Enable memory protection to help mitigate online attacks in the IE8, and it works ok for a while. Then the Bugchecks come agian.I've activated the driver verifier again, but this time with the all drivers option. After restart the computer and ask for the user/password, the computer goes to blue screen with this message:IO SYSTEM VERIFICATION ERROR IN Wmiacpi.sys (WDM driver error 20e)