If the data is only on this drive then by definition it is NOT a backup, since a backup is a secondary copy just in case the first one fails. If the drive truly had a backup then no data would be at risk, just so you know.
External desktop hard drives
Downloads

External hard drives

Portable hard drives

External Drives:
If your WD external drive is not recognized, it can be caused by one of the following problems:
- Your driver may be corrupted. The symptoms of this problem can vary - The majority of the time however, the drive may request a driver, or will not appear as a connected device. You will need to contact Microsoft or your System Manufacturer for assistance in resolving this issue, as we are unable to provide assistance in diagnosing your OS.
- Your drive may be damaged or have failed. A good test for this is to try the drive in another system. If the issue continues to occur, than this is most likely the case. For assistance replacing your drive under warranty see Answer ID 8: How can I replace a product under warranty?.
- In some cases you may need to install a drive in order for your drive to be recognized. Check the table below to see if your model drive requires a driver to be installed besides the one that is included in your Operating System. Please note that this table includes any drive that has a driver for any reason.In most cases the drivers listed are not required for the drive to function, but add some additional funcationality that the OS supplied driver cannot provide. If an OS is not listed in either column, your WD external drive is not supported on that OS. If a driver is available, select the OS in the list to go to the download page for that driver.
 |
Important: It has been reported to us that some users have been able to resolve this issue using the SFC Command in a Command Prompt. When contacting Microsoft or your System Manufactuer, providing them with this information may assist in resolving this issue. Please note that WD Technical Support cannot assist with the usage of this command line program, and is not responsible for any damage to your system or data it may cause. |
Select the type of drive you would like to find a driver for:
- Internal Hard Drives and SSD
- WD Elements and My Book 3.0
- WD My Book
- WD My Passport
- Network (NAS)
- Older and Legacy Products
Model Prefixes
|
Product Name
|
USB ID (hex)
|
Disk LUN Inquiry Data
|
||
VID
|
PID
|
Product ID
|
|||
WDBAAF
WDBAAG
|
1058
|
1110
|
My Book 1110
|
||
WDBAAH
|
1058
|
1111
|
My Book 1111
|
||
WDBAAJ
WDBACH
|
1058
|
1112
|
My Book 1112
|
||
WDBAAA
WDBAAB
WDBABM
WDBABW
|
1058
|
070A
|
My Passport 070A
|
||
WDBAAC
|
1058
|
070B
|
My Passport 070B
|
||
WDBAAE
|
1058
|
070C
|
My Passport 070C
|
||
WD Elements Desktop
My Book Essential
| Capacity: 1 TB - 3 TB |
USB 3.0 and USB 2.0
| Specifications | Order Number | Capacity | Interface |
|---|---|---|---|
| WDBAAF0020HBK | WDBAAF0020HBK | 2 TB | USB 2.0 |
| WDBAAF0015HBK | WDBAAF0015HBK | 1.5 TB | USB 2.0 |
| WDBAAF0010HBK | WDBAAF0010HBK | 1 TB | USB 2.0 |
| WDBAAF6400EBK | WDBAAF6400EBK | 640 GB | USB 2.0 |
| WDBAAF5000EBK | WDBAAF5000EBK | 500 GB | USB 2.0 |
=======================
My Book Essential 1,5 TB (wdbaaf0015hbk-01)
[WD Elements Desktop, 1.5 TB WDBAAU0015HBK
the drive inside is WD15EARS with 64MB Cache]
 | Available Downloads |
- WD Macintosh +TURBO Drivers
- WD Universal Firmware Updater for Windows
- WD Universal Firmware Updater for Mac
- WD SmartWare Utilities (VCD & Firmware) for Windows
- WD SmartWare Utilities (VCD & Firmware) for Mac
- New Release - Windows WD SmartWare version 1.5.1.6
- WD SmartWare Update for Windows
- WD SmartWare 1.2.2.5 for Mac
- WD SmartWare Update for Mac
- WD SES Driver
=====================
SES (SCSI Enclosure Services) driver
Important: |
|
Problem:
Windows attempts to install a driver called the SES Driver every time I connect the drive to a computer. What is this driver, why is it required and how can I get rid of the repeated prompts to install the driver?
Cause:
Your new Western Digital My Passport/My Book hard drive requires a special communications channel (SCSI) between your PC and the drive to enable certain features such as password protection, LED control, and access to the drives label if applicable.
At install, the Windows operating system detects this SCSI communications channel and attempts to install a SCSI Enclosure Services (SES) driver. This driver is only used by your hard drive and is installed by default when you first attach the drive to a computer.
However if you did not install the driver upon first install and chose not to install WD Smartware, Windows will continue to prompt you to install the driver each time you connect the drive to a computer. This will continue to occur unless the SES driver is installed.
Solution:
We recommend that you install the driver by selecting the Install the software automatically option on the popup screen. Windows will automatically find the Windows SES driver online, and the prompting will disappear. This will not affect your operating system negatively in any way. If Windows is unable to find the driver you can download a copy of the driver from Answer ID 5419: WD SES driver download and instructions for recovering the WD SmartWare installer.
 |
Note: If you can't get the SES driver to install, automatically, you can install the SES driver, manually. To install the WD SES driver, manually, follow the steps below. |
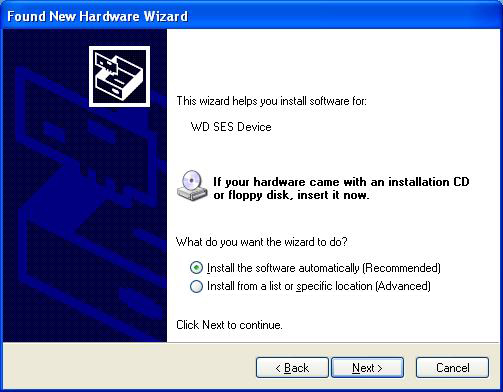
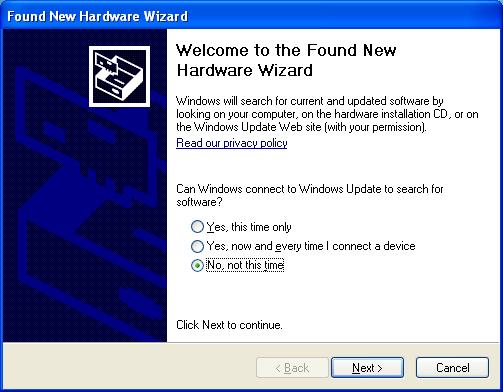
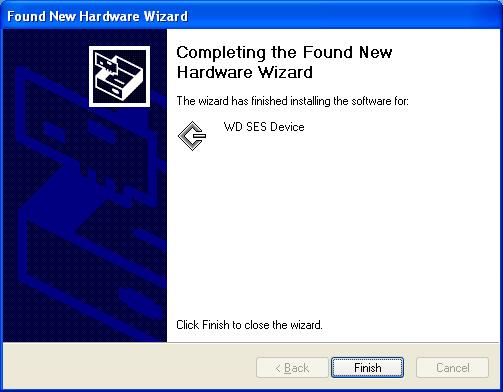
- When the Found New Hardware Wizard starts, choose No, not this time and click on Next.
- The software will ask for the driver for the WD SES Device that it found. Click Install from a list or specific location (Advanced), and click Next.
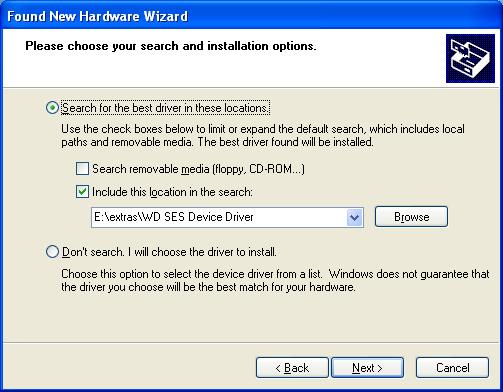
- You will want to specify the location of the driver, so check the Include this location in the search. Then have it search on the Virtual CD in the x:\extras\WD SES Device Driver folder. (“x” would be the drive letter of your Virtual CD). Note: This window may look different depending on your version of Windows.
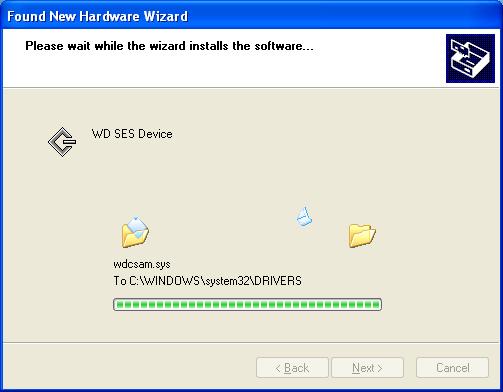
- Windows will install the driver after it finds it.
- Click on Finish when it is done. Your drive and Virtual CD should be fully installed.
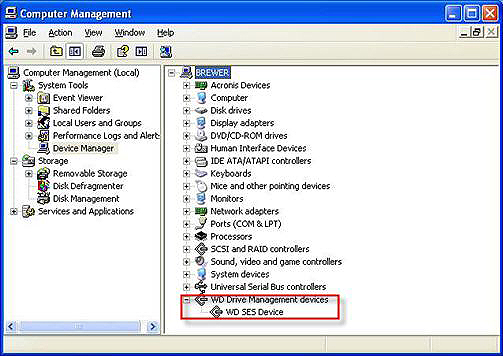
- The driver should show up in Device Manager under WD Drive Management devices.

|
Note: If the drive is not working properly, or you get a driver error when installing SmartWare, make sure that this driver is present and doesn’t have any Exclamation Points or Question Marks. |
Direct Connection Drives (USB/Firewire/eSATA)
- There are a few My Book drives that have firmware updates to resolve minor issues. You can check to see if your drive has a firmware update by vising our Downloads Library
WD SES driver download and instructions for recovering the WD SmartWare installer
http://wdc.custhelp.com/app/answers/detail/search/1/a_id/5419
| WD SES Driver and WD SmartWare Installer Recovery Images | ||||
| WD SES Driver (32-bit) | Click Here for Instructions (instructions will appear below this table) |
WD SES Driver Setup (x86) | ||
| WD SES Driver (64-bit) | Click Here for Instructions (instructions will appear below this table) |
WD SES Driver Setup (x64) | ||
| WD SmartWare Disk Image for Windows | Click Here for Instructions (instructions will appear below this table) |
WD SmartWare PP4R2 1.4.1.2 | ||
| WD SmartWare Disk Image for Mac OSX | Click Here for Instructions (instructions will appear below this table) |
WD SmartWare Mac Disk Image PP4R2 1.3.0.18 | ||
http://wdc.custhelp.com/app/answers/detail/a_id/1708/related/1/session/L2F2LzMvc25vLzEvdGltZS8xMzMxMjM4MjgxL3NpZC9pcEVubEJTaw%3D%3D
My Book Essential software update for Windows users
WD smartware download? - Western Digital Community
WD SES driver download and instructions for recovering
Where to find a driver for a WD product or the operating system (OS) fails to recognize a WD driveData recovery services
Use first SIW - System Information for Windows (free version from http://www.gtopala.com) Use on the drive before opening it up
Follow these steps and check if it helps
Method 1:
- Click on start, go to control panel.
- Click on Administrative Tools.
- Go to Computer Management, and open Disk Management.
- Check if it is recognized correct there.
Try running this below fixit and check if it helps:
http://windows.microsoft.com/en-US/windows-vista/Tips-for-solving-problems-with-USB-devices
=========================
=========================
The drive is recognized as a Initio Default controller
Initio combo default controller
=============================
External HD to Internal HD after firmware failure Options
Since the 2 TB drive is a SATA drive and my computer has IDE connectors, I bought a 2TB capable SATA to IDE converter, attached it to the drive, and attempted to install this 2 TB drive as an internal drive as a slave drive. The drive was recognized on the computer, both in the BIOS and by the Device Manager. However, the computer did not assign a drive letter to it because the disk had not been initialized on the PC. Since initializing was not the same as formatting and Windows did not warn of a data loss, I went ahead and initialized the drive. So, now I have an initialized drive but still no drive letter and more questions than answers at this point on proceeding forward.
Some resources are indicating that once you initialize the disk you cannot retrieve the data, other are saying you can, so I am uncertain what to believe at this point.
------------------------
If the data is only on this drive then by definition it is NOT a backup, since a backup is a secondary copy just in case the first one fails. If the drive truly had a backup then no data would be at risk, just so you know.
On the other hand, initializing the drive does not give any drive a drive letter... Formatting does.
The drive will not be seen on Windows explorer until it is given a file system that Windows understands after the new initialization as an internal drive.
Good news are that if you are were able to initialize the drive then it means it is not encrypted.
I can suggest you to try TestDisk, which is free and has given good results here, if it doesn't work for you then yes, try the software you have in mind and many different ones. Since the drive itself is working then trying different softwares is the way to go.
--------
The computer alone won't read the data on the drive while it still needs to be formatted.
That's when TestDisk, File Scavenger, Recover My Files and many other data recovery softwares come into play: They can.
If
you initialized the drive as a Master Boot Record (MBR) patition table,
then TestDisk will try to repair it first to grant you direct access to
the files without formatting, if the file system cannot be repaired
then most data recovery softwares tend to extract the files directly
from the lower levels (Sectors and clusters) of the drive.
-------------------=============================
WD SmartWare Virtual CD Manager 1.0.7.4
Remove WD smartware
After many return with Western Digital, I learned that the virtual CD automatically installed on their external hard drive 1TB CAN NOT BE DELETED. I find it unacceptable that buying a 1TB capacity, approximately 700 MB is used by software, again, is a virtual cd that we can not eject from his office in the dismantling every time by Disk Utility.
---------------------------------
I have the same problem, I can not eject it, but I use "Disk Utility" and got 999.5 GB in 1 TB. It does not solve the problem but I have 2 partitions of 500 GB . The WD response: "I'm sorry, but the virtual drive Smartware''''can not be deleted but disabled." And most importantly, it eats 700 MB of space of 1 TB.
----------------------------------
Disable the VCD - WD SmartWare
The VCD is necessary if you wish to install WD SmartWare or if you want
to use the encryption and password protection features on the drive. If
you don't wish to run WD SmartWare or use the security features, you can
disable the VCD following the steps below. The VCD can be re-enabled by
running the VCD manager.
How to install the Virtual CD Manager
Windows XP, Windows Vista, Windows 7
STEP 1: Firmware Update: Release 1.032 (11/16/09)
Before running the Virtual CD Manager, you must first update the firmware on your hard drive.
- All AntiVirus software MUST be disabled
- All Anti-Spyware software MUST be disabled
- NY and ALL programs that would require drive access during the update MUST be disabled
How to install the Virtual CD Manager
Windows XP, Windows Vista, Windows 7
STEP 1: Firmware Update: Release 1.032 (11/16/09)
Before running the Virtual CD Manager, you must first update the firmware on your hard drive.
- Disconnect all other external drives from the computer except for the My Book or My Passport hard drive you want to update.
- Download the Firmware Updater for Windows.
- Unzip the file and double click to open the Firmware Updater.
- Click Continue to update the firmware.
- Verify the attached drive's serial number located on the back of the drive.
- Click Update Firmware.
- Click Accept the End User's License Agreement (EULA). The updater will scan the drive; this may take a few minutes.
- Once the updater is finished, click Exit.
- Turn off the drive - For My Passport, disconnect the USB cable. For My Book disconnect both USB and power cables.
- Wait 10 seconds. Reconnect the USB/power cables.
- Download VCD Manager for Windows.(WDSmartWareVirtualCDManagerforWindows-v1.0.7.4.zip) to your desktop.
- Unzip the utility (Extract the file using an extraction utility.)
- Double click WDSmartWareVirtualCDManagerforWindows-v1.0.7.4.exe.
- Click Continue to disable the VCD.
- Once the utility has found your drive, click Configure Drive and then click Exit.
- Turn off the drive - For My Passport, disconnect the USB cable. For My Book disconnect both USB and power cables.
- Wait 10 seconds. Reconnect the USB/power cables that have been disconnected in the previous step.
- Verify that the VCD no longer appears.


 Firefox
1 comment:
I can't tell if this is a real person compiling the blog or not, but RE: the Initio problem for WD drives, I found a fix for my My Passport Essential.
I did all of the things that other people have mentioned: uninstalling the Initio driver, disabling the Initio device, fiddling with the cable, using more USB power, trying HP disk drive utilities, WD utilities, MSFT USB utilities, etc.
I tried reaching out to WD Support, but they have no tools to help when the firmware is wonky in this post-smart update firmware age. I actually contacted Initio to see if they could help, and they were very responsive, but there wasn’t much that they could do. I opened up my drive and encountered the mystery non-SATA connection internals.
It drives me nuts when I cannot get to the root of software issues. Fortunately, I worked my way through this one. To fix it, I had to use an older version of the firmware updater:
http://www.userdrivers.com/RAID-HD-Controller/WD-SmartWare-Essential-Elite-Apollo-1607E-Firmware-Updater-1-032/
It seems that this older version of the firmware updater was smart enough to detect properly flashed WD drives and the “transition state” / “blank slate” ones. I really hope that this helps you. Let me know if it does, and my sympathies if it does not.
Thanks,
-Tim
Post a Comment