Wednesday, September 12, 2012


Wednesday, September 5, 2012
Administrator Account -Wndows 7
Source
First you’ll need to open a command prompt in administrator mode by right-clicking and choosing “Run as administrator” (or use the Ctrl+Shift+Enter shortcut from the search box)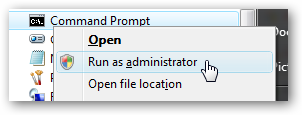
Now type the following command:
You should see a message that the command completed successfully. Log out, and you’ll now see the Administrator account as a choice. (Note that the screenshots are from Vista, but this works on Windows 7)
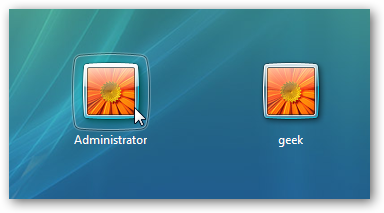
You’ll note that there’s no password for this account, so if you want to leave it enabled you should change the password.
Disable Built-in Administrator Account
sourceMake sure you are logged on as your regular user account, and then open an administrator mode command prompt as above. Type the following command:
The administrator account will now be disabled, and shouldn’t show up on the login screen anymore.
====================
Access the real Administrator account in Windows 7
Source
====================
Windows 7 Safe Mode - Login With an Administrator
To start Windows 7 in Safe Mode, you must log on with an account that has administrator permissions.
Note: If you're not sure if any of your personal accounts have administrator privileges, logon using your own account and see if that works.
Important: If you're not sure what the password is to an account with administrator access, see How To Find the Administrator Password in Windows 7 for more information.
===================
Lost administrator account on Windows 7
Like Vista, the Windows 7 built-in Administrator account is disabled by default. However, when there are no other administrative accounts on the system the built-in Administrator account may become enabled. Go into Safe Mode and see if Administrator appears on the Welcome Screen. If it does, log in and create an extra administrative account for elevation and emergencies (see below for suggested user account setup).
If Administrator doesn't appear on the Welcome Screen, enable it as follows:
Method 1 - If you have a Windows 7 installation DVD (not a recovery DVD) you can boot the system with it. Select the default language, then choose "Repair your computer". Then select "Command Prompt". At the command prompt type:
net user administrator /active:yes [enter]
Remove the DVD, reboot the computer, and log into the built-in Administrator account.
If you don't have a Windows 7 installation DVD (only have a recovery disc), the computer mftr. may have given you the Windows 7 System Repair option (not a System Recovery!) on the diagnostic menu. This diagnostic menu is the same one where you can choose Safe Mode. To get to this menu, repeatedly tap the F8 key as the computer is starting up. Or you can make a bootable Repair DVD from the file at this link:
http://neosmart.net/blog/2009/windows-7-system-repair-discs/
Note: All the Neosmart recovery disc downloads are torrent files. There is a good explanation of torrent files at the Neosmart website. You will need a torrent client such as muTorrent to get the files. The torrent client will download the .iso file with which to create the bootable DVD.
If you used Method 1, after you have created the extra administrative user account log into it and disable the built-in Administrator again for security purposes:
Start Orb -- Search box -- Type: cmd
When cmd appears in Results above, right-click it and choose "Run as administrator" [OK]. Now you will get the command prompt. At the command prompt type:
net user administrator /active:no [enter]
Exit the command prompt.
General Recommendations For Setting Up Users In Windows 7:
You absolutely do not want to have only one user account. Like XP, Vista and all other modern operating systems, Windows 7 is a multi-user operating system with built-in system accounts such as Administrator, Default, All Users, and Guest. These accounts should be left alone as they are part of the operating system structure.
You particularly don't want only one user account with administrative privileges on Windows 7 because the built-in Administrator account (normally only used in emergencies) is disabled by default. If you're running as Administrator for your daily work and that account gets corrupted, things will be Difficult. It isn't impossible to activate the built-in Administrator to rescue things, but it will require third-party tools and working outside the operating system.
The user account that is for your daily work should be a Standard user, with the extra administrative user (call it something like "CompAdmin" or "Tech" or the like) only there for elevation purposes. Running as a Standard user is best practice for security purposes and will help protect your computer from infection. After you create "CompAdmin", log into it and change your regular user account to Standard. Then log back into your regular account.
First you’ll need to open a command prompt in administrator mode by right-clicking and choosing “Run as administrator” (or use the Ctrl+Shift+Enter shortcut from the search box)
Now type the following command:
net user administrator /active:yes
You should see a message that the command completed successfully. Log out, and you’ll now see the Administrator account as a choice. (Note that the screenshots are from Vista, but this works on Windows 7)
You’ll note that there’s no password for this account, so if you want to leave it enabled you should change the password.
Disable Built-in Administrator Account
sourceMake sure you are logged on as your regular user account, and then open an administrator mode command prompt as above. Type the following command:
net user administrator /active:no
The administrator account will now be disabled, and shouldn’t show up on the login screen anymore.
====================
Access the real Administrator account in Windows 7
Source
====================
Windows 7 Safe Mode - Login With an Administrator
To start Windows 7 in Safe Mode, you must log on with an account that has administrator permissions.
Note: If you're not sure if any of your personal accounts have administrator privileges, logon using your own account and see if that works.
Important: If you're not sure what the password is to an account with administrator access, see How To Find the Administrator Password in Windows 7 for more information.
===================
Lost administrator account on Windows 7
I
wanted to create an administrator account so that I could have control
over the content he views. However in creating the second account which
was intended to be the one with admin rights somehow
I've ended up with neither account having rights - ie both accounts are
classed as stanbard user and neither with admin rights. I'm sure when I
added the second account I specified that it should be the
administrator - but maybe I made a mistake. Any how when
I try and change this UAC comes up with a very unhelpful window that
asked for an admin password - but no box to type it in. What can I do?
------------------------- Like Vista, the Windows 7 built-in Administrator account is disabled by default. However, when there are no other administrative accounts on the system the built-in Administrator account may become enabled. Go into Safe Mode and see if Administrator appears on the Welcome Screen. If it does, log in and create an extra administrative account for elevation and emergencies (see below for suggested user account setup).
If Administrator doesn't appear on the Welcome Screen, enable it as follows:
Method 1 - If you have a Windows 7 installation DVD (not a recovery DVD) you can boot the system with it. Select the default language, then choose "Repair your computer". Then select "Command Prompt". At the command prompt type:
net user administrator /active:yes [enter]
Remove the DVD, reboot the computer, and log into the built-in Administrator account.
If you don't have a Windows 7 installation DVD (only have a recovery disc), the computer mftr. may have given you the Windows 7 System Repair option (not a System Recovery!) on the diagnostic menu. This diagnostic menu is the same one where you can choose Safe Mode. To get to this menu, repeatedly tap the F8 key as the computer is starting up. Or you can make a bootable Repair DVD from the file at this link:
http://neosmart.net/blog/2009/windows-7-system-repair-discs/
Note: All the Neosmart recovery disc downloads are torrent files. There is a good explanation of torrent files at the Neosmart website. You will need a torrent client such as muTorrent to get the files. The torrent client will download the .iso file with which to create the bootable DVD.
If you used Method 1, after you have created the extra administrative user account log into it and disable the built-in Administrator again for security purposes:
Start Orb -- Search box -- Type: cmd
When cmd appears in Results above, right-click it and choose "Run as administrator" [OK]. Now you will get the command prompt. At the command prompt type:
net user administrator /active:no [enter]
Exit the command prompt.
General Recommendations For Setting Up Users In Windows 7:
You absolutely do not want to have only one user account. Like XP, Vista and all other modern operating systems, Windows 7 is a multi-user operating system with built-in system accounts such as Administrator, Default, All Users, and Guest. These accounts should be left alone as they are part of the operating system structure.
You particularly don't want only one user account with administrative privileges on Windows 7 because the built-in Administrator account (normally only used in emergencies) is disabled by default. If you're running as Administrator for your daily work and that account gets corrupted, things will be Difficult. It isn't impossible to activate the built-in Administrator to rescue things, but it will require third-party tools and working outside the operating system.
The user account that is for your daily work should be a Standard user, with the extra administrative user (call it something like "CompAdmin" or "Tech" or the like) only there for elevation purposes. Running as a Standard user is best practice for security purposes and will help protect your computer from infection. After you create "CompAdmin", log into it and change your regular user account to Standard. Then log back into your regular account.
Monday, September 3, 2012
Event ID 1530 -Avira Antivirus
In Event Viewer is the following error Event ID 1530:
Windows detected your registry file is still in use by other applications or services. The file will be unloaded now. The applications or services that hold your registry file may not function properly afterwards.
DETAIL -
1 user registry handles leaked from \Registry\User\S-1-5- _Classes:
Process 1788 (\Device\HarddiskVolume1\Program Files (x86)\Avira\AntiVir Desktop\avguard.exe) has opened key \REGISTRY\USER\S-1-5-21-1856070677-1184215578-1670999655-1001_CLASSES\SOFTWARE\Microsoft\Windows\CurrentVersion
Source
They suggest to uninstall Sandboxie and check whether error will still happen, and it still does after Sandboxie is completely removed. Always on shutdown, always event 1530.
After playing with Avira settings, I found out that disabling option "protect files and registry entries from manipulation" stops event 1530, with or without Sandboxie installed.
-----------------
I had mentioned this procedure here before.
Windows detected your registry file is still in use by other applications or services. The file will be unloaded now. The applications or services that hold your registry file may not function properly afterwards.
DETAIL -
1 user registry handles leaked from \Registry\User\S-1-5- _Classes:
Process 1788 (\Device\HarddiskVolume1\Program Files (x86)\Avira\AntiVir Desktop\avguard.exe) has opened key \REGISTRY\USER\S-1-5-21-1856070677-1184215578-1670999655-1001_CLASSES\SOFTWARE\Microsoft\Windows\CurrentVersion
Source
They suggest to uninstall Sandboxie and check whether error will still happen, and it still does after Sandboxie is completely removed. Always on shutdown, always event 1530.
After playing with Avira settings, I found out that disabling option "protect files and registry entries from manipulation" stops event 1530, with or without Sandboxie installed.
-----------------
I had mentioned this procedure here before.
DHCP in Windows 7
Source
So your router supports DHCP and you want to know how to enable DHCP in Windows 7? DHCP is actually enabled by default, because all modern routers nowadays support DHCP, but if your configuration is messed up somehow, you still might want to check it.

Network Properties
1. Right-click on the “Network” icon on your desktop and click on “Properties”:

Local Area Connection
2. On the following screen you will get basic network information and see all of your current connections. One of the connections, should be called “Home network” (if you did not set it to something else, e.g. Work network).

Click on “Local Area Connection”.
Connection Status
3. The status screen of your “Local Area Connection” will appear. Click on “Properties”:
LAN Properties
4. Click “Ok” when prompted. Scroll down the list until you find the entry “Internet Protocol Version 4″ and double-click on it. (as you can see the Internet Protocol 6 is currently unchecked, more about that later).
Internet Protocol 4 Properties
5. Next, you will find the settings that allow you to enable DHCP for your connection or disable it and retrieve a static IP. In this case I entered a fictive static IP:

We have the following entries that are important.
a) Obtain an IP address automatically
b) IP Address
c) Subnet mask
d) Default gateway
e) Obtain DNS server address automatically
f) “Use the following DNS server addresses”
g) Preferred DNS server
To enable DHCP, you have to make sure to check the options a) and e). That’s how you tell your router to automatically find the addresses provided by the DHCP. DHCP stands for Dynamic Host Configuration Protocol and is basically a protocol to retrieve IP addresses automatically and that’s exactly what we want to do, right?
Disable DHCP
If you want to disable DHCP instead of enabling it, you can enter a static IP. In your router manual, you will find the default IP gateway. Write it down or remember it. Then enter the IP into the field d) and g). Copy the gateway address from your manual again and enter it into the field IP address, but the last field should be a random number other than the default gateway IP.
Example:
You router gateway IP could be:192.168.5.1
Then you enter the IP address:192.168.5.xxx (every other number other than the one defined by your router, in this case “1″)
How to disable IPv6
As you might have noticed, I disabled IPv6. New broadband routers support IPv6, so you can also follow the instructions above and simply use Internet Protocol Version 6. Keep in mind that IPv6 are longer.
If you want to find out if it’s a good reason to enable IPv6 or if you should disable it, you can read this guide:
Disable IPv6 in Windows 7?
So your router supports DHCP and you want to know how to enable DHCP in Windows 7? DHCP is actually enabled by default, because all modern routers nowadays support DHCP, but if your configuration is messed up somehow, you still might want to check it.
Network Properties
1. Right-click on the “Network” icon on your desktop and click on “Properties”:
Local Area Connection
2. On the following screen you will get basic network information and see all of your current connections. One of the connections, should be called “Home network” (if you did not set it to something else, e.g. Work network).
Click on “Local Area Connection”.
Connection Status
3. The status screen of your “Local Area Connection” will appear. Click on “Properties”:
LAN Properties
4. Click “Ok” when prompted. Scroll down the list until you find the entry “Internet Protocol Version 4″ and double-click on it. (as you can see the Internet Protocol 6 is currently unchecked, more about that later).
Internet Protocol 4 Properties
5. Next, you will find the settings that allow you to enable DHCP for your connection or disable it and retrieve a static IP. In this case I entered a fictive static IP:
We have the following entries that are important.
a) Obtain an IP address automatically
b) IP Address
c) Subnet mask
d) Default gateway
e) Obtain DNS server address automatically
f) “Use the following DNS server addresses”
g) Preferred DNS server
To enable DHCP, you have to make sure to check the options a) and e). That’s how you tell your router to automatically find the addresses provided by the DHCP. DHCP stands for Dynamic Host Configuration Protocol and is basically a protocol to retrieve IP addresses automatically and that’s exactly what we want to do, right?
Disable DHCP
If you want to disable DHCP instead of enabling it, you can enter a static IP. In your router manual, you will find the default IP gateway. Write it down or remember it. Then enter the IP into the field d) and g). Copy the gateway address from your manual again and enter it into the field IP address, but the last field should be a random number other than the default gateway IP.
Example:
You router gateway IP could be:192.168.5.1
Then you enter the IP address:192.168.5.xxx (every other number other than the one defined by your router, in this case “1″)
How to disable IPv6
As you might have noticed, I disabled IPv6. New broadband routers support IPv6, so you can also follow the instructions above and simply use Internet Protocol Version 6. Keep in mind that IPv6 are longer.
If you want to find out if it’s a good reason to enable IPv6 or if you should disable it, you can read this guide:
Disable IPv6 in Windows 7?
LMS Service cannot connect to Intel(R) MEI driver
Both Local Manageability Service (LMS) service and Host
Embedded Controller Interface (HECI) driver are from Intel.
Now HECI driver is called Management Execution Engine (MEI) driver.
For more information, please refer to the following link:
http://software.intel.com/en-us/blogs/2007/01/24/let-us-talk-about-heci-and-lms/
I would suggest you uninstall and reinstall the latest version of Intel chipset drivers and Intel Matrix Storage Manager.
Follow these steps to uninstall the drivers:
1. Open Device Manager by clicking the Start button, clicking Control Panel, clicking System and Security, and then, underSystem, clicking Device Manager.
If you're prompted for an administrator password or confirmation, type the password or provide confirmation.
2. In the list of hardware categories, click on system devices and then double-click the device name.
3. Click the Driver tab, click uninstall, and then follow the instructions. If you're prompted for an administrator password or confirmation, type the password
or provide confirmation.
Follow these steps to manually update the drivers:
1. Open Device Manager by clicking the Start button, clicking Control Panel, clicking System and Security, and then, underSystem, clicking Device Manager.
If you're prompted for an administrator password or confirmation, type the password or provide confirmation.
2. In the list of hardware categories, find the device that you want to update, and then double-click the device name.
3. Click the Driver tab, click Update Driver, and then follow the instructions. If you're prompted for an administrator password or confirmation, type the
password or provide confirmation.
Click on this link for more information:
http://windows.microsoft.com/en-us/windows7/Update-a-driver-for-hardware-that-isnt-working-properly
Additional information:
http://windows.microsoft.com/en-us/windows7/Update-drivers-recommended-links
As the notebook is brand new, you can also contact the computer manufacturer for further assistance or for a replacement.
-------------
Please see the following post on HP's website with a similar issue and possible fix:
Operating-systems-and-software/LMS-Service-cannot-connect-to-Intel-R-MEI-driver/
----------
You might want to attempt twm's suggestion in the
LMS service cannot connect to Intel(R) MEI driver...? thread in the TechNet forums.
======================
Source
[...]
Any of these errors will cause a "
To make it easier to troubleshoot, here is an exhaustive list of causes to this error (in the order they're likely to happen), and how to fix each one:
Now HECI driver is called Management Execution Engine (MEI) driver.
For more information, please refer to the following link:
http://software.intel.com/en-us/blogs/2007/01/24/let-us-talk-about-heci-and-lms/
I would suggest you uninstall and reinstall the latest version of Intel chipset drivers and Intel Matrix Storage Manager.
Follow these steps to uninstall the drivers:
1. Open Device Manager by clicking the Start button, clicking Control Panel, clicking System and Security, and then, underSystem, clicking Device Manager.
If you're prompted for an administrator password or confirmation, type the password or provide confirmation.
2. In the list of hardware categories, click on system devices and then double-click the device name.
3. Click the Driver tab, click uninstall, and then follow the instructions. If you're prompted for an administrator password or confirmation, type the password
or provide confirmation.
Follow these steps to manually update the drivers:
1. Open Device Manager by clicking the Start button, clicking Control Panel, clicking System and Security, and then, underSystem, clicking Device Manager.
If you're prompted for an administrator password or confirmation, type the password or provide confirmation.
2. In the list of hardware categories, find the device that you want to update, and then double-click the device name.
3. Click the Driver tab, click Update Driver, and then follow the instructions. If you're prompted for an administrator password or confirmation, type the
password or provide confirmation.
Click on this link for more information:
http://windows.microsoft.com/en-us/windows7/Update-a-driver-for-hardware-that-isnt-working-properly
Additional information:
http://windows.microsoft.com/en-us/windows7/Update-drivers-recommended-links
As the notebook is brand new, you can also contact the computer manufacturer for further assistance or for a replacement.
-------------
Please see the following post on HP's website with a similar issue and possible fix:
Operating-systems-and-software/LMS-Service-cannot-connect-to-Intel-R-MEI-driver/
----------
You might want to attempt twm's suggestion in the
LMS service cannot connect to Intel(R) MEI driver...? thread in the TechNet forums.
======================
Source
[...]
Any of these errors will cause a "
Failed to subscribe to local Intel AMT" message in the Event Viewer.To make it easier to troubleshoot, here is an exhaustive list of causes to this error (in the order they're likely to happen), and how to fix each one:
| Possible cause | Explanation | Fix |
Less than 3 minutes since previous subscription | In order to protect the Intel AMT flash part in the board from continuous write instructions, Intel AMT accepts only one local subscription every 3 minutes. | Wait at least three minutes before re-starting UNS. Note: When this error appears, UNS will retry to connect automatically after a few minutes. There is no need to restart it manually. |
TLS is not correctly configured | As you can see from the explanation above, UNS will not be able to use TLS certificates unless they're located at the computer account storage. | Install the certificates in the computer account storage using the "mmc" tool, as is specified in step 4 of http://support.microsoft.com/kb/901183/ |
Bad credentials | If the username and/or password used are not existent or correct, Intel AMT will refuse the subscription. | Clear the configuration (with the "-clear" argument or entered correct existent credentials. |
LMS Stopped | LMS is stopped or not started.This only happens if you manually stop the service or remove it from the service lists.You can check if this is the case by running "sc query LMS" from a command line. | Either restart the LMS service ("sc start LMS") and/or reinstall the LMS software. |
HECI disabled or uninstalled | This happens when the HECI (Intel MEI) device is disabled (see device manager) or uninstalled.The Intel MEI device can additionally be disabled or enabled in the BIOS, but that depends on your platform vendor. | Enable Intel MEI in the device manager, and/or re-install the driver.In case you have disabled Intel MEI in the BIOS, re-enable it. |
Ports 16992 or 16993 are occupied by another app | Ports 16992 and 16993 are registered with IANA to Intel .However, that doesn't mean that another application can't use these ports inadvertently.You can check with "netstat -oba" if this is the case | Stop/kill the other application and re-start LMS and UNS. |
Anonymous access is disabled | In case anonymous access to Intel AMT is disabled, UNS will not be able to connect unless credentials are provided. | Use the "-unsUser" and "-unsPass" to configure credentials, as explained in the previous article. |
Intel AMT unconfigured or disabled | In some of the early platforms of 2.5 version, this error may appear in event viewer when Intel AMT is disabled or unconfigured on the platform. | Update the software version, by installing a new LMS/SOL software pack. |
Maximum subscriptions reached | There is a maximum to the number of concurrent local subscriptions, the number varies between projects. If the max was reached, no additional subscriptions are allowed. | This situation is very unlikely to happen, as UNS deletes all the local subscriptions he's got access to before adding his own. This fact, and the fact that you probably have no other service subscribing locally make it almost impossible to happen in the field. However, we list it in order to keep the list complete. |
sesión "Circular Kernel Context Logger"
No se pudo iniciar la sesión "Circular Kernel Context Logger" por el siguiente error: 0xC0000035
Error de origen común?:
El servidor DHCP no asignó ninguna dirección de red al equipo para la tarjeta de red con dirección de red 0x080027003CDF. Error: 0x79. El equipo continuará intentando obtener una dirección desde el servidor de direcciones de red (DHCP).
Nothing to worry about, the system repeatedly tries to start the logger session until it succeeds. A temporary failure to start mostly (but not always) happens during a system state transition from standby to running.
Error de origen común?:
El servidor DHCP no asignó ninguna dirección de red al equipo para la tarjeta de red con dirección de red 0x080027003CDF. Error: 0x79. El equipo continuará intentando obtener una dirección desde el servidor de direcciones de red (DHCP).
Deshabilita IPV6 y comprueba si el error sigue apareciendo
Source
Es un error que se produce SOLO cuando la maquina
está suspendida o hibernada y se levanda de hibernacion TIene que ver
con el IPv6 que no puede activarse al tener una tarjeta de red o
wireless que no se levanta bien de odos de ahorro de energia y
normalmente se soluciona, o bien quitando la marca de "permitir ahorro
de energia en este dispositivo" en la correspondiente tarjeta de red en
el Administrador de dispositivos, o bien desactivando el IPv6 (no
recomendado).
Puede ser el driver de la tarjeta de red... y efectivamente no conviene
desactivar el IPv6. En cualquier caso por lo leido, no pasa nada.
SourceNothing to worry about, the system repeatedly tries to start the logger session until it succeeds. A temporary failure to start mostly (but not always) happens during a system state transition from standby to running.
-------------------
Solution:
Go to Control Panel\All Control Panel Items\Network and Sharing Center
Choose homegroup and sharing options
Leave the homegroup
-----------------------------
Exact same errors and this fixed it for me
There probably more to it and this may be just a workaround but its working since--no errors )
1 found this article http://support.microsoft.com/kb/293497
2 Then Did the folowing
(from cmd as Administrator )
- ipconfig /all -- return (save results for next time---its microsoft)
- ipconfig /flushdns --return
- ipconfig /release /all --return
- quit
Make sure DCHP is enabled (well I had to), then you will have to reboot
--on restart, it re-registered with dns
-------
Below is what I think happened in my case
(Ive a small home network with 5 networked devices) Windows 7pro 32bit
ID 2 pcs mapped manually(This must be treated like a private
network automatically?Somehow the subnet was set (automatically) to
255.255.255.255-- which is wrong but Ive no idea how it happened )
Although both devices were OK and I had net access all the time
(homegroup), the system was also trying to allocate 2 extra addresses
to the SAME 2 mapped pcs (which are been recognised as 2 seperate
devices on a private network--- and cant be registered with dns,) so
basically my system was retrying over and over--giving the errors above.
--------
I am not sure what your network config has to do with this error.
But, I'll bite. Microsoft in teh above link says to To resolve this
problem, change the mask of the address pool to the subnet mask that the
external network uses
-----------------------
I was able to relate my problem to a change I did a few days ago, about
the time I start receiving the above error message. The change that I
did was to leave the homegroup (in the : change homegroup settings
windows)
They say the homegroup only work with other win7 system on the network and since I do not have another win7 to share media and file on the local network I figured I did not need it. Well that is when approximately that I started receiving these errors messages. As a trial solution, I re-enable the homegroup and rebooted the system, the error message did not reappear so far, I keep my finger crossed.
Leaving the homegroup did not stop me from sharing file through a regular workgroup on my local network, I am still confuse as to why they have to introduce this homegroup at all.
They say the homegroup only work with other win7 system on the network and since I do not have another win7 to share media and file on the local network I figured I did not need it. Well that is when approximately that I started receiving these errors messages. As a trial solution, I re-enable the homegroup and rebooted the system, the error message did not reappear so far, I keep my finger crossed.
Leaving the homegroup did not stop me from sharing file through a regular workgroup on my local network, I am still confuse as to why they have to introduce this homegroup at all.
------------------
Do you have a printer attached but not shared? Your network LAN is trying to find something. You may need a better print driver
----------------------
I ran into trouble with this, and it was a
Homegroup issue and here's what I think caused it. I created a Homegroup
on my computer and my wife joined it on hers. Via Homegroup, her
computer discovered my printer and installed the drivers. That was the
plan,
she wanted to print on my printer. So far so good. But at some point
down the road I happened to find myself inside of Homegroup, and I saw a
message about Homegroup finding a printer which I thought was a little
strange. It asked me whether I wanted
to install the printer and I said yes (I figured my wife had somehow
uninstalled our shared printer on her computer or something). What
actually happened was that Homegroup discovered an old printer driver on
her computer from a printer she used to use a long
time ago.
Long story short, if you use Homegroups to share a printer, the person who is physically connected to the printer likely doesn't want to install any printers found on Homegroup on their computer.
Source
CAUSE
Long story short, if you use Homegroups to share a printer, the person who is physically connected to the printer likely doesn't want to install any printers found on Homegroup on their computer.
Source
CAUSE
This
originated in the Windows 7 SP1 DVD/ISO creation process. There was an
issue in the creation process that caused a WMI registration to remain
in the DVD/ISO. Since the registration is designed to work only during
the DVD/ISO creation process, it fails to run on a live system and
causes these events. These events are not indicative of any issue in the
system and can be safely ignored. If however you want to prevent these
events from getting generated and want to remove this specific WMI
registration manually, please follow the steps mentioned in this article
for running the workaround script.
Saturday, September 1, 2012
Comodo Unite -error code 103
Your Remote Desktop Sharing session has ended. Error code: 103
Source
I had this problem when I had more than one computer logged-on on the same account. This is a serious design problem with Comodo Unite. Hamachi for instance gives each computer a unique name tag on the VPN, but Unite does not. So if you have more than one computer running on the same account, which one is receiving or sending desktop requests? All the computers are trying to access the same port. The only way to create a unique name tag on a computer is to create another account and log onto it, which means a different email identifier.
-------------
If you had more than one computer logged-on the same account, all computers will list in 'My Computers' netgroup in Unite, with each computer's name, which you could find the computers' property.
User could send desktop request to specified one computer by selecting it with context menu.
Or you mean user should edit each computer's name in 'My Computers' list locally so he could identify them out, that's should be a good idea
--------------
My solution was to check all access box's in my server(Windows 2008R2) firewall access under the Comodo Unite program.
The few problems I had in remote desktops was solved by doing the same with their respective firewalls too.
Source
I had this problem when I had more than one computer logged-on on the same account. This is a serious design problem with Comodo Unite. Hamachi for instance gives each computer a unique name tag on the VPN, but Unite does not. So if you have more than one computer running on the same account, which one is receiving or sending desktop requests? All the computers are trying to access the same port. The only way to create a unique name tag on a computer is to create another account and log onto it, which means a different email identifier.
-------------
If you had more than one computer logged-on the same account, all computers will list in 'My Computers' netgroup in Unite, with each computer's name, which you could find the computers' property.
User could send desktop request to specified one computer by selecting it with context menu.
Or you mean user should edit each computer's name in 'My Computers' list locally so he could identify them out, that's should be a good idea
--------------
My solution was to check all access box's in my server(Windows 2008R2) firewall access under the Comodo Unite program.
The few problems I had in remote desktops was solved by doing the same with their respective firewalls too.
Subscribe to:
Posts (Atom)


 LibreOffice
 Firefox