... with Free Partition Recovery
In order to more clearly understand how the partition sector fits into the boot sequence, the following is a standard garden variety boot up.
When you turn on your computer several things happen. The first of which is the BIOS (Basic Input Output System) is executed by the CPU (Central Processing Unit). The CPU knows to load the BIOS on power up as there is a flag set at power on. The BIOS then jumps to a set of routines that will execute the POST (Power On Self Test). The POST will look at memory, some peripheral devices, and do some other house keeping procedures. The most important of these is determining the boot device. The boot device is stored in non-volatile read/write memory. If the boot device is set to a hard drive, then an industry standard interrupt 0×19 is called. This routine loads the first 512 bytes of the boot device, which in this case the hard drive, into memory location 0×7C00. The 512 bytes is a standard sector size. It then jumps to that address (0×7C00) and executes whatever it finds there.
If all goes well, the set of instructions executed will look at the partition entry data. The partition entry data is used to determine which partition is the boot partition. If it finds a boot partition in the partition entry list the instructions will then load a secondary set of instructions which the partition entry has pointed to. In the case of Windows the OS (Operating System) pre loader is now loading itself into memory. This type of OS loader is called a two phase loader and is very common. Take a look at the table below to help better understand the role of the partition sector entry data.
The format of a partition sector entry is as follows:
1.) Byte 1 Boot Partition Indicator (0×80 is bootable, 0×00 is not)
2.) Byte 2 Starting Head of the partition (255 or less)
3.) Byte 3-4 Starting Sector and Cylinder of the partition
This is set up as 10 bits for the Cylinder and
6 bits for the Sector (Sector Max 63, Cylinders Max 1024)
4.) Byte 5 File System Type (NTFS, FAT32 etc)
5.) Byte 6 Ending Head of the partition (255 or less)
6.) Byte 7-8 Ending Sector and Cylinder of the partition
This is set up as 10 bits for the Cylinder and
6 bits for the Sector (Sector Max 63, Cylinders Max 1024)
7.) Bytes 9 -12 Relative Sector to the partition sector. In other
words, where the actual partition starts.
8.) Bytes 13-16 Total sectors for this partition.
If any of this data is outside the stated parameters the partition will fail and consequently the boot sequence will stop. In order to clearly understand what happens when the partition sector is corrupt or damaged, the following is a list of scenarios.1. Boot Failure: System Halted
An error message that comes from the BIOS. Certain BIOS versions, especially the most recent revisions, take a look at the partition sector. The BIOS will perform some preliminary tests and one of the tests is the Partition Identifier. At the end of every partition sector is the value 0xAA55. If this indicator is missing then the BIOS assumes that this is not a partition sector and the aforementioned error message will be issued.
2. System reboots over and over
Although this is not an error message, it can happen if the relative sectors point to an invalid OS pre loader. A trap is set and if the data that is loaded is not executable machine most BIOS’s will reboot.
3. Invalid Partition Table
This error message comes from the partition boot code. If there are no boot devices then the boot code will enter an infinite loop after this message is displayed.
4. Error Loading Operating System
After a valid partition is found the LBA sector pointed to by the partition entry table will be loaded using INT 13. This is the operating system loader. If the code cannot be loaded into memory then the above message is normally displayed.
5. Missing Operating System
Once the operating system boot code is loaded it is checked for the 0xAA55 identifier in the same manner that the partition sector is tested. If this test fails, then the above message will be displayed.
Over the years the BIOS writers have gotten smarter, personal computer as well as operating system standards have been set and are normally followed. So many of the messages, as well as error checking is now handled by the BIOS. The messages I have mentioned are just a few, but, are very common; however, from BIOS to BIOS the messages as well as the error handling can differ greatly.
As you can clearly see the partition sector is of primary importance in the boot sequence. Without it nothing happens. In the future there may be ways to overcome the use of a partition sector, one would be to store the partition entry data in the BIOS, this would eliminate boot sector viruses as well as the possibility that the boot sector goes bad and becomes unreadable. However for now, we will work with what we have. The next segment will discuss how to do partition recovery using a simple piece of software.
How To Use The Software
Free Partition Recovery is an extremely powerful tool for anyone to use but this statement must be caveated with the fact that with power comes a degree of responsibility. In other words, use this tool with extreme caution as it can destroy your file system to the point of massive and possibly permanent data loss. That being said lets take a look at how we can put this tool to good use.
First, the software should be run from a master drive. There should be two drives in the system, your boot drive from where the software is executed, and the damaged drive. The damaged drive being the one with the corrupt or missing partition. Free Partition Recovery is designed to work on Windows XP type operating systems, so make sure that you have unzipped the file onto that type of operating system.
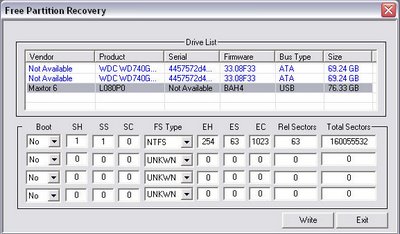
Once the Free Partition Recovery has been executed you will see in Figure 1.
Figure 1
The top row displays all the physical drives currently active in your system. This will also include any external devices that can be mounted as a physical block device. An example of this would be the 80 GB Maxtor USB device. Once you choose a physical drive all partition entry data will be displayed as in Figure 2.
Figure 2
The partition entry data for this particular drive gives us a clear example of a drive that has been configured with one NTFS logical drive with the standard offset of 63 sectors, start head and sector of 1 and ending cylinder of 1023. These are classic values for a normal single logical drive setup.
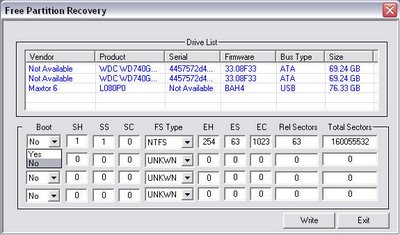
The other three entries are clear and not in use. These entries will be ignored by the OS loader. There is one other important item in this configuration. On the far left of Figure 2 of the first partition entry is the boot flag “No”. This indicates that this partition is ‘Not Bootable’. You can change that value buy using the drop down list (Figure 3)
Figure 3
Once you have configured all of the partition entries to reflect the correct values all you need do is press the “Write” button. You will be presented with the following message box in Figure 4. A word of caution, once you write the data down to the partition sector, you must live with it. Please exhibit extreme caution.
Figure 4
You can download the free NTFS partition repair software here. For more info about freeware data recovery visit our free data recovery software page.


 LibreOffice
 Firefox
No comments:
Post a Comment