Problem Signature 01: 0.0.0.0
Problem Signature 02: 0.0.0.0
Problem Signature 03: unknown
Problem Signature 04: 0
Problem Signature 05: unknown
Problem Signature 06: 1
Problem Signature 07: unknown
OS Version: 6.01.7600.2.0.0.256.1
Locale ID: 1033
Mi solución:
Start reparación Win7
Command line box con teclas {Mayúsculas}+F10
DISKPART
LIST DISK
SELECT DISK 0 (confirmar de esa lista el que contiene la particioón de Wibndows 7 HD #)
LIST PARTITION
SELECT PARTITION # (replace # with Windows 7 part #)
ACTIVE
ASSIGN LETTER=C
EXIT
Por razones inexplicables (es güindous?!) a la partición de inicio se le asigna una letra diferente a la C:, donde gralmente. se instala el sistema operativo.
Source
In the details of the diagnosis are the results of several tests: Search for updates, disk system, fault diagnosis disk, test the metadata of the disk, test the target operating system, verify content of the volume, diagnostic boot loader, Diagnostic record system startup, diagnostic event log, checking the internal state, state testing start.
Source
Make sure Windows 7 partition is marked Active then try Startup Repair up to 3 separate times with reboots: Partition - Mark as Active
If Windows 7 still won't show up to repair, try using Repair CD Command Line to run bootrec.exe /fixboot then bootrec.exe /fixmbr to see if it will jump start it to show up to repair.
Next test your HD using maker's diag/repair full CD scan: http://www.carrona.org/hddiag.html followed by Disk Check from the Repair CD Command Line.
You can copy your files out using the Repair CD:
Copy & Paste - in Windows Recovery Console
Then run your Recovery Partition or Recovery Disks, or re-install windows 7
Startup Repair - Run 3 Separate Times
When a Windows Operating System (OS) is installed it becomes the system volume or commonly referred to as "System, Active" partition and by default it will contain all the files needed to boot Windows. When a second OS is installed to the same PC (a dual or multi boot) the files needed to boot that OS will be added to the existing "system volume" containing boot files from the previous install and the 2 OSs will 'share' the boot files and if either of the 2 is removed or damaged so as to not boot, that may directly affect the other OS's ability to boot.
There is another situation that is common now, when Windows 7 is installed to an un-partitioned or "unallocated space" on a Hard Disk Drive (HDD) it creates one partition (the first) labeled "System Reserved" that becomes the "system volume" and a second partition that Windows 7 installs to, both "Primary" partitions; the "System Reserved" partition is where the boot files are created and has a link to the recovery options console built into Windows 7, it serves a very useful purpose but there may be times when removing or repairing the "System Reserved" partition becomes necessary.click any image to enlargeThe simplest way to make these changes is to do what is referred to as a startup repair it's a process that will write new boot files to the selected OS and it will then be able to boot independently; or in other cases you may want to rearrange / change the partition structure, you can use a startup repair to correct this also.

The trick is that sometime and in certain situations it becomes absolutely necessary to do as many as 3 separate startup repairs with a system restart between each repair to completely write boot files to the "new" location and if the process is interrupted or not completed you will be right back where you started, with a PC that will not start-up at all.
As with anything that makes changes to the Windows structure there is always the chance for an error to occur, it would be advisable to make reliable backups to the media of your choice of any important data, i.e. pictures, music or documents, that you would not want to lose before you make any changes to your system, it is always better to be safe than sorry.
Option One
Using Disk Management
[...]
Using DISKPARTIf you have a Windows 7 full installer DVD, have a look at Method One in this tutorial at the link below to see how to boot to diskpart so you can mark the desired partition as "Active" so that WinRE (Windows Recovery Environment) will know where to write the new boot files.
How to Boot to DISKPART at PC Startup
If you are using a created windows repair disk have a look at Method Two and if you are using a Vista full installer view Method Three.
Once in diskpart of course you would substitute your disk / partition information in-place of that listed in the snips for demonstration purposes.
1) To mark the selected partition as "Active" click to see this snip below.
If there is more than 1 partition marked "Active" that will cause WinRE to not be able to complete the repairs properly as the active flag is the designation of where the new boot files are to be created / repaired, if so the other partitions will have to be marked as "Inactive" for the repairs to be completed.
To see how to mark the selected partition as "Inactive" click this snip below.
This can also be done from an elevated command window.
Startup repair doesn't work!
Repair Install shuts down and doesn't startup again
System repair disc doesn't work
Option Two
Using DISKPART
How to Boot to DISKPART at PC Startup
If you are using a created windows repair disk have a look at Method Two and if you are using a Vista full installer view Method Three.
Once in diskpart of course you would substitute your disk / partition information in-place of that listed in the snips for demonstration purposes.
1) To mark the selected partition as "Active" click to see this snip below.
2) To mark the selected partition as "Inactive" click to see this snip below.

If there is more than 1 partition marked "Active" that will cause WinRE to not be able to complete the repairs properly as the active flag is the designation of where the new boot files are to be created / repaired, if so the other partitions will have to be marked as "Inactive" for the repairs to be completed.
To see how to mark the selected partition as "Inactive" click this snip below.
This can also be done from an elevated command window.
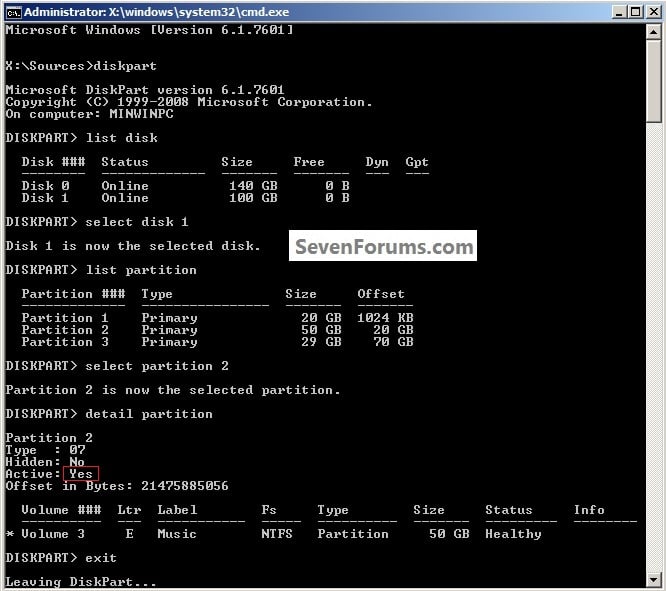
3) How to check if a partition is marked "Active" click to see the snip below.


Startup repair doesn't work!
Repair Install shuts down and doesn't startup again
System repair disc doesn't work
Problem Signature 01: 0.0.0.0
Problem Signature 02: 0.0.0.0
normal signature is 6.1.7600.
Problem Signature 02: 0.0.0.0
normal signature is 6.1.7600.
Mark Windows 7 active, boot the Windows 7 DVD Repair console or Repair CD, click through to Recovery Tool list to run StartupTo mark Windows 7 active, press Shift F10 at first screen when booting DVD or Repair CD, or choose Command Line from Repair Console's Recov Tools list, type:
DISKPART
LIST DISK
SELECT DISK 0 (confirm from list this is Windows 7 HD #)
LIST PARTITION
SELECT PARTITION # (replace # with Windows 7 part #)
ACTIVE
EXIT
Now return to Recov Tools list to run Startup REpair up to 3 separate times with reboots to write MBR to Windows 7.
====================
http://captaindbg.com/resolving-common-boot-issues-on-windows-7/
mbr-restore-windows-7-master-boot-record
USE it:
partitionwizard.com/partition-wizard-bootable-cd.html
MiniTool Partition Wizard Bootable CD
Download MiniTool Partition Wizard Bootable CD iso file absolutely FREE from http://www.partitionwizard.com/download.html. Burn ISO file onto a CD using any CD/DVD Burner software.
MiniTool Partition Wizard Bootable CD 5.2
MiniTool Partition Wizard Bootable CD allows user to boot computer directly into MiniTool Partition Wizard to manage partitions without any limitations. Features including Rebuild MBR, Partition Recovery, Move/Resize Partition, Merge Partition, Change Cluster Size, Copy Partition, Create Partition, Delete Partition, Format Partition, Convert File System, Hide/Unhide Partition, Explore Partition and much more.
Functions of MiniTool Partition Wizard Bootable CD
MiniTool Partition Wizard Bootable CD has the same features as of MiniTool Partition Wizard Home/Professional Edition. Features include: Move/Resize Partition, Copy Partition, Create Partition, Delete Partition, Format Partition, Convert File System, Hide/Unhide Partition, Explore Partition, Partition Recovery, Convert Dynamic Disk to Basic Disk, Rebuild MBR and much more.


 Firefox
No comments:
Post a Comment