Bienvenido! - Willkommen! - Welcome!

Bitácora Técnica de Tux&Cía., Santa Cruz de la Sierra, BO
Bitácora Central: Tux&Cía.
Bitácora de Información Avanzada: Tux&Cía.-Información
May the source be with you!

Sunday, July 31, 2011

The Swarm of Firebug

Source
Firebug integrates with Firefox to put a wealth of development tools at your fingertips while you browse. You can edit, debug, and monitor CSS, HTML, and JavaScript live in any web page.
Visit the Firebug website for documentation, screen shots, and discussion forums: http://getfirebug.com

Friday, July 29, 2011

Panda USB vaccine - autorun.inf

Para deshabilitar el autorun de los lectores de CD y DVD
cambiar autorun de 1 a 0
HKEY_LOCAL_MACHINE\SYSTEM\CurrentControlSet\Services\Cdrom
==================
www.pandasecurity.com/homeusers/downloads/usbvaccine/
soporte para NTFS en pañales desde hace años..
BETA 1.0? PUFF!!!... software español...
como que no sea común un disco usb en NTFS
Soy el único que quiero quitar esa opción de Panda Global Protection de un usuario?
Mientras que todos lo quieren instalar... Están avisados!
Removing Panda Vaccine autorun_.inf
(without formatting USB disk or flash memory)
Panda USB Vaccine can protect your USB disks against autorun viruses and malware, by creating a un-removable autorun.inf on the root folder of your USB disk. According to Panda Security, this can be removed only by formatting the USB disk. But there is a workaround.
The technique used by Panda USB Vaccine is that it modifies the file table, making the autorun.inf file inaccessible permanently. We will open the file table and edit it to make the autorun.inf file readable, writable and deletable. Here is the process :
  1. Download a copy of iBored v. 1.1.8- a portable hex editor which can edit the disk sectors.
    For mac users

    For MS users
    Note to Windows users:
    On Window 7 (maybe on Vista, too), you may get an empty disks list. In that case, you need to quit iBored, right-click on its icon, and choose Run as administrator from the menu.
  2. Insert the Panda USB Vaccine protected USB key into USB port of your computer.
  3. Extract the contents of the iBored zip file to a folder and run iBored.exe.
  4. iBored will show you a list of detected disks attatched to your computer. Be careful to select the USB key. Click View to open the disk sector.
  5. Select the Hex tab by clicking on it as shown.
  6. Press the key combination Ctrl + F to open the find dialog. In the Find dialog, type AUTORUN INF and click Find button as shown :
  7. iBored will show and highlight the found string. The found hex values are highlighted in green. We have to edit the very next value to the found values. In this case, it is value 40 in hex (I have marked it with an arrow). This value can be different in your case (e.g., it may be 42).
  8. From the menu select BlockView → Make Writable to be able to edit this block. You can also press the key combination Ctrl + Shift + M.
  9. Click on the value we want to edit and type 20. This would edit the value from 40 to 20.
  10. Click on the Save button to save the disk sector. Close iBored window.
  11. That's it. Now autorun.inf file created by Panda USB Vaccine is accessible, readable, writable and deletable.

Thursday, July 28, 2011

Partición reservada -Windows 7

Sobre la nueva partición de sistema de Windows 7Una de las novedades más notables de Windows 7 es la nueva configuración de particiones que aplica por defecto. Cuando Windows 7 se instala en un disco recién formateado, automáticamente crea una partición de 200 MB, la marca como activa y no le asigna una letra de unidad. Esta captura de pantalla refleja esto:
Configuración de particiones por defecto en Windows 7
Lo primero de todo aclarar un poco la nomenclatura, que resulta algo confusa: La primera partición de la imagen se denomina partición de sistema y contiene los archivos que sirven para que Windows 7 arranque correctamente. La otra partición se denomina partición de arranque y contiene el resto de archivos del sistema operativo.
¿Qué beneficios conlleva separar la partición de arranque de la partición de sistema?
Tener una partición separada para los ficheros de arranque es beneficioso puesto que facilita la instalación de múltiples sistemas operativos, sobre todo si unos son de la rama Windows NT (Windows NT, 2000, XP, Vista) y otros de la rama Windows 9x (Windows 95, 98, ME) ya que estos últimos no soportan el sistema de archivos NTFS. Otro motivo por el cual es beneficioso tener particiones separadas es que algunos virus y malware (aunque cada vez menos) suponen que el sistema operativo reside en la unidad C. Al tener los archivos del sistema operativo en otra partición, el código del virus fallará.
Sin embargo, el motivo principal por el cual Microsoft ha adoptado esta medida es que ciertas herramientas relacionadas con el almacenamiento requieren una configuración de particiones en la que la unidad de arranque esté separada de la unidad de sistema. Una de estas herramientas es Bitlocker, ya presente en las ediciones Ultimate y Enterprise de Windows Vista. Bitlocker requiere una partición de sistema separada de la partición de arranque para poder cifrar correctamente el contenido de un volumen.
¿Puedo configurar en algún sitio que esa reserva de 200 MB sea menor?
No es posible, pero Microsoft espera reducir el tamaño de la partición de sistema en posteriores versiones de Windows 7 (tenga en cuenta que aún no está ni en fase beta).
¿Se puede evitar la creación de dos particiones de alguna manera?
Si durante la instalación Windows 7 detecta que la partición donde se va a instalar es la partición activa, los ficheros de arranque y el resto de archivos del sistema operativo se almacenarán en una única partición. Sin embargo, por todo lo comentado más arriba, es altamente recomendable indicar que se instale en una partición no activa para que los archivos de arranque se instalen en otra partición separada (la partición activa).
Es importante comentar que la creación de dos particiones es una posibilidad que ya estaba presente en Windows Vista, con tres diferencias con respecto a Windows 7: No era la configuración por defecto, la partición de sistema sí recibía una letra de unidad y el tamaño de dicha partición era bastante elevado (1,5 GB). Por último comentar que si tiene Windows Vista y los archivos de arranque y de sistema residen en una misma partición, puede separarlos en dos particiones usando la herramienta Bitlocker Drive Preparation.

USB hard drive as bootable Windows 7 install disk

news.cnet.com/PDC 2008
Make your  USB hard drive a bootable Windows 7 install disk
sevenforums.com/...usb-hard-drive-bootable-windows-7-install-disk
it also applies to using ANY USB hard drive as a bootable disk.
If you’re one of eight thousand people lucky enough to attend PDC 2008 last week and receive the ultra-cool 160GB portable hard drive with “the goods” then I have some extra good news for you, your hard drive can also become a bootable Windows 7 install disk. The best part is that you don’t even have to delete any of the existing files on the drive since there’s about 90GB free of the 160GB drive.

This is especially handy if you’re trying to install Windows 7 on a device without a DVD drive or if you don’t have any blank DVDs to burn the ISO on.

Of course this guide also works if you have an existing portable USB hard drive that has enough free space to partition and a copy of a Windows 7 ISO, which I’m sure you can get *wink*.

USB hard drive a bootable Windows 7 install disk-1.jpg
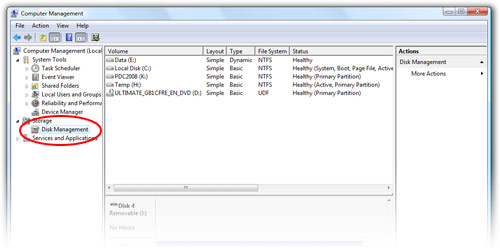
Step 1: Click open the Start Menu, right click on “Computer”, “Manage”. Open the “Disk Management” tool.
USB hard drive a bootable Windows 7 install disk-pdchd2.jpg
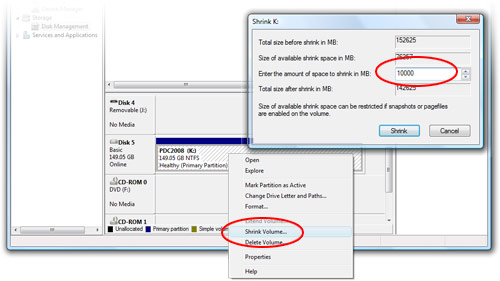
Step 2: Find the USB hard drive, should be 149.05GB. Right click on the volume and click “Shrink volume”. Shrink the volume by 10000MB.
USB hard drive a bootable Windows 7 install disk-pdchd3.jpg
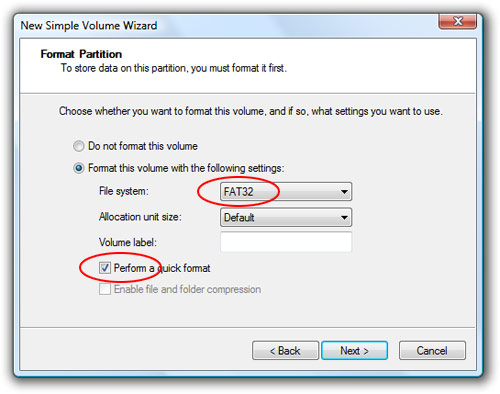
Step 3: Right click on the new unallocated volume, “New Simple Volume”, format as “FAT32″. Check “Perform quick format” unless you have time to waste.
USB hard drive a bootable Windows 7 install disk-pdchd4.jpg
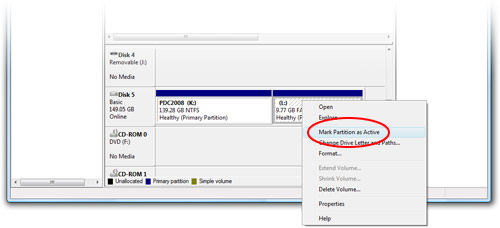
Step 4: Right click on the new volume, “Mark Partition as Active”.
USB hard drive a bootable Windows 7 install disk-pdchd5.jpg
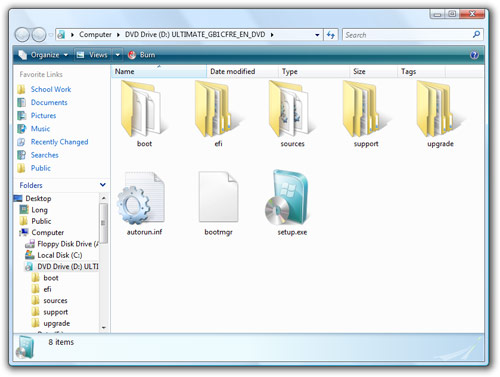
Step 5: Mount the Windows 7 ISO from the USB (\Windows7\ISO\6801.0.080913-2030_Client_en-us_ULTIMATE-ULTIMATE_GB1CFRE_EN_DVD.iso) using your favorite ISO tool (I use Daemon Tools Lite).
USB hard drive a bootable Windows 7 install disk-pdchd6.jpg
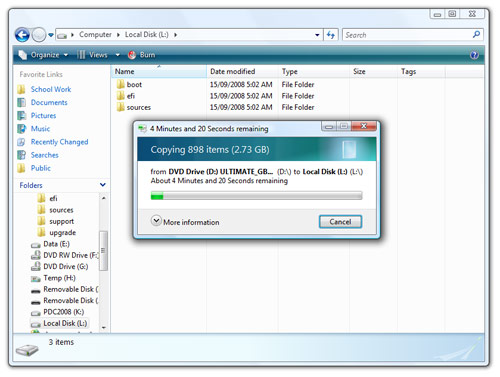
Step 6: Copy the entire DVD directory into your newly created volume.
USB hard drive a bootable Windows 7 install disk-pdchd7.jpg
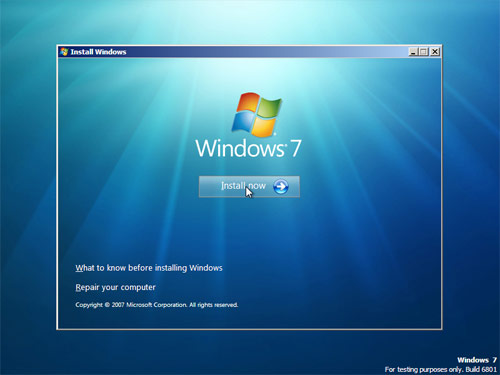
Step 7: Now take your USB drive and tell the PC to boot from USB. The Windows 7 setup should appear.

To restore your USB drive to the previous state and reclaim the 10GB of space, simply delete the new volume created and extend the original volume to consume the entire 10000MB now unallocated."
==============================

http://kmwoley.com/blog/?p=345
EDIT 2009/12/11: Microsoft Provides a tool to do this for you – Windows 7 USB/DVD Download Tool which is available for download here.  If you need instructions on how to use the tool, see the Microsoft Store Help on the ISO-Tool (http://store.microsoft.com/Help/ISO-Tool).
It surprised me to find that there are very few dead-simple guides to creating a bootable USB thumb/pen/flash drive for a Vista and/or Windows 7 installation.  I cobbled together the following from VistaPCGuy and another source I don’t remember right now.
This will walk through the steps to create a bootable USB flash drive for the purpose of installing a Vista or Windows 7 OS.  These instructions assume that you have a computer with Windows Vista installed on it.

Required:
  • USB Flash Drive (4GB+)
  • Microsoft OS Disk (Vista / Windows 7)
  • A computer running Vista / Windows 7
Step 1: Format the Drive
The steps here are to use the command line to format the disk properly using the diskpart utility. [Be warned: this will erase everything on your drive. Be careful.]
  1. Plug in your USB Flash Drive
  2. Open a command prompt as administrator (Right click on Start > All Programs > Accessories > Command Prompt and select “Run as administrator”
  3. Find the drive number of your USB Drive by typing the following into the Command Prompt window:
    diskpart
    list disk
    The number of your USB drive will listed. You’ll need this for the next step.  I’ll assume that the USB flash drive is disk 1.
  4. Format the drive by typing the next instructions into the same window. Replace the number “1” with the number of your disk below.
    select disk 1
    clean
    create partition primary
    select partition 1
    active
    format fs=NTFS
    assign
    exit
    When that is done you’ll have a formatted USB flash drive ready to be made bootable.
Step 2: Make the Drive Bootable
Next we’ll use the bootsect utility that comes on the Vista or Windows 7 disk to make the flash drive bootable.  In the same command window that you were using in Step 1:
  1. Insert your Windows Vista / 7 DVD into your drive.
  2. Change directory to the DVD’s boot directory where bootsect lives:
    d:
    cd d:\boot
  3. Use bootsect to set the USB as a bootable NTFS drive prepared for a Vista/7 image. I’m assuming that your USB flash drive has been labeled disk G:\ by the computer:
    bootsect /nt60 g:
  4. You can now close the command prompt window, we’re done here.
Step 3: Copy the installation DVD to the USB drive
The easiest way is to use Windows explorer to copy all of the files on your DVD on to the formatted flash drive.  After you’ve copied all of the files the disk you are ready to go.
Step 4: Set your BIOS to boot from USB
This is where you’re on your own since every computer is different. Most BIOS’s allow you to hit a key at boot and select a boot option.
I used these instructions to get my new Dell Mini 9 laptop loaded with Windows 7 (the PDC bits).  HTH.
--------------------------------------
http://kmwoley.com/blog/?p=345 [Look for more info]
EDIT 2009/12/11: Microsoft Provides a tool to do this for you – Windows 7 USB/DVD Download Tool which is available for download here.  If you need instructions on how to use the tool, see the Microsoft Store Help on the ISO-Tool (http://store.microsoft.com/Help/ISO-Tool).
It surprised me to find that there are very few dead-simple guides to creating a bootable USB thumb/pen/flash drive for a Vista and/or Windows 7 installation.  I cobbled together the following from VistaPCGuy and another source I don’t remember right now.
This will walk through the steps to create a bootable USB flash drive for the purpose of installing a Vista or Windows 7 OS.  These instructions assume that you have a computer with Windows Vista installed on it.
Required:
  • USB Flash Drive (4GB+)
  • Microsoft OS Disk (Vista / Windows 7)
  • A computer running Vista / Windows 7
Step 1: Format the Drive
The steps here are to use the command line to format the disk properly using the diskpart utility. [Be warned: this will erase everything on your drive. Be careful.]
  1. Plug in your USB Flash Drive
  2. Open a command prompt as administrator (Right click on Start > All Programs > Accessories > Command Prompt and select “Run as administrator”
  3. Find the drive number of your USB Drive by typing the following into the Command Prompt window:
    diskpart
    list disk
    The number of your USB drive will listed. You’ll need this for the next step.  I’ll assume that the USB flash drive is disk 1.
  4. Format the drive by typing the next instructions into the same window. Replace the number “1” with the number of your disk below.
    select disk 1
    clean
    create partition primary
    select partition 1
    active
    format fs=NTFS
    assign
    exit
    When that is done you’ll have a formatted USB flash drive ready to be made bootable.
Step 2: Make the Drive Bootable
Next we’ll use the bootsect utility that comes on the Vista or Windows 7 disk to make the flash drive bootable.  In the same command window that you were using in Step 1:
  1. Insert your Windows Vista / 7 DVD into your drive.
  2. Change directory to the DVD’s boot directory where bootsect lives:
    d:
    cd d:\boot
  3. Use bootsect to set the USB as a bootable NTFS drive prepared for a Vista/7 image. I’m assuming that your USB flash drive has been labeled disk G:\ by the computer:
    bootsect /nt60 g:
  4. You can now close the command prompt window, we’re done here.
Step 3: Copy the installation DVD to the USB drive
The easiest way is to use Windows explorer to copy all of the files on your DVD on to the formatted flash drive.  After you’ve copied all of the files the disk you are ready to go.
Step 4: Set your BIOS to boot from USB
This is where you’re on your own since every computer is different. Most BIOS’s allow you to hit a key at boot and select a boot option.
I used these instructions to get my new Dell Mini 9 laptop loaded with Windows 7 (the PDC bits).  HTH.
--------------------------
This info on making the usb drive bootable with running bootsect from the dvd to the usb, then copying all files to usb drive and booting from it was not anywhere else i looked, becuase i was trying to just straight copy all files to usb and boot from it but was getting an error saying remove disks or other media. 
----------------------------------
Use PE to USB, available here:
http://www.gocoding.com/page.php?al=petousb 
Create a usb bootable flash drive for xp installation…
eeguides.com/2007/11/installing-windows from USB…
If you cant get XPs diskpart to find your disk, just format it in FAT32, then use CONVERT in command prompt to convert it to ntfs. After the disk has been converted continue to step 3. Tested it on my machine and worked fine on the first try.
-------
remember that in windows command prompt to change from one drive to another you cant use cd, you just put in the drive letter. So to change from C: to E: just put "E:" without quotes, then from there you can use "cd boot" and that should get you to bootsect.exe
------------------------------
I wonder what it is that causes you to have to specify the size when creating a partition? I've never had to do that before.
You're right that my directions should have explicitly stated that you have to change to the drive first by typing in the drive letter. I'll get that updated.
I ran into the same issue, the solution i found, was i didnt do a step you mentioned, once i did that it worked. Not sure why but what that option does made it happen.
at step #4
select disk 1
clean
" i didnt do the clean step then i got the boot size error, on my fat32 partioned flash drive.
I re-ran "clean" started over those steps then it did not ask me for any size or anything and workd as yours listed did.
What does "clean" actually do, im not sure i havent read up details for it, but that made the next step work with no added details of any size issues or putting in any numbers an such for it.
---------------------------
Adam, there are some threads that suggest that Fat32 also works. In fact, they explicitely format the USB in Fat32. I myself have not tried that though.
For the second step (loading the ISO on the USB) i have used a slightly different approach. I unzipped the ISO file with WinRar and just moved the files over to the USB. That worked perfectly. And then there is always this command: xcopy x:*.* /s/e/f y:
===========================
You don't even have to backup your files or change the dimensions of your partitions. Just right click on Computer and select Manage. Go to Disk Management and set the partition of your external hard disk as active. Next, copy all the files from your Windows 7 disk image into the partition you've set active. An fast way to do that is, if you use WinRAR, open the disk image with it and extract all the files to your external hard drive.
That's all! I don't even had the need to reconfigure the USB emulation on the BIOS. Just use your boot selector when your machine is in the POST, choose your external hard disk from the list and the rest goes like magic. ^_^ 
ASRock motherboard: this motherboard's brand was always a problem when booting USB devices
  This method also applies to pen drives (>8GB)
=========================== 
This work!
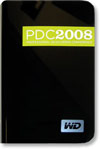
If you’re one of eight thousand people lucky enough to attend PDC 2008 last week and receive the ultra-cool 160GB portable hard drive with “the goods” then I have some extra good news for you, your hard drive can also become a bootable Windows 7 install disk. The best part is that you don’t even have to delete any of the existing files on the drive since there’s about 90GB free of the 160GB drive.
This is especially handy if you’re trying to install Windows 7 on a device without a DVD drive or if you don’t have any blank DVDs to burn the ISO on.
Of course this guide also works if you have an existing portable USB hard drive that has enough free space to partition and a copy of a Windows 7 ISO, which I’m sure you can get *wink*.
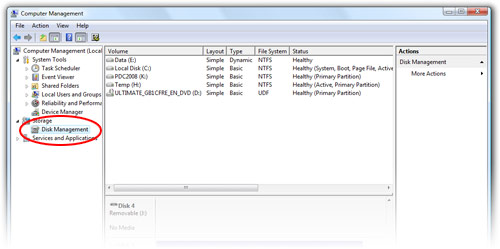
Step 1: Click open the Start Menu, right click on “Computer”, “Manage”. Open the “Disk Management” tool.

Step 2: Find the USB hard drive, should be 149.05GB. Right click on the volume and click “Shrink volume”. Shrink the volume by 10000MB.
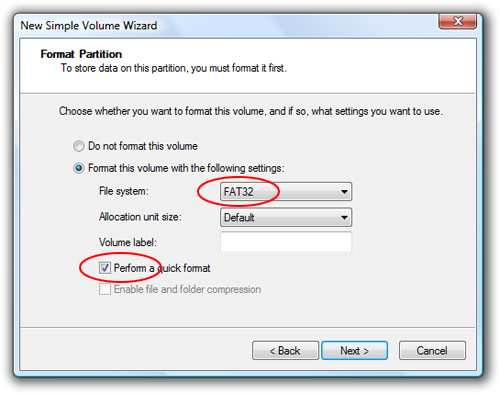
Step 3: Right click on the new unallocated volume, “New Simple Volume”, format as “FAT32″. Check “Perform quick format” unless you have time to waste.
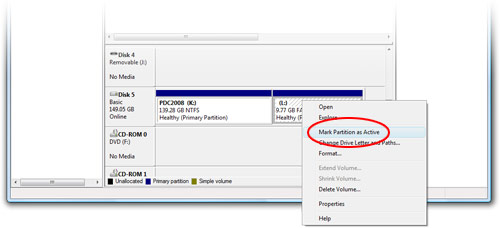
Step 4: Right click on the new volume, “Mark Partition as Active”.
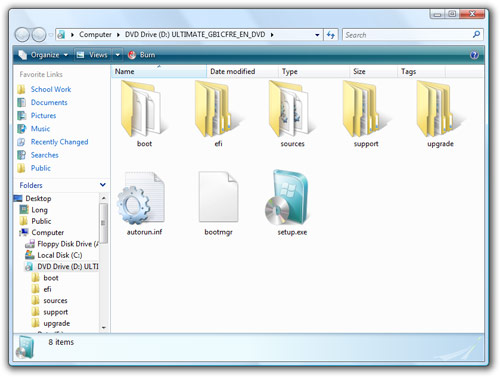
Step 5: Mount the Windows 7 ISO from the USB (\Windows7\ISO\6801.0.080913-2030_Client_en-us_ULTIMATE-ULTIMATE_GB1CFRE_EN_DVD.iso) using your favorite ISO tool (I use Daemon Tools Lite).
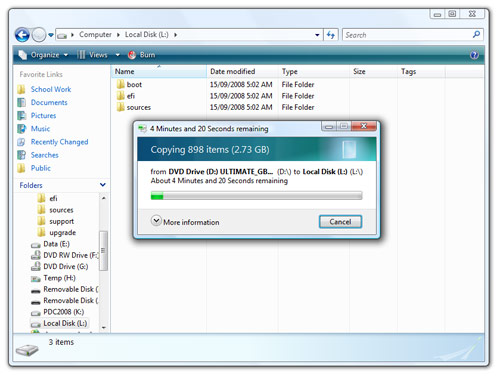
Step 6: Copy the entire DVD directory into your newly created volume.
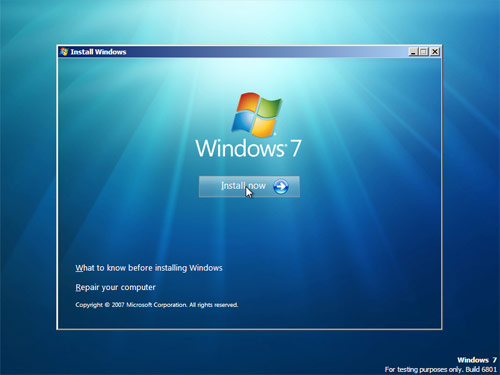
Step 7: Now take your USB drive and tell the PC to boot from USB. The Windows 7 setup should appear.
To restore your USB drive to the previous state and reclaim the 10GB of space, simply delete the new volume created and extend the original volume to consume the entire 10000MB now unallocated.
=============================
That defeats one of the biggest selling points in this guide, no need to delete any files (also to note, I seperated the hard drive into two partitions as directed, the cmd only see them as one). So how does one make it bootable without clearing all the files.
Update: How to make your external HD bootable
==============================
Multiple boot guide

USB_MultiBoot_10.zip  (from msfn.org)

Wednesday, July 27, 2011

NTI backup

backup_now5

NTI Backup Now EZ 2010 Special design for Netbook, Notebook and Desktop users. - Total Backup Solution to Protect Your Entire PC
• Complete System Backup
• File and Folder Backup
• Installs Ready to Run with Two Predefined Jobs
• At-a-Glance Job Status
• Rapid PC and Data Restore
Whether you are a novice PC user or an IT pro, Backup Now EZ is the right choice for everyone looking for that simple yet powerful solution. Designed specifically for your personal computer, Backup Now EZ will install two predefined jobs to let you start protecting your computer immediately.
Get Fully Protected with Image Backup
We all know it can happen, but nobody wants to think about it. In an instant all of your precious digital memories could be lost forever due to computer failure, malicious viruses, or even human error, Backup Now EZ will back up everything on your computer. Backup Now EZ offers you peace of mind knowing that all of your digital memories and important files are safe and secure. Should the unthinkable happen, you can easily retrieve specific files and folders and even your complete system in a snap.
Hard Drive Upgrades Made Easy
Backup Now EZ is also great for helping you upgrade your netbook, notebook or desktop computers to a higher capacity hard drive. All you need to do is let Backup Now EZ run a complete backup of your computer, replace the original hard drive with a higher capacity one, and restore. You do not need to format or partition the new drive as Backup Now EZ will take care of it all for you. Backup Now EZ makes this once difficult task a breeze for all.
Backup Features:
• Incremental backups for both Complete System and File & Folder backups.
• Supports a wide range of destination including internal & external hard drives, pen drives, optical drives, and network & NAS drives.
• Destination Capacity Alert to warn you when your destination is getting full
• CPU Priority settings to allow for faster backups or faster PC programs
• Supports Compresssion and secure 256bit Encryption
Restore Features:
• Boot from USB hard drive or CD/DVD disc
• One-click restore automatically prepares your replacement hard drive and restores your entire PC in a snap!
• Restore to same size hard drive, larger hard drive, or even a smaller hard drive.
• Multiple restore points to restore
Download
    http://freakshare.com/files/ixej2tp6/dr64ent1.rar.html
NTI Backup Now 5.5 Advanced Edition es una completa y fácil solución para copia de seguridad y para restaurar el uso de su PC. La EasyStep ® interfaz de usuario simplemente le guía para realizare una copia de seguridad de su sistema completo de PC o archivos y carpetas específicas. Esto incluye sus datos, aplicaciones, fotos, videos, música, documentos financieros, ajustes, y todo en su sistema. La copia de seguridad o bien se puede configurar de forma manual o programada en un intervalo de tiempo específico. También puede configurar la copia de seguridad de funcionamiento continuo (Continuous Data Protection), que de inmediato hace una copia de seguridad de sus archivos.
Mejoras:
[Nuevo] mejora el desempeño de las copias de seguridad
[Nuevo] Soporte para Microsoft Volume Shadow Copy Service (VSS)
[Nuevo] Puede introducir la información del trabajo de copia de seguridad para mostrar cuándo y por qué fue creado
[Nuevo] Crear una imagen de inicio de restauración de CD / DVD - restaura rápidamente un disco duro entero, incluyendo el sistema operativo, todos los datos y aplicaciones
[Nuevo] Los puntos de restauración permiten de una forma fácil volver atrás y restaurar desde un punto determinado en el tiempo

================ 
Source
Description
This installer will help you reinstall the NTI BackupNow EZ software, QuickStart card, and other original factory software on your Toshiba portable USB hard drive.To install, save, or copy the downloaded file to the USB hard drive, and double-click the copy on the USB hard drive. 
Released Date: 06/01/11
Applicable Categories: Application, HDD
Operating System: Windows 7 (32bit), Windows 7 (64bit), Windows Vista, Windows Vista 64, Windows XP, Windows XP SP2/SP3
Package: WinZIP self-installing ZIP file. Can also be unZIPped using PKUnZip 2.04g or equivalent.
File: portable_hdd_software.exe
  Download Now
Toshiba Canvio Plus 640 GB USB 2.0 Portable External Hard Drive E05A064CAU2XK (Raven Black) Product Features
  • High speed USB controller and Dual Memory Channel for ultra fast data transfer speeds.
  • Data transfer rates of up to 21.1MB/sec. read and up to 10MB/sec write.
  • Internal dampening system for shock protection.
  • Slim, Compact & Stylish Retractable design - Pocket-sized for easy transportability and no more lost caps.
  • Computer backup made simple. Canvio Portable Hard Drives are preloaded with software to make backup simple.

Technical Details

  • Brand Name: Toshiba
  • Model: E05A064CAU2XK
  • Hard Disk Size: 640 GB
  • Warranty: 3 years warranty
  • Hardware Platform: PC, Mac
  • Hard Disk Description: External hard drive
  • Hard Disk Rotational Speed: 5400
  • Buffer Size: 8 MB
  • Width: 3.1 inches
  • Depth: 4.7 inches
  • Height: 0.7 inches
  • Weight: 6.3 Ounces

SMART technology

 Self-Monitoring, Analysis, and Reporting Technology, or S.M.A.R.T., is a monitoring system for computer hard disks to detect and report on various indicators of reliability, and assist in the anticipation of failures.
PC techguide's page on S.M.A.R.T. (2003) comments that the technology has gone through three phases: "In its original incarnation SMART provided failure prediction by monitoring certain online hard drive activities. A subsequent version improved failure prediction by adding an automatic off-line read scan to monitor additional operations. The latest SMART III technology not only monitors hard drive activities but adds failure prevention by attempting to detect and repair sector errors. Also, whilst earlier versions of the technology only monitored hard drive activity for data that was retrieved by the operating system, SMART III tests all data and all sectors of a drive by using off-line data collection to confirm the drive's health during periods of inactivity."

S.M.A.R.T History and predecessors

S.M.A.R.T Information

The inability to read some sectors is not always an indication that the drive is about to fail; one way that unreadable sectors can be created even when the drive is functioning within specification is if the power fails while the drive is writing. Even if the physical disk is damaged in one location so that a sector is unreadable, the disk may be able to use spare space to replace the bad area so that the sector can be overwritten.
A drive supporting SMART may optionally support a number of self-test or maintenance routines, and the results of the tests are kept in the self-test log. The self-test routines can be efficiently used to detect any unreadable sectors on the disk so that they may be restored from backup (for example, from other disks in a RAID). This helps to reduce the risk of a situation where one sector on a disk becomes unreadable, then the backup is damaged, and the data is lost forever.

S.M.A.R.T Standards and Implementation

Some S.M.A.R.T.-enabled motherboards and related software may not communicate with certain S.M.A.R.T.-capable drives, depending on the type of interface. Few external drives connected via USB and Firewire correctly send S.M.A.R.T. data over those interfaces. With so many ways to connect a hard drive (e.g. SCSI, Fibre Channel, ATA, SATA, SAS, SSA and SSD) it's difficult to predict whether S.M.A.R.T. reports will function correctly.
Even on hard drives and interfaces that support it, S.M.A.R.T. data may not be reported correctly to the computer's operating system. Some disk controllers can duplicate all write operations on a secondary "backup" drive in real-time. This feature is known as "RAID mirroring". However, many programs which are designed to analyze changes in drive behavior and relay S.M.A.R.T. alerts to the operator do not function when a computer system is configured for RAID support, usually because under normal RAID array operational conditions, the computer may not be permitted to 'see' (or directly access) individual physical drives, but only logical volumes, by the RAID array subsystem.
S.M.A.R.T Attributes
Spinup retry count
Count of retry of spin start attempts. This attribute stores a total count of the spin start attempts to reach the fully operational speed (under the condition that the first attempt was unsuccessful). An increase of this attribute value is a sign of problems in the hard disk mechanical subsystem. (Better: RAW Value LESS)
Note that the attribute values are always mapped to the range of 1 to 253 in a way that means higher values are better. For example, the "Reallocated Sectors Count" attribute value decreases as the number of reallocated sectors increases. In this case, the attribute's raw value will often indicate the actual number of sectors that were reallocated.
Known S.M.A.R.T. attributes
Legend
Higher value is better Lower value is better
Critical Potential indicators of imminent electromechanical failure
ID Hex Attribute name Better Description
01 01 Read Error Rate Indicates the rate of hardware read errors that occurred when reading data from a disk surface. Any number indicates a problem with either disk surface or read/write heads.
02 02 Throughput Performance Overall (general) throughput performance of a hard disk drive. If the value of this attribute is decreasing there is a high probability that there is a problem with the disk.
03 03 Spin-Up Time Average time of spindle spin up (from zero RPM to fully operational).
04 04 Start/Stop Count A tally of spindle start/stop cycles.
05 05 Reallocated Sectors Count Count of reallocated sectors. When the hard drive finds a read/write/verification error, it marks this sector as "reallocated" and transfers data to a special reserved area (spare area). This process is also known as remapping and "reallocated" sectors are called remaps. This is why, on modern hard disks, "bad blocks" cannot be found while testing the surface — all bad blocks are hidden in reallocated sectors. However, the more sectors that are reallocated, the more read/write speed will decrease.
06 06 Read Channel Margin Margin of a channel while reading data. The function of this attribute is not specified.
07 07 Seek Error Rate Rate of seek errors of the magnetic heads. If there is a failure in the mechanical positioning system, a servo damage or a thermal widening of the hard disk, seek errors arise. More seek errors indicates a worsening condition of a disk surface and the mechanical subsystem.
08 08 Seek Time Performance Average performance of seek operations of the magnetic heads. If this attribute is decreasing, it is a sign of problems in the mechanical subsystem.
09 09 Power-On Hours (POH) Count of hours in power-on state. The raw value of this attribute shows total count of hours (or minutes, or seconds, depending on manufacturer) in power-on state.
10 0A Spin Retry Count Count of retry of spin start attempts. This attribute stores a total count of the spin start attempts to reach the fully operational speed under the condition that the first attempt was unsuccessful). An increase of this attribute value is a sign of problems in the hard disk mechanical subsystem.
11 0B Recalibration Retries This attribute indicates the number of times recalibration was requested (under the condition that the first attempt was unsuccessful). A decrease of this attribute value is a sign of problems in the hard disk mechanical subsystem.
12 0C Device Power Cycle Count This attribute indicates the count of full hard disk power on/off cycles.
13 0D Soft Read Error Rate Uncorrected read errors reported to the operating system. If the value is non-zero, you should back up your data.
190 BE Airflow Temperature (WDC) Airflow temperature on Western Digital HDs (Same as temp. (C2), but current value is 50 less.)
190 BE Temperature Difference from 100 Value is equal to (100 -temp °C), allowing manufacturer to set a minimum threshold which corresponds to a maximum temperature.
Seagate ST910021AS: Verified Present
Seagate ST3802110A: Verified Present 2007-02-13
Seagate ST980825AS: Verified Present 2007-04-05
Seagate ST3320620AS: Verified Present 2007-04-23
Seagate ST3500641AS: Verified Present 2007-06-12
Seagate ST3250824AS: Verified Present 2007-08-07

191 BF G-sense error rate Frequency of mistakes as a result of impact loads
192 C0 Power-off Retract Count Number of times the heads are loaded off the media. Heads can be unloaded without actually powering off. (or Emergency Retract Cycle count -Fujitsu)
193 C1 Load/Unload Cycle Count of load/unload cycles into head landing zone position.
194 C2 Temperature Current internal temperature.
195 C3 Hardware ECC Recovered Time between ECC-corrected errors.
196 C4 Reallocation Event Count Count of remap operations. The raw value of this attribute shows the total number of attempts to transfer data from reallocated sectors to a spare area. Both successful & unsuccessful attempts are counted.
197 C5 Current Pending Sector Count Number of "unstable" sectors (waiting to be remapped). If the unstable sector is subsequently written or read successfully, this value is decreased and the sector is not remapped. Read errors on the sector will not remap the sector, it will only be remapped on a failed write attempt. This can be problematic to test because cached writes will not remap the sector, only direct I/O writes to the disk.
198 C6 Uncorrectable Sector Count The total number of uncorrectable errors when reading/writing a sector. A rise in the value of this attribute indicates defects of the disk surface and/or problems in the mechanical subsystem.
199 C7 UltraDMA CRC Error Count The number of errors in data transfer via the interface cable as determined by ICRC (Interface Cyclic Redundancy Check).
200 C8 Write Error Rate / Multi-Zone Error Rate The total number of errors when writing a sector.
201 C9 Soft Read Error Rate Number of off-track errors. If non-zero, make a backup.
202 CA Data Address Mark errors Number of Data Address Mark errors (or vendorspecific).
203 CB Run Out Cancel Number of ECC errors
204 CC Soft ECC Correction Number of errors corrected by software ECC
205 CD Thermal Asperity Rate (TAR) Number of thermal asperity errors.
206 CE Flying Height

207 CF Spin High Current Amount of high current used to spin up the drive.
208 D0 Spin Buzz Number of buzz routines to spin up the drive
209 D1 Offline Seek Performance Drive’s seek performance during offline operations
220 DC Disk Shift Distance the disk has shifted relative to the spindle (usually due to shock). Unit of measure is unknown.
221 DD G-Sense Error Rate The number of errors resulting from externally-induced shock & vibration.
222 DE Loaded Hours

Time spent operating under data load (movement of magnetic head armature)
223 DF Load/Unload Retry Count Number of times head changes position.
224 E0 Load Friction Resistance caused by friction in mechanical parts while operating.
225 E1 Load/Unload Cycle Count Total number of load cycles
226 E2 Load 'In'-time Total time of loading on the magnetic heads actuator (time not spent in parking area).
227 E3 Torque Amplification Count Number of attempts to compensate for platter speed variations
228 E4 Power- Off Retract Cycle The number of times the magnetic armature was retracted automatically as a result of cutting power.
230 E6 GMR Head Amplitude Amplitude of "thrashing" (distance of repetitive
forward/reverse head motion)
231 E7 Temperature Drive Temperature
240 F0 Head Flying Hours Time while head is positioning
250 FA Read Error Retry Rate Number of errors while reading from a disk