Make your USB hard drive a bootable Windows 7 install disk
sevenforums.com/...usb-hard-drive-bootable-windows-7-install-disk
it also applies to using ANY USB hard drive as a bootable disk.
If you’re one of eight thousand people lucky enough to attend PDC 2008 last week and receive the ultra-cool 160GB portable hard drive with “the goods” then I have some extra good news for you, your hard drive can also become a bootable Windows 7 install disk. The best part is that you don’t even have to delete any of the existing files on the drive since there’s about 90GB free of the 160GB drive.
This is especially handy if you’re trying to install Windows 7 on a device without a DVD drive or if you don’t have any blank DVDs to burn the ISO on.
Of course this guide also works if you have an existing portable USB hard drive that has enough free space to partition and a copy of a Windows 7 ISO, which I’m sure you can get *wink*.
Step 1: Click open the Start Menu, right click on “Computer”, “Manage”. Open the “Disk Management” tool.
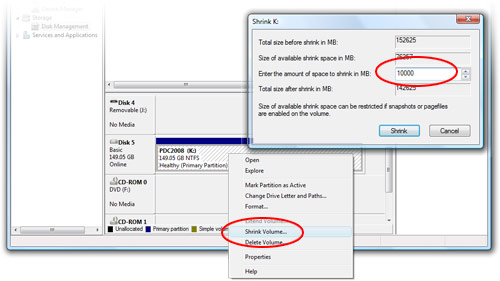
Step 2: Find the USB hard drive, should be 149.05GB. Right click on the volume and click “Shrink volume”. Shrink the volume by 10000MB.
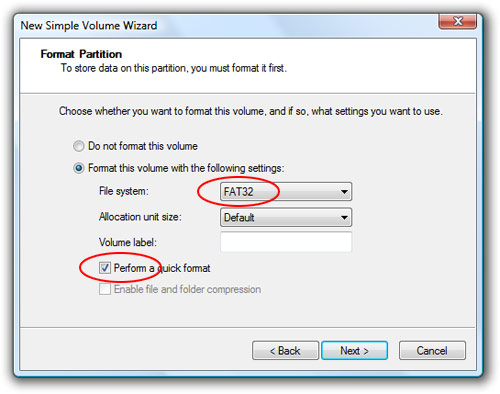
Step 3: Right click on the new unallocated volume, “New Simple Volume”, format as “FAT32″. Check “Perform quick format” unless you have time to waste.
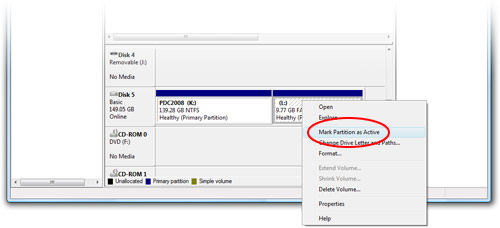
Step 4: Right click on the new volume, “Mark Partition as Active”.
Step 5: Mount the Windows 7 ISO from the USB (\Windows7\ISO\6801.0.080913-2030_Client_en-us_ULTIMATE-ULTIMATE_GB1CFRE_EN_DVD.iso) using your favorite ISO tool (I use Daemon Tools Lite).
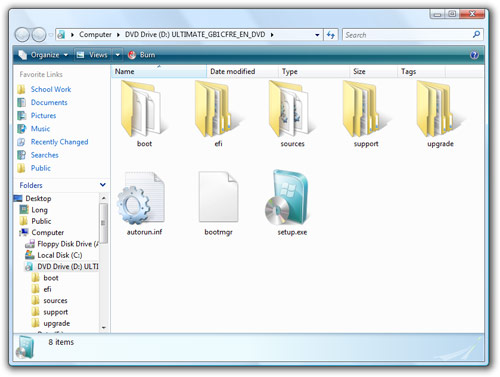
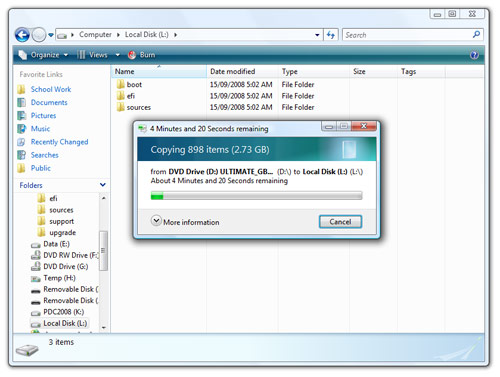
Step 6: Copy the entire DVD directory into your newly created volume.
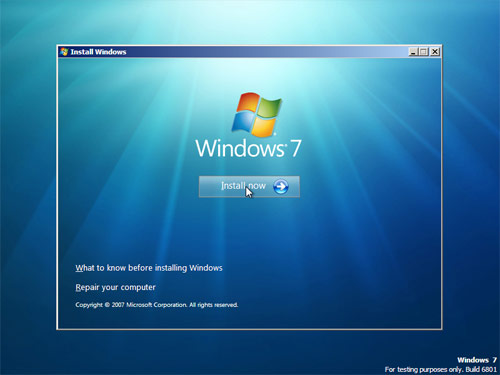
Step 7: Now take your USB drive and tell the PC to boot from USB. The Windows 7 setup should appear.
To restore your USB drive to the previous state and reclaim the 10GB of space, simply delete the new volume created and extend the original volume to consume the entire 10000MB now unallocated."
==============================
http://kmwoley.com/blog/?p=345
EDIT 2009/12/11: Microsoft Provides a tool to do this for you – Windows 7 USB/DVD Download Tool which is available for download here. If you need instructions on how to use the tool, see the Microsoft Store Help on the ISO-Tool (http://store.microsoft.com/Help/ISO-Tool).
It surprised me to find that there are very few dead-simple guides to creating a bootable USB thumb/pen/flash drive for a Vista and/or Windows 7 installation. I cobbled together the following from VistaPCGuy and another source I don’t remember right now.
This will walk through the steps to create a bootable USB flash drive for the purpose of installing a Vista or Windows 7 OS. These instructions assume that you have a computer with Windows Vista installed on it.
Required:
The steps here are to use the command line to format the disk properly using the diskpart utility. [Be warned: this will erase everything on your drive. Be careful.]
Next we’ll use the bootsect utility that comes on the Vista or Windows 7 disk to make the flash drive bootable. In the same command window that you were using in Step 1:
The easiest way is to use Windows explorer to copy all of the files on your DVD on to the formatted flash drive. After you’ve copied all of the files the disk you are ready to go.
Step 4: Set your BIOS to boot from USB
This is where you’re on your own since every computer is different. Most BIOS’s allow you to hit a key at boot and select a boot option.
I used these instructions to get my new Dell Mini 9 laptop loaded with Windows 7 (the PDC bits). HTH.
It surprised me to find that there are very few dead-simple guides to creating a bootable USB thumb/pen/flash drive for a Vista and/or Windows 7 installation. I cobbled together the following from VistaPCGuy and another source I don’t remember right now.
This will walk through the steps to create a bootable USB flash drive for the purpose of installing a Vista or Windows 7 OS. These instructions assume that you have a computer with Windows Vista installed on it.
Required:
- USB Flash Drive (4GB+)
- Microsoft OS Disk (Vista / Windows 7)
- A computer running Vista / Windows 7
The steps here are to use the command line to format the disk properly using the diskpart utility. [Be warned: this will erase everything on your drive. Be careful.]
- Plug in your USB Flash Drive
- Open a command prompt as administrator (Right click on Start > All Programs > Accessories > Command Prompt and select “Run as administrator”
- Find the drive number of your USB Drive by typing the following into the Command Prompt window:
diskpart
list disk
The number of your USB drive will listed. You’ll need this for the next step. I’ll assume that the USB flash drive is disk 1. - Format the drive by typing the next instructions into the same window. Replace the number “1” with the number of your disk below.
select disk 1
clean
create partition primary
select partition 1
active
format fs=NTFS
assign
exit
When that is done you’ll have a formatted USB flash drive ready to be made bootable.
Next we’ll use the bootsect utility that comes on the Vista or Windows 7 disk to make the flash drive bootable. In the same command window that you were using in Step 1:
- Insert your Windows Vista / 7 DVD into your drive.
- Change directory to the DVD’s boot directory where bootsect lives:
d:
cd d:\boot - Use bootsect to set the USB as a bootable NTFS drive prepared for a Vista/7 image. I’m assuming that your USB flash drive has been labeled disk G:\ by the computer:
bootsect /nt60 g: - You can now close the command prompt window, we’re done here.
The easiest way is to use Windows explorer to copy all of the files on your DVD on to the formatted flash drive. After you’ve copied all of the files the disk you are ready to go.
Step 4: Set your BIOS to boot from USB
This is where you’re on your own since every computer is different. Most BIOS’s allow you to hit a key at boot and select a boot option.
I used these instructions to get my new Dell Mini 9 laptop loaded with Windows 7 (the PDC bits). HTH.
--------------------------------------
http://kmwoley.com/blog/?p=345 [Look for more info]
EDIT 2009/12/11: Microsoft Provides a tool to do this for you – Windows 7 USB/DVD Download Tool which is available for download here. If you need instructions on how to use the tool, see the Microsoft Store Help on the ISO-Tool (http://store.microsoft.com/Help/ISO-Tool).
It surprised me to find that there are very few dead-simple guides to creating a bootable USB thumb/pen/flash drive for a Vista and/or Windows 7 installation. I cobbled together the following from VistaPCGuy and another source I don’t remember right now.
This will walk through the steps to create a bootable USB flash drive for the purpose of installing a Vista or Windows 7 OS. These instructions assume that you have a computer with Windows Vista installed on it.
Required:
- USB Flash Drive (4GB+)
- Microsoft OS Disk (Vista / Windows 7)
- A computer running Vista / Windows 7
Step 1: Format the Drive
The steps here are to use the command line to format the disk properly using the diskpart utility. [Be warned: this will erase everything on your drive. Be careful.]
The steps here are to use the command line to format the disk properly using the diskpart utility. [Be warned: this will erase everything on your drive. Be careful.]
- Plug in your USB Flash Drive
- Open a command prompt as administrator (Right click on Start > All Programs > Accessories > Command Prompt and select “Run as administrator”
- Find the drive number of your USB Drive by typing the following into the Command Prompt window:
diskpart
list disk
The number of your USB drive will listed. You’ll need this for the next step. I’ll assume that the USB flash drive is disk 1. - Format the drive by typing the next instructions into the same window. Replace the number “1” with the number of your disk below.
select disk 1
clean
create partition primary
select partition 1
active
format fs=NTFS
assign
exit
When that is done you’ll have a formatted USB flash drive ready to be made bootable.
Step 2: Make the Drive Bootable
Next we’ll use the bootsect utility that comes on the Vista or Windows 7 disk to make the flash drive bootable. In the same command window that you were using in Step 1:
Next we’ll use the bootsect utility that comes on the Vista or Windows 7 disk to make the flash drive bootable. In the same command window that you were using in Step 1:
- Insert your Windows Vista / 7 DVD into your drive.
- Change directory to the DVD’s boot directory where bootsect lives:
d:
cd d:\boot - Use bootsect to set the USB as a bootable NTFS drive prepared for a Vista/7 image. I’m assuming that your USB flash drive has been labeled disk G:\ by the computer:
bootsect /nt60 g: - You can now close the command prompt window, we’re done here.
Step 3: Copy the installation DVD to the USB drive
The easiest way is to use Windows explorer to copy all of the files on your DVD on to the formatted flash drive. After you’ve copied all of the files the disk you are ready to go.
The easiest way is to use Windows explorer to copy all of the files on your DVD on to the formatted flash drive. After you’ve copied all of the files the disk you are ready to go.
Step 4: Set your BIOS to boot from USB
This is where you’re on your own since every computer is different. Most BIOS’s allow you to hit a key at boot and select a boot option.
This is where you’re on your own since every computer is different. Most BIOS’s allow you to hit a key at boot and select a boot option.
I used these instructions to get my new Dell Mini 9 laptop loaded with Windows 7 (the PDC bits). HTH.
--------------------------
This info on making the usb drive bootable with running bootsect from the dvd to the usb, then copying all files to usb drive and booting from it was not anywhere else i looked, becuase i was trying to just straight copy all files to usb and boot from it but was getting an error saying remove disks or other media.
----------------------------------
Use PE to USB, available here:
http://www.gocoding.com/page.php?al=petousb
http://www.gocoding.com/page.php?al=petousb
Create a usb bootable flash drive for xp installation…
===========================
You don't even have to backup your files or change the dimensions of your partitions. Just right click on Computer and select Manage. Go to Disk Management and set the partition of your external hard disk as active. Next, copy all the files from your Windows 7 disk image into the partition you've set active. An fast way to do that is, if you use WinRAR, open the disk image with it and extract all the files to your external hard drive.
That's all! I don't even had the need to reconfigure the USB emulation on the BIOS. Just use your boot selector when your machine is in the POST, choose your external hard disk from the list and the rest goes like magic. ^_^
That's all! I don't even had the need to reconfigure the USB emulation on the BIOS. Just use your boot selector when your machine is in the POST, choose your external hard disk from the list and the rest goes like magic. ^_^
ASRock motherboard: this motherboard's brand was always a problem when booting USB devices
This method also applies to pen drives (>8GB)
===========================
This work!
 If you’re one of eight thousand people lucky enough to attend PDC 2008 last week and receive the ultra-cool 160GB portable hard drive with “the goods” then I have some extra good news for you, your hard drive can also become a bootable Windows 7 install disk. The best part is that you don’t even have to delete any of the existing files on the drive since there’s about 90GB free of the 160GB drive.
This is especially handy if you’re trying to install Windows 7 on a device without a DVD drive or if you don’t have any blank DVDs to burn the ISO on.
Of course this guide also works if you have an existing portable USB hard drive that has enough free space to partition and a copy of a Windows 7 ISO, which I’m sure you can get *wink*.
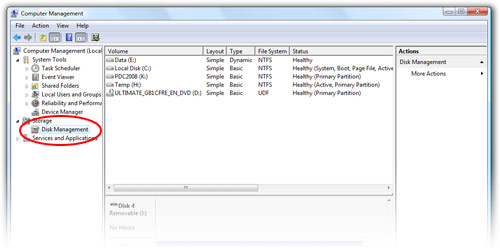
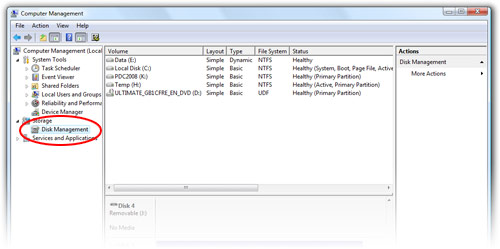 Step 1: Click open the Start Menu, right click on “Computer”, “Manage”. Open the “Disk Management” tool.
 Step 2: Find the USB hard drive, should be 149.05GB. Right click on the volume and click “Shrink volume”. Shrink the volume by 10000MB.
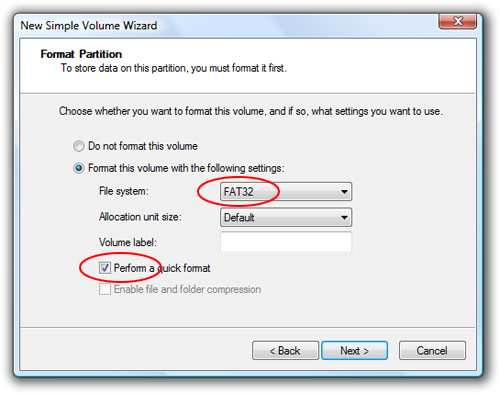 Step 3: Right click on the new unallocated volume, “New Simple Volume”, format as “FAT32″. Check “Perform quick format” unless you have time to waste.
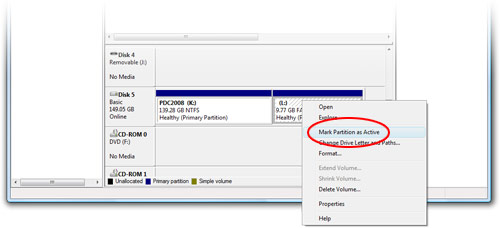 Step 4: Right click on the new volume, “Mark Partition as Active”.
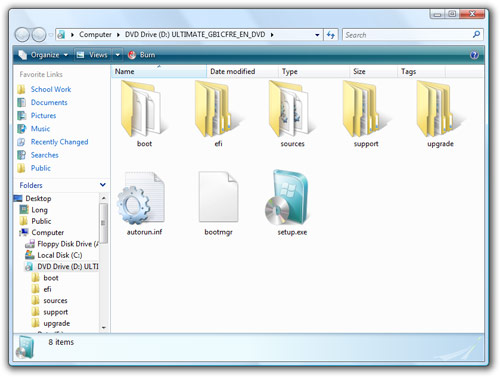 Step 5: Mount the Windows 7 ISO from the USB (\Windows7\ISO\6801.0.080913-2030_Client_en-us_ULTIMATE-ULTIMATE_GB1CFRE_EN_DVD.iso) using your favorite ISO tool (I use Daemon Tools Lite).
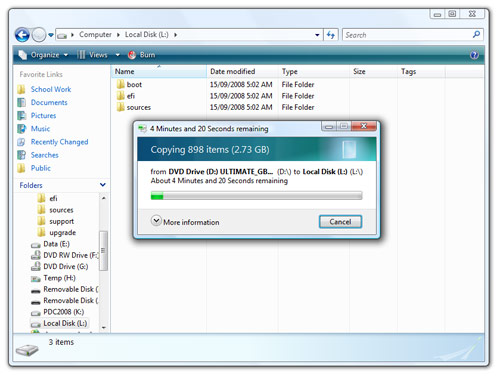 Step 6: Copy the entire DVD directory into your newly created volume.
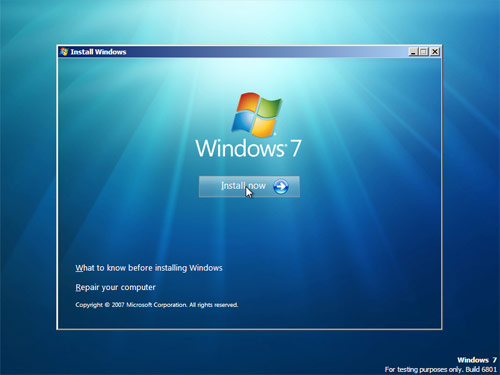 Step 7: Now take your USB drive and tell the PC to boot from USB. The Windows 7 setup should appear.
To restore your USB drive to the previous state and reclaim the 10GB of space, simply delete the new volume created and extend the original volume to consume the entire 10000MB now unallocated.
=============================
That defeats one of the biggest selling points in this guide, no need to delete any files (also to note, I seperated the hard drive into two partitions as directed, the cmd only see them as one). So how does one make it bootable without clearing all the files.
Update: How to make your external HD bootable
Update: How to make your external HD bootable
Multiple boot guide
USB_MultiBoot_10.zip (from msfn.org)


 LibreOffice
 Firefox
If you cant get XPs diskpart to find your disk, just format it in FAT32, then use CONVERT in command prompt to convert it to ntfs. After the disk has been converted continue to step 3. Tested it on my machine and worked fine on the first try.
-------
remember that in windows command prompt to change from one drive to another you cant use cd, you just put in the drive letter. So to change from C: to E: just put "E:" without quotes, then from there you can use "cd boot" and that should get you to bootsect.exe
------------------------------
I wonder what it is that causes you to have to specify the size when creating a partition? I've never had to do that before.
You're right that my directions should have explicitly stated that you have to change to the drive first by typing in the drive letter. I'll get that updated.
at step #4
select disk 1
clean
" i didnt do the clean step then i got the boot size error, on my fat32 partioned flash drive.
I re-ran "clean" started over those steps then it did not ask me for any size or anything and workd as yours listed did.
What does "clean" actually do, im not sure i havent read up details for it, but that made the next step work with no added details of any size issues or putting in any numbers an such for it.
Adam, there are some threads that suggest that Fat32 also works. In fact, they explicitely format the USB in Fat32. I myself have not tried that though.
For the second step (loading the ISO on the USB) i have used a slightly different approach. I unzipped the ISO file with WinRar and just moved the files over to the USB. That worked perfectly. And then there is always this command: xcopy x:*.* /s/e/f y: