Test if all the security software and antivirus sites are accesible.. If not, you have a worm infection or something else.
Look for a dorkbot or conficker infection
computerhope.com/forum/index.php?topic=127768.15
Malwarebytes Anti-Malware from here.
Download DDS from HERE or HERE and save it to your desktop
Boot in Safe Mode with NetWorking, download and install MBAM. Run the scan. Re-boot in Normal mode and try to run the scan again.
If MBAM encounters a file that is difficult to remove,you will be presented with 1 of 2 prompts,click OK to either and let MBAM proceed with the disinfection process. If asked to restart the computer, please do so immediately.
Download OTL to your desktop.
* Open OTL
* Copy and Paste the following text in the codebox into the Custom Scans/Fixes window.
Code: [Select]
:OTL
BHO: {00A6FAF1-072E-44cf-8957-5838F569A31D} - No File
BHO: Searchqu Toolbar: {99079a25-328f-4bd4-be04-00955acaa0a7} - c:\progra~1\wi371a~1\datamngr\toolbar\searchqudtx.dll
TB: Searchqu Toolbar: {99079a25-328f-4bd4-be04-00955acaa0a7} - c:\progra~1\wi371a~1\datamngr\toolbar\searchqudtx.dll
BHO: DataMngr: {9d717f81-9148-4f12-8568-69135f087db0} - c:\progra~1\wi371a~1\datamngr\BROWSE~1.DLL
AppInit_DLLs: c:\progra~1\wi371a~1\datamngr\datamngr.dll c:\progra~1\wi371a~1\datamngr\IEBHO.dll

:Files
c:\documents and settings\all users\application data\igukaaa.tmp
c:\documents and settings\all users\application data\ggukaaa.tmp
c:\documents and settings\all users\application data\usskaaa.tmp
c:\documents and settings\all users\application data\vsskaaa.tmp
c:\documents and settings\all users\application data\ysskaaa.tmp
c:\documents and settings\all users\application data\xsskaaa.tmp
c:\documents and settings\all users\application data\ofrkaaa.tmp
c:\documents and settings\all users\application data\nfrkaaa.tmp
c:\documents and settings\all users\application data\mfrkaaa.tmp
c:\documents and settings\all users\application data\kfrkaaa.tmp
c:\documents and settings\all users\application data\lfrkaaa.tmp
c:\documents and settings\all users\application data\rtvkaaa.tmp
c:\documents and settings\all users\application data\ptvkaaa.tmp
c:\documents and settings\all users\application data\otvkaaa.tmp
c:\documents and settings\all users\application data\stvkaaa.tmp
c:\documents and settings\all users\application data\qtvkaaa.tmp
c:\documents and settings\all users\application data\ahxkaaa.tmp
c:\documents and settings\all users\application data\zgxkaaa.tmp
c:\documents and settings\all users\application data\ygxkaaa.tmp
c:\documents and settings\all users\application data\chxkaaa.tmp
c:\documents and settings\all users\application data\bhxkaaa.tmp

:services
MLJCHGIH

:COMMANDS
[resethosts]
[purity]
[start explorer]
* Click Run Fix
* OTLI2 may ask to reboot the machine. Please do so if asked.
* Click OK
* A report will open. Copy and Paste that report in your next reply.
************************************************************
Download Combofix from any of the links below, and save it to your desktop.
Link 1
Link 2
Link 3
To prevent your anti-virus application interfering with ComboFix we need to disable it. See here for a tutorial regarding how to do so if you are unsure.
As part of it's process, ComboFix will check to see if the Microsoft Windows Recovery Console is installed. With malware infections being as they are today, it's strongly recommended to have this pre-installed on your machine before doing any malware removal. This will not occur in Windows Vista and 7
It will allow you to boot up into a special recovery/repair mode that will allow us to more easily help you should your computer have a problem after an attempted removal of malware.
If you did not have it installed, you will see the prompt below. Choose YES.
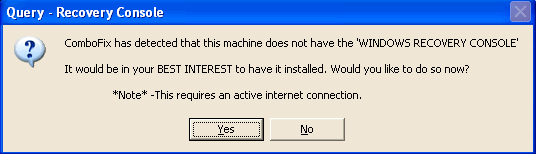
Follow the prompts to allow ComboFix to download and install the Microsoft Windows Recovery Console, and when prompted, agree to the End-User License Agreement to install the Microsoft Windows Recovery Console.
**Please note: If the Microsoft Windows Recovery Console is already installed, ComboFix will continue it's malware removal procedures.
Once the Microsoft Windows Recovery Console is installed using ComboFix, you should see the following message:
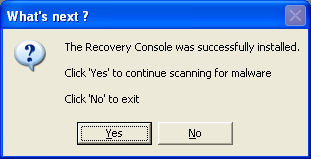
Click on Yes, to continue scanning for malware.
+++++++++....................
Please download this file from Microsoft and save it on your desktop.
WindowsXP-KB310994-SP2-Home-BootDisk-ENU
Next, please drop/drop it onto Combofix, and Combofix will install the recovery console.
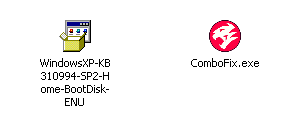
Once that is done, Combofix will ask if you want to continue to scan. Select no, and then let me know once you have gotten this far.
--------------------------------
Let's see what's up with your internet connection.
Please download MiniToolBox to Desktop and run it.
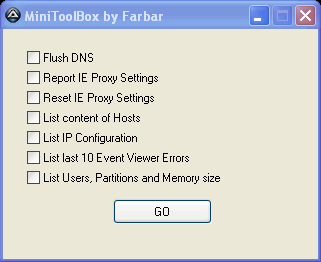
Checkmark the following boxes:
- Flush DNS
- Report IE Proxy Settings
- Reset IE Proxy Settings
- List content of Hosts
- List IP Configuration
- Lst Last 10 Event Viewer Errors
- List Users, Partitions and Memory Size
Start - Run and type cmd
in the window that pops up type ipconfig /flushdns
---------
download Farbar Service Scanner and run it on the computer with the issue.
- Press "Scan".
- It will create a log (FSS.txt) in the same directory the tool is run.
- Please copy and paste the log to your reply
download SystemLook from one of the links below and save it to your desktop.
Link # 1
Link # 2
Temporarily disable your antivirus and any antispyware real time protection before performing a scan. Click this link to see a list of security programs that should be disabled and how to disable them.
Double-click SystemLook.exe to run
Copy the contents of the following codebox into the main textfield.
Code: [Select]
:filefind
svchost.exe
Click the Look button to start the scan.
Note: The scan may take some time so please just let it do its work and be patient (or do something else unrelated to the computer).
When finished, a notepad window will open with the results of the scan. Please post the log. The log can also be found on your desktop entitled SystemLook.txt------------------------------
You will need to download ComboFix to your desktop, install the Recovery Console and post the full log. There are things there that we need to fix before we can go any further.
Please download SystemLook from one of the links below and save it to your desktop.
Link # 1
Link # 2
Temporarily disable your antivirus and any antispyware real time protection before performing a scan. Click this link to see a list of security programs that should be disabled and how to disable them.
Double-click SystemLook.exe to run it.
Copy the contents of the following codebox into the main textfield.
Code: [Select]
:filefind
explorer.exe
winlogon.exe
i8042prt.sys
Click the Look button to start the scan.
Note: The scan may take some time so please just let it do its work and be patient (or do something else unrelated to the computer).
When finished, a notepad window will open with the results of the scan. Please post the log. The log can also be found on your desktop entitled SystemLook.txt
---------------------------
Please click here to download AVP Tool by Kaspersky.
- Save it to your desktop.
- Reboot your computer into SafeMode. You can do this by restarting your computer and continually tapping the F8 key until a menu appears. Use your up arrow key to highlight SafeMode then hit enter.
- Double click the setup file to run it.
- Click Next to continue.
- Accept the License agreement and click on next.
- It will, by default, install it to your desktop folder. Click Next.
- It will then open a box There will be a tab that says Automatic scan.
- Under Automatic scan make sure these are checked.
- Hidden Startup Objects
- System Memory
- Disk Boot Sectors.
- My Computer.
- Also any other drives (Removable that you may have)
•Then click on Scan at the to right hand Corner.
•It will automatically Neutralize any objects found.
•If some objects are left un-neutralized then click the button that says Neutralize all
•If it says it cannot be neutralized then choose the delete option when prompted.
•After that is done click on the reports button at the bottom and save it to file name it Kas.
•Save it somewhere convenient like your desktop and just post only the detected Virus\malware in the report it will be at the very top under Detected post those results in your next reply.
Note: This tool will self uninstall when you close it so please save the log before closing it.
------------------------------
using a Windows Recovery Environment to help disinfect the system so it may boot again.
Download the OTLPE Standard REATOGO Windows Recovery Environment.
- Place a blank CD-R disc in to your CD burning drive.
- Download OTLPEStd.exe and double-click on it to burn to a CD using an ISO Burner. One can be found here.
- Reboot your system using the boot CD you just created.
- Note : If you do not know how to set your computer to boot from CD follow the steps here
- Your system should now display a REATOGO-X-PE desktop.
- Double-click on the OTLPE icon.
- When asked "Do you wish to load the remote registry", select Yes
- When asked "Do you wish to load remote user profile(s) for scanning", select Yes
- Ensure the box "Automatically Load All Remaining Users" is checked and press OK
- OTL should now start. Change the following settings
- Change Drivers to Non-Microsoft
- Press Run Scan to start the scan.
- When finished, the file will be saved in drive C:\_OTL\MovedFiles
- Copy this file to your USB drive if you do not have internet connection on this system
- Please post the contents of the OTL.txt file in your reply.
* Open OTL
* Copy and Paste the following text in the codebox into the Custom Scans/Fixes window.
Code: [Select]
:OTL
O3 - HKU\.DEFAULT\..\Toolbar\WebBrowser: (no name) - {2318C2B1-4965-11D4-9B18-009027A5CD4F} - No CLSID value found.
O3 - HKU\.DEFAULT\..\Toolbar\WebBrowser: (no name) - {7FEBEFE3-6B19-4349-98D2-FFB09D4B49CA} - No CLSID value found.
O3 - HKU\Kaitlyn_Cochrane_ON_C\..\Toolbar\WebBrowser: (no name) - {2318C2B1-4965-11D4-9B18-009027A5CD4F} - No CLSID value found.
O3 - HKU\Kaitlyn_Cochrane_ON_C\..\Toolbar\WebBrowser: (no name) - {7FEBEFE3-6B19-4349-98D2-FFB09D4B49CA} - No CLSID value found.
O3 - HKU\Kaitlyn_Cochrane_ON_C\..\Toolbar\WebBrowser: (no name) - {D3DEE18F-DB64-4BEB-9FF1-E1F0A5033E4A} - No CLSID value found.
O3 - HKU\Keith__Cochrane_ON_C\..\Toolbar\WebBrowser: (no name) - {D3DEE18F-DB64-4BEB-9FF1-E1F0A5033E4A} - No CLSID value found.
O3 - HKU\Lori_Cochrane_ON_C\..\Toolbar\WebBrowser: (no name) - {07B18EA9-A523-4961-B6BB-170DE4475CCA} - No CLSID value found.
O3 - HKU\Lori_Cochrane_ON_C\..\Toolbar\WebBrowser: (no name) - {2318C2B1-4965-11D4-9B18-009027A5CD4F} - No CLSID value found.
O3 - HKU\Lori_Cochrane_ON_C\..\Toolbar\WebBrowser: (no name) - {7FEBEFE3-6B19-4349-98D2-FFB09D4B49CA} - No CLSID value found.
O4 - HKU\Kaitlyn_Cochrane_ON_C..\Run: [swg]  File not found
O4 - HKU\Lori_Cochrane_ON_C..\Run: [swg]  File not found

:COMMANDS
[resethosts]
[purity]
[start explorer]
* Click Run Fix
* OTLI2 may ask to reboot the machine. Please do so if asked.
* Click OK
* A report will open. Copy and Paste that report in your next reply.
---------------------------------
Let's try to uninstall/reinstall TCP/IP stack.
1. Download winsock.zip
Unzip it.
Right click on Winsock.reg, click "Merge".
Allow registry merge.
2. Restart computer.
3. Go to Start ==> Control Panel. Double-click Network Connections. Right-click Local Area Connection, and select Properties.
- On the General tab, click Install a popup window opens.
- Select Protocol from the list and then click Add.
- A new window opens, click Have Disk....
- In the browse... box type c:\windows\inf
- Click OK.
- Select Internet Protocol (TCP/IP), and then click OK.
- Restart and check the connection.
Please download RenewMyDNS by DragonMaster Jay.
•Save it to your Desktop.
•Right-click on the file and select Extract All...
•Choose a location to save extracted files and keep pressing Next until Finished.
•Double-click RenewMyDNS folder, then double-click RenewMyDNS.bat to start the program.
•Follow the prompts, and when finished it will launch a log.
•Post that log in your next reply.
•After posting the log, delete the folder RenewMyDNS.


 Firefox
No comments:
Post a Comment