http://www.cisco.com/en/US/docs/wireless/controller/5.2/configuration/guide/c52users.html#wp1066125
Configuring Wired Guest Access
Wired guest access enables guest users to connect to the guest access
network from a wired Ethernet connection designated and configured for
guest access. Wired guest access ports might be available in a guest
office or through specific ports in a conference room. Like wireless
guest user accounts, wired guest access ports are added to the network
using the lobby ambassador feature.
Wired guest access can be configured in a standalone configuration or in
a dual-controller configuration that uses both an anchor controller and
a foreign controller. This latter configuration is used to further
isolate wired guest access traffic but is not required for deployment of
wired guest access.
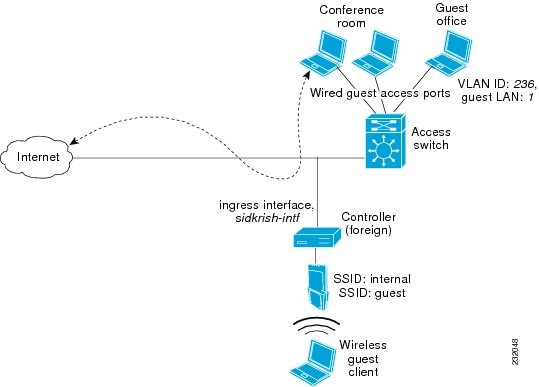
Wired guest access ports initially terminate on a Layer 2 access switch
or switch port configured with VLAN interfaces for wired guest access
traffic. The wired guest traffic is then trunked from the access switch
to a controller. This controller is configured with an interface that is
mapped to a wired guest access VLAN on the access switch. See Figure 10-15.

Note  The DMZ controller set to local
for mobility anchor should not have an ingress interface set. You
cannot enable the WLAN if the ingress interface is not set to none
and is changed to an ingress interface (defined under the Controller
> Interface tab). You should recreate the mobility anchor and WLAN if
the ingress interface is changed.
The DMZ controller set to local
for mobility anchor should not have an ingress interface set. You
cannot enable the WLAN if the ingress interface is not set to none
and is changed to an ingress interface (defined under the Controller
> Interface tab). You should recreate the mobility anchor and WLAN if
the ingress interface is changed.
Figure 10-15 Wired Guest Access Example with One Controller
If two controllers are being used, the foreign controller, which
receives the wired guest traffic from the access switch, forwards it to
the anchor controller. A bidirectional EoIP tunnel is established
between the foreign and anchor controllers to handle this traffic. See Figure 10-16.
Note Multicast traffic over the EoIP tunnel from the Foreign to Anchor controllers is not supported.
Figure 10-16 Wired Guest Access Example with Two Controllers

Note Although
wired guest access is managed by anchor and foreign anchors when two
controllers are deployed, mobility is not supported for wired guest
access clients. In this case, DHCP and web authentication for the client
are handled by the anchor controller.
Note You
can specify the amount of bandwidth allocated to a wired guest user in
the network by configuring a QoS role and a bandwidth contract. For
details on configuring these features, refer to the "Configuring Quality of Service Roles" section.
Configuration Overview
To configure wired guest access on a wireless network, you will perform the following:
1. Configure a dynamic interface (VLAN) for wired guest user access
2. Create a wired LAN for guest user access
3. Configure the controller
4. Configure the anchor controller (if terminating traffic on another controller)
5. Configure security for the guest LAN
6. Verify the configuration
Configuration Guidelines
Follow these guidelines before using wired guest access on your network:
•Wired
guest access is supported only on the following controllers: 4400
series controllers, the Cisco WiSM, and the Catalyst 3750G Integrated
Wireless LAN Controller Switch.
•Wired guest access interfaces must be tagged.
•Wired guest access ports must be in the same Layer 2 network as the foreign controller.
•Up to five wired guest access LANs can be configured on a controller.
•Layer 3 web authentication and web passthrough are supported for wired guest access clients. Layer 2 security is not supported.
•Do
not attempt to trunk a guest VLAN on the Catalyst 3750G Integrated
Wireless LAN Controller Switch to multiple controllers. Redundancy
cannot be achieved by doing so.
Using the GUI to Configure Wired Guest Access
Using the controller GUI, follow these steps to configure wired guest user access on your network.
Step 1 To create a dynamic interface for wired guest user access, click Controller > Interfaces. The Interfaces page appears.
Step 2 Click New to open the Interfaces > New page.
Step 3 Enter a name and VLAN ID for the new interface.
Step 4 Click Apply to commit your changes.
Step 5 Check the Guest LAN check box.
Step 6 In the Port Number text box, enter a valid port number. You can enter a number between 0 and 25 (inclusive).
Step 7 Click Apply to commit your changes.
Step 8 To create a wired LAN for guest user access, click WLANs.
Step 9 On the WLANs page, choose Create New from the drop-down box and click Go. The WLANs > New page appears (see Figure 10-17).
Figure 10-17 WLANs > New Page

Step 10 From the Type drop-down box, choose Guest LAN.
Step 11 In the Profile Name field, enter a name that identifies the guest LAN. Do not use any spaces.
Step 12 In the WLAN SSID field, enter an SSID that identifies the guest LAN. Do not use any spaces.
Step 13 Click Apply to commit your changes. The WLANs > Edit page appears (see Figure 10-18).


 Firefox
No comments:
Post a Comment