Bienvenido! - Willkommen! - Welcome!

Bitácora Técnica de Tux&Cía., Santa Cruz de la Sierra, BO
Bitácora Central: Tux&Cía.
Bitácora de Información Avanzada: Tux&Cía.-Información
May the source be with you!

Thursday, December 15, 2011

Verify file SFV, MD5, SHA-1 with ilSFV utility

Source

ilSFV is a free open-source SFV, MD5 and SHA-1 file verification utility.
It has neat interface and allows batch file verification processing.
You can create and verify checksums for files in subdirectories with optional cache for quickly re-verifying files. It can run in the background and reads BSD style checksum files and other less-known formats. It also has option to find renamed files based on checksum files.
Download ilSFV     1.42MB \ Windows

Wednesday, December 14, 2011

Acronis managed machine service is unavailable

To resolve the issue you should have restarted the services:
* Go to Start -> Run -> services.msc
* Right-click on the following Acronis services, and click on Restart:
- Acronis Managed Machine Service;
- Acronis Remote Agent;
- Acronis Scheduler2 Service.
-------------------------------------------
The CAUSE
- Windows is unable to appropriately connect to Acronis Machine Service, hence the reported error.
- Windows is unable to register the created Acronis User as a user with log on as a service RIGHTS.
- Some Windows' files are not available for modification during installation.
- In case you ignore the default user, the user to be used must be an Administrator with the above rights.
SOLUTION
- Go to SERVICES and restart The affected service until the error message disappears
- If you're using a normal Windows Admin user, right click the affected service and SELECT properties
- click the LOG ON tab and check "This account" (specify your system Admin account using the full domain syntax)
- put the current system Admin password and click APPLY
- You will get a message telling you that the Account has been granted the Log On As A Service right.
- STOP and RESTART the service or
- Do a Reboot
NOTE
1. You will have to go through the procedure above every time you change your Admin password. I think that's the idea behind the dedicated default Acronis Agent User account suggested during Installation.
2. You may have to do several reboot in order to get the service started the first time.
3. Ensure the appropriate port is opened if you're using any third party FIREWALL.
-------------------------------------------
1. Programs > Administrative Tools > Services.
2. Right click on "Acronis Managed Service" and Properties
3. Click on the Log On tab.
4. Enter your new password and click "Apply" and "OK"
-------------------------------------------
I set the service to manual. I created a batch file to ( net start MMS ) then created a shortcut to Runas Administrator and placed the shortcut in the startup all user folder. No more error just see the flash of the batch file.
MMS is the service name for the Acronis service causing the issue.
-------------------------------------------
By the way, (as a quick fix) to stop my computer from blue screening on reboot, I booted into Safe Mode and re-disabled the three services:
- Acronis Managed Machine Service;
- Acronis Remote Agent;
- Acronis Scheduler2 Service.
after doing that it would reboot and start fine.
-------------------------------------------
workaround
To properly use Acronis product you need a user that has "log on as service" rights, after looking in system services I found out that Acronis Remote Agent is running as Local Service. I forced the service to run as the user that has the "log on as service" rights and now can with no father problems connect both locally and remotely to with menagment console.
-------------------------------------------
-------------------------------------------
Actually, the Agent reinstallation should solve the issue.  
Problem solved by the german support professionals.
Uninstall with revo uninstaller
then abr_cleanup.exe and
then reinstalling.
Not nice but works
-------------------------------------------
One reason why "Acronis Managed Machine Service is unavailable" will show up is when the user account name or password that Acronis is using to connect is changed (this just happened to me when my domain account password expired and I couldn't get the service to restart because of a login failure but I didn't want to uninstall the software).
To fix this access the services console (e.g. in Windows XP right click My Computer -> Manage -> Services and Applications -> Services), right-click on the Acronis Managed Machine Service, left-click Properties, left-click the Log On tab, and then set the appropriate username and password and click OK.
-------------------------------------------
Here is a detailed solution to the problem (for my particular problem):
Acronis Secure Zone had filled up and was not deleting older archives that I had thought it would do. When a job would run, it would hang because the SZ was full. This created a very large log file in the "\ProgramData\Acronis\BackupAndRecovery\MMS\LogEvents" and/or "\ProgramData\Acronis\BackupAndRecovery\MMS\LogContexts" folder (I forget which one). This huge log file causes the MMS service to hang up and give you the "Cannot connect to 'localhost'" error. Deleting this log file allows the service to start normally, but eventually the problem will happen again if the the SZ problem is not fixed.
The overall cause of my problem was several things:
1) My job option "Error handling" was set to "Do not show messages and dialog boxes while processing (silent mode)"
2) My job option "Clean up archive" was set to "When there is insuffiecent space while backing up"
This combination causes it to fail. Apparently there is a "bug" that if you are running with Error Handling set to silent mode, it never kicks off a notification to the Clean up archive task and hence the job just sits sitting filling up the log file and eventually killing the MMS service. Alternatively, you can leave silent mode on but set the "Clean up archive" to "Use retention rules" which uses a scheduled task to clean the archive instead of relying on a notfication from the job.
I hope this helps others. I found this solution by gathering information from a few posts other people had made and eventually calling and working with Acronis Tier-2 support
--------------------------------------------

Tuesday, December 13, 2011

syslinux - extlinux

Quelle
SYSLINUX is a boot loader for the Linux operating system which runs on an MS-DOS/Windows FAT filesystem. It is intended to simplify first-time installation of Linux, and for creation of rescue and other special purpose boot disks.
When properly configured, SYSLINUX can be used to completely eliminate the need for distribution of raw boot floppy images. A SYSLINUX floppy can be manipulated using standard MS-DOS (or any OS capable of accessing an MS-DOS filesystem) tools once it has been created.
SYSLINUX - Syslinux Wiki
Gerne auch Ubuntu-Packages:
Zitat:
SYSLINUX ist ein Bootloader für das Linux/i386-Betriebssystem, welches aus einem MS-DOS/Windows FAT-Dateisystem gestartet wird. Die Erstinstallation von Linux soll damit vereinfacht werden. Außerdem ist es zur Erstellung von Rettungsmedien und anderen startbaren Medien für spezielle Zwecke gedacht.
Es kann auch als PXE-Bootloader beim Start über ein Netzwerk verwendet werden.
SYSLINUX ist möglicherweise nicht als Allzweck-Bootloader verwendbar. Jedoch hat es sich gezeigt, dass SYSLINUX für eine Reihe von speziellen Anwendungsfällen recht gut geeignet ist.
Syslinux ist ein Bootloader für spezielle Anwendungen (USB-Sticks, PXE-Boot) und ist, meiner persönlichen Meinung nach, nicht für die Verwendung gedacht, wie du es gerne hättest.
Du kannst dir gerne auch nochmal den offiziellen Howto-Bereich zu Gemüte führen, hier wird immerhin auf USB-Boot und ISO-Boot eingegangen.
HowTos - Syslinux Wiki
Im ArchLinux-Wiki wird grob auf die Einrichtung von auf Festplatte installierten Systemen und extlinux eingegangen, hier ist vielleicht für dich was dabei:
https://wiki.archlinux.de/title/Syslinux
Erfahrungen wirst du vermutlich nicht so leicht finden, Syslinux ist ein Spezialfall und wird bei "normal" installierten Systemen nicht verwendet.
==============
Das Syslinux Projekt beinhaltet Bootloader für das Dateisystem FAT (SYSLINUX), die Dateisysteme EXT2 und EXT3 (EXTLINUX), CD-ROMs (ISOLINUX) und das Booten aus dem Netzwerk (PXELINUX). Dies steht im Gegensatz zu anderen Bootloadern, die alle Funktionen in einem Programm vereinen. EXTLINUX stellt auf regulären Linuxsystemen eine einfache Alternative zu GRUB und GRUB2 dar.

EXTLINUX:

Um EXTLINUX zu nutzen, muss ein MBR (Master Boot Record) auf die Festplatte geschrieben werden, von der gestartet wird.
cat /usr/lib/syslinux/mbr.bin > /dev/sdX
EXTLINUX wird mittels
mkdir /boot/extlinux
extlinux --install /boot/extlinux

installiert. Alle Pfadangaben in der Konfigurationsdatei beziehen sich auf das hier angegebene Verzeichnis /boot/extlinux.
SYSLINUX:
Um SYSLINUX zu nutzen, muss ein MBR (Master Boot Record) auf die Festplatte geschrieben werden, von der gestartet wird.
cat /usr/lib/syslinux/mbr.bin > /dev/sdX
SYSLINUX wird mittels
mkdir /boot/syslinux
syslinuxl /boot/syslinux

installiert.
====================
Da wurde eine virtuelle Platte angelegt, Mint 11 drauf installiert, eine Datei angelegt, die einen MBR simuliert, ein Eintrag in der boot.ini ... und jetzt läuft's! Noch mit kleinen Fehlern in der Grafik und etwas langsam, aber es läuft. Bin erst mal geschockt - was ist das jetzt eigentlich - eine virtuelle Maschine unter Windows, oder was?
Nö, Wubi (bzw. in deinem Fall eine angepasste Version für Mint) modifiziert deinen Bootloader, es wird ein Eintrag für Mint hinzugefügt. Wenn dieser Bootmenü-Punkt gewählt wird, wird die Datenträger-Datei gemountet, sodass sie wie eine physikalische Festplatte angesprochen werden kann - und davon bootet das System. Jegliche Aktion von Mint wird nur innerhalb dieser virtuellen Festplatte geschrieben und nicht auf deine physikalische NTFS/Fat32-Partition. Hat auch nichts mit virtuellen Maschinen oder so zu tun.

Zitat:
Zitat von wodim Beitrag anzeigen
Natürlich erst mal sinnig: Mein GRUB bootet Win2K, das wiederum Mint 11 über GRUB auf der vrutuellen Platte... Möchte also gar nicht wissen, wie's im RAM aussieht.
Windows 2000 wird in diesem Moment nicht gestartet. Im RAM ist in dem Moment einzig Linux Mint und nichts anderes.

Change resolution and frequency in LXDE Mint

My solution:
In a terminal type
sudo apt-get install lxrand
sudo lxrand
========================
Source
Use this xorg.conf
Section "Screen"
# The Identifier, Device and Monitor lines must be present
Identifier "Screen 1"
Device "VESA"
Monitor "Generic Monitor"
#Option "AddARGBGLXVisuals" "true"
# The favoured Depth and/or Bpp may be specified here

DefaultDepth 24

SubSection "Display"
Depth 8
ViewPort 0 0
Modes "800x600" "640x480"
EndSubsection

SubSection "Display"
Depth 16
ViewPort 0 0
Modes "800x600" "640x480"
EndSubsection

SubSection "Display"
Depth 24
ViewPort 0 0
Modes "800x600" "640x480"
EndSubsection

EndSection
As you can see the defaul Depth is 24, and in that mode "800x600" is the first option, so it will be my startup resolution.
============================
http://ubuntuforums.org/showthread.php?t=1877757
============================
How change display resolution settings using xrandr
Xrandr is used to set the size, orientation and/or reflection of the outputs for a screen. It can also set the screen size. There are a few global options; the rest modify a particular output and follow the specification of that output on the command line.
Open the terminal and run the following commands
First you need to enter the following command
$ xrandr
This will display the allowed resolutions
Sample output
Screen 0: minimum 320 x 200, current 1024 x 768, maximum 4096 x 4096
VGA1 connected 800×600+0+0 (normal left inverted right x axis y axis) 267mm x 200mm
800×600 85.1* +
640×480 75.0 60.0
720×400 70.1
If you want to add a mode with resolution 1024X768, you can enter the following command: (The output is shown following.)
$ cvt 1024 768
Sample output
# 1024×768 59.92 Hz (CVT 0.79M3) hsync: 47.82 kHz; pclk: 63.50 MHz
Modeline “1024x768_60.00″ 63.50 1024 1072 1176 1328 768 771 775 798 -hsync +vsync
Now you need to create a modeline
$ xrandr --newmode
copy the modeline of the previous output to the place mode line
$ xrandr --newmode “1024x768_60.00″   63.50  1024 1072 1176 1328  768 771 775 798 -hsync +vsync
Now you need to add the above mode using the following command
$ xrandr --addmode VGA1 1024x768_60.00
here for VGA1 you have to use what ever that was there for $ xrandr output
$ xrandr --output VGA1 --mode 1024x768_60.00
Running these would change your resolution but this is temporary.these steps were done to make sure that these commands work
Now we need to make these changes permanent
Now you need to edit the default file
$gksudo gedit /etc/gdm/Init/Default
Look for the following lines
PATH=/usr/bin:$PATH
OLD_IFS=$IFS
and Add the the following lines below them
xrandr --newmode “1024×768″ 70.00 1024 1072 1176 1328 768 771 775 798 -hsync +vsync
xrandr --addmode VGA1 1024x768_60.00
xrandr --output VGA1 --mode 1024×768
Save and exit the file
Credit goes here

Multiple Keyboard Selection in LXDE


Source
by pmav99 on Mon Mar 14, 2011 In case you haven't found how to do it yet, it involves the following steps
1. Open as root, the following file:
Code: Select all
/etc/xdg/lxsession/LXDE/autostart
2. Add a line like this one (obviously change the locales at the appopriate ones :
Code: Select all
@setxkbmap -option grp:switch,grp:alt_shift_toggle,grp_led:scroll us,gr
3. Log out.
It should work on all distros.
Propably you could just add it at the corresponding file at your home if you don't want the settings to be global.
======================
Keyboard layout switch

Find Maximum MTU

Source
Thanks!
A script to find the maximum MTU (the value before the packet is fragmented). I was not particularly satisfied with dlsreports guide. The command given for us linux might not work most of the time (doesn’t prohibit fragmentation at time) as well as it is not an automatic operation but relies on trial and error.
=================================================================================
#!/bin/bash

PKT_SIZE=1472
HOSTNAME="www.dslreports.com"

count=`ping -M do -c 1 -s $PKT_SIZE $HOSTNAME | grep -c "Frag needed"`

while [ $count -eq 1 ]; do
 ((PKT_SIZE--))
 count=$((`ping -M do -c 1 -s $PKT_SIZE $HOSTNAME | grep -c "Frag needed"`))
done

printf "Your Maximum MTU is [ $((PKT_SIZE + 28)) ] \n"
=============================================================================================
This script will neatly print out the maximum MTU at the end of the operation after finding the optimal value of the packet size.
Explaination:
-M do : Select Path MTU Discovery strategy do (pro‐hibit  fragmentation,  even local one)
-c : to stop ping when you are done sending information.

Issues with Ubuntu logo

Big and Ugly Plymouth Logo in Ubuntu 10.04
Plymouth & Virtual Terminal for ATI/NVIDIA

For Katya:
Download "plymouth-theme-mint-logo" and "plymouth-theme-mint-text" using PACKAGE MANAGER

LXDE Setup Guide

Source
A Beginners Guide To Setting Up Linux Mint LXDE, The Lightweight Champion
1. Linux File System12. Updating and Upgrading
2. Browsers13. Purging and Cleaning
3. Desktop14. Password and Name Changes
4. Taskbar15. Hidden GUI's and Run
5. Terminal16. Dual Monitors and Autostart
6. Wallpaper17. Sound
7. Installing & Removing Repository Applications18. Network Sharing
8. Installing Nonrepository Applications & Handbrake19. Renaming Hard Drives
9. Tarballs, The LXDE Main Menu & Lxmed20. Flash Player in Firefox & Mint 64-bit
10. Microsoft Programs & Wine21. Simple Bash Command Examples
11. Main Menu and Internet Links to the Desktop - .Desktop Files22. Some Important Places
Source
Use LXSession Edit to turn on important services
Unfortunately some useful desktop services are turned off in LXDE by default. So you might need to turn them on manually in LXDE. Please execute 'lxsession-edit' or find 'Desktop Session Settings' in the application menu. Please complain to the developers of the distro you use and asked them to enable those services, such as network manager, in LXDE.
File:Lxsession-edit.png
As you can see, network manager, pulse audio, and others can all be turned on here. 
Network
After login, the first issue you'll encounter is 'how to connect to the internet'?
  • Network manager: Actually, network manager works pretty well under LXDE. You just need to turn it on since it's deliberately disabled in LXDE by some distros. Use LXSession Edit to turn it on.
  • wicd: Many users prefer this over network manager. However it's less user-friendly and it's written in Python. So you'll need python runtime to use it.
  • connman: The network management tool from Intel. I have tested it but it doesn't work on my laptop.
  • lxnm: It's currently broken. Don't use it until Fred fixes it.
  • Other distro-specific ways: Read the 'fine' manuals for your distros.
NOTE: unlike XFCE, Gnome, KDE and almost every other Desktop environment there is no way to "remember" wireless settings in Lubuntu or LXDE Mint, which is a huge snafu. I do not know if ubuntu plans on fixing this and can find no solution in the forums.

Lightweight X11 Desktop Environment

LXDE, Lightweight X11 Desktop Environment, is a desktop environment which is lightweight and fast. It is designed to be user friendly and slim, and keep the resource usage low. LXDE uses less RAM and less CPU while being a feature rich desktop environment. Unlike other iphone photography tightly integrated desktops LXDE strives to be modular, so each component can be used independently with few dependencies. This makes porting LXDE to different distributions and platforms easier.
A good starting point is the General Information page, where you find information on system requirements and compatibility. You also find an overview of distributions including LXDE with installation instructions, plus more general installation instructions, information on LXDE components and our future plans on the wiki. More about LXDE on the lxde.org website, the LXDE blogs, and in the LXDE forum.
Here is a complete LXDE setup guide from the creator of LXDE.

LXDE Components
  • PCManFM, is a fast and lightweight file manager with features like Drag & Drop support, tabbed browsing (Similar to Firefox), Built-in file searching utility, fast load of large directories, File association support (Default application), Thumbnail for image files, Bookmarks support, correct handling of non-UTF-8 encoded filenames and more 
  • LXLauncher, an easy-mode application launcher
  • LXPanel, desktop panel. The panel can generate menu for installed applications automatically from *.desktop files. It can be configured from GUI preference dialog, and there is no need to edit config files. The component provides a "Run" dialog with autocompletion.
  • LXSession, a session manager. The LXSession manager is used to automatically start a set of applications and set up a working desktop environment. Moreover, the session manager is able to remember the applications in use when a user logs out and to restart them the next time the user logs in.
  • LXSession Edit, an edit manager for session management. The window manager in use in LXDE can be changed, the tool offers the ability to turn on disabled applications.
  • LXAppearance, a theme switcher. You can change the theme, icons, and fonts used by applications easily.
  • Leafpad, a text editor
  • Xarchiver, archiving
  • GPicView, an image viewer. GPicView features lightening fast startup and intuitive interface.
  • LXTerminal, a terminal emulator
  • LXTask, a task manager / system monitor
  • LXNM, a lightweight network connection helper daemon for LXDE supporting wireless connections (Linux-only)
  • Openbox, a window manager and obconf
  • LXRandr, a screen manager. Manages screen resolution and external monitors.
  • LXShortCut, an easy way to edit application shortcuts
  • LXMusic, a minimalist xmms2-based music player
  • LXDE Common, the default settings configuration file for integrating the different components of LXDE. LXDE Common manages the system behavior and functions to integrate icons and artwork.
  • GtkNetCat, a Graphic User Interface for netcat. Netcat provides system functions as a computer networking utility for reading from and writing to network connections on either TCP or UDP.
  • Menu-Cache now moved to libexec
  • LXInput, a config tool to configure your keyboard and mouse under LXDE
  • lxde-settings-daemon, configures theme, keyboard and mouse for you. (works with lxinput config tool)
  • LXDM, a lightweight display manager
  • LXMenu Data, a collection of files, intended to adapt LXDE menus to the freedesktop.org menu specification
How to customize LXDE more in the category How tos

Tips and Tricks for Linux Mint 11

Editions for Linux Mint 11 "Katya" 
Desktop environments: LXDE and gnome
=========================
This is the official Linux Mint User Guide, available in many languages in both PDF and ODT formats:
Download link: http://www.linuxmint.com/documentation.php
=========================
Source
If you have the Linux Mint system which comes with the default Gnome desktop environment installed in your PC, you might find these tips and tricks useful for working with the system.
Note: The steps described in this article work with Linux Mint 11 and Linux Mint 10.
Start - Herramientas del sistema - Soporte de idiomas

or
sudo gnome-language-selector
Panel
Window
Desktop
File Manager
Keyboard Shortcuts
Sound
Add Fonts, Screenlets and More Software
Drive and Partition
Startup and Shutdown

Linux:VGA boot modes to set screen resolution

Source
A simple way to set your screen resolution and color depth for most Live Linux distro's is via the use of the vga=parameter boot option.
VGA Resolution and Color Depth reference Chart:
Depth 800×600 1024×768 1152×864 1280×1024 1600×1200
8 bit vga=771 vga=773 vga=353 vga=775 vga=796
16 bit vga=788 vga=791 vga=355 vga=794 vga=798
24 bit vga=789 vga=792 vga=795 vga=799

Wireless devices issues in LInux

Source
On Debian-based systems (which of course include Ubuntu, Lubuntu, Kubuntu, Xubuntu), and by extension, Peppermint Two, which is derived directly from Lubuntu), the following Debian Wiki page is of great help: http://wiki.debian.org/bcm43xx
On that page, it is pointed out that the firmware-b43-installer package will normally do everything required, including probing for the correct firmware module, once installed. In my case, apparently on Peppermint Two, something was already "there", either installed or configured in a way that created a conflict with the expected behavior. The Wiki page listed above also covers work around behavior to account for issues with module probing.
In case of difficulties, these steps, described on the Wiki page, should resolve the conflict:
The necessary kernel module should be automatically loaded. If necessary, it can be manually loaded via either:
modprobe b43
or
modprobe b43legacy
Verify your device has an available interface:
iwconfig
Raise the interface to activate the radio, for example:
ifconfig wlan0 up
If that still does not immediately resolve the issue, then
modprobe -r b43
echo options b43 pio=1 qos=0 >> /etc/modprobe.d/local.conf
modprobe b43
should take care of it.
Consult the Wiki page for a step by step installation, with follow-up troubleshooting steps. Normally, just installing firmware-b43-installer will perform all steps needed. When that fails, the troubleshooting will take care of the rest. This works great, and I have all of my systems correctly, automatically, and cleanly bringing up the wireless interface now.
A final point: I have found the wicd network management package to be more robust than the network-manager package that is usually distributed, especially in Ubuntu-based distributions. One nice feature of the wicd package is that you can configure your system to automatically connect to a wired Ethernet connection when one is present, and either automatically or manually connect to a wireless network otherwise. Furthermore, you can optionally configure wicd to reconnect in the event of a network disruption or disconnection (and disable that feature if your network tends to "bounce" up and down. The flexibility of these features has resulted in extremely reliable network management on every system in which wicd controls network management.
I did PM the guy who wrote the original HOWTO concerning configuring Broadcom wireless interfaces. His information looks a bit dated. There should be absolutely no reason to have to download source code and have to build it for wireless firmware. That goes a bit against the tone and spirit of this distribution, and moreover, since that stuff was created, it appears that it was either unavailable when I looked at it or inaccessible, but I was unable to even reach the sites mentioned in the HOWTO. But the main thing is that the HOWTO completely misses the big thing: when even the automatic firmware installer can't probe the modules, correctly, there are modprobe steps to probe, remove the probed module, and reinitialize it - if needed - that overcome issues, and we don't touch those areas at all (that I have been able to find) in our existing documentation, yet that was the "magic step" that finally got me past the issues I was facing.

Monday, December 12, 2011

Tips and Tricks for Linux Mint after Installation

Source
Linux Mint is one of the top free operating systems widely used in the world and currently receives the highest hits at DistroWatch.
Even though it's an Ubuntu-based system, Linux Mint features only one panel at the bottom which looks closer to the taskbar in the Windows system, and a well-organized start menu complete with a useful Search box. It also pre-installs some proprietary software, including the Adobe Flash plugin and necessary media codecs, by default so that you can view streaming media, such as YouTube videos in a browser, and play mp3, mp4 or most other media files with a player right away out of the box.
If you have the Linux Mint system which comes with the default Gnome desktop environment installed in your PC, you might find these tips and tricks useful for working with the system.
Note: The steps described in this article work with Linux Mint 11 and Linux Mint 10.
 
Tips and Tricks for Linux Mint - Quick Select Index
After clicking a link, use your browser's Back icon to return here.
Panel
Window
Desktop
File Manager
Keyboard Shortcuts
Sound
Add Fonts, Screenlets and More Software
Drive and Partition
Startup and Shutdown

Sunday, December 11, 2011

F-OS software:Calculators

Source

LibreOffice in Ubuntu

1 History 
LibreOffice (pronounced /ˌliː.brəˈɒ.fɪs/) is a free and open source office suite developed by The Document Foundation as a fork of OpenOffice.org. It is largely compatible with other major office suites, including Microsoft Office, and available on a variety of platforms. Its developers' goal is to produce a vendor-independent office suite with ODF file support, accessible to anyone and led by developers which do not have to sign their name to the product.
LibreOffice is a hybrid word, meaning "Free Office". Libre means free (as in freedom) in French and Spanish.
LibreOffice has been downloaded approximately 7.5 million times since its first stable launch in January 2011.[4] It is the default office suite in many Linux distributions, such as Fedora,[5] Linux Mint,[6] openSUSE,[7] and Ubuntu.[8]
LibreOffice can be run on Microsoft Windows 2000 (with Service Pack 4 or newer) or newer, Mac OS X 10.4 Tiger or newer, and Linux-based systems running Linux kernel version 2.6.18 or newer.[1] Ports for FreeBSD and OpenBSD are being maintained by contributors to those projects, respectively.[9]
=============================
Source
Easily testing the latest builds of OpenOffice-fork LibreOffice in Ubuntu is now a cinch using the dedicated LibreOffice packaging PPA for Ubuntu users.
Bye bye .deb downloading
Up until now users have had to install via the oh-so-not-so-painful task of downloading a bunch of .debs files. This manual approach to installing updates has meant many users are running older versions, unaware of subsequent releases.
Adding a PPA ensures you are notified of pending updates whilst also offering the advantage of being able to upgrade easily.
Better still adding the LibreOffice PPA won’t affect OpenOffice (if installed) so feel free to take it for a test sans undue stress.
Download
The PPA provides packages for Ubuntu 10.04, 10.10 and 11.04 users.
To add the PPA and install LibreOffice add ‘ppa:libreoffice/ppa’ to your software sources or run the command below in a new Terminal session: -
sudo add-apt-repository ppa:libreoffice/ppa
sudo apt-get update && sudo apt-get install libreoffice
Now to make it appear a tad nicer under your desktop environment of choice: -
Ubuntu users should run
sudo apt-get install libreoffice-gnome
Kubuntu users should run: -
sudo apt-get install libreoffice-kde

Personal Package Archive (PPA)

Source by  Shawn Powers
Package management in Linux is great, but unfortunately, it comes with a few cons. Granted, most distributions keep all your software, not just system software like Apple and Microsoft, updated. The downside is that software packages aren't always the latest versions. Whatever is in the repository is what you get. Another frustration is when the software you want to install isn't in the distribution repositories at all.
Usually, it's possible to add software packages, even if they're not in the repos. For Red Hat-based systems, those are RPM files. For Debian-based, they're DEBs. Unfortunately, installing applications that way doesn't give you upgrades when they're available; you need to keep them updated yourself. Most package management systems also have the ability to add third-party repos, but those don't always have the packages you want.
Canonical has a feature in newer versions of Ubuntu that allow the best of both worlds. They're called PPAs (Personal Package Archives). Instead of distributing .deb files, developers simply can distribute their PPAs. With a PPA, the software is updated automatically along with being installed in the first place. While installing PPAs hopefully will become simpler, in the short term, they're still pretty easy to install. You just need to find the right PPA structure, usually given by the developers that support the idea. For example, to install the Mozilla Daily Build PPA, simply type:
sudo apt-add-repository ppa:ubuntu-mozilla-daily/ppa
Someday, installing a third-party application will be as easy in Linux as it is in Windows and Macintosh. With ideas like PPA repositories, however, your software will stay updated. And, that sounds P-P-Perfect to me.

install and configure wine in mint linux

Source
Wine is a compatibility layer that lets you, in theory, run applications written for Windows on a Unix-like system (though depending on the application, it can take some tweaking, and some applications just won’t work properly). Wine installs quite easily and runs just fine on Linux Mint 10. First, you’ll need to install Wine with this command at the Terminal prompt:
sudo apt-get install wine
Enter your password to authenticate, and apt-get will download and install Wine. The combined packages come to a little over a hundred megabytes, so it might take a while to install depending upon your connection speed.
After the installation is finished, you’ll have a new Wine category added to your Applications menu.
To install Windows software in Wine, you need to right-click on the installer file and select “Open With Wine Windows Program Loader”.
You can also install Windows software with Wine through the command line, which is often the easier way to do it. For instance, to install the example above, you would use this command:
wine ~/Downloads/INSTALL.EXE
If the application did not install, you’ll probably have to change the Wine settings. The best course is to probably browse the Wine application database, and see if you can find the correct settings there.
=========================
howtoforge.com/installing-windows-software-with-wine-linux-mint-11
shameless copied! Danke vielmals,  Christian!
Copyright © 2011 Christian Schmalfeld
c [dot] schmalfeld [at]  projektfarm[dot] de
All Rights Reserved.
[...]
Install Windows Software
After having installed Wine you can browse the internet for software you would like to use with it. As I said before, I will use Windows' version of VLC media player. Software you download from the internet is usually stored in your home directory's Downloads folder. I have put my VLC installer on my desktop:
To start working with it you first have to change permissions, otherwise following error will appear:

If you are not certain that you can trust the source you downloaded the software from, better let it be or download it from another source. If you are certain however, open a terminal, become root with
su
and grant permissions by entering the following (replace my document path with your file's path):
chmod 777 /home/ctest/Desktop/vlc-1.1.11-win32.exe
Afterwards you should be able to doubleclick it to open it. If not, rightclick and choose Open With Wine Windows Program Loader. This should open the installation setup:

Follow the steps of the setup. When you are asked for the installation directory do not be confused about the fact that you proposed a C:\ drive for installation, this is a virtual drive provided by Wine. You can leave it at that or install your software somewhere else.

After the installation is done, you can run your software by navigating to the installation path and opening the .exe file. If you were given the option to create a start menu link, your software will also be available on Menu > Wine.

Submitted by Spanky (not registered) on Fri, 2011-11-04 16:12.
I use Playonlinux, and put everything (not just games) in it's own container. This way, experiments don't mess-up good installs, and they can be summarily deleted. Plus, each can use it's own version of wine, and this is separate, from the base system install.

Separate from all that, and the base WINE install, is Picasa; with it's very own container automatically. You don't even have to think about it. However, I have moved it(very custom), and upgraded it to the beta 3.8, with face recognition.

Submitted by JohnP (not registered) on Tue, 2011-11-01 00:14.
For some Windows software, using Winetricks is necessary too. While I haven't attempted any WINE efforts under Mint, I have gotten Quicken 2011 Premium and Quicken 2008 Home and Business working under LUbuntu 10.04. For the specific steps, Greg has been posting updates over at WineHQ.org. http://appdb.winehq.org/objectManager.php?sClass=application&iId=107
Today I received a new Quicken H&B 2012, so instructions on getting that loaded will be posted soon. There's nothing in the "system requirements" to make me think it will not work.
I can confirm that MS-Office 2003 works under Wine too. Sadly, not all Windows software can run under WINE. More and more, there are Linux native options, which is very nice.

Saturday, December 10, 2011

Windows 7 Service Pack1

Windows Automated Installation Kit for Windows 7 Readme
Documentation
Windows 7 Service Pack 1 is Released: But Should You Install It?
upgrade only if your version is Genuine!
Installing Windows 7 Service Pack 1Head to Windows Update through your Start Menu search box, and then click on the “Important updates are available” link. If you don’t see this link, click the “Check for updates” on the left side, and it should show up.

You should see Windows 7 Service Pack 1 in the list, and you’ll need to check it (it’s unchecked by default).
Click the OK button, then click to install it, and then just wait. It’ll take a while to download, and once it finishes downloading, it’ll force you to reboot.
This Service Pack 1 is IMPORTANT and should be installed due to hardware transition which is now taking place.Example:
http://support.microsoft.com/kb/982018
Download the ISO here:
microsoft.com/downloads/en/details.aspx?FamilyID...

Windows 7 and Windows Server 2008 R2 SP1 helps keep your PCs and servers on the latest support level. It also provides ongoing improvements to the Windows Operating System (OS), by including previous updates delivered over Windows Update as well as continuing incremental updates to the Windows 7 and Windows Server 2008 R2 platforms based on customer and partner feedback. This enables organizations to deploy a single set of updates.
Windows 7 and Windows Server 2008 R2 SP1 will help you:
  • Keep your PCs supported and up-to-date
  • Get ongoing updates to the Windows 7 platform
  • Easily deploy cumulative updates at a single time
  • Meet your users' demands for greater business mobility
  • Provide a comprehensive set of virtualization innovations
  • Provide an easier Service Pack deployment model for better IT efficiency
Do not click download if you are updating just one computer: A smaller, more appropriate download is now available on Windows Update. The best way to ensure you get Windows 7 and Windows Server 2008 R2 SP1 is by turning on the Automatic Updates feature. You can use our step-by-step instructions or, if you prefer, let us do it for you. If Windows Update is not offering you the option to install the service pack, see KB 2498452. If you are encountering a problem when installing the service pack from Windows update, see Troubleshoot problems installing a service pack for Windows 7 or Windows Server 2008 R2.
Steps to take before installing Windows 7 Service Pack 1 from the Microsoft Download Center

If you choose to install Windows 7 SP1 from the Microsoft Download Center Web site, there are steps that you can take to make sure that you have a good experience when you install the service pack. This article, KB 2505743, provides some suggestions to improve your experience when you install Windows 7 SP1 from the Microsoft Download Center Web site.
In order to download and install Windows 7 and Windows Server 2008 R2 SP1 you must currently have a Release to Manufacturing (RTM) version of Windows 7 or Windows Server 2008 R2 already installed.
If you have previously installed a pre-release version of Windows 7 and Windows Server 2008 R2 SP1 on your machine, you must uninstall that version before installing SP1.
Windows 7 and Windows Server 2008 R2 SP1 is available for installation in the same languages made available at original launch of Windows 7 and Windows Server 2008 R2.
Instructions
Click the Continue button then on any Download button on this page to start the download, or choose a different language from the drop-down list and click Go.
  1. Do one of the following:
    • To copy the download to your computer for installation at a later time, click Save or Save this program to disk.
    • To start the installation immediately, click Open or Run this program from its current location.
7601.17514.101119-1850_Update_Sp_Wave1-GRMSP1.1_DVD.iso - This DVD image contains standalone update for all architectures.
windows6.1-KB976932-IA64.exe - This application installs Sp1 to an Itanium 64-bit Windows Server 2008 R2.
Windows_Win7SP1.7601.17514.101119-1850.X86FRE.Symbols.msi - Standalone debugging symbols (free) for 32-bit machines.
Windows_Win7SP1.7601.17514.101119-1850.X86CHK.Symbols.msi - Standalone debugging symbols (checked) for 32-bit machines.
Windows_Win7SP1.7601.17514.101119-1850.AMD64FRE.Symbols.msi - Standalone debugging symbols (free) for 64-bit machines. This contains debugging symbols for both Windows 7 SP1 and Windows Server 2008 R2 SP1.
Windows_Win7SP1.7601.17514.101119-1850.AMD64CHK.Symbols.msi - Standalone debugging symbols (checked) for 64-bit machines. This contains debugging symbols for both Windows 7 SP1 and Windows Server 2008 R2 SP1.
Windows_Win7SP1.7601.17514.101119-1850.IA64FRE.Symbols.msi - Standalone debugging symbols (free) for Itanium 64-bit machines.
Windows_Win7SP1.7601.17514.101119-1850.IA64CHK.Symbols.msi - Standalone debugging symbols (checked) for Itanium 64-bit machines. 
windows6.1-KB976932-X86.exe - This application installs Sp1 to a 32-bit machine running Windows 7.
windows6.1-KB976932-X64.exe - This application installs Sp1 to a 64-bit machine running Windows 7 or Windows Server 2008 R2.
windows6.1-KB976932-X86.exe 537,8 MB
Spanish SP1:
http://www.microsoft.com/downloads/es-es/details.aspx?familyid=c3202ce6-4056-4059-8a1b-3a9b77cdfdda&displaylang=es

Windows File Sharing

This is a general checklist for sharing files between PCs in a peer to peer network. There can be other reasons for problems but I think most people new to networking and finding sharing a problem will find the answer somewhere in this checklist.
These checks are all necessary for sharing to work with TCP/IP.
- PCs which are not XP must have TCP/IP installed.
- Each PC must have a unique computer name.
- Each PC must have a network share defined.
- ALL NICS must be on the same subnet (e.g. IP 192.168.0.* subnet mask 255.255.255.0).
- XP PCs must have Netbios over TCP/IP enabled (only essential for XP to talk to W9X PCs).
- MS Client and file and printer sharing must be enabled on each NIC.
- All NICs must have their node type = anything except p-node (peer to peer, or point-point). Check at cmd prompt with Ipconfig /all (XP/W2K) or winipcfg (W9X).
- XP's ICF firewall is permanently disabled. (Only necessary for pre XP SP2).
- All 3rd party firewalls are disabled, uninstalled and deleted (until connection is working).
- PCs have the same workgroup (helps, but not essential).
Allow 15 mins after rebooting a PC for that PC to appear in the workgroup, or for it to see all other PCs. Or you can search for the PC by its computer name.
If all the above checked out and still a problem check these:
Other ideas:
- Realtek cards have been known to be a problem with IRQ conflicts. Move the Realtek card to another PCI slot.
- Check your Services are Started on all PCs: Workstation, Server, TCP/IP Netbios helper, Computer Browser.
- You only need TCP/IP. NWLink NetBIOS, NWLink IPX/SPX/NetBIOS Compatible Transport Protocol are not needed and can confuse things. Remove them.
- XP gives access to its shares via the Guest Account. (Note, the local guest account in user accounts which should be off).
Net Guest Account access is enabled by default in XP, but check it:
At command prompt:
Net user guest
Should return a line with 'Account active yes'.
If not active use:
Net user guest /active:yes
(Still leave the user guest account off)
See link for explanation of guest account: 
http://support.microsoft.com/kb/300489/
Check XP Security policies:
- Access this computer from the network: add guest
- Deny logon locally: remove guest
- Network access:Sharing and security model... -- Guest only
- Deny access to this computer from the network-- check Guest is not here.
Other useful guides for step by step sharing are available here:
http://practicallynetworked.com/shar...ilesharing.htm
MS Tech D/B
http://support.microsoft.com/default...&Product=winxp
and here:
http://www.homenethelp.com/web/howto/net.asp
Developing a SOHO network, sharing and security (by MS):
http://www.microsoft.com/windowsxp/p...et/default.asp
How to share a printer and connect to a shared printer:
http://www.microsoft.com/downloads/d...DisplayLang=en
Ports to open in a firewall for various applications:
http://www.microsoft.com/security/protect/ports.asp
I will try to develop these checks with time. If you have suggestions to add/improve the checklist feel free to post your ideas.
If you have a network problem please start your own thread with the problem. Please do not post your problem here or reply to this thread. 
TCP/IP File Sharing Checklist
Wireless a/b/g
If you are waiting a reply from me and none appears, Personal Message me to get my attention.
Note: My views are based on my personal experience and do not represent practicallynetworked.com 
===========================
Source
Vista asks for password trying to connect to other Vista PC
Click Start - Network - Network and Sharing:
Password Protected: OFF (unless you want to set up identical usernames and passwords on ALL computers in your Network) If you have it ON, and no identical usernames/passwords set up, you will be asked for a username and password when you try to access a Vista computer from an XP computer, or a
Vista computer.
-------------
Make sure you can ping the Vista machine from the XP and with that being successful, try this tutorial I put together:
http://willsit.com/XP_Vista.aspx
XP and Vista Networking within a Home Network
Many critics of Microsoft products have thru the years have blamed those products with a lack of security, and sometimes rightly so. Microsoft does everything possible to lock down those products and everyone starts complaining this it is now “broken”.
Well, it is not broken but there a couple of issues you need to resolve and configure to make these two systems “talk” to one another. By “talking” to one another, we mean sharing resources across your home network.  Resources could be anything from music files, pictures, or even a printer.  In this section, show you the new settings within Vista you need to consider and configure. Vista sees two types of networks, Public and Private.
Navigate to the Network and Sharing Center and take a look at the new features. You will see you connection to the internet and whether it is designated as Private or Public. This would have been determined at the time you made you connection to the internet. For the moment, let’s deal with a private network, which is your network at home. You must have a "Private" network in order to share files within your home environment.
Hit "Customize" on the right side of the panel to make any needed changes. 
What we want is a "Private Network" with any name you deisre to identify your network.
Choose Private and complete the wizard.
 By default, Public File Sharing will de disabled. We have been talking about a Public folder so just where is it located? Go to the C Drive>Users>Public and within there you will see the “Public Folders”.
Among these there are folders for Documents, Music, Pictures, etc. At this point, only users on the local machine have access to this folder as shown in the graphic below:
 

 Special caveat at this point. These instructions will allow access to
the built in Public Folder from within your local network 
Hit the drop down arrow on the right side of the panel and you will be presented with three options:
 • Turn on sharing so anyone with network access can open files
• Turn on sharing so anyone with network access can open, change, and create files
• Turn off sharing (people logged onto this machine can still access this folder)
 
Special Note:
Option #1 menas that users from another machine can "Read' files withn the public folder
 Option #2 means that users from another network machin can "Read, Change, abd Create" Files within the public folder
 Option #3 only allows access to user logged on to the local machine, i.e., no network access.
You could circumvent this by enabling the Guest Account but this is not encouraged.
Open, Create, and Change Files are the same as “Modify” within NTFS permissions. NTFS permissions are an advanced set of permissions used by operating systems since Windows 2000 was introduced. No access means just that. The folder is only available to local users on the Vista machine.
In the graphic below you see a Vista machine named VMVista connected to the internet from within a Private Network. My Workgroup name is named “Wills”. Public File Sharing has been turned on for Network users to “Open, Change, and Create “files. My XP machine (Dell1705) has a Username “John Wills” and so does the Vista machine. I can either “map” a drive to the Public Folder or use “Explorer” to use it.
We can now get to the Public Folder, but what about if you want to create a "special" Shared Folder in which you want to restrict access. This would mean that although a User might have an account on the target Vista machine, you can deny access to this new folder.Go to the C drive and create a new folder named “Test”.
Right click the folder and go to Properties. You will see the Security and Sharing tabs (in version Home Premium and Ultimate). Hit the Sharing tab and you are now presented with a couple of options. Look for a button named Share and hit it and you see the box below:
 
Continuing with the example, I have created a new user named "Network User" choose “Network User” (a local user on my Vista and XP machine) and select add. Hit the Permission Level and determine the level of access they need. Hit the Share button and complete the process. In this case, “Network User” will be given “Reader” access.
 
 Now hit the "Share" button and you will now see the newly created Shared Folder.
 
This folder is now accessable from the XP machine on the network by either mapping a Network Drive or using the "Explorer" Method.
 Go to My Computer and in the Explorer URL type:
and you will see the folders accessable to you.
**Note**
Subsituite the correct name of your Vista machine for this example to work for you.
The owner of the folder (the user who created it) has by default full access to that folder. Now you can add named users on the network or something unique named “Everyone”. This is basically the same process you went thru in the previous example but now you begin to see how the process works. The “Permissions” that you can give to any user are:
1. Reader (Default)
2. Contributor – this means the user can modify the data
3. Co-Owner – gives the user full access to the entire folder
4. Remove (after action)
Something to note. “Everyone” means EVERYONE. Anyone who gains or has access to your network has access to and file or folder with the Everyone permission. A better plan of action would be to give a specific user the permissions they need otherwise put data that “Everyone” needs access to in the Public folder. Beginning to make sense?Continuing with the example, I have created a new user named "Network User" choose “Network User” (a local user on my Vista and XP machine) and select add. Hit the Permission Level and determine the level of access they need. Hit the Share button and complete the process. In this case, “Network User” will be given “Reader” access.
 At times this can get confusing but the key to remember is properly allocate permissions.  My examples were created with a "virtual" Vista machine using VM Ware and the host machine running XPSP2. 
============================
If you have a home network and are running Windows 7 and have XP on other PC(s) you might want to share files between them.  Today we will look at the steps to share files and hardware devices like a printer.
Sharing Files In Windows 7 and XP
Sharing folders between two Windows 7 machines with the new HomeGroup feature is an easy process, but the HomeGroup feature is not compatible with Vista or XP.  For this tutorial we are using Windows 7 x64 RC1 and XP Professional SP3 connected through a basic Linksys home wireless router. 
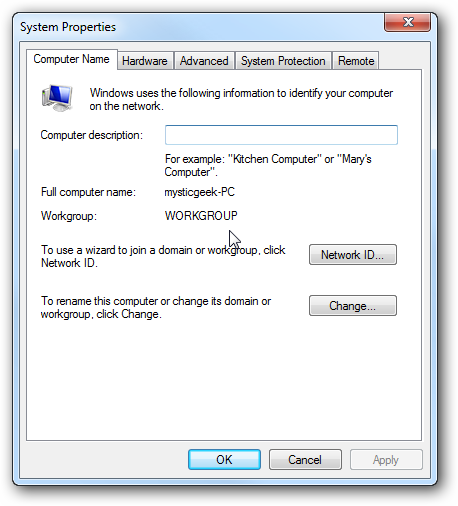
First make sure both machines are members of the same Workgroup which by default is named Workgroup.
workgroup 
On the Windows 7 machine go into Control Panel \ All Control Panel Items \ Network and Sharing Center then click on Change advanced sharing settings.


You will want to verify the following settings under Advanced Sharing Settings for the Home or Work and Public profile.

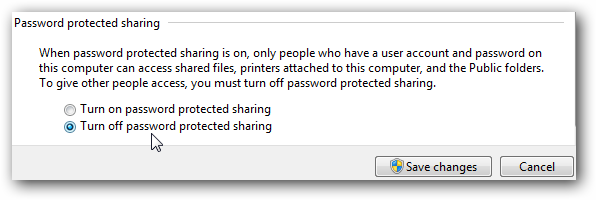
If you want any user to have access the public shares turn off password protection.  This is located in Advanced Sharing Settings toward the bottom of the list. 
 
If you want to keep it enabled make sure there is a log in account for the other XP machines and they have a password.

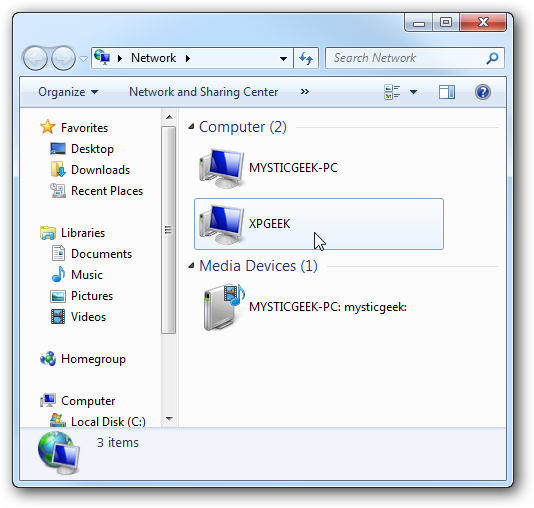
Now if you go into Network in Windows 7 you should see your XP machine and the Windows 7 as well which in this case is Mysticgeek-PC.

To share the printer on the Windows 7 machine go into Devices and Printers from the Start menu and double click on the printer icon.

Next double click on “Customize your printer”.

In the Properties screen click on the Sharing Tab and check the box to share the printer and type in its share name.

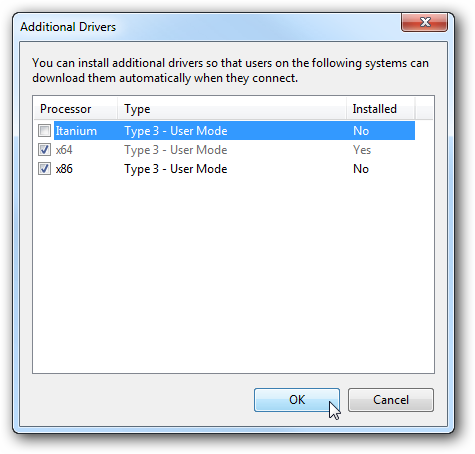
If your XP machine is an x86 OS you can install Additional Drivers before setting up the XP machine.
 
To find the shared folders and devices double click on the Windows 7 machine icon under Network.  Here you can see the printer connected to my Windows 7 machine is shared and also the Users Folder.

Continue into the Users folder and Public to see the shared folders, here I also created a folder called XP Share just to keep everything in central location.

Over on your XP machine open up My Network Places to find the Windows 7 (mysticgeek-pc) shared folder.

Double click on the Share folder to find a list of shared folders in the Public folder on Windows 7.  If you have password protection enabled you will need to type in the username and password of the user account on the Windows 7 machine first. 

Setup XP With Shared Printer
To set up the shared printer in XP you will need to go into Printers and Faxes from the Start menu and kick off the Add Printer Wizard.

Now select “A network printer, or a printer attached to another computer” then hit Next.

Next select “Connect to this printer…” and type in the path for the printer connected to the Windows 7 machine and click next.  

Now click Yes to the confirmation message.

Then click Finish the printer to install and complete the Wizard.

In some cases you will need to install the x86 XP drivers for the shared printer because the Windows 7 drivers are not compatible with XP.  When everything is installed open up Printers and Faxes to find the shared printer.

This should help you get started with sharing your files and other devices with your Windows 7 machine.  When I first started I was able to see the printer on XP right away because I had a HomeGroup set up, but once I deleted it I needed to share the printer like you would for a workgroup.  You might also have to do a couple restarts of the XP machine for it to see the shared resources on Windows 7.  If you have had any experiences with sharing between Windows 7 and XP leave us a comment!