Even after opening ports 5500 - 5900, assigning Static IP to my computer at workas 192.168.1.221. Subnet 255.255.255.0 & default gateway 192.168.1.1. I m using the external IP 10.0.0.3( this is the Internet IP / External ...noted from my router configs) I STILL CANT CONNECT TO SERVER AT WORK...CANT FIGURE OUT WHY.??? Also in the security tab under Firewall tab - which is enabled obviously...Anonymous requests was checked ...I removed that too.But still cant figure out what going on.
I am doing what is required ..but nothing ...infact the error also doesnot change ...Always it says FAILED TO CONNECT TO SERVER.
-------------
Open following ports on the router or firewall: 5800 - 5901
Very often servers at work will have those ports closed to make sure no one from the outside tries to exploit them.
Talk to your system admin & see if one can be opened specifically for you ( if you're trying to do legit work from home).& BTW VNC server will show the only IP it can see which is the one from your work machine. That is not the IP you should use to connect from the outside. You need the IP of the server.-----------
You router's external IP shows that there is another NAT device between your router and the internet (10.x.x.x addresses are private too meaning your router does not have direct connection to internet). You have to set up port forwarding in that device too to point to your router.
You will have:Internet -> The true gateway of your workplace -> (forward VNC port to 10.0.0.3) -> Your router at work -> (forward VNC port to 192.168.1.221) -> your work PCYou don't need to change anything under advanced routing.------------------------
First of all you need to have Static IP Provided by ISP at both ends to connect each othere with VNC. Next is check that you can ping that m/c Or VNC Server from you Vnc viewer. If u get reply then u will get the acess. otherwise no.
-----------------------
Do you mean that I have to open the same ports ie 5900-5910 for both my work PC 192.168.1.221 and also open 5900-5910 for 10.0.0.3 which is router IP on the router Setup.
And I think you are right because when I tried to connect from the IP that I got from"whatsmyip.com It still says "CAnt connect to server"And later I used ping & telnet for the IP 138.89.188.xI am able to ping and after telnet it asks for pswd.-------------------------
I think the way my network is setup is all creating problem. So I tested it on some other computers and BOOM!!....it works.
But I didnot understand why the connection is slow....when I am working with excel/word files its fine...but when I work on unix based program Tech7 (if anybody has heard about it..)it takes too much of time & is slow------------------------
How are you running the UNIX program? Do you have VNC server running on a UNIX box and you connect to that or do you connect VNC to a windows machine and then make an X connection to some UNIX server?You can get better speeds if you select better compression options for VNC.
TightVNC and UltraVNC offer superior compression to the vanilla RealVNC.
-------------------------
Slow connection ? Easy - your work network connects at least 100Mbit/second, maybe 1Gb, but over the internet broadband you might only be getting 5Mb download, 500Kb upload, plus a lot more latency in the various routinings involved.
--------------------------
Slow connection ? Easy - your work network connects at least 100Mbit/second, maybe 1Gb, but over the internet broadband you might only be getting 5Mb download, 500Kb upload, plus a lot more latency in the various routinings involved.
--------------------------
Sorry for the bump to such an old post. I was having the hardest time getting my IP locked down in some kind of way, I came across an article at variableghz that helped me lock down my IP and get VNC working finally. Anyway, just thought that would be helpful for anybody else searching since this is what came up in my Google search along with everything else... !
=========================
by admin@variableghz.com
What is UltraVNC SC? It’s a solution for fast remote-access to a client’s system. It’s free, too.
What’s the difference between UltraVNC and UltraVNC SC? UltraVNC SC takes all of the complexities of setting up a VNC server, and puts the burden on the admin, rather than the client side. Forwarding ports, installing services, setting up passwords, configuring firewalls — all of that is transparent to the client. All the client has to do is double-click a custom *.exe that you set up ahead of time by following this guide.
So, let’s get started.
First, the prep work. You’re the admin, so you need to lock down your local IP and get your ports forwarded appropriately.
1. Determine your local IP. Start > Run > cmd > ipconfig — write down your local IP. Mine is 192.168.1.6. What’s your default gateway? Mine is 192.168.1.1, yours will likely be similar.
2. Log into your router administration panel by navigating to your default gateway address using your browser. (Note: more complex routers may have other methods of getting into the admin panel, check your documentation).
3. Forward port 5500 on your local IP address. (Not to be confused with 5900, the default VNC port — make sure you do 5500).
4. Configure your firewall to allow connections over port 5500 (this is really important, don’t forget!)
Now that you’ve got that all set up, you have a choice to make. You can compile the .exe with your current WAN IP, or you can lock it down using something like DynDNS, similar to the way you normally do with UltraVNC. I strongly recommend you lock it down using DynDNS, and use the DynDNS Updater on your system. So, with that in mind, let’s continue:
5. Head over to the UltraVNC SC “Create” section of their website and download custom.zip.
6. Inside custom.zip, you’ll find 6 files. These files are there for you to customize and then have UltraVNC SC compile them for you in the cloud. You can customize quite a bit with this, but for this tutorial we’re just gonna get the remote access up and running as fast as possible. Once you master this, you can then go back and tweak with all the settings and options and make a very “pretty” UI for your client.
7. Extract custom.zip and open up helpdesk.txt. Inside, you will see a *.ini-like file which contains defaults for all the settings you need to instruct UltraVNC SC what to compile in the final .exe.
8. Under the first [HOST] section (“Internet support”), change the default IP to be your DynDNS (or WAN IP) and be sure to leave the :5500 (port) at the end. Then delete the second [HOST] entry “Internet support encryption” because we won’t be using encryption in this guide. Save the helpdesk.txt file and close.
9. Go ahead and delete the rc4.key file, because we aren’t using encryption right now.
10. Highlight all the files and create a *.zip file. Call it whatever you want (do not have a folder inside of the *.zip, just the data).
11. Now, we need to “compile” the .exe with the UltraVNC SC website. So, head on over to the “Online Creator” section of their site. For reasons unbeknown to me, they require you to use the username: foo, password: foobar. Then upload your newly minted *.zip file.
12. Download the resulting *.exe, which will be named whatever you called your *.zip file.
Now you’re ready to give the *.exe to your client, right? Not just yet — now we have to set up your host computer to “listen” for clients which are going to try to connect to you via port 5500. To get the UltraVNC viewer, you’ll need to have the regular UltraVNC installed, and just choose Viewer if you don’t want the server as well during install.
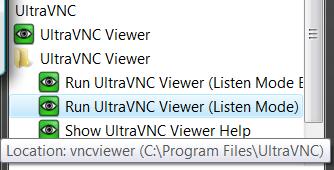
13. With the UltraVNC viewer installed, go to your start menu and find UltraVNC > UltraVNC Viewer (Listen Mode). Run it. When you do, you’ll see a green eye appear in your system tray.
Curiously, this icon is the same color as previous versions of UltraVNC server which would change from blue when idle, to green when connected. Nonetheless, you know it’s in listening mode by just hovering over it. Again, make sure your firewall isn’t blocking anything. If you want to “verify” that the port is listening, open up a command prompt and type netstat -a and check for port 5500 and a status of “Listening.”
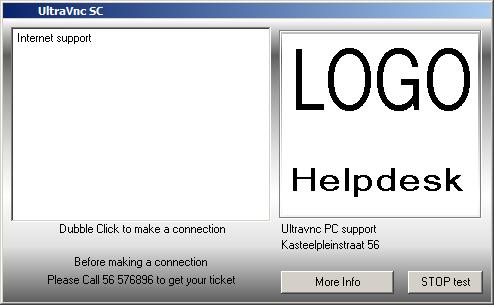
14. With all the aforementioned in place, your clients are ready to connect! Send them your *.exe and it will look like this by default:
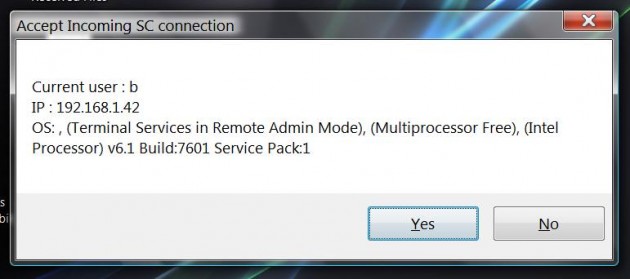
Most aspects of this awkward looking client executable are changeable. You’ll obviously want to change this if you plan to use this seriously. Your client simply has to double click “Internet support” to initiate the connection. When they do, you’ll be presented with a popup that looks something like this:
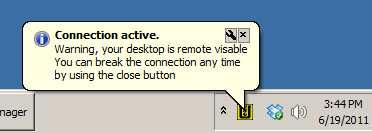
15. Click Yes and you will be able to see their desktop, and your client will be presented with this default, incorrectly spelled message:
Your client can close the connection by right clicking on the VNC icon on his/her system tray, and choosing close. Or you can close it at any time by just closing the UltraVNC Viewer window.
Important: My tests conclude that when doing an UltraVNC SC connection with a client running Windows Vista or 7 with Aero enabled, there is a 15-21 second delay even over lightning-fast connections. This is unacceptable. If you believe your client is running a system with Aero enabled, you must disable it or UltraVNC SC will be nearly unusable! Because your client is in dire need of remote assistance, they probably have no idea what Aero is — so make it easy for them and disable it via a simple batch script on their system which runs the following commands:
net stop uxsms (to disable Aero), and a pause with a message then, net start uxsms (to enable Aero). All you have to do is hit any key in the command prompt window before closing your session!
[disable and enable aero batch file]
net stop uxsmsecho offclsecho Press any key to re-enable Windows Aero.pausenet start uxsmsexit
You will find that with Aero off, the speed is super quick. It seems a lot more complex than it really is with all the steps laid out like this — but it’s really not that bad. Once you’ve got it set up, it’s easy to deploy to all your clients. Good luck!


 LibreOffice
 Firefox
No comments:
Post a Comment