Bienvenido! - Willkommen! - Welcome!

Bitácora Técnica de Tux&Cía., Santa Cruz de la Sierra, BO
Bitácora Central: Tux&Cía.
Bitácora de Información Avanzada: Tux&Cía.-Información
May the source be with you!

Monday, October 31, 2011

Core status C0000135

on folding@home distributed computing
Main CoreStatus Codes

64
Folding@home Core Shutdown: FINISHED_UNIT
CoreStatus = 64 (100)
Sending work to server
66 
Folding@home
Core Shutdown: INTERRUPTED CoreStatus = 66 (102)
+ Shutdown requested by user. Exiting.***** Got a SIGTERM signal (15) Killing all core threads Folding@Home Client Shutdown.
Also see GPU Error Codes
There are unexplained reports where this message is received but nobody interrupted the WU.
72
Folding@home Core Shutdown: BAD_WORK_UNIT CoreStatus = 72 (114) Sending work to server
Possibly memory issues, see:
Folding-community: vgt's post in Folding@Home Common Errors
Folding-community: bad work unit
Folding@home Core Shutdown: EARLY_UNIT_END CoreStatus = 72 (114) Sending work to server
The EARLY_UNIT_END error is returned whenever a WU dies with a known error that can provide useful results. All this error code signifies is that the results can be returned even though the MD calculations failed. The points received are proportional to the work done. The causes can be machine related (see link below). It is also possible that several machines EUE on it at the same point, but that it is completed (100%) by yet another. Folding-community: Uncle_Fungus' post in EUE #771 - Partial Log Pasted
Read more at Early Unit End for descriptions and possible causes.
99 
CoreStatus = 63 (99)
This error has been noted when switching from one version of the Windows SMP to another.
Apparently a WU started with one version of MPI cannot be completed with the other version.
If you need to switch versions, use the -oneunit flag to finish the current WU first or discard the active WU.


Other CoreStatus Codes
Non-fatal
62
CoreStatus = 62 (98)
+ Restarting core (settings changed)
6E 
Folding@Home Core Shutdown: CORE_OUTDATED
CoreStatus = 6E (110)
+ Core out of date. Auto updating...
If the new dowloaded core still fails with the same error then it is likely that there is an assignment issue server-side at Stanford. Report the case and delete the WU.
Folding-community: Core Status 6e .. FahCore_7a.exe (not?)
At the extreme you'll need to download the beta core manually for normal operation:
Folding-community: DoubleTop's post in Core Status 6e .. FahCore_7a.exe (not?)
Downloading FAH Core files manually

Fatal 
...

C0000135 
CoreStatus = C0000135 (-1073741515) Client-core communications error: ERROR 0xc0000135 
This is a sign of more serious problems, shutting down.
Error C0000135 is a Windows error which means it was unable to locate a component.
It could be an installation error if the .dll files used by FAH are not where they are supposed to be.
Also, you may have been infected by a virus, which was partially removed.
GPU Error Codes

Buffer Overflows

Source

Laptop Recovery Instructions

Source
Laptop Recovery Instructions
http://www.nec-computers.com/support/
Select your model and download the Users Guide. You need to extract the files and open Main.htm. Search for RECOVERY topic.
Example (for i-Select M5210):
Once the NEC logo appears, press the F11 key

Standard Acer Recovery Instructions
1. Power on the machine
2. At the white ACER BIOS screen, hold the “Alt” key and press the “F10” key simultaneously to start Acer eRecovery
3. Once eRecovery has loaded, click “Restore to Factory Default Settings”
4. Click “OK” to continue
5. From here, the eRecovery process will update all the data on the C: drive and restore a fully functional factory image (approximately 10 minutes).
6. Once eRecovery has run, press “OK” to reboot unit
Asus Laptop Recovery
Tap on F9 when Asus logo appears.. for details, follow link below:
http://support.asus.com/technicaldoc...e=en-us&NO=498

Dell Recovery Instructions
Here are the recovery instructions from Dell.
1. Reboot, and press Ctrl + F11 at the Dell logo.
2. The Dell™ PC Restore by Symantec screen will come up.
3. Select "Restore" or use the Tab key to highlight it and press Enter.
4. if you wish to continue, click "Confirm", or use the Tab key to highlight it and press Enter.
5. When the utility is finished, click "Finish", or use the Tab key to highlight it and press Enter. 
EI Systems laptop recovery instructions
To start the recovery, press the F10 key when you first turn on your computer. Tap F10 repeatedly until you see 'Starting System Recovery'.
From there you can choose to do Format or a Non-destructive recovery.
For more information on EI Systems 3085 recovery (may work with other models), refer to this website
Fujitsu Recovery Instructions
http://www.fujitsu.com/sg/services/c.../recovery.html
HP/Compaq Recovery Instructions
Here are recovery instructions for HP/Compaq laptops.
1. Reboot, and repeatedly press F10 at the HP logo until the recovery screen appears.
2. When the recovery screen appears, press "Next" and then "Yes" to perform a non-destructive recovery.
3. To perform a destructive recovery, click "Advanced" and then "Yes".
4. After the recovery is finished, the laptop will reboot.
IBM Thinkpad laptop recovery
To access pre-boot service partition to recover your software:
http://www-307.ibm.com/pc/support/si...id=MIGR-4UFUYK
To access service partition when linux changed F11 function:
http://www-307.ibm.com/pc/support/si...IGR-46088.html
To get a Product Recovery CD or DVD:
http://www-307.ibm.com/pc/support/si...7HWZ#partition
Gateway Recovery Instructions
Here are the Gateway Recovery Instructions.
1. Reboot, and press F11 or the R key to start the recovery process.
2. Select either "Full System Restore (Destructive)" or "Full System Restore (With Backup)"*.
3. Click "Next", and then click "Yes" to confirm the recovery process.
4.Wait for the computer to restore itself. When it is done, click "Reboot" to reboot the computer.
*Full System Restore With Backup preserves data in the My Documents folder, but requires 4 GB of disk space.
Laptop Recovery for Sony Vaio
When the VAIO logo appears on the computer's screen, briefly press the F10 key on the computer keyboard.
The VAIO Recovery Wizard appears.
Other options here:
http://www.kb.sony.com/selfservice/m...200%2034432948
Packard Bell laptop recovery
When the Packard Bell logo appears, press the
F11 key for a few seconds to start the Recovery Program.
Toshiba laptop recovery
Recovery procedure for Toshiba laptops (may not work for all models but worth a try).
http://cdgenp01.csd.toshiba.com/cont...208010_web.pdf
http://cdgenp01.csd.toshiba.com/cont...339010_web.pdf
 

Uso correcto del teclado para windows

incredibly dumb inventions11

Sunday, October 30, 2011

Recovering RAID


Source
Source
Recover all types of corrupted RAID arrays
Recover corrupted RAID arrays in a fully automatic mode. DiskInternals Raid Recovery is the first tool to automatically detect the type of the original RAID array while still allowing for fully manual operation. Raid Recovery is no doubt a highly valuable tool for users of all types of RAID arrays, whether hardware, native, or software. The drag-and-drop user interface allows for easy operation by anyone.
Product features:
  • RAID JBOD, 0, 1, 1E, RAID 4, RAID 5, 0+1 and 1+0
  • RAID-enabled motherboard from NVidia, Intel, or VIA
  • Adaptec RAID Controllers and DDF compatible devices
  • Microsoft software raids (also called Dynamic Disks)
  • Linux software raids
  • All features from DiskInternals Partition Recovery
  • All features from DiskInternals Uneraser
Download | Buy Now | Raid Recovery
oron.com/
Raid Recovery” is the first tool to automatically detect the type of the original RAID array while still allowing for fully manual operation. Raid Recovery is no doubt a highly valuable tool for users of all types of RAID arrays, whether hardware, native, or software. Due to the drag-and-drop interface you will be able to specify parts of the RAID array just by dragging and dropping the icons that represent the disks.
Reconstruct all types of arrays just as easily as a single hard disk. Raid Recovery recognizes all imaginable configurations of various types of arrays, including RAID 0, 1, JBOD, RAID 5, and 0+1, no matter whether they are connected to a dedicated RAID controller or a RAID-enabled motherboard from NVidia, Intel, or VIA. Microsoft software raids (also called Dynamic Disks) are also supported, including JBOD (span), RAID 0, 1, and 5 configurations.
Detecting the right type of an array is vital for correct recovery. “Raid Recovery” supports both manual and fully automatic detection of essential parameters such as type of array, type of RAID controller, stripe size, and disk order.
Assemble RAID configurations manually via a simple drag-and-drop operation. Raid Recovery re-constructs an array from the available hard disks being simply dragged and dropped, and detects the right type and size or the array as well as the order of the disks automatically. Anyone can recover broken RAID arrays with Raid Recovery!
Raid Recovery gives top priority to your data, allowing you to recover and back up all files from the corrupted array before attempting to fix it. You can store the files on another hard disk or partition, use a recordable CD or DVD, or even upload the files over FTP. Raid Recovery uses advanced search algorithms that allow recovering important files such as documents, pictures and multimedia even if there is a missing disk in the array, or if the file system is missing or damaged.
Here are some key features of “DiskInternals Raid Recovery”:
· Recovered files can be Uploaded to Ftp or NAS!
· Recovered files can be burned to CD or DVD!
· Preview recoverable files before purchasing the product.
· Easy Recovery Wizard.
· Supported file systems: FAT16, FAT32, EXT2, EXT3, NTFS, NTFS 4, NTFS 5.
· Recovered files can be saved on any (including network) disks visible to the host operating system.
· Creates recovery snapshot files for logical drives. Such files can be processed like regular disks.
· Creates Virtual partitions. Such partitions can be processed like regular disks.

Voller Zugriff in der Konsole

Source
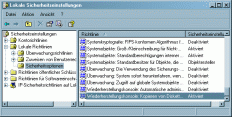
Um den Zugriff auf alle Laufwerke und Ordner dennoch zu erhalten, müssen Sie noch in Windows einige Einstellungen an den Sicherheitsrichtlinien vornehmen. Dazu gehen Sie unter Start/Einstellungen auf Systemsteuerung und wählen dort Verwaltung/Lokale Sicherheitsrichtlinie aus. Anschließend gehen Sie im linken Fensterteil auf Lokale Richtlinien/Sicherheitsoptionen. Rechts sollten Sie nun relativ weit unten den Eintrag Wiederherstellungskonsole: Kopieren von Disketten und Zugriff auf alle Laufwerke und alle Ordner zulassen finden.
Änderung an der Richtlinie
Klick aufs Bild zum Vergrößern
Klicken Sie jetzt mit der rechten Maustaste auf den entsprechenden Eintrag und wählen Eigenschaften, im sich nun öffnenden Fenster markieren Sie das Optionsfeld Aktiviert.
Die Einstellung kann alternativ auch über die Registry vorgenommen werden:
Unter HKEY_LOCAL_MACHINE\ SOFTWARE\ Microsoft\ Windows NT\ CurrentVersion \Setup\ RecoveryConsole
erstellt man den REG_DWORD-Eintrag SetCommand mit dem Wert 1 und bootet den PC neu.
Achtung: Windows XP Home ist an dieser Stelle beschränkt und bietet keine Richtlinien. In diesem Fall müssen Sie die Änderungen über die Registry vornehmen. Dann können die folgenden SET-Befehle auch genutzt werden.
Wenn Sie anschließend in der Konsole arbeiten, können Sie mit dem Befehl
SET AllowAllPaths=true
den Zugriff auf alle Verzeichnisse und Dateien freigeben. Haben Sie die vorhergehende Option nicht aktiviert, so haben Sie keine Möglichkeit, auf die jeweiligen Verzeichnisse zuzugreifen. Es ist also empfehlenswert, vorher die Änderung vorzunehmen, denn wenn Windows bereits nicht mehr startet, hat dies wenig Sinn. Die Richtlinienänderung (s.o.) schaltet letztlich nur die Nutzung der speziellen SET-Befehle frei.
Weitere SET Befehle für die Konsole sind:
SET AllowWildCards=true
=erlaubt Platzhalter bei der Dateisuche, löschen etc.
SET AllowRemovableMedia=True
=erlaubt Zugriff auf Wechselmedien
SET NoCopyPrompt=True
=keine Rückfrage bei Kopieraktionen
Wer will, kann alle Befehle in eine BATCH-Datei schreiben, um so die Freischaltung bei Bedarf zu automatisieren.
Sichern und Wiederherstellen aus der Konsole
Um eine Sicherung der Registry-Dateien vorzunehmen, starten Sie die Konsole und erstellen zunächst einen neuen Ordner, in dem Sie die Sicherung aufbewahren können. Am besten ist es, wenn Sie diesen Ordner auf einem anderen Laufwerk erstellen, somit ist die Sicherheit wesentlich höher, als wenn Sie alles auf demselben Laufwerk machen. Den Ordner können Sie mit dem Befehl md C:\sicherung erstellen. Um jetzt alle relevanten Dateien in diesen gerade erstellten Ordner zu kopieren, geben Sie folgende Befehle ein:
copy C:\windows\system32\config\system C:\sicherung\system.bak
copy C:\windows\system32\config\software C:\sicherung\software.bak
copy C:\windows\system32\config\sam C:\sicherung\sam.bak
copy C:\windows\system32\config\security C:\sicherung\security.bak
copy C:\windows\system32\config\default C:\sicherung\default.bak
Die aktuell defekten Registrierungsdateien löschen Sie danach mit den folgenden Befehlen:
del C:\windows\system32\config\system
del C:\windows\system32\config\software
del C:\windows\system32\config\sam
del C:\windows\system32\config\security
del C:\windows\system32\config\default
Wollen Sie nun eine vorhandene Registry-Sicherung, die Windows automatisch erstellt hat, wiederherstellen, so geben Sie copy repair\(regback\) system32\config\ ein. Statt geben Sie den Namen der wiederherzustellenden Datei an. Wenn Sie alle benötigten Dateien zurückgespielt haben, können Sie die Konsole mit dem Befehl exit wieder verlassen. Der Computer startet jetzt automatisch neu und sollte hoffentlich wieder richtig laufen.
Sie haben in der Wiederherstellungskonsole aber auch noch andere Möglichkeiten, Ihr System zu reparieren oder Änderungen vorzunehmen. Nachfolgend sehen Sie eine Liste aller Befehle, die Sie in der Konsole verwenden können. Besonders Bootcfg, listsvc und fixmbr sind von besonderem Interesse.attrib Ändert die Attribute einer Datei oder eines Verzeichnisses.
  • batch = Führt die Befehle aus, die in der Textdatei aufgeführt sind
  • bootcfg = Konfiguration und Wiederherstellung der Startdatei (boot.ini)
  • chDir (cd) = Zeigt den Namen des aktuellen Verzeichnisses an oder wechselt das aktuelle Verzeichnis.
  • chkdsk = Überprüft einen Datenträger und zeigt einen Statusbericht an.
  • cls = Löscht die Bildschirmanzeige.
  • copy = Kopiert eine einzelne Datei in einen anderen Pfad.
  • delete (del) = Löscht eine oder mehrere Dateien.
  • dir = Zeigt eine Liste der Dateien und Unterverzeichnisse in einem Verzeichnis an.
  • disable = Deaktiviert einen Systemdienst oder einen Gerätetreiber.
  • diskpart = Verwaltet Partitionen auf den Festplatten.
  • enable = Startet oder aktiviert einen Systemdienst oder einen Gerätetreiber.
  • exit = Beendet die Wiederherstellungskonsole und startet den Computer neu.
  • expand = Extrahiert eine Datei aus einer komprimierten Datei.
  • fixboot = Schreibt einen neuen Partitionsbootsektor auf der angegebenen Partition.
  • fixmbr = Repariert den MBR (Master Boot Record) des angegebenen Datenträgers.
  • format = Formatiert einen Datenträger.
  • help = Zeigt eine Liste der Befehle an, die in der Wiederherstellungskonsole zur Verfügung stehen.
  • listsvc = Zeigt eine Liste der auf dem Computer verfügbaren Dienste und Treiber an und kann diese über „DISABLE“ abschalten, falls diese den Start verhindern
  • logon = Meldet sich bei einer Windows-Installation an.
  • map = Zeigt die Laufwerkzuordnung an.
  • mkdir (Md) = Erstellt ein Verzeichnis.
  • more = Zeigt eine Textdatei an.
  • net Use = Verbindet eine Netzwerkfreigabe mit einem Laufwerkbuchstaben.
  • rename (Ren) = Benennt eine einzelne Datei um.
  • rmdir (Rd) = Löscht ein Verzeichnis.
  • set = Zeigt Umgebungsvariablen an und legt diese fest.
  • systemroot = Legt als aktuelles Verzeichnis das Verzeichnis systemroot des Systems fest,bei dem Sie aktuell angemeldet sind.
  • type = Zeigt eine Textdatei an.
Diese sind auch in der Hilfe der Konsole beschrieben, die Sie mit dem Befehl help aufrufen können.
Die Befehle der Wiederherstellungskonsole sind zum größten Teil spezialisierte Kommandos für das Reparieren des Systems und haben mit DOS-Befehlen nicht viel gemeinsam. So kann man z.B. über spezielle Befehle Treiber und Services aktivieren oder deaktivieren oder den Master Boot Record der Festplatte neu schreiben lassen. Dafür fehlen andere Möglichkeiten, z.B. das Bearbeiten von Dateien, das Benutzen von Wildcards oder das Kopieren von Dateien auf Diskette. Einige Einschränkungen lassen sich aber mit Hilfe des set-Kommandos aufheben.
ERUNT das Supertool
Das Tool ERUNT schafft Abhilfe beim Sichern der Registry. Es sichert aus dem Betriebssystem heraus alle relevanten Registry-Hives und speichert diese an einem anderen Ort. Auch eine automatische Arbeit über Parameter ist möglich. Für den Fall, dass die Registry beschädigt ist, kann man diese aus DOS heraus mit dem Tool wieder herstellen. Es empfiehlt sich daher, die Dateien nicht auf einem NTFS-Laufwerk zu sichern und das Tool auf einer Diskette für Notfälle zu speichern. Zusammen mit dem Taskplaner kann man so wöchentlich seine Registry sichern. Vor Benutzung sollte man die umfangreiche Liesmich.txt lesen.
Die Freeware findet sich im Downloadbereich von WinTotal.

Gebäudesystemtechnik KNX

http://www.eib-home.de/instabus_eib_home.htm

BootDisk2BootStick

Quelle


Dieses Tool stellen wir kostenlos zum download bereit.
Aus diesem Grund können wir keinen telefonischen Support für die Software anbieten.
Anfragen per e-Mail werden wir Ihnen gerne beantworten.

Mit BootDiskToBootStick kann man seinen USB-Stick Bootfähig machen.
Als Quelle dient dabei eine Boot-Diskette oder das Binäre Image einer Boot-Diskette
So kann man  endlich völlig auf sein altes Diskettenlaufwerk verzichten!
Download
Fertige BootDiskImages gibts unter:
Achtung das Microsoft .NET Framework Version 4.0 Redistributable Package muss installiert sein!
------------------------------------------
1   Link   BartPE von einem BootStick starten
PeToUSB ist eine Win32 GUI Applikation um eine BartPE CD auf einen USBStick zu bannen.

2   Link   KNOPPIX von einem USB Memory Stick Booten
KNOPPIX von einem USB Memory Stick booten


Data Destruction on Demand

www.securedrives.co.uk

Solid State Security: How SecureDrives Answered the Data Destruction Issues of SSDs Solid State storage has been an integral part of mainstream storage solutions for some time and is slowly starting to make appearances in laptops and tablets.

Fortuito placer

Der Begriff Serendipität (auch: Glücksfund, engl. Serendipity), gelegentlich auch Serendipity-Prinzip bzw. Serendipitätsprinzip, bezeichnet eine zufällige Beobachtung von etwas ursprünglich nicht Gesuchtem, das sich als neue und überraschende Entdeckung erweist.[1] Verwandt, aber nicht identisch, ist der weiter gefasste Begriff „glücklicher Zufall“. Serendipität betont zusätzlich „Untersuchung“; auch „intelligente Schlussfolgerung“ oder Findigkeit.
Serendipity in der Informationswissenschaft
Auch im Bereich des Information Retrievals können Serendipitätseffekte eine Rolle spielen, wenn beispielsweise beim Surfen im Internet unbeabsichtigt nützliche Informationen entdeckt werden (dabei ist nicht der Zustand der Desorientierung in Hypertexten und virtuellen Informationsräumen gemeint, diesen bezeichnet man als Lost in Hyperspace). Aber auch bei der Recherche in professionellen Datenbanken und vergleichbaren Informationssystemen kann es zu Serendipity-Effekten kommen. Hier wird die Serendipity zu einem Kennwert der Fähigkeit eines Informationssystems, auch im eigentlichen Ballast nützliche Informationen zu finden.
Der Wert der unten genannten Formel zeigt, wie weit ein Informationssystem fähig ist, auch im Ballast einer Suche nützliche Informationen zu finden.
S = \frac{b(s)}{b}
S: Serendipity
b(s): Anzahl der brauchbaren Dokumente im Ballast – wenn auch für ein anderes Suchargument!
b: Anzahl der für das Suchargument nicht relevanten Dokumente (siehe Recall und Precision)
Der Serendipity-Effekt ist nicht auf Hypertexte beschränkt, sondern tritt auch beim Stöbern in der Freihandaufstellung einer Bibliothek oder dem Angebot einer gut sortierten Buchhandlung auf.[2] Dafür wurde bereits lange vor dem Aufkommen des Internets der Begriff Browsing verwendet.
linux-magazin.de/User-friendly  
userfriendly.org

DiskInternals Linux Reader

Source
This easy-to-use tool runs under Windows and allows you to browse Ext2/3/4, HFS and ReiserFS file systems
There are a number of evident merits of the program, which you should know. First of all, DiskInternals Linux Reader is absolutely free. Secondly, the program provides for read-only access and does not allow you to make records in file system partitions. This guarantees that the interference in an alterative file system will not affect the work of Linux later. Apart from this, it is necessary to note, that it gives you an opportunity to use common Windows Explorer for extracting data. A preview option for pictures is one more pleasant point, which is worth mentioning.
How to get safe and quick access to any file systems? DiskInternals Linux Reader is an easy and short way to solve the problem!
While saving, it ignores file security policies. It means that it is possible to access absolutely any file on a Linux disk from Windows. The program can create and open disk images.
Linux Reader is 100% FREE.
Try it now. You can download a full-featured freware version of DiskInternals Linux Reader for free.
Download Now 

google bomb


The terms Google bomb and Googlewashing refer to practices, such as creating large numbers of links, that cause a web page to have a high ranking for searches on unrelated or off topic keyword phrases, often for comical or satirical purposes. In contrast, search engine optimization is the practice of improving the search engine listings of web pages for relevant search terms.
It is done for either business, political, or comedic purposes (or a combination of the latter two).[1] Google's search-rank algorithm ranks pages higher for a particular search phrase if enough other pages linked to it using similar anchor text (linking text such as "miserable failure"). However, by January 2007 Google had made changes to search results to counter popular Google bombs, such as "miserable failure", which now lists pages about the Google bomb itself.[2] Google bomb is used both as a verb and a noun. The phrase "Google bombing" was introduced to the New Oxford American Dictionary in May 2005.[3] Google bombing is closely related to spamdexing, the practice of deliberately modifying HTML pages to increase the chance of their website being placed close to the beginning of search engine results, or to influence the category to which the page is assigned in a misleading or dishonest manner.
The term Googlewashing was coined in 2003 to describe the use of media manipulation to change the perception of a term, or push out competition from search engine results pages (SERPs).[4]

Saturday, October 29, 2011

Medidas contra el SPAM

Das-Anti-Spam-Arsenal.pdf 450,03 kB

NAS: Multistores

NAS-Round-up: Multi-Stores
Update 
nas-portal.org
forum.nas-portal.org
Günstig-und-Stromsparend-Komponentenwahl 
e-bug.de

IPfire

IPFire ist eine Firewall-Distribution für den optimalen Einsatz in mittleren bis kleinen Unternehmensnetzwerken und Heimnetzwerken.
Obwohl das System extrem schlank gehalten wurde, können Addons mit nur einem Klick installiert werden. Diese Eigenschaft unterscheidet IPFire von anderen Distributionen: IPFire ist einfach zu administrieren hat aber genug Leistung um allen Anforderungen gewachsen zu sein.
http://forum.ipfire.org/index.php?topic=550.0
http://forum.ipfire.org/index.php?topic=5426.msg38494;topicseen#msg38494
http://forum.ipfire.org/index.php?topic=1685.0
http://forum.ipfire.org/index.php?topic=2859.0
http://forum.ipfire.org/index.php?topic=4866.0

Friday, October 28, 2011

QoS unter Linux

BESTE INFORMATION!
Datenleitungen nach Maß von Peter Gastinger 29.05.2009
Neulich in der Firma: Die VoIP-Qualität wird gelegentlich unerträglich mies, das muss besser werden. Wenn aber niemand telefoniert, sollen bitte die Downloads flotter gehen. Die Lösung firmiert unter dem Schlagwort Quality of Service (QoS). Dieser Artikel zeigt in Theorie und Praxis, wie sich das QoS-Modell Differentiated Services unter Linux umsetzen lässt.
Quality of Service (QoS) wird von vielen Netzwerkverantwortlichen, vor allem im Local Area Network (LAN), noch immer als überflüssig eingestuft. Meist wird versucht, schlechte Performance durch mehr Bandbreite zu lösen. Was aber verhindert, dass ein defektes Netzwerkgerät die gesamte Bandbreite beansprucht und dadurch unternehmenskritische Anwendungen beeinträchtigt?
Ein Beispiel dafür ist eine Voice over IP (VoIP)-Anwendung, die für eine gute Gesprächsqualität ein Netzwerk mit vorhersagbarem Verhalten erfordert. Genau das bietet Quality of Service: ein Netzwerk mit konstanter, geringer Verzögerung, geringem Packet Loss und garantierter Bandbreite für wichtige Anwendungen auch bei starker Netzwerkauslastung.
Modelle für Qualität
Es gibt drei verschiedenen QoS-Modelle: Best Effort, Integrated Services (IntServ) und Differentiated Services (DiffServ). Beim Best Effort-Modell gibt es keine Priorisierung, es ist wegen der Einfachheit und guten Skalierbarkeit auch das gebräuchlichste Modell. Das IntServ-Modell verwendet RSVP (Resource Reservation Protocol) um Bandbreite zwischen zwei Endgeräten zu reservieren, die ausschließlich für diese Pakete verwendet werden kann. Dadurch ist dieses Modell nur schlecht skalierbar und wenig verbreitet.
Beim DiffServ-Modell wird von Hop zu Hop entschieden, wie die Pakete behandelt werden. Es ist keine vorhergehende Signalisierung wie beim IntServ-Modell notwendig, wodurch das Modell skalierbar und leicht zu implementieren ist. Dieser Artikel demonstriert die Umsetzung von Differentiated Services in einem kleinen Linux-Netzwerk.
Für das DiffServ-Modell sind folgende Schritte notwendig: Klassifizierung, Markierung und Priorisierung.
More  
Seite 2 3 4

lighttpd

lighttpd.net
Security, speed, compliance, and flexibility -- all of these describe lighttpd (pron. lighty) which is rapidly redefining efficiency of a webserver; as it is designed and optimized for high performance environments. With a small memory footprint compared to other web-servers, effective management of the cpu-load, and advanced feature set (FastCGI, SCGI, Auth, Output-Compression, URL-Rewriting and many more) lighttpd is the perfect solution for every server that is suffering load problems. And best of all it's Open Source licensed under the revised BSD license.
Web 2.0
lighttpd powers several popular Web 2.0 sites like YouTube, wikipedia and meebo. Its high speed io-infrastructure allows them to scale several times better with the same hardware than with alternative web-servers.
This fast web server and its development team create a web-server with the needs of the future web in mind:
Its event-driven architecture is optimized for a large number of parallel connections (keep-alive) which is important for high performance AJAX applications.

stop 0xc000021a (schwerer system fehler)


windows logon process unerwartet beendet
status 0xc0000135 (0x00000000, 0x00000000)
"Stop C000021a (schwerer Systemfehler) Der Systemprozeß Windows Logon Process wurde unerwartet beendet Status 0XC0000135 (0x00000000 0x00000000)
Cause
The STOP 0xC000021A error occurs when either Winlogon.exe or Csrss.exe fails. When the Windows NT kernel detects that either of these processes has stopped, it stops the system and raises the STOP 0xC000021A error. This error may have several causes. Among them are the following:
  • Mismatched system files have been installed.
  • A Service Pack installation has failed.
  • A backup program that is used to restore a hard disk did not correctly restore files that may have been in use.
  • An incompatible third-party program has been installed.
==============
Source
Winlogon is trying to load a DLL and failing. Your machine won't run without Winlogon, it's a fundamental part of the OS, so it crashes.
Barte PE Builder starten und alle DLLs von Barts PE system32 (nur die DLLs) in Windows/system32 auf der Platte reinkopieren (nichts überschrieben, nur fehlende ersetzen!)

support.microsoft.com/kb/156669
Note Most STOP 0xC000021A errors occur because Winlogon.exe fails. This typically occurs because of a faulty third-party Graphical Identification and Authentication (GINA) DLL.
The GINA is a replaceable DLL component that Winlogon.exe loads. The GINA implements the authentication policy of the interactive logon model. The GINA performs all identification and authentication user interactions.
Bug Check 0xC000021A: STATUS_SYSTEM_PROCESS_TERMINATED
Cause
This error occurs when a user-mode subsystem, such as WinLogon or the Client Server Run-Time Subsystem (CSRSS), has been fatally compromised and security can no longer be guaranteed.
In response, the operating system switches to kernel mode. Microsoft Windows cannot run without WinLogon or CSRSS.
Therefore, this is one of the few cases where the failure of a user-mode service can shut down the system.
Mismatched system files can also cause this error. This can occur if you have restored your hard disk from a backup. Some backup programs might skip restoring system files that they determine are in use.
Running the kernel debugger is not useful in this situation because the actual error occurred in a user-mode process.
Resolving an error in a user-mode device driver, system service, or third-party application:  
Because bug check 0xC000021A occurs in a user-mode process, the most common culprits are third-party applications.
If the error occurred after the installation of a new or updated device driver, system service, or third-party application, the new software should be removed or disabled. Contact the manufacturer of the software about a possible update.
If the error occurs during system startup, restart your computer, and press F8 at the character-based menu that displays the operating system choices. At the resulting Windows Advanced Options menu, choose the Last Known Good Configuration option. This option is most effective when only one driver or service is added at a time. If this does not resolve the error, try manually removing the offending software. If the system partition is formatted with file allocation table (FAT), use an MS-DOS startup disk to gain access to the computer's hard disk. If the system partition is formatted with NTFS file system, you might be able to use Safe Mode to rename or delete the faulty software. If the faulty software is used as part of the system startup process in Safe Mode, you need to start the computer using the Recovery Console in order to access the file. If a newly installed piece if hardware is suspected, remove it to see if this resolves the issue.
Try running the Emergency Recovery Disk (ERD) and allow the system to repair any errors that it detects.
Resolving a mismatched system file problem: If you have recently restored your hard disk from a backup, check if there is an updated version of the Backup/Restore program available from the manufacturer. Make sure the latest Windows Service Pack is installed.
==================  ===================
Boote mit der Win XP-CD und führe eine Reparatur-Installation durch. Ich denke deaktivieren von Diensten und treibern in der Reparaturkonsole wird zu kompliziert.
==================  ===================
0xC0000135: UNABLE TO LOCATE DLL
Windows attempted to load a DLL file and encountered some error condition. Among the many possible causes are that the file is missing or damaged, or that there is Registry corruption. mögliche Lösungen dafür:
http://support.microsoft.com/?kbid=173309&sd=RMVP
http://support.microsoft.com/?kbid=318159&sd=RMVP
==================  ===================
Cause This error occurs when a user-mode subsystem, such as WinLogon or the Client Server Run-Time Subsystem (CSRSS), has been fatally compromised and security can no longer be guaranteed. In response, the operating system switches to kernel mode. Microsoft Windows cannot run without WinLogon or CSRSS. Therefore, this is one of the few cases where the failure of a user-mode service can shut down the system.
Mismatched system files can also cause this error. This can occur if you have restored your hard disk from a backup. Some backup programs might skip restoring system files that they determine are in use.
This error occurs when a user-mode subsystem, such as WinLogon or the Client Server Run-Time Subsystem (CSRSS), has been fatally compromised and security can no longer be guaranteed. In response, the operating system switches to kernel mode. Microsoft Windows cannot run without WinLogon or CSRSS. Therefore, this is one of the few cases where the failure of a user-mode service can shut down the system.
Mismatched system files can also cause this error. This can occur if you have restored your hard disk from a backup. Some backup programs might skip restoring system files that they determine are in use.
Resolution
Running the kernel debugger is not useful in this situation because the actual error occurred in a user-mode process.
Resolving an error in a user-mode device driver, system service, or third-party application: Because bug check 0xC000021A occurs in a user-mode process, the most common culprits are third-party applications. If the error occurred after the installation of a new or updated device driver, system service, or third-party application, the new software should be removed or disabled. Contact the manufacturer of the software about a possible update.
If the error occurs during system startup, restart your computer, and press F8 at the character-based menu that displays the operating system choices. At the resulting Windows Advanced Options menu, choose the Last Known Good Configuration option. This option is most effective when only one driver or service is added at a time. If this does not resolve the error, try manually removing the offending software. If the system partition is formatted with file allocation table (FAT), use an MS-DOS startup disk to gain access to the computer's hard disk. If the system partition is formatted with NTFS file system, you might be able to use Safe Mode to rename or delete the faulty software. If the faulty software is used as part of the system startup process in Safe Mode, you need to start the computer using the Recovery Console in order to access the file. If a newly installed piece if hardware is suspected, remove it to see if this resolves the issue.
Try running the Emergency Recovery Disk (ERD) and allow the system to repair any errors that it detects.
Resolving a mismatched system file problem: If you have recently restored your hard disk from a backup, check if there is an updated version of the Backup/Restore program available from the manufacturer. Make sure the latest Windows Service Pack is installed.
0xC000021A: STATUS_SYSTEM_PROCESS_TERMINATED
Diese Nachricht tritt auf, wenn Windows in den Kernelmodus wechselt und dadurch ein Subsystem gefährdet ist und die Sicherheit nicht mehr garantiert werden kann. Weitere Ursache könnten fehlerhafter Grafikkartentreiber und/oder Systemdienst eines Drittanbieters sein.
 Mögliche Ursache:
1. Fehlerhafter Gerätetreiber
2. Fehlerhafter Systemdienst eines Drittanbieters
Mögliche Lösungsansätze:
1. Melde Dich als Admin an und führe folgende Befehle aus:
       Start/Ausführen - cmd              [Enter] drücken
    hier dann folgendes eintippen
        sfc /scannow                             [Enter] drücken
2. Start | Ausführen - msconfig.exe
    Gehe dann zu Dienste und setze zuerst einen Haken bei Alle Microsoft-Dienste ausblenden.
    Jetzt schalte alle übrigen ab und boote Dein Rechner neu. Schaue jetzt, ob eine Besserung
    eingetreten ist.
3. Treiber und Programme von Drittanbietern, die Probleme bereiten deinstallieren.
  (WinXP)
Nach der Installation von GoBack von Roxio (in Norton System Works enthalten) wird Ihnen möglicherweise sinngemäß
folgende Fehlermeldung angezeigt:
C000021a (schwerer Systemfehler). Der Systemprozess für die Sitzungs-Manager-Initialisierung wurde unerwartet mit Status 0xc000003a (0x00000000, 0x00000000) beendet (The Session Manager Initialization system process terminated unexpectedly
with a status of 0xc000003a).
  (WinXP Pro)
 (WinNT4.0/Win2000,/WinXP Pro/Server2003)
STOP: c000021a {Fatal System Error} The Windows Logon Process system process terminated unexpectedly with a status
of 0xc0000034 (0x00000000 0x0000000) The system has been shutdown.
=================  =================
Solution of error
To troubleshoot this problem, you must determine which of these processes failed and why.
To determine which process failed, register Dr. Watson as the default system debugger (if it is not already the default debugger). Dr. Watson for Windows NT logs diagnostic information about process failures to a log file (Drwtsn32.log). Also, you can configure this program to produce memory dump files of failed processes that you can analyze in a debugger to determine why a process fails.
To set up Dr. Watson to trap user-mode program errors, follow these steps:
  1. At a command prompt, type
    System Root\System32\Drwtsn32.exe -I
    and then press ENTER.
    This command configures Dr. Watson as the default system debugger.
  2. At a command prompt, type
    System Root\System32\Drwtsn32.exeand then select the following options:
    Append to existing log file
    Create crash dump
    Visual Notification
  3. After the computer restarts from the STOP 0xC000021A error, run Dr. Watson (Drwtsn32.exe).
  4. View the Dr. Watson log to determine what user mode process may be causing the problem.
  5. If the Dr. Watson log does not contain sufficient information to determine the cause of the problem, analyze the User.dmp file to determine the cause of the STOP 0xC000021A error.
    If Dr. Watson did not create a User.dmp file for either Winlogon.exe or Csrss.exe, you may have to use a different tool to generate a memory dump file of the process that fails. For more information, click the following article number to view the article in the Microsoft Knowledge Base:
    241215  How to use the Userdump.exe tool to create a dump file
    Note Follow the instructions in the Knowledge Base article to troubleshoot a process that shuts down with an exception. While you follow these instructions, monitor the following processes to troubleshoot the STOP 0xC000021A error:
    • Winlogon.exe
    • Csrss.exe
    Note Most STOP 0xC000021A errors occur because Winlogon.exe fails. This typically occurs because of a faulty third-party Graphical Identification and Authentication (GINA) DLL. The GINA is a replaceable DLL component that Winlogon.exe loads. The GINA implements the authentication policy of the interactive logon model. The GINA performs all identification and authentication user interactions.
It is very common for certain types of remote control software to replace the default Windows GINA DLL (Msgina.dll). Therefore, a good first step is to examine the system to see if it has a third-party GINA DLL. To do this, locate the following registry key:
HKEY_LOCAL_MACHINE\SOFTWARE\Microsoft\Windows NT\CurrentVersion\Winlogon


Value = GinaDLL REG_SZ
  • If the Gina DLL value is present and if it is anything other than Msgina.dll, it probably means that a third-party product has changed this value.
  • If this value is not present, the system uses Msgina.dll as the default GINA DLL.
If this error first occurred after the installation of a new or updated device driver, system service, or third-party program, the new software should be removed or disabled. Contact the manufacturer of the software to see if an update is available. For more information about hardware and software vendor contact information, visit the following Microsoft Web site: -
Last known good configuration  
If the previous steps in this article do not resolve the problem, start the computer by using the last known good configuration. To start the computer by using the last known good configuration, follow these steps:Note Because there are several versions of Microsoft Windows, the following steps may be different on your computer. If they are, see your product documentation to complete these steps.
  1. Click Start, and then click Shut Down.
  2. Click Restart, and then click OK.
  3. Press F8 at the indicated time:
    • For an x86-based computer: When a screen of text appears and then disappears , press F8. (The screen of text may include a memory test, lines about the BIOS, and other lines.) There may also be a prompt that tells you when to press F8.
    • For an Itanium architecture-based computer: After you make your selection from the boot menu, press F8. There may be a prompt that tells you when to press F8.
  4. Use the arrow keys to select Last Known Good Configuration, and then press ENTER.

    NUM LOCK must be off before the arrow keys on the numeric keypad will function.
  5. Use the arrow keys to highlight an operating system, and then press ENTER.
Notes
  • Choosing the Last Known Good Configuration startup option provides a way to recover from problems such as a newly added driver that may be incorrect for your hardware. However, it does not solve problems that are caused by corrupted or missing drivers or files.
  • When you choose the Last Known Good Configuration option, only the information in registry key HKLM\System\CurrentControlSet is restored. Any changes you have made in other registry keys remain.
In-place upgrade 
If the previous steps in this article do not resolve the problem, perform an in-place upgrade. For more information about how to do this,, click the following article numbers to view the articles in the Microsoft Knowledge Base:
292175  How to perform an in-place upgrade of Windows 2000
315341  How to perform an in-place upgrade (reinstallation) of Windows XP
816579  How to perform an in-place upgrade of Windows Server 2003
Remove incompatible software by using the Recovery Console 
If the previous steps in this article do not resolve the problem, remove incompatible software by using the Recovery Console. Complete steps that describe how to do this are beyond the scope of this article. However, you may be able to use the following articles as guidelines for performing this procedure.
313670  How to replace a driver by using Recovery Console in Windows 2000
816104  How to replace a driver by using Recovery Console in Windows Server 2003
326215  How to use the Recovery Console on a Windows Server 2003-based computer that does not start
229716  Description of the Windows 2000 Recovery Console
307654  How to install and use the Recovery Console in Windows XP
307545  How to recover from a corrupted registry that prevents Windows XP from starting
216417  How to install the Windows Recovery Console
=================   ==================
Fehlermeldung: Die Anwendung konnte nicht richtig initialisiert werden (0xc0000135).
Das Microsoft .NET Framework Version 2.0 Redistributable Package muss installiert werden !

mcseboard.de/stop-0xc000021a-waehrend-ausfuehrung-xp-setup
Speicherzugriffsverletzung: Status 0xc0000005 das ist schliesslich auch möglich..Speicher raus ... . 
Speicher raus ...

aaw7boot.log

Problem with uninstalled Lavasoft application
It remanins allways a log file
Solution
Delete the remains of the Lavasoft programs in the registry and under the folder Programs
Source
It seems like sometimes the uninstaller can leave behind lsdelete... This is a application that removes stuff on boot of the system (for those extra sneaky malware).
The file is located in c:/windows/system32/
If you remove it manually from there the issue should go away. Also, we will work on making sure the installer captures this file better.
Source
Uninstall adaware using the instructions shown here
Also delete the folder (if it exists):
C:\Documents and Settings\%USER%\Application Data\Lavasoft\
And rename the following file:
C:\Windows\System32\drivers\Lbd.sys
to C:\Windows\System32\drivers\Lbd.sys_old

WinSetupFromUSB

Vielen Dank, Andreas!
Windows Installation vom USB-Stick
shameless copied from myeee.wordpress.com! (es könnte dort gelöscht werden)
Eine neue Möglichkeit, Windows von einem USB-Stick zu installieren, bietet WinSetupFromUSB. Das Programm verfügt im Gegensatz zu den verschiedenen USB_Multiboot Versionen über eine grafische Benutzeroberfläche und ist meiner Meinung nach insgesamt einfacher zu bedienen.
In der folgenden Anleitung beschreibe ich im einzelnen die Erstellung eines bootfähigen USB-Sticks mit WinSetupFromUSB, sowie die anschließende Installation von Windows XP.
WinSetupFromUSB wurde von ilko_t aus dem MSFN-Forum entwickelt. Die Links zu dem Original-Beitrag im Forum [englisch], sowie zum Download des Programms findet ihr im Download-Bereich.
Um sich ein Bild von der Arbeit mit WinSetupFromUSB und der anschließenden Windows-Installation machen zu können, empfehle ich die Anleitung bevor man anfängt komplett und aufmerksam durchzulesen.
WinSetupFromUSB verwendet AutoIt-Skripte,
auf die manche Virenscanner relativ sensibel reagieren.
Um sicherzugehen, bietet sich die eventuelle Überprüfung
einer verdächtigen Datei z.B. über virustotal.com an.
Sollte es bei der Erstellung des USB-Sticks oder bei der anschließenden Installation von Windows XP zu Problemen kommen, hilft oft ein Blick in die Logdatei WinSetupFromUSB.log im Installationsverzeichnis von WinSetupFromUSB. Dort wird jeder Schritt bei der Arbeit mit dem Programm festgehalten und es können eventuelle Fehler, z.B. beim Kopieren der Windows-Installationsdateien auf den USB-Stick, lokalisiert werden.
Weitere Hilfe und Informationen zur Installation von Windows XP über USB findet man in der Liste der am häufigsten gestellten Fragen (FAQ) im MSFN-Forum [englisch].
1. Voraussetzungen
Getestet habe ich WinSetupFromUSB sowohl unter Windows XP 32-bit als auch Windows Vista 64-bit. Bei beiden Betriebssystemen konnte ich keine Probleme beim Arbeiten mit dem Programm feststellen. Auch die spätere Installation von Windows verlief problemlos.
Was wird außerdem benötigt:
  • USB-Stick mit mindestens 1 GB Speicherplatz
  • Original Windows XP Installations-CD
  • WinSetupFromUSB
Eine mit nLite modifizierte Windows Version kann verwendet werden, darf aber nicht als ISO-Datei vorliegen. Zusätzlich unbedingt folgendes beachten:
Wichtig! Auf keinen Fall unter Betriebssystem
„Manuelle Installation und Upgrade“ entfernen!
Außerdem empfehle ich, vorher das aktuelle Service Pack 3 in die Windows XP Installations-CD zu integrieren.
2. Vorbereitungen
WinSetupFromUSB herunterladen und per Doppelklick installieren. Das Standard-Installationsverzeichnis ist C:\WinSetupFromUSB und wird auch in diesem Beispiel verwendet. Es sollte darauf verzichtet werden, WinSetupFromUSB in Unterverzeichnisse zu installieren wie zum Beispiel:
  • C:\Dokumente und Einstellungen\Benutzername\Desktop
  • C:\Dokumente und Einstellungen\Benutzername\Eigene Dateien
  • C:\Programme
  • C:\WINDOWS
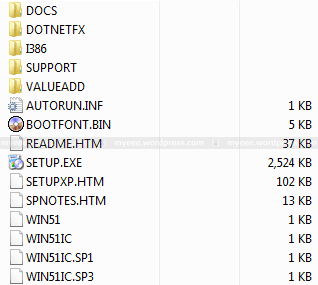
Anschließend einen Ordner mit dem Namen WINXPCD im Hauptverzeichnis des Laufwerkes C:\ anlegen und den gesamten Inhalt der Windows XP Installations-CD in diesen kopieren. Der Inhalt sollte je nach Version des Service Packs dann ungefähr so aussehen:
Inhalt von WINXPCD
Welches Service Pack aktuell integriert ist, erkennt man an den folgenden Dateien:
  • WIN51IC.SP1, Sevice Pack 1
  • WIN51IC.SP2, Sevice Pack 2
  • WIN51IC.SP3, Sevice Pack 3
3. WinSetupFromUSB starten
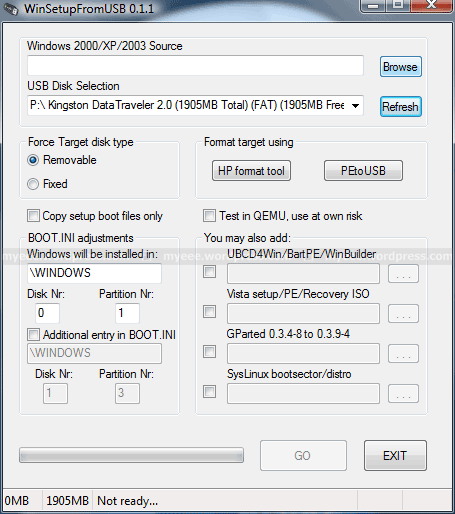
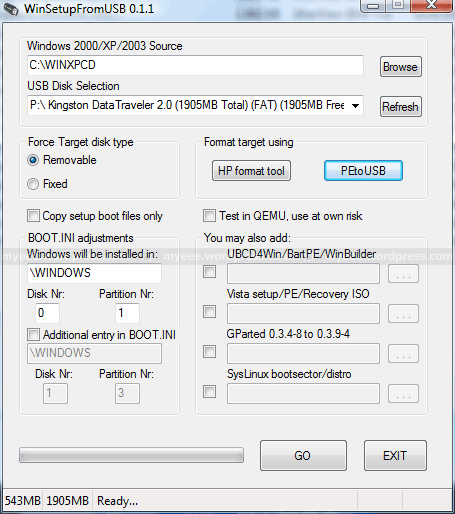
Zuerst den zu verwendenden USB-Stick mit dem Computer verbinden und dann WinSetupFromUSB über die Verknüpfung auf dem Desktop starten. Es öffnet sich folgendes Fenster:
WinSetupFromUSB - Hauptfenster
Unter USB Disk Selection sollte der korrekte USB-Stick angezeigt werden. Fährt man mit dem Mauszeiger über die verschiedenen Eingabefelder oder Schaltflächen, wird eine kurze Erklärung in englisch angezeigt. In der Statusleiste steht Not ready… da noch nicht alle erforderlichen Informationen vorhanden sind.
4. Pfad zu den Windows XP Installationsdateien angeben
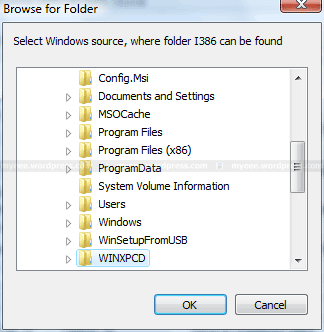
Mit einem Klick auf die Schaltfläche Browse unter Windows 2000/XP/2003 Source öffnet sich folgendes Fenster:
Auswahlfenster
Dort kann der Pfad zu dem Ordner ausgewählt werden, wo sich die Windows Installationsdateien befinden. Wer also, wie am Beginn der Anleitung beschrieben, seine Windows XP Installations-CD in den Ordner C:\WINXPCD kopiert hat, muß diesen hier auswählen.
Anschließend auf OK klicken. Der Ordner sollte dann im Hauptfenster von WinSetupFromUSB unter Windows 2000/XP/2003 Source erscheinen.
WinSetupFromUSB
In der Statusleiste steht zwar Ready…, allerdings muß im nächsten Schritt der USB-Stick noch formatiert werden.
5. USB-Stick formatieren
Zur Formatierung des USB-Sticks verwendet man je nach dessen Speicherkapazität entweder PeToUSB oder das HP Format Tool. Diese beiden Programme sind im Installationspaket von WinSetupFromUSB schon enthalten und brauchen nicht extra heruntergeladen zu werden.
USB-Sticks bis einschließlich 2 GB Speicherkapazität sollten mit PeToUSB im FAT16-Format formatiert werden, USB-Sticks mit 4 GB oder mehr mit dem HP Format Tool im FAT32-Format.
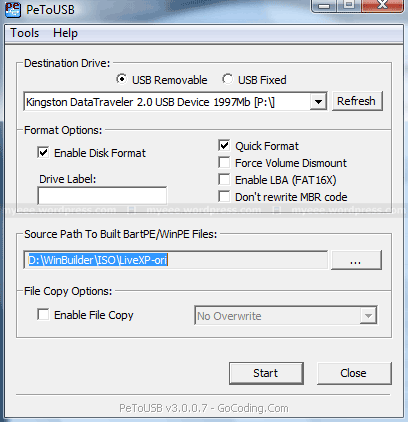
Für meinen Kingston Data Traveler mit 2 GB verwende ich PeToUSB. Mit einem Klick auf die Schaltfläche PeToUSB unter Format target using wird das Programm gestartet und es öffnet sich folgendes Fenster:
PeToUSB
Unter Destination Drive sollte wiederum der korrekte USB-Stick angezeigt werden. Bei Format Options sicherstellen, das Enable Disk Format und Quick Format angewählt ist. Unter File Copy Options sollte Enable File Copy für diesen Anleitung nicht angewählt sein.
Anschließend auf Start klicken, dann die Frage „Continue?“ mit Ja bestätigen und bei der Frage „Are You Sure You Want To Continue?“ nochmal auf Ja klicken.
Danach wird der USB-Stick formatiert und es erscheint „Operation Completed Successfully!“. Diesen Dialog mit einem Klick auf OK schließen und danach auch PeToUSB mit einem Klick auf Close beenden.
Der Ablauf mit dem HP Format Tool ist ähnlich. Dabei ist jedoch zu beachten, das alle eventuell vorhandenen Partitionen gelöscht werden und eine einzelne neue Partition erstellt wird, die den gesamten Speicherplatz umfasst.
6. Installationsdateien kopieren
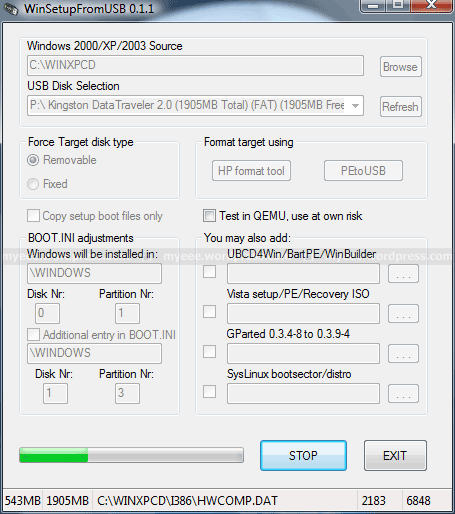
Im Hauptfenster von WinSetupFromUSB auf die Schaltfläche GO klicken. Anschließend werden die Windows-Installationsdateien auf den USB-Stick kopiert. Dieser Vorgang kann je nach dessen Schreibgeschwindigkeit längere Zeit in Anspruch nehmen.
WinSetupFromUSB - Kopiervorgang
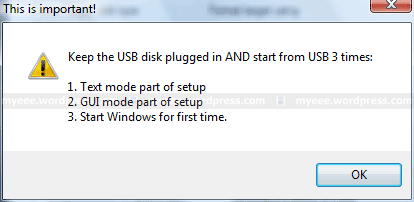
Am Ende des Kopiervorganges erscheint dann der folgende wichtige Hinweis zum Installationsablauf von Windows XP:
Hinweis zum Installationsablauf
Der USB-Stick muß während der gesamten Zeit mit dem Computer verbunden sein. Während der Installation muß dieser insgesamt 3 mal vom USB-Stick gestartet werden:
  1. Text-Mode Teil der Installation
  2. GUI-Mode Teil der Installation
  3. Erster Start von Windows
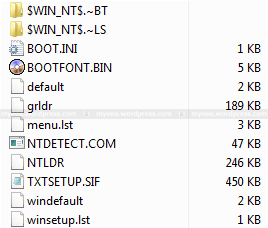
Den Hinweis mit einem Klick auf OK schließen. Damit ist die Erstellung des bootfähigen USB-Sticks abgeschlossen und WinSetupFromUSB kann mit einem Klick auf EXIT beendet werden. Der Inhalt sollte nun so aussehen:
Inhalt des USB-Sticks
7. Windows Installation – Teil 1
Den nun bootfähigen USB-Stick mit dem Computer verbinden, das Gerät einschalten und beim Bootscreen die Taste ESC drücken. Es erscheint ein Bootmenü, aus dem man den USB-Stick auswählt und mit Enter bestätigt.
Welche Taste man drücken muß um das Bootmenü aufzurufen,
ist je nach Hersteller verschieden.
In dieser Anleitung beziehe ich mich auf die Eee PC-Serie von ASUS.
Nach kurzer Zeit erscheint ein Menü mit folgendem Inhalt:
  • Windows XP/2000/2003 Setup – First and Second parts
Hier ist keine Eingabe erforderlich, denn nach 10 Sekunden erscheint automatisch das nächste Menü:
  • First part of Windows XP Home Edition setup
  • Second part of XP Home Edition setup+Start Windows for first time
Auch hier ist keine Eingabe erforderlich. Der richtige Menüpunkt First part of Windows XP Home Edition setup ist schon ausgewählt und nach 10 Sekunden startet der Text-Mode Teil der Windows Installation. Das Setup lädt erforderliche Dateien und anschließend muß die Partition ausgewählt werden, in der Windows XP installiert werden soll.
Wenn der USB-Stick mit WinSetupFromUSB korrekt formatiert wurde und beim Kopieren der Windows-Installationsdateien keine Fehler unterlaufen sind, sollte folgendes Menü angezeigt werden:
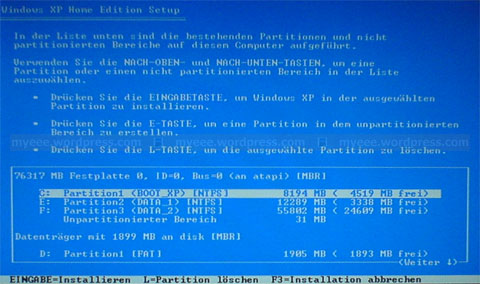
Liste der Laufwerke und Partitionen
Bitte auf das Bild klicken um eine Großansicht zu erhalten
Am Beispiel des ASUS Eee PC 1000H mit 80 GB Festplatte und einem USB-Stick mit 2 GB erkläre ich den Inhalt dieses Menüs:
Als erstes wird die interne Festplatte mit den vorhandenen Partitionen aufgeführt (76317 MB Festplatte 0, ID=0, Bus=0 (an atapi) [MBR]):
  • C:    Partition1
  • E:    Partition2
  • F:    Partition3
  • Unpartitionierter Bereich
Als zweites der USB-Stick (Datenträger mit 1899 MB an disk [MBR]):
  • D:    Partition1
In der Standardeinstellung von WinSetupFromUSB ist vorgesehen, das Windows XP auf Festplatte 0 in der Partition 1, also dem Laufwerk C: installiert wird.
Wird eine andere Festplatte oder Partition ausgewählt, kann die
Windows Installation im nächsten Schritt nicht fortgesetzt werden!
Nachdem die korrekte Partition ausgewählt und formatiert wurde, werden die kompletten Windows-Installationsdateien auf die Festplatte kopiert und der Computer wird neu gestartet.
Es ist selbstverständlich auch möglich, Windows XP auf einer anderen Festplatte oder Partition zu installieren. Das ist z.B. dann notwendig, wenn am Anfang der Festplatte eine versteckte Partition zur Wiederherstellung des Systemes [englisch: Recovery] vorhanden ist. Darauf im einzelnen einzugehen, würde jedoch den Rahmen dieser Anleitung sprengen. Weiterführende Informationen dazu findet man in diesem Beitrag im MSFN-Forum [englisch].
8. Windows Installation – Teil 2
Nach dem Neustart wieder vom USB-Stick starten und es erscheint wie schon im vorherigen Schritt das Menü mit folgendem Inhalt:
  • Windows XP/2000/2003 Setup – First and Second parts
Hier ist wieder keine Eingabe erforderlich, denn nach 10 Sekunden erscheint automatisch das nächste Menü:
  • First part of Windows XP Home Edition setup
  • Second part of XP Home Edition setup+Start Windows for first time
Auch hier ist wieder keine Eingabe erforderlich. Der richtige Menüpunkt Second part of XP Home Edition setup+Start Windows for first time ist schon ausgewählt und nach 10 Sekunden startet der GUI-Mode Teil der Windows Installation, in dem Angaben zum Product-Key, Zeitzonen, Benutzernamen usw. gemacht werden müssen. Am Ende dieses Teiles wird der Computer neu gestartet.
Sollte im Schritt 7 nicht die korrekte Festplatte und Partition ausgewählt worden sein, erscheint folgende Fehlermeldung:
Windows konnte nicht gestartet werden, da folgende Datei fehlt oder beschädigt ist:
\system32\hal.dll
9. Windows Installation – Teil 3
Nach dem Neustart wieder vom USB-Stick starten und es erscheint wie schon im vorherigen Schritt das Menü mit folgendem Inhalt:
  • Windows XP/2000/2003 Setup – First and Second parts
Hier ist wieder keine Eingabe erforderlich, denn nach 10 Sekunden erscheint automatisch das nächste Menü:
  • First part of Windows XP Home Edition setup
  • Second part of XP Home Edition setup+Start Windows for first time
Auch hier ist wieder keine Eingabe erforderlich. Der richtige Menüpunkt Second part of XP Home Edition setup+Start Windows for first time ist schon ausgewählt und nach 10 Sekunden wird Windows das erste Mal gestartet, die Installation wird abgeschlossen und erst wenn der Windows-Desktop erscheint und der Bootvorgang komplett abgeschlossen ist, kann der USB-Stick vom Computer getrennt werden.
Wichtig! Auf keinen Fall den USB-Stick zu früh trennen!
Die Windows-Installation vom USB-Stick ist damit abgeschlossen und beim nächsten Neustart kann dann ganz normal von der Festplatte gestartet werden.
Bemerkung
Nach erfolgreicher Installation erscheint beim Starten des Computers immer ein Bootmenü mit folgendem Inhalt:
Wählen Sie das zu startende Betriebssystem:
  • Microsoft Windows XP Home Edition
  • USB Repair NOT to Start Microsoft Windows XP Home Edition
Hier wird einem die Möglichkeit geboten, seine Windows-Installation mit Hilfe der Wiederherstellungskonsole vom USB-Stick zu reparieren, indem man die Option „USB Repair NOT to Start Microsoft Windows XP Home Edition“ auswählt.
Wer diese Option nicht nutzen will, sondern ohne Bootmenü sofort Windows starten möchte, muß folgendes machen:
Im Laufwerk C:\ die Datei boot.ini mit dem Standard Text-Editor öffnen:
[Boot Loader]timeout=30
Default=multi(0)disk(0)rdisk(0)partition(1)\WINDOWS
[Operating Systems]
multi(0)disk(0)rdisk(0)partition(1)\WINDOWS=“Microsoft Windows XP Home Edition“ /noexecute=optin /fastdetect
multi(0)disk(0)rdisk(1)partition(1)\WINDOWS=“USB Repair NOT to Start Microsoft Windows XP Home Edition“ /noexecute=optin /fastdetect
Die folgende Zeile komplett löschen:
multi(0)disk(0)rdisk(1)partition(1)\WINDOWS=“USB Repair NOT to Start Microsoft Windows XP Home Edition“ /noexecute=optin /fastdetect
Wichtig! Nicht die falsche Zeile löschen,
da ansonsten der Computer nicht mehr startet!
Anschließend die Datei speichern.
Beim nächsten Bootvorgang wird das Bootmenü dann nicht mehr angezeigt.
Wer sich die Option erhalten will, Windows zu reparieren, kann auch die Zeit in der das Bootmenü angezeigt wird von 30 Sekunden auf 5 Sekunden verkürzen:
[Boot Loader]
timeout=5
Anschließend die Datei speichern.
Beim nächsten Bootvorgang wird das Menü nur 5 Sekunden angezeigt.
Fazit
Mit WinSetupFromUSB lässt sich schnell und einfach ein bootfähiger USB-Stick zur Windows Installation erstellen. Es bietet zahlreiche Zusatzoptionen auf die ich hier allerdings nicht näher eingehen möchte. Mehr Informationen dazu findet man in dem Original-Beitrag im MSFN-Forum. Das Programm hat wie ich finde aber auch einen Nachteil:
Sind auf der Festplatte mehrere Partitionen vorhanden, stimmt nach der Windows-Installation die Zuordnung der Buchstaben für die Laufwerke D, E, F usw. nicht mehr. Diese sind um jeweils einen Buchstaben nach oben verschoben, da der USB-Stick bei der Installation den Laufwerksbuchstaben D zugewiesen bekommt.
Das Problem lässt sich jedoch leicht beheben, indem man nach Beendigung der Windows Installation in der Datenträgerverwaltung den jeweiligen Laufwerken die alten Buchstaben neu zuweist. Dazu unter Start > Ausführen compmgmt.msc eingeben und mit Enter bestätigen. Mit diesem Befehl wird die Computerverwaltung gestartet. Anschließend auf Datenträgerverwaltung klicken. Mit einem Rechtsklick auf das betreffende Laufwerk kann diesem über Laufwerkbuchstaben und -pfade ändern ein anderer, freier Buchstabe zugewiesen werden.